Playgroundによるコーディングです。
初めての方は下記をご参考ください。
前回:【初心者向け】Swift3で爆速コーディングその1(画面作成とSnippetsの使い方)
UIView
画面上にUIを表示するにはUIKitフレームワークを利用します。
画面自体(UIViewController)もUIなのでUIKitフレームワークの利用はほぼ必須です。
import UIKit
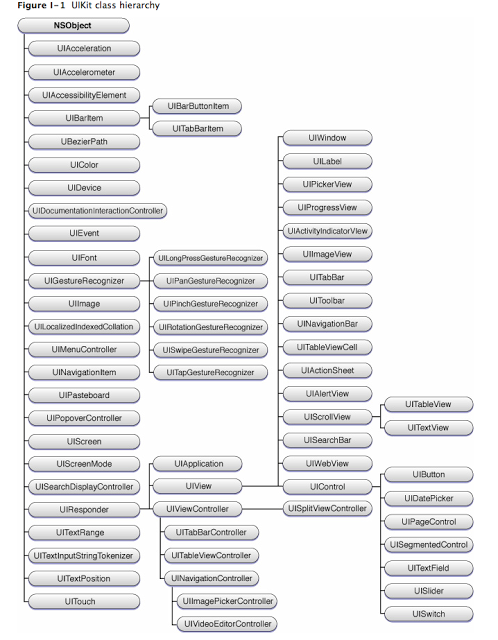
iOSのUIコンポーネントはUIViewクラスと呼ばれるクラスを継承して
UIViewを継承したコンポーネントには以下のものがあります。
- UILabel:ラベル、文字列表示
- UIButton:ボタン
- UITextField:テキスト入力(基本1行)
- UITextView:複数行のテキスト表示
- UIImageView:画像表示
- UISwitch:スイッチ、ON,OFF切り替え
- UISlider:スライダー、値をドラッグで調整できる
- UIPickerView:リール式選択
- UIDatePickerView:リール式選択(日付用)
- UIWebView:ウェブページ表示
- UIProgressBar:プログレスバー
さらにUIViewをグループ化してまとめるビューには次のようなコンポーネントがあります。
- UIScrollView:入りきらない場合にスクロールするための入れ物
- UITableView:リスト表示するための入れ物
- UICollectionView:グリッド表示するための入れ物
- UIStackView:複数のビューの整列をするための入れ物
具体的には次のような階層(継承関係)になっています(若干図が古くて書かれていないコンポーネントがありますがほぼ変わっていません)
画面に文字を表示する
全ソースコードです。
import UIKit


class ViewController: UIViewController {


    override func viewDidLoad() {
        super.viewDidLoad()


        // Labelを作成
        let label: UILabel = UILabel(frame:CGRect(x:0,y:0,width:100,height:50))
        label.text = "Label"
        label.textColor = UIColor.black
        label.shadowColor = UIColor.gray
        label.textAlignment = NSTextAlignment.center
        label.layer.position = CGPoint(x:label.bounds.width/2,y:label.bounds.height/2)

        self.view.addSubview(label)
        print(self.view.perform(Selector(("recursiveDescription"))))

    }


    override func viewWillAppear(_ animated: Bool) {
        super.viewWillAppear(animated)


    }

    override func didReceiveMemoryWarning() {
        super.didReceiveMemoryWarning()
    }

}

let viewController = ViewController()
viewController.view.backgroundColor = UIColor.white

import PlaygroundSupport

PlaygroundPage.current.liveView = viewController
PlaygroundPage.current.needsIndefiniteExecution = true
ラベル表示部分(UILabel)は次のようになっています。
// Labelを作成
let label: UILabel = UILabel(frame:CGRect(x:0,y:0,width:100,height:50))
label.text = "Label"
label.textColor = UIColor.black
label.shadowColor = UIColor.gray
label.textAlignment = NSTextAlignment.center
label.layer.position = CGPoint(x:label.bounds.width/2,y:label.bounds.height/2)

self.view.addSubview(label)
self.view.addSubview(UIView)をすることで
UIViewControllerが保持するUIViewの子要素にUILabelを追加することができます。
プレビュー

UIViewの階層
次の1行を追加することでUIViewのプライベートメソッドであるrecursiveDescriptionメソッドを呼び出してビューの階層を見ることができます。
print(self.view.perform(Selector(("recursiveDescription"))))
UILabelが子ビューとして含まれていることが確認できます。
Unmanaged<AnyObject>(_value: <UIView: 0x7fd896903090; frame = (0 0; 768 1024); autoresize = W+H; layer = <CALayer: 0x60000003e6c0>>
   | <UILabel: 0x7fd893d05b10; frame = (0 0; 100 50); text = 'Label'; userInteractionEnabled = NO; layer = <_UILabelLayer: 0x60800008ad20>>)
注意としてアプリにプライベートメソッドが含まれているとアプリ審査に通らないので
アプリ申請時にはコメントアウトしてください(あくまでデバッグ用です。)
PlaygroundでなければView Debuggingという機能があり、階層を立体的に可視化することもできますが、それに関してはまた別の機会に・・・
