はじめに
覚えた当時、もっと早く知ってればなあと思った便利なチップスで、現在もよく使っているものを紹介します。
デザイン関連サイト
アイコン素材
https://www.google.com/design/icons/index.html
https://romannurik.github.io/AndroidAssetStudio/
https://materialdesignicons.com/
カラーチャート
http://www.materialui.co/colors
http://www.materialpalette.com/
チートシート(Holo 時代のもの)
http://petrnohejl.github.io/Android-Cheatsheet-For-Graphic-Designers/#naming-conventions-for-drawables
レイアウトのフォーマット
下記のページでも紹介されているフォーマットにするととても編集しやすいです。
https://github.com/futurice/android-best-practices#resources
<?xml version="1.0" encoding="utf-8"?>
<LinearLayout
    xmlns:android="http://schemas.android.com/apk/res/android"
    xmlns:tools="http://schemas.android.com/tools"
    android:layout_width="match_parent"
    android:layout_height="match_parent"
    android:orientation="vertical"
    >

    <TextView
        android:id="@+id/name"
        android:layout_width="match_parent"
        android:layout_height="wrap_content"
        android:layout_alignParentRight="true"
        android:text="@string/name"
        style="@style/FancyText"
        />

    <include layout="@layout/reusable_part" />

</LinearLayout>
XML のコードスタイルを変えてあげれば簡単に導入できます。
Preferences から Editor > Code Style > XML を開き、Layout Files の Insert line break after last attribute にチェックを入れれば OK です。
Live Template 機能を使う
こちらの記事で紹介されていますので、詳細は割愛します。
よく使う内容を登録しておけば、レイアウトの編集がとても楽になります。
http://qiita.com/kgmyshin/items/df0abb03fe51b8645292
プレビュー機能を有効活用する
主に tools を使ったチップスです。
ここに紹介するもの以外にもあるものも見たい場合はこちらをどうぞ。
http://tools.android.com/tech-docs/tools-attributes
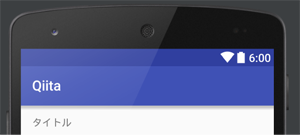
tools:text
<!-- 動的に値が変わるテキストであるが、プレビューにサンプルを表示したい場合 -->
<TextView
    android:id="@+id/textViewTitle"
    android:layout_width="wrap_content"
    android:layout_height="wrap_content"
    tools:text="タイトル"
    />
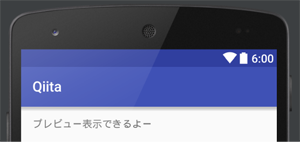
tools:visibility
<!-- 非表示の View であるが、プレビューでレイアウトを確認したい場合 -->
<TextView
    android:layout_width="wrap_content"
    android:layout_height="wrap_content"
    android:text="プレビュー表示できるよー"
    android:visibility="invisible"
    tools:visibility="visible"
    />
tools:showIn
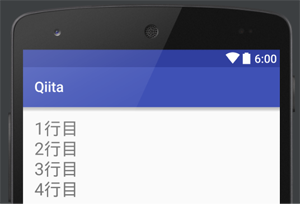
include を使った下記のようなサンプルがあったとします。
<LinearLayout
    xmlns:android="http://schemas.android.com/apk/res/android"
    android:layout_width="match_parent"
    android:layout_height="match_parent"
    android:orientation="vertical"
    android:padding="16dp"
    >

    <TextView
        android:layout_width="wrap_content"
        android:layout_height="wrap_content"
        android:text="1行目"
        android:textSize="24sp"
        />

    <include layout="@layout/layout_include_sample"/>

    <TextView
        android:layout_width="wrap_content"
        android:layout_height="wrap_content"
        android:text="4行目"
        android:textSize="24sp"
        />

</LinearLayout>
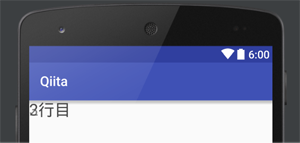
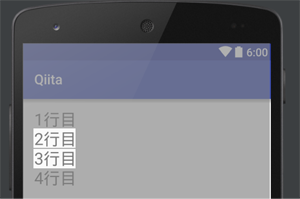
merge タグを使ったレイアウトはプレビューが崩れてしまいます。
<merge
    xmlns:android="http://schemas.android.com/apk/res/android"
    >

    <TextView
        android:layout_width="wrap_content"
        android:layout_height="wrap_content"
        android:textSize="24sp"
        android:text="2行目"
        />

    <TextView
        android:layout_width="wrap_content"
        android:layout_height="wrap_content"
        android:textSize="24sp"
        android:text="3行目"
        />

</merge>
showIn を指定してあげるとプレビューできます。
カスタムビューでも使えますね。便利!
<merge
    xmlns:android="http://schemas.android.com/apk/res/android"
    xmlns:tools="http://schemas.android.com/tools"
    tools:showIn="@layout/activity_sample"
    >

    <TextView
        android:layout_width="wrap_content"
        android:layout_height="wrap_content"
        android:textSize="24sp"
        android:text="2行目"
        />

    <TextView
        android:layout_width="wrap_content"
        android:layout_height="wrap_content"
        android:textSize="24sp"
        android:text="3行目"
        />

</merge>
View の切り替えを ViewAnimator で行う
下記のようなレイアウトがあったとします。
<FrameLayout
    xmlns:android="http://schemas.android.com/apk/res/android"
    android:layout_width="match_parent"
    android:layout_height="match_parent"
    >

    <FrameLayout
        android:id="@+id/frameLayout1"
        android:layout_width="match_parent"
        android:layout_height="match_parent"
        >
        ...
    </FrameLayout>

    <FrameLayout
        android:id="@+id/frameLayout2"
        android:layout_width="match_parent"
        android:layout_height="match_parent"
        android:visibility="invisible"
        >
        ...
    </FrameLayout>

</FrameLayout>
Child のレイアウト切り替えを、以下のように行うコードをよく見かけます。
mFrameLayout1.setVisibility(View.INVISIBLE);
mFrameLayout2.setVisibility(View.VISIBLE);
このように、複数の Child のうち同時にひとつの Child を表示する場合は、ViewAnimator(FrameLayout を継承したクラス) を使うと便利です。
<ViewAnimator
    xmlns:android="http://schemas.android.com/apk/res/android"
    android:layout_width="match_parent"
    android:layout_height="match_parent"
    >

    <FrameLayout
        android:layout_width="match_parent"
        android:layout_height="match_parent"
        >
        ...
    </FrameLayout>

    <FrameLayout
        android:layout_width="match_parent"
        android:layout_height="match_parent"
        >
        ...
    </FrameLayout>

</ViewAnimator>
ViewAnimator#setDisplayChild メソッドで、引数に Child の番号を指定すれば、簡単にレイアウトの切り替えができます。
mViewAnimator.setDisplayChild(1);
また、inAnimation、outAnimation を指定すれば、これまた簡単にレイアウト切替のアニメーションを入れることができます。
<ViewAnimator
    xmlns:android="http://schemas.android.com/apk/res/android"
    android:layout_width="match_parent"
    android:layout_height="match_parent"
    android:inAnimation="@android:anim/fade_in"
    android:outAnimation="@android:anim/fade_out"
    >
    ...
</ViewAnimator>
Space クラスを使う
スペーシングの調整は margin や padding に以外にも Space クラスを使う方法もあります。
その名の通り、単純に指定された領域を確保する View です。
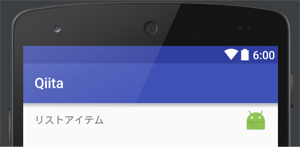
LinearLayout と Space を使って下記のようなレイアウトを作ることもできます。
<LinearLayout
    xmlns:android="http://schemas.android.com/apk/res/android"
    android:layout_width="match_parent"
    android:layout_height="wrap_content"
    android:orientation="horizontal"
    android:gravity="center_vertical"
    >

    <TextView
        android:layout_width="wrap_content"
        android:layout_height="wrap_content"
        android:layout_marginLeft="16dp"
        android:text="リストアイテム"
        />

    <Space
        android:layout_width="0dp"
        android:layout_height="0dp"
        android:layout_weight="1"
        />

    <ImageView
        android:layout_width="48dp"
        android:layout_height="48dp"
        android:padding="8dp"
        android:layout_marginRight="8dp"
        android:src="@mipmap/ic_launcher"
        />

</LinearLayout>
LinearLayout の gravity を使ったセンタリング
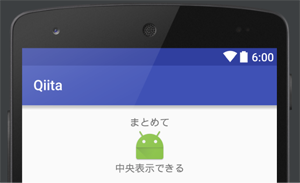
LinearLayout で gravity を使えばセンタリングがとても楽になります。
もちろん横向きでも同様に立て方向の中央寄せができます。
<LinearLayout
    xmlns:android="http://schemas.android.com/apk/res/android"
    android:layout_width="match_parent"
    android:layout_height="match_parent"
    android:orientation="vertical"
    android:gravity="center_horizontal"
    android:padding="16dp"
    >

    <TextView
        android:id="@+id/textViewTitle"
        android:layout_width="wrap_content"
        android:layout_height="wrap_content"
        android:text="まとめて"
        />

    <ImageView
        android:layout_width="48dp"
        android:layout_height="48dp"
        android:src="@mipmap/ic_launcher"
        />

    <TextView
        android:layout_width="wrap_content"
        android:layout_height="wrap_content"
        android:text="中央表示できる"
        />
</LinearLayout>
単色画像の色を変える
ImageView#setColorFilter を使えば OK です。
xml でも指定できるともっと便利なんですけどね。
色違いのリソースが大量にあるようなプロジェクトであれば、xml で色指定ができるようなカスタムビューを作るのもいいかもしれません。
(追記)xml の場合、android:tint を使うとよさそうです。以下参考リンクです。
http://developer.android.com/intl/ja/reference/android/widget/ImageView.html#attr_android:tint
http://y-anz-m.blogspot.jp/2011/04/androidcolorfilter.html
ImageView imageView = (ImageView) findViewById(R.id.imageView);
imageView.setColorFilter(Color.RED);
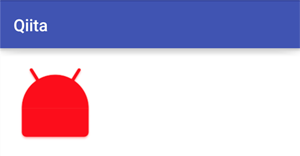
以下の画像は、プロジェクトの新規作成時に用意されるドロイドアイコンに赤でカラーフィルターをかけたものです。
ベースカラー、スタイルを Theme で定義する
ベースとなる色、スタイルなどを Theme で定義すれば、レイアウトファイルで指定する attributes を減らすことができます。
指定漏れも減りますし一石二鳥ですね。
<style name="AppTheme" parent="Theme.AppCompat.Light.DarkActionBar">
    <item name="colorPrimary">@color/colorPrimary</item>
    <item name="colorPrimaryDark">@color/colorPrimaryDark</item>
    <item name="colorAccent">@color/colorAccent</item>
    <item name="android:textColor">@color/textColor</item>
    <item name="android:textColorLink">@color/textColorLink</item>
    <item name="android:windowBackground">@color/windowBackground</item>
</style>

