何がやりたいのか
-
Pillowの(おそらく)強力なグラフィック処理を
-
保守のしやすいvirtualenvによる仮想化を使い
-
使いやすいiPython で操作できる
Pythonの処理環境を実現する。
前提条件
Python 3.4 、pip、virtualenvはすでに導入済みであるとする。
仮想環境の構築
py3 という作業ディレクトリを作成し、そこにbox01 というvirtualenvの仮想環境を構築する。
mkdir py3
virtualenv  --python=python3.4 py3/box01

cd py3/box01
仮想環境を有効化
source bin/activate
仮想環境にPillowをインストール
pip install pillow
仮想環境にiPython他、各種モジュールをインストール
pip install ipython3
pip install jinja2
pip install tornado
pip install pyzmq

pip install numpy
pip install matplotlib
pip install pandas
pip install scipy

pip install jsonschema # 後から入っていないと怒られた

pip install requests # iptest3の実行に必要

pip install mistune # 以下、iptest3で、入ってないって言われた
pip install pygments
pip install pymongo
pip install sphinx
iPythonが実行できるかテスト
iPython3を入れると、iptest3というコマンドがついてきて、実行できるかどうか調べてくれるらしい。
iptest3
実行結果(抜粋)
Test suite completed for system with the following information:
IPython version: 3.0.0
IPython commit : f75fda4 (installation)
IPython package: ~/py3/box01/lib/python3.4/site-packages/IPython
Python version : 3.4.2 (default, Oct  8 2014, 13:18:07) [GCC 4.9.1]
sys.executable : ~/py3/box01/bin/python3.4
Platform       : Linux-3.16.0-31-generic-i686-with-Ubuntu-14.10-utopic

Tools and libraries available at test time:
   curses jinja2 jsonschema matplotlib mistune numpy pexpect pygments pymongo requests sphinx sqlite3 terminado tornado zmq

Tools and libraries NOT available at test time:
   casperjs phantomjs qt slimerjs
下の4つはどうすりゃいいか分からんかった。
結局、入れたモジュール構成は以下のようになった。
(試行錯誤の結果、不必要なモジュールも入っていると考えられますな)
pip freeze
Babel==1.3
Jinja2==2.7.3
MarkupSafe==0.23
Pillow==2.7.0
Pygments==2.0.2
Sphinx==1.3.1
WebOb==1.4
WebTest==2.0.18
alabaster==0.7.2
beautifulsoup4==4.3.2
certifi==14.05.14
docutils==0.12
gp.recipe.phantomjs==2.0.0.0
hexagonit.recipe.download==1.7
ipython==3.0.0
jsonschema==2.4.0
matplotlib==1.4.3
mistune==0.5.1
nose==1.3.4
numpy==1.9.2
pandas==0.15.2
ptyprocess==0.4
pymongo==2.8
pyparsing==2.0.3
python-dateutil==2.4.1
pytz==2014.10
pyzmq==14.5.0
requests==2.6.0
scipy==0.15.1
six==1.9.0
snowballstemmer==1.2.0
sphinx-rtd-theme==0.1.7
terminado==0.5
tornado==4.1
waitress==0.8.9
webtest-casperjs==0.1
zc.buildout==2.3.1
zc.recipe.egg==2.0.1
iPython サーバーの設定
プロファイルを作成
ipython3 profile create py3nb
パスワード文字列を作成
コンソールからipyton3を起動
ipyton3
from IPython.lib import passwd
passwd()
(設定したいパスワードを2回入力)
'sha1:<文字列>'
という出力がでる。これをipython_notebook_config.pyに記述する。
一旦、ipyton3から抜ける
exit()
ノートブック(Notebook)の設定ファイルを編集
設定ファイル python_notebook_config.py は新規作成
vi ~/.ipython/profile_py3nb/ipython_notebook_config.py
c = get_config()
c.NotebookApp.ip = '*'
c.NotebookApp.open_browser = False
c.NotebookApp.port = 9999
c.NotebookApp.password = 'sha1:<文字列>' # 先ほど作成したパスワード文字列
この辺はノリというか、勢いで作業したので、間違っている可能性がある。
起動時実行スクリプトの設定
vi ~/.ipython/profile_py3nb/startup/00-startup.py
# ! /usr/bin/env python
# -*- coding: utf-8 -*-

import sys, os
import readline
import numpy as np
import scipy as sp
import pandas as pd
import matplotlib.pyplot as plt

# EOF
ノートブック(Notebook)の起動
ipython3 notebook --profile=py3nb
なお、--pylab=inline オプションは廃止されたもよう。
ブラウザからアクセス
http://<ノートブックサーバーのIPアドレス>:9999/
パスワードを入力して、ノートブックに入れればOK
動作確認
以下、iPythonのノートブック上で実行
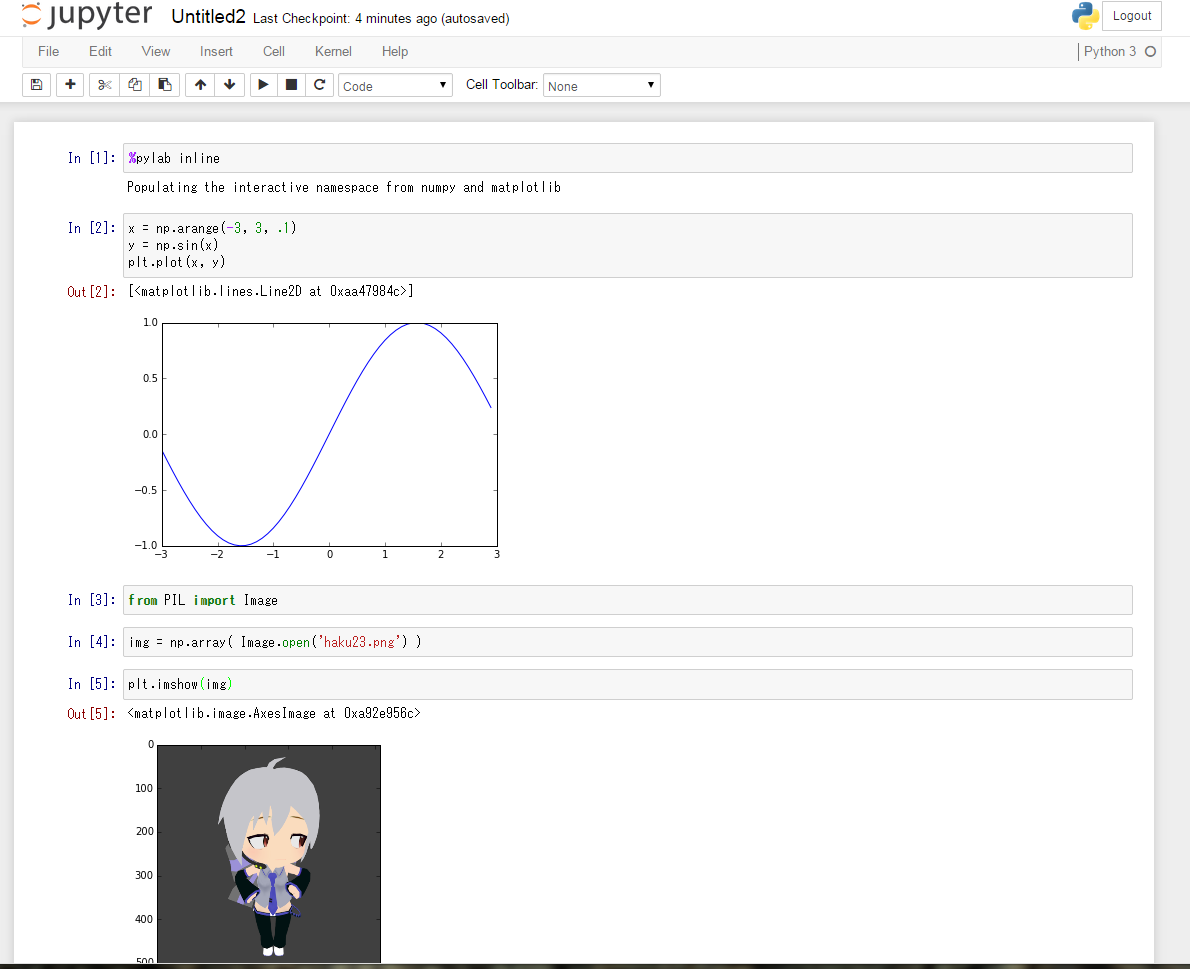
最初にこれをやらなきゃならんらしい。
%pylab inline
1 まずは matplotlibのプロットを確認
(以前に動作確認済)
x = np.arange(-3, 3, .1)
y = np.sin(x)
plt.plot(x, y)
2 Pillowの動作確認
Pillowのインポート
from PIL import Image
画像の読み込み(画像ファイルは事前にサーバーにアップロードしておく)
img = np.array( Image.open('<画像ファイル名>') )
画像の表示。
img.show() では表示されないようだ。
plt.imshow(img)
使ってみよう
カレントディレクトリが乱雑になりそうなので、~/py3/box01の下にipyという作業用ディレクトリを作成して、さらにその下に
in-image/(入力用)
out-image/(出力用)
work-image/(作業用)
というディレクトリを作成し画像ファイルはこの中に入れるようにしています。
↓このような起動用のシェルスクリプトを作成しました。
# ! /bin/bash

source ~/py3/box01/bin/activate
cd ~/py3/box01/ipy
~/py3/box01/bin/ipython3 notebook --profile=py3nb
# EOF
iPython上でPillowを使ってみる(その1) - Qiita
