今回はAnsibleを使って環境構築をやってみる。
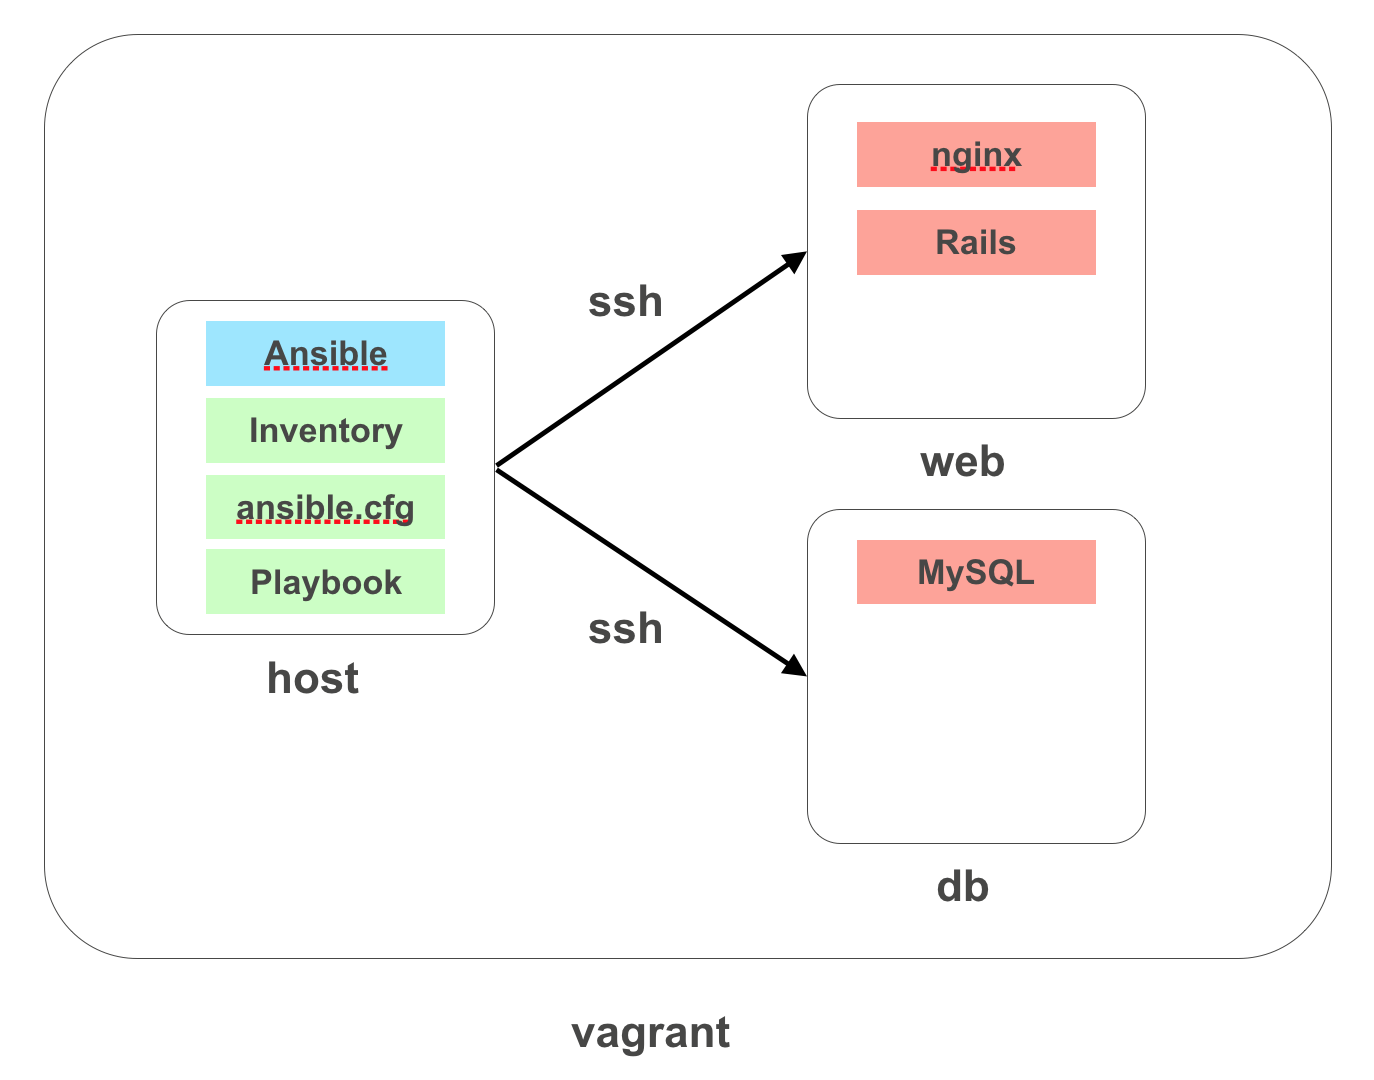
まずは入門編として以下のような構成をAnsibleでPlaybookを書いて構築していく。
vagrant で local に 環境を作る
さっそくvagrantで環境を立てていきましょう。
vagrantのインストールなどはvagrantを使用してローカル開発環境を構築するを参考にしてみてください。
$ vagrant init chif/centof

A `Vagrantfile` has been placed in this directory. You are now
ready to `vagrant up` your first virtual environment! Please read
the comments in the Vagrantfile as well as documentation on
`vagrantup.com` for more information on using Vagrant.
Gs:vagrant$ emacs Vagrantfile
Vagrantfileができるので次にVagrantfileを編集していく。
config.vm.box = "chif/centos-6.5"をコメントアウトして下のように設定する。
簡単に説明すると、host用の環境・webサーバ用の環境・db用の環境を構築しています。
vm.boxでboxイメージを取得。なんでもいいですが、ここではbento/centos-6.7を採用してみる。
  # config.vm.box = "chif/centos-6.5" <- ここをコメントアウト

  # -- 以下を記入する --
  config.vm.define "host" do |node|
    node.vm.box = "bento/centos-6.7"
    node.vm.hostname = "host"
    node.vm.network :private_network, ip: "192.168.43.51"
  end

  config.vm.define "web" do |node|
  node.vm.box = "bento/centos-6.7"
    node.vm.hostname = "web"
    node.vm.network :private_network, ip: "192.168.43.52"
  end

  config.vm.define "db" do |node|
  node.vm.box = "bento/centos-6.7"
    node.vm.hostname = "db"
    node.vm.network :private_network, ip: "192.168.43.53"
  end
これでVagrantで3台環境が立ち上がったので、次はHostの設定をしていきましょう。
HostとWebとDBが立ち上がっています。
次はAnsibleの導入をしてきましょう。
Host側でやっていくので、まずはHostにsshで接続します。
$ vagrant ssh host
でいいですね。これでhostに入れました。
次にAnsibleの導入ですが、epelというリポジトリが必要なのでダウンロードします。
wgetで次から落としてくればOKです。「epel donwload」とかで検索するとすぐに見つかります。
$ wget https://dl.fedoraproject.org/pub/epel/6/x86_64/epel-release-6-8.noarch.rpm
これを適用するには以下のコマンドでOKです。
$ sudo rpm -Uvh epel-release-6-8.noarch.rpm
これはまぁ、おまじないだと思ってください。
rpmはRPMパッケージをインストールするためのコマンドです。オプションを軽く説明しておくと
-U パッケージをアップグレードする。前パージョンのパッケージが存在しない場合は新規にパッケージをインストールする。
-V パッケージを検査する。
-h インストール状況を「#」と割合で表示する
って感じですね。興味がある人は調べてみてください。
で、やっとAnsibleのインストールですね。
$ sudo yum install ansible
やっとインストールまで終わりました。![]()
sshで接続できるようにしよう
ここまででAnsibleまではインストールできました。
まだ準備が必要です。
webとdbのIPは設定しましたが、
ssh web
とかで接続したいですよね?
なので.ssh/configに設定を書きます。
$ vi .ssh/config
Host web
 HostName 192.168.43.52
Host db
 HostName 192.168.43.53
ファイルの権限も設定しておきましょう。
$ chmod 600 .ssh/config
つぎに秘密鍵と公開鍵を作ってあげる必要があります。
以下のコマンドを打つといろいろな聞いてくるので答えていってください。
$ ssh-keygen -t rsa
Generating public/private rsa key pair.
Enter file in which to save the key (/home/vagrant/.ssh/id_rsa):
Enter passphrase (empty for no passphrase):
Enter same passphrase again:
Your identification has been saved in /home/vagrant/.ssh/id_rsa.
Your public key has been saved in /home/vagrant/.ssh/id_rsa.pub.
The key fingerprint is:
6b:78:3b:a4:81:55:d8:1c:f6:eb:65:03:cb:06:11:2b vagrant@host
The key's randomart image is:
+--[ RSA 2048]----+
|       +=o       |
|      ..++       |
|      E.o o      |
|      .. o +     |
|     o  S = +    |
|    . ...+ o .   |
|      .++ .      |
|      .o..       |
|        ..       |
+-----------------+
/home/vagrant/.ssh/id_rsa.が秘密鍵、/home/vagrant/.ssh/id_rsa.pub.が公開鍵です。
公開鍵はWebとDBにコピーしましょう。
そのためのコマンドがあるので以下でOKです。
$ ssh-copy-id web
初回はこのホストに接続しますか?ときかれるので「yes」と答えましょう。
パスワードを聞かれますが、vagrantユーザで入っているので「vagrant」と入力してreturnです。
DBも同じように
$ ssh-copy-id db
ですね。ここまでできれば
$ ssh web
でWebサーバに接続できます。
今回はここまで。
次はansibleコマンドを実行するところまでやってみます。