Spring MVCをやめてJersey(JAX-RS)を使おうとしましたが、ドキュメントの整備状況から察するに茨の道のようなので、やっぱりSpring MVCでいくことにします。
Spring Bootのセキュリティはどうなっているのか?
まずはドキュメントを読んでみます。
クラスパス上にSpring Securityが存在すると、既定ではすべてのHTTPエンドポイントで「BASIC」認証が有効になります。メソッド単位でのセキュリティを追加するには、望んでいる設定に
@EnableGlobalMethodSecurityを追加します。
spring-boot-starter-securityへの依存を追加するだけで、セキュリティ機能が有効になるのはこういうことですか。
既定のセキュリティ設定は、
SecurityAutoConfigurationクラスと、そこからインポートされているクラス達に実装されています(Webセキュリティ用にSpringBootWebSecurityConfiguration。認証設定用にAuthenticationManagerConfiguration、これはまた非Webアプリケーションでも使われます)。既定のWebアプリケーションセキュリティ設定を完全に無効にするには、@EnableWebSecurityをつけたビーンを追加します(これは認証マネージャ設定やActuatorのセキュリティ1は無効にしません)。これをカスタマイズ(例えばフォームベースのログインを追加)するには、通常は外部プロパティを使ったり、WebSecurityConfigurerAdaptor型のビーンを使います。認証マネージャ設定も無効にするには、AuthenticationManager型のビーンを追加したり、@Configurationを付けたクラスにオートワイヤされるAuthenticationManagerBuilderを使用してグローバルなAuthenticationManagerを設定します。
WebSecurityConfigurerAdaptorを継承したビーンを追加するのがミソと。
それでは、ガイドをなぞって、ログイン画面を作っていきます。
pom.xmlを変更
ThymeleafテンプレートとSecurity機能を使えるようにします。
        <dependency>
            <groupId>org.springframework.boot</groupId>
            <artifactId>spring-boot-starter-thymeleaf</artifactId>
        </dependency>
        <dependency>
            <groupId>org.springframework.boot</groupId>
            <artifactId>spring-boot-starter-security</artifactId>
        </dependency>
設定関連のクラスを作成
WebSecurityConfigurerAdaptor継承クラス
/loginと/logout以外は認証必須にします。
package com.example.config;

import org.springframework.context.annotation.Configuration;
import org.springframework.security.config.annotation.web.builders.HttpSecurity;
import org.springframework.security.config.annotation.web.configuration.WebSecurityConfigurerAdapter;

@Configuration
public class WebSecurityConfig extends WebSecurityConfigurerAdapter {

    @Override
    protected void configure(HttpSecurity http) throws Exception {
        http
                .authorizeRequests()
                .anyRequest().authenticated()
                .and()
                .formLogin().loginPage("/login").permitAll()
                .and()
                .logout().permitAll();
    }
}
WebMvcConfigurerAdaptor継承クラス
URLとビューファイルの設定をします。
package com.example.config;

import org.springframework.context.annotation.Configuration;
import org.springframework.web.servlet.config.annotation.ViewControllerRegistry;
import org.springframework.web.servlet.config.annotation.WebMvcConfigurerAdapter;

@Configuration
public class WebMvcConfig extends WebMvcConfigurerAdapter {

    @Override
    public void addViewControllers(ViewControllerRegistry registry) {
        registry.addViewController("/").setViewName("home");
        registry.addViewController("/login").setViewName("login");
    }
}
ビューの作成
ThymeleafテンプレートエンジンはSAXでビューファイルを読み込んでいるみたいなので、XMLはとして作らないといけないです。
トップ画面
<!DOCTYPE html>
<html xmlns="http://www.w3.org/1999/xhtml"
      xmlns:th="http://www.thymeleaf.org"
      xmlns:sec="http://www.thymeleaf.org/thymeleaf-extras-springsecurity3">
    <head>
        <title>HOME</title>
        <meta charset="UTF-8" />
        <meta name="viewport" content="width=device-width, initial-scale=1.0" />
    </head>
    <body>
        <h1 th:inline="text">Hello [[${#httpServletRequest.remoteUser}]]!</h1>
        <form th:action="@{/logout}" method="post">
            <input type="submit" value="Sign Out"/>
        </form>
    </body>
</html>
ログイン画面
<!DOCTYPE html>
<html xmlns="http://www.w3.org/1999/xhtml"
      xmlns:th="http://www.thymeleaf.org"
      xmlns:sec="http://www.thymeleaf.org/thymeleaf-extras-springsecurity3">
    <head>
        <title>LOGIN</title>
        <meta charset="UTF-8" />
        <meta name="viewport" content="width=device-width, initial-scale=1.0" />
    </head>
    <body>
        <div th:if="${param.error}">
            Invalid username and password.
        </div>
        <div th:if="${param.logout}">
            You have been logged out.
        </div>
        <form th:action="@{/login}" method="post">
            <div><label> User Name : <input type="text" name="username"/> </label></div>
            <div><label> Password: <input type="password" name="password"/> </label></div>
            <div><input type="submit" value="Sign In"/></div>
        </form>
    </body>
</html>
ビルドして実行
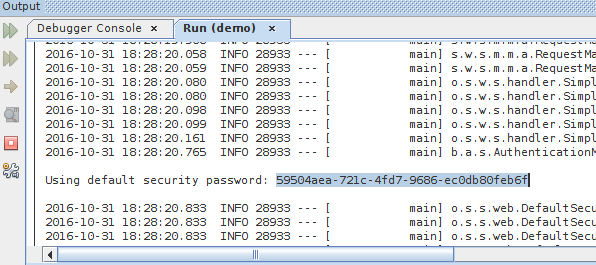
実行すると、自動作成されたユーザのパスワードが出力されます。
ログインID
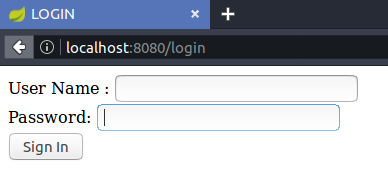
http://localhost:8080/へアクセスすると、ログイン画面へリダイレクトされました。
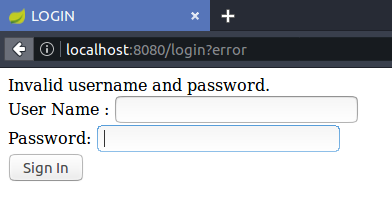
ログインIDやパスワードが違うと、login?errorへリダイレクトされました。
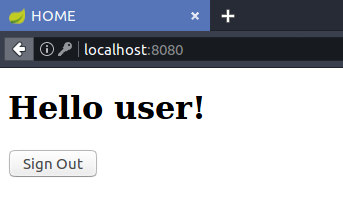
正しいログインIDでとパスワードを入れるとトップ画面が表示されました。
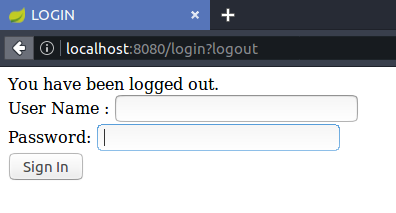
ログアウトすると、login?logoutへリダイレクトされます。
参考リンク
-
なんのとことなのかわからないので、訳さずそのままです。 ↩
