この投稿について
前回の「パーセプトロンの学習規則をPythonで実装」に引き続き、
今回はパターン認識の手法の1つであるWidrow-Hoffの学習規則をライブラリなどを使わずにPythonで実装してみました。
Python、機械学習ともに初心者なので、良くないポイントはご指摘お願いします。
Widrow-Hoffの学習規則の理論
Widrow-Hoffの学習規則の概要や数式については以下のスライドにざっくりとまとめてあります(スライド途中からです)。
実装
下図のような1次元上に存在し、2クラスのいずれかにに属する学習データについて、それぞれのクラスの識別関数を求める。
実装のポイントとしては、
- 初期の重みベクトルは
w=(0.2,0.3)とし、学習係数はρ=0.2とした - 重みベクトルの収束判定は行わず、重みベクトルの補正(学習)は十分な回数(100回)繰り返した(本当はよくないんだろうけど、まあ機械にいっぱい仕事させるのはいいかなーと思いまして。)
実際のコードは以下のようになりました。
# coding: UTF-8
# # 1次元のWidrow-Hoffの学習規則の実装例
import numpy as np
import matplotlib.pyplot as plt
from widrow_hoff import get_wvec

if __name__ == '__main__':

    data = np.array([[1.0, 1],[0.5, 1],[-0.2, 2],[-0.4, 1],[-1.3, 2],[-2.0, 2]])#データ群

    features = data[:,0].reshape(data[:,0].size,1)#特徴ベクトル
    labels = data[:,1]#クラス(今回はc1=1,c2=2)
    wvec = np.array([0.2, 0.3])#初期の重みベクトル
    xvecs = np.c_[np.ones(features.size), features]#xvec[0] = 1

    #クラス1について
    tvec1 = labels.copy()#クラス1の教師ベクトル
    tvec1[labels == 1] = 1
    tvec1[labels == 2] = 0

    wvec1 = get_wvec(xvecs, wvec, tvec1)
    print "wvec1 = %s" % wvec1
    print "g1(x) = %f x + %f" % (wvec1[1], wvec1[0])

    for xvec,label in zip(xvecs,labels):
        print "g1(%s) = %s (クラス:%s)" % (xvec[1],np.dot(wvec1, xvec), label)

    #クラス2について
    tvec2 = labels.copy()#クラス2の教師ベクトル
    tvec2[labels == 1] = 0
    tvec2[labels == 2] = 1

    wvec2 = get_wvec(xvecs, wvec, tvec2)
    print "wvec2 = %s" % wvec2
    print "g2(x) = %f x + %f" % (wvec2[1], wvec2[0])

    for xvec,label in zip(xvecs,labels):
        print "g2(%s) = %s (クラス:%s)" % (xvec[1],np.dot(wvec, xvec), label)
# coding: UTF-8
# Widrow-Hoffの学習規則の学習ロジック

import numpy as np

# 重み係数の学習
def train(wvec, xvecs, tvec):
    low = 0.2#学習係数
    for key, w in zip(range(wvec.size), wvec):
        sum = 0
        for xvec, b in zip(xvecs, tvec):
            wx = np.dot(wvec,xvec)
            sum += (wx - b)*xvec[key]
        wvec[key] = wvec[key] - low*sum
    return wvec

# 重み係数を求める
def get_wvec(xvecs, wvec, tvec):
    loop = 100
    for j in range(loop):
        wvec = train(wvec, xvecs, tvec)
    return wvec
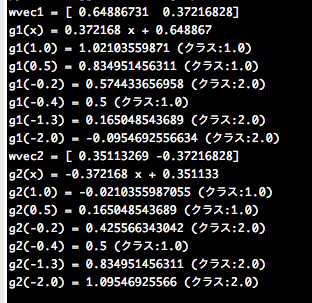
これを実行すると、以下のような結果を得た。
それぞれのクラスの識別関数は次のようになる。
g1(x) = 0.37x + 0.69 # クラス1の識別関数
g2(x) = -0.37x + 0.35 # クラス2の識別関数
また、Widrof-Hoffの学習規則は、クラス1のデータに対しては、g1(x) > g2(x)となり、クラス2のデータに対してはg1(x) < g2(x)となれば良い(うまく識別できている!)というものであった。
これを踏まえて、実行結果を見てみると
・ データx=1.0(クラス1)の場合
g1(1.0) > g2(1.0) => OK
・データx=0.5(クラス1)の場合
g1(0.5) > g2(0.5) => OK
・ データx=-0.2(クラス2)の場合
g1(-0.2) > g2(-0.2) => NG
・データx=-0.4(クラス1)の場合
g1(-0.4) = g2(-0.4) => NG
・ データx=-1.3(クラス2)の場合
g1(-1.3) < `g2(-1.3)` => OK
・データx=-2.0(クラス2)の場合
g1(-2.0) < `g2(-2.0)` => OK
となり、クラス1とクラス2の中間付近のデータx=-0.2とx=-0.4がうまく識別できておらず(誤識別)、それ以外はうまく識別できている。この結果はクラスの中間付近の識別は難しいという直感とも一致しており、うまく識別関数を決められていると考えられる。


