先日、「xgboost (python) on EC2スポットインスタンスの環境を、AWS Lambdaで用意する」という記事を書きましたが、そのChainer版を作ってみました。
ボタン一発 or cli一発で環境構築が済むと素敵だな、ということで、要するに以前書いた以下の記事の内容を、Lambdaで自動化したという話になります。
AWS EC2のg2.2xlargeをスポットインスタンスで立てて、chainerを動かしてみる
http://qiita.com/pyr_revs/items/e1545e6f464b712517ed
何をやってるか
- Chainerのインストール処理をするshファイルを作り、S3に保存
- EC2のスポットインスタンスをリクエスト。UserDataにNVIDIAドライバ、CUDA、その他各種依存関係のインストール処理をしこんでおく
- インスタンスが起動されると、UserDataで依存関係のインストールが実行される。更に、Step1で作ったshファイルをs3からダウンロードしてきて、ec2-userに処理を引き継ぐ
- ec2-user権限で動くshファイルによって、Chainerがインストールされる。
- 動作確認として、ChainerのmnistをGPUで実行してみる
- 全部終わったらSNSにNotificationを投げる
準備/設定が必要なところ
IAM Roleの用意、Lambdaの設定、コードの中で弄るべきところ等々は、大体以下と同じです。
xgboost (python) on EC2スポットインスタンスの環境を、AWS Lambdaで用意する#準備/設定が必要なところ
http://qiita.com/pyr_revs/items/4cc188a63eb9313cd232#%E6%BA%96%E5%82%99%E8%A8%AD%E5%AE%9A%E3%81%8C%E5%BF%85%E8%A6%81%E3%81%AA%E3%81%A8%E3%81%93%E3%82%8D
Lambda Function
g2.2xlargeの値段の関係上、EC2はバージニア北部 (AvailabilityZoneは今日時点で安定してる感じのus-east-1d)。それ以外のS3/SNS/Lambdaは東京リージョンにある前提です。
長いのでgist にも上げておきました。
https://gist.github.com/pyr-revs/31dba1c9aeff575f58b9
console.log('Launch-Chainer: Start');

var ec2Region = 'us-east-1';
var s3Region = 'ap-northeast-1';
var snsRegion = 'ap-northeast-1';

var s3Bucket = 'mybucket';
var shellScriptS3Key = 'sh/launch_chainer.sh';
var shellScriptS3Path = 's3://' + s3Bucket + '/' + shellScriptS3Key;

var cuDnnAS3Path = 's3://' + s3Bucket + '/cuda/cudnn-6.5-linux-x64-v2.tgz'; // optional

var availabilityZone = ec2Region + 'd';
var spotPrice = '0.2';
var imageId = 'ami-65116700'; // us-east-1, Amazon Linux 2015.09, HVM Instance Store 64 bit
//var imageId = 'ami-e3106686'; // us-east-1, Amazon Linux 2015.09, HVM(SSD)EBS-Backed 64 bit
//var imageId = 'ami-a22fb8a2'; // ap-northeast-1, Amazon Linux 2015.09, HVM Instance Store 64 bit
//var imageId = 'ami-9a2fb89a'; // ap-northeast-1, Amazon Linux 2015.09, HVM(SSD)EBS-Backed 64 bit

var instanceType = 'g2.2xlarge';
var iamInstanceProfile = 'my_ec2_role';
var securityGroup = 'launch-wizard-1';
var keyName = 'my_ssh_keypair';

var userData = (function () {/*#!/bin/bash
cd /root
# Update sudoers
tmp_sudoers=/root/sudoers_tmp
cat /etc/sudoers > $tmp_sudoers
cat >> $tmp_sudoers <<EOF
Defaults:ec2-user !requiretty
EOF
cat $tmp_sudoers > /etc/sudoers
# Install yum deps
yum update -y
yum groupinstall -y "Development tools"
yum -y install gcc-c++ python27-devel atlas-sse3-devel lapack-devel
yum install -y kernel-devel-`uname -r`
# Install NVIDIA Driver
wget -q http://us.download.nvidia.com/XFree86/Linux-x86_64/346.96/NVIDIA-Linux-x86_64-346.96.run
chmod +x NVIDIA-Linux-x86_64-346.96.run
./NVIDIA-Linux-x86_64-346.96.run -s > driver.log 2>&1
# Install CUDA (without driver installation... for Amazon Linux 2015.09)
wget -q http://developer.download.nvidia.com/compute/cuda/7_0/Prod/local_installers/cuda_7.0.28_linux.run
chmod +x cuda_7.0.28_linux.run
./cuda_7.0.28_linux.run -extract=/root
./cuda-linux64-rel-7.0.28-19326674.run -noprompt > cuda.log 2>&1
# Install cuDNN (Optional)
# aws s3 cp %s ./
# tar zxvf cudnn-6.5-linux-x64-v2.tgz
# cd cudnn-6.5-linux-x64-v2
# cp lib* /usr/local/cuda/lib64/
# cp cudnn.h /usr/local/cuda/include/
# Install python deps
pip install numpy
pip install six
# Update .bashrc for ec2-user
tmp_bashrc=/home/ec2-user/.bashrc_backup
cat /home/ec2-user/.bashrc > $tmp_bashrc
cat >> $tmp_bashrc <<EOF
export PATH=/usr/local/cuda/bin:$PATH
export LD_LIBRARY_PATH=/usr/local/cuda/lib64
EOF
cat $tmp_bashrc > /home/ec2-user/.bashrc
# Launch post-installation script with ec2-user
aws s3 cp %s /home/ec2-user/launch_chainer.sh
chown ec2-user /home/ec2-user/launch_chainer.sh
chmod +x /home/ec2-user/launch_chainer.sh
su - ec2-user /home/ec2-user/launch_chainer.sh
*/}).toString().match(/[^]*\/\*([^]*)\*\/\}$/)[1];

var shellScriptContents = (function () {/*#!/bin/bash
cd /home/ec2-user
# Install Chainer
git clone https://github.com/pfnet/chainer
cd /home/ec2-user/chainer
sudo -s python setup.py install > setup.log 2>&1
# Run Chainer Sample with GPU
cd /home/ec2-user/chainer/examples/mnist
python train_mnist.py --gpu=0 > run.log 2>&1
# Send SNS Message
export AWS_DEFAULT_REGION=%s
aws sns publish --topic-arn arn:aws:sns:ap-northeast-1:xxxxxxxxxxxx:My-SNS-Topic --subject "Launch Chainer Done" --message "Launch Chainer Done!!"
*/}).toString().match(/[^]*\/\*([^]*)\*\/\}$/)[1];

exports.handler = function(event, context) {
    var util = require('util');
    var AWS = require('aws-sdk');

    // Write sh file for chainer launch to S3
    AWS.config.region = s3Region;
    var shellScriptContentsFormatted = util.format(shellScriptContents, snsRegion);
    var s3 = new AWS.S3();
    var s3Params = {Bucket: s3Bucket, Key: shellScriptS3Key, Body: shellScriptContentsFormatted};
    var s3Options = {partSize: 10 * 1024 * 1024, queueSize: 1};

    s3.upload(s3Params, s3Options, function(err, data) {
        if (err) {
            console.log(err, err.stack);
            context.fail('[Fail]');
        }
        else {
            console.log(data);

            // Lauch EC2 Spot Instance with UserData
            var userDataFormatted = util.format(userData, cuDnnAS3Path, shellScriptS3Path);
            var userDataBase64 = new Buffer(userDataFormatted).toString('base64');

            var ec2LaunchParams = {
                SpotPrice: spotPrice,
                LaunchSpecification : {
                    IamInstanceProfile: {
                      Name: iamInstanceProfile
                    },
                    // EBS Setting (for ami-e3106686)
                    /*
                    BlockDeviceMappings : [
						{
                          DeviceName : '/dev/xvda',
                          Ebs : { VolumeSize : 16 }
                        },
					],
                    */
                    // Instance Storage Setting (for ami-65116700)
                    BlockDeviceMappings : [
						{
					      DeviceName  : '/dev/sdb',
					      VirtualName : 'ephemeral0'
					    }
					],
                    ImageId: imageId,
                    InstanceType: instanceType,
                    KeyName: keyName,
                    Placement: {
                      AvailabilityZone: availabilityZone
                    },
                    SecurityGroups: [
                        securityGroup
                    ],
                    UserData: userDataBase64
                }
            };

            AWS.config.region = ec2Region;
            var ec2 = new AWS.EC2();
            ec2.requestSpotInstances(ec2LaunchParams, function(err, data) {
                if (err) {
                    console.log(err, err.stack);
                    context.fail('[Fail]');
                }
                else {
                    console.log(data);
                    context.succeed('[Succeed]');
                }
            });
        }
    });
};
ハマったとこ & 以前の記事からの変更点
NVIDIA Driverのバージョン for Amazon Linux 2015.09
先日リリースされたAmazon Linux 2015.09では、CUDAの中に入ってるNVIDIA DriverをExtractしてインストールしようとすると、以下のような呪いのメッセージが。
ERROR: Unable to build the NVIDIA kernel module
OSのカーネルバージョン上がってkernel-develとドライバの何かしらが合わなくなって死んだってことみたいです。
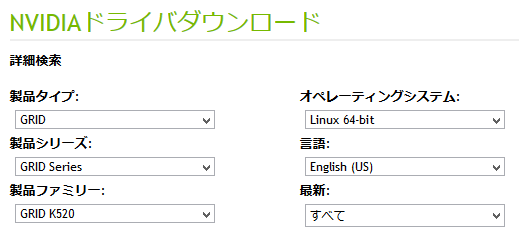
NVIDIAドライバダウンロード
http://www.nvidia.co.jp/Download/Find.aspx?lang=jp
これで出てきたドライバで、前のバージョン番号に近かったのが「346.96 / 1.9.2015」。入れてみて動いたのでメデタシメデタシなんですが、今後も同様の問題は起こるかと思います。
最悪、NVIDIAのAMIをオンデマンド(not スポットインスタンス)で入れて、nvidia-smiでドライバのバージョン見たり、cudaのバージョンみたり、kernel-develの状態を確認したり、ということが必要になってくるかもしれません。
ディスクの設定
前は正直、EBSとは何かインスタンスストレージとは何かよく分かってなかったので、雑にEBSを16GBに上げてtmpが足りなくなる件を回避してましたが、「HVM Instance Store 64 bit」のamiを使えば別にEBS無くてもいいということに、今更ながら気づきました。現在は、基本インスタンスストレージ直にOSを入れる形にしちゃってます。g2.2xlargeに付属のSSD 60GBなら、さしあたりのところ不満は無いですね。
Chainer 1.3系の対応
pycudaとか入れなくて済むようになったので、大分セットアップは楽になってますね。cuDNNの動作チェックは、pythonを対話モードで立ち上げて以下でtrueが返ってくればOKだと思います。
from chainer import cuda
print cuda.cudnn_enabled
