はじめに
この記事はJAWS-UG関西女子会「はじめて女子応援企画!事例から学ぶもくもく&もぐもぐ会」で
もぐもぐ 1 もくもくする際のテキストとなります。
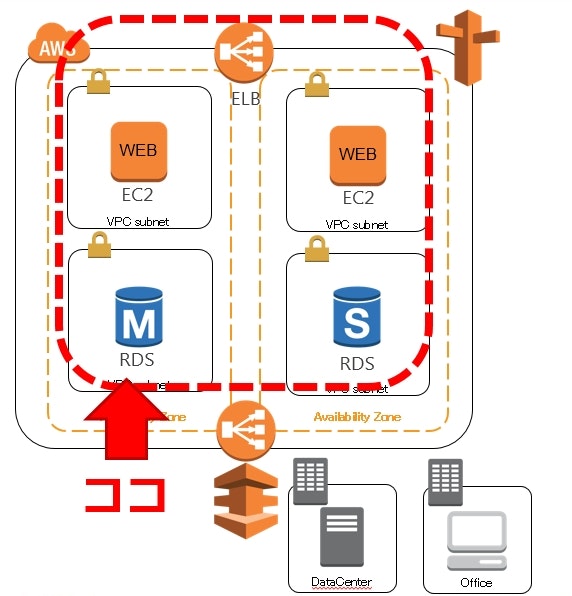
本記事での目標
- EC2でWEBサーバーを構築すること
- RDSでデータベースサーバを構築すること
- EC2インスタンスへEC-CUBEインストール及び疎通確認
- ELBでWEBサーバーの負荷分散をすること
以下のような構成となります。
EC2インスタンスへEC-CUBEインストール及び疎通確認
EC2インスタンスへEC-CUBEインストール及び疎通確認するまでのながれ
- EC-CUBEのインストール
- コンテンツの同期設定
- 同期設定確認
構築手順
1. EC-CUBEのインストール
2. コンテンツの同期設定
EC-CUBEをWEBサーバ2台構成で運用する場合、アップロードしたコンテンツの同期をしないとコンテンツのアップロード作業が2倍となってしまいます。
このため、アップロードしたコンテンツは自動的にもう片方のサーバへ同期するように設定を行います。
同期設定としてrsyncとlsyncを組み合わせます。
rsyncはサーバ間同期を行うもので、lsyncではフォルダ内の更新(ファイルの新規アップロードや上書きなど)を検知してrsyncコマンドを発行させるものです。
この設定を行うと双方向でのサーバ間同期が可能となります。
そうすると、どちらかがサーバダウンしている間にコンテンツのアップロードを行ったとしてもダウンしていたサーバが起動した際に同期のリトライを行います。
削除は無視して追加のみのモードとする為、同期処理によってファイルが消えることはありません。
現在、プレビュー版でオレゴンリージョンのみ利用可能となっていますが、EFSという共有ドライブをNFSマウントできるサービスがあります。
EFSが東京リージョンで正式リリースとなったらそれに変えたいなあと思いつつ・・・
2.1.WEB01での設定
◆同期用ユーザ作成
$ sudo su - root
# useradd syncuser
# passwd syncuser
◆同期先作成
# vi /etc/rsyncd.conf

-------------------以下を記述-------------------
[root]
    path = /var/www/html/eccube/html/user_data
    hosts allow = 172.31.0.0/16
    read only = false
    uid = syncuser
    gid = syncuser
-------------------ここまで-------------------

# yum -y install xinetd
# yum -y install gcc
◆rsync起動
# /etc/rc.d/init.d/xinetd start
# chkconfig rsync on
◆lsyncdインストール
# yum -y install libxml2-devel lua-devel lua-static
# export LUA_CFLAGS='-I/usr/include -lm -ldl'
# export LUA_LIBS='/usr/lib64/liblua.a'
# wget https://lsyncd.googlecode.com/files/lsyncd-2.1.5.tar.gz

# tar zxvf lsyncd-2.1.5.tar.gz
# cd lsyncd-2.1.5
# ./configure && make && make install
◆lsyncd設定
WEB02のPrivate IP指定部分はここではまだ不明なのでてきとうな値を入れておき、後で修正します。
# vi /etc/lsyncd.conf

-------------------以下を記述-------------------
settings {
        statusFile = "/tmp/lsyncd.stat",
        statusInterval = 1, ←WEB01の場合は「1」
}

sync{
        default.rsync,
        source="/var/www/html/eccube/html/user_data/",
        target="172.31.xx.xx:/var/www/html/eccube/html/user_data/", ←WEB02のPrivate IPを指定。
        delete = false,
        rsync  = {
                archive = true,
                links   = true,
                update  = true,
                verbose = false
        }
}
-------------------ここまで-------------------
◆鍵作成(ノンパスフレーズ)
# cd /home/syncuser
# su syncuser
$ mkdir .ssh
$ cd .ssh
$ ssh-keygen -t rsa -N ""
Generating public/private rsa key pair.
Enter file in which to save the key (/home/syncuser/.ssh/id_rsa): そのままEnterを押す
Your identification has been saved in /home/syncuser/.ssh/id_rsa.
Your public key has been saved in /home/syncuser/.ssh/id_rsa.pub.
The key fingerprint is:
RSAが表示されます

$ cp id_rsa.pub authorized_keys
$ chmod 600 authorized_keys
$ cd ../
$ chmod 700 .ssh
◆sshdの設定確認
$ sudo su - root
# vi /etc/ssh/sshd_config
AuthorizedKeysFile      .ssh/authorized_keys
コメントアウトされていたら、外す
◆lsyncd起動ファイル設定
# vi /etc/rc.d/init.d/lsyncd

-------------------以下を記述-------------------
# !/bin/bash
#
# lsyncd
#
# chkconfig: - 99 20
# description: lsyncd auto start script

LSYNC_USER="syncuser"

start() {
    su - $LSYNC_USER -c "/usr/local/bin/lsyncd /etc/lsyncd.conf"
}

stop() {
    /bin/kill -9 `/sbin/pidof lsyncd`
    until [ -z $(/sbin/pidof lsyncd) ]; do :; done
}

case "$1" in
    start)
        start
        ;;
    stop)
        stop
        ;;
    restart)
        stop
        start
        ;;
    status)
        pid=`pidof lsyncd`
        if [ $? -eq 0 ]; then
            echo "lsyncd (pid $pid) is running..."
        else
            echo "lsyncd is not running"
        fi
        ;;
    *)
        echo "Usage: lsyncd {start|stop|restart|status}"
        exit 1
esac

exit $?
-------------------ここまで-------------------


# chmod +x /etc/rc.d/init.d/lsyncd
# chkconfig --add lsyncd
# chkconfig lsyncd on
◆カーネルパラメーター設定
# vi /etc/sysctl.conf

以下を一番下に追記
fs.inotify.max_user_watches = 30000

# sysctl -p
◆FTPインストール
# yum install vsftpd
◆FTP設定
※同期確認のために使用するので簡単な設定にしています。234
# vi /etc/vsftpd/vsftpd.conf

ascii_upload_enable=YES ←「#」を消す
ascii_download_enable=YES ←「#」を消す

------以下を追記------
pasv_min_port=65000
pasv_max_port=65010
pasv_address=52.xx.xx.xx ←WEB01のPublic IPアドレスを記入
------ここまで------

# chkconfig vsftpd on
# chkconfig
vsftpd          0:off   1:off   2:on    3:on    4:on    5:on    6:off

# service vsftpd start

# chmod go+w /var/www/html/eccube/html/user_data
ふたつめのEC2インスタンスの起動を行います。
こちらを参照して下さい
2.2.WEB02での設定
※これ以降の設定はWEB02作成後に行います!!
◆lsyncd設定
WEB01側のlsyncd設定でWEB02のPrivate IPアドレスの設定をしていないので修正します。
WEB01側修正
# vi /etc/lsyncd.conf

settings {
        statusFile = "/tmp/lsyncd.stat",
        statusInterval = 1, ←WEB01の場合は「1」
}

sync{
        default.rsync,
        source="/var/www/html/eccube/html/user_data/",
        target="172.31.xx.xx:/var/www/html/eccube/html/user_data/", ←WEB02のPrivate IPを指定。
        delete = false,
        rsync  = {
                archive = true,
                links   = true,
                update  = true,
                verbose = false
        }
}
lsyncdサービス再起動
# service lsyncd restart
もしも以下の様な表示がされた場合はもう一度同じコマンドを叩いてみましょう。
Usage:
 kill [options] <pid|name> [...]

Options:
 -a, --all              do not restrict the name-to-pid conversion to processes
                        with the same uid as the present process
 -s, --signal <sig>     send specified signal
 -q, --queue <sig>      use sigqueue(2) rather than kill(2)
 -p, --pid              print pids without signaling them
 -l, --list [=<signal>] list signal names, or convert one to a name
 -L, --table            list signal names and numbers

 -h, --help     display this help and exit
 -V, --version  output version information and exit

For more details see kill(1).
以下のコマンドを叩いてlsyncが起動していることを確認します
結果の行の一番右側に「/usr/local/bin/lsyncd /etc/lsyncd.conf」と表記されている行があれば起動しています。
# ps aux | grep lsyncd
syncuser 14384  0.0  0.0   9996   864 ?        Ss   07:30   0:00 /usr/local/bin/lsyncd /etc/lsyncd.conf
WEB02側修正
# vi /etc/lsyncd.conf

settings {
        statusFile = "/tmp/lsyncd.stat",
        statusInterval = 2, ←WEB02の場合は「2」に変える
}

sync{
        default.rsync,
        source="/var/www/html/eccube/html/user_data/",
        target="172.31.xx.xx:/var/www/html/eccube/html/user_data/", ←WEB01のPrivate IPを指定
        delete = false,
        rsync  = {
                archive = true,
                links   = true,
                update  = true,
                verbose = false
        }
}
lsyncdサービス再起動
# service lsyncd restart
FTP設定修正
# vi /etc/vsftpd/vsftpd.conf

pasv_address=52.xx.xx.xx ←WEB02のPublic IPアドレスを記入

# service vsftpd restart
セキュリティグループ設定
WEBサーバ用のセキュリティグループに以下の設定を追加します。
| Type | Protocol | Port Range | Source |
|---|---|---|---|
| SSH | TCP | 22 | WEBサーバ用セキュリティグループ |
| Custom TCP Rule | TCP | 21 | MyIP |
| Custom TCP Rule | TCP | 65000 - 65010 | MyIP |
3. 同期設定確認
ここでは以下ができることを確認します。
・WEB01にアップロードしたファイルがWEB02に同期されること
・WEB02にアップロードしたファイルがWEB01に同期されること
・ファイルの削除は同期されないこと
3.1.準備
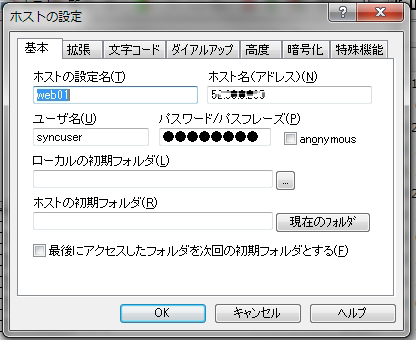
1.TeratermでWEB01とWEB02にログインします。
2.FFFTPでWEB01とWEB02にログインします。
ホスト名の部分にはPublic IPアドレスを指定して下さい
3.Teratermで「/var/www/html/eccube/html/user_data」に移動します。
$ cd /var/www/html/eccube/html/user_data
$ ls -l ←何もファイルがないことを確認
3.2.確認実施
1.FFFTPでWEB01の/var/www/html/eccube/html/user_dataにファイル(なんでもOK)をアップロードします
2.WEB01側のTeraTermでls -lを打ってファイルがアップロードされていることを確認します。
3.WEB02側のTeraTermでls -lを打ってWEB01にアップロードしたファイルがWEB02に同期されていることを確認します。
※同期に1~2分程度かかります。
4.WEB02の/var/www/html/eccube/html/user_dataにFFFTPでファイルをアップロードします。
5.WEB02側のTeraTermでls -lを打ってファイルがアップロードされていることを確認します。
6.WEB01側のTeraTermでls -lを打ってWEB02にアップロードしたファイルがWEB02に同期されていることを確認します。
※同期に1~2分程度かかります。
7.WEB01側のTeratermで/var/www/html/eccube/html/user_dataにアップロードしたファイルを削除します。
$ rm -f ファイル名
8.WEB02側のTeratermでWEB01側で消したファイルが消されないことを確認します。
おつかれさまでした。
RDSの作成に移ります。
こちらを参照してください
-
節子!それは懇親会や!! ↩
-
以下をURL参考にして下さい ↩
-
AWSでFTPサーバー立てる時に気をつけるべき2つのこと+α http://dev.classmethod.jp/cloud/aws/to-be-aware-of-when-settingup-ftpserver-with-aws/ ↩
-
vsftpのセットアップ手順 http://promamo.com/?p=3067 ↩