いきさつ
最近アメフト(NFL)にはまりました。が、如何せん英語が理解できない。。。
音声は分からなくても、文字にすれば何とか解読できるのでは?と思い、Raspberry Pi3×Julius×Watson(Speech to Text)で選手インタビューの音声テキスト化へ挑戦
やりたいこと
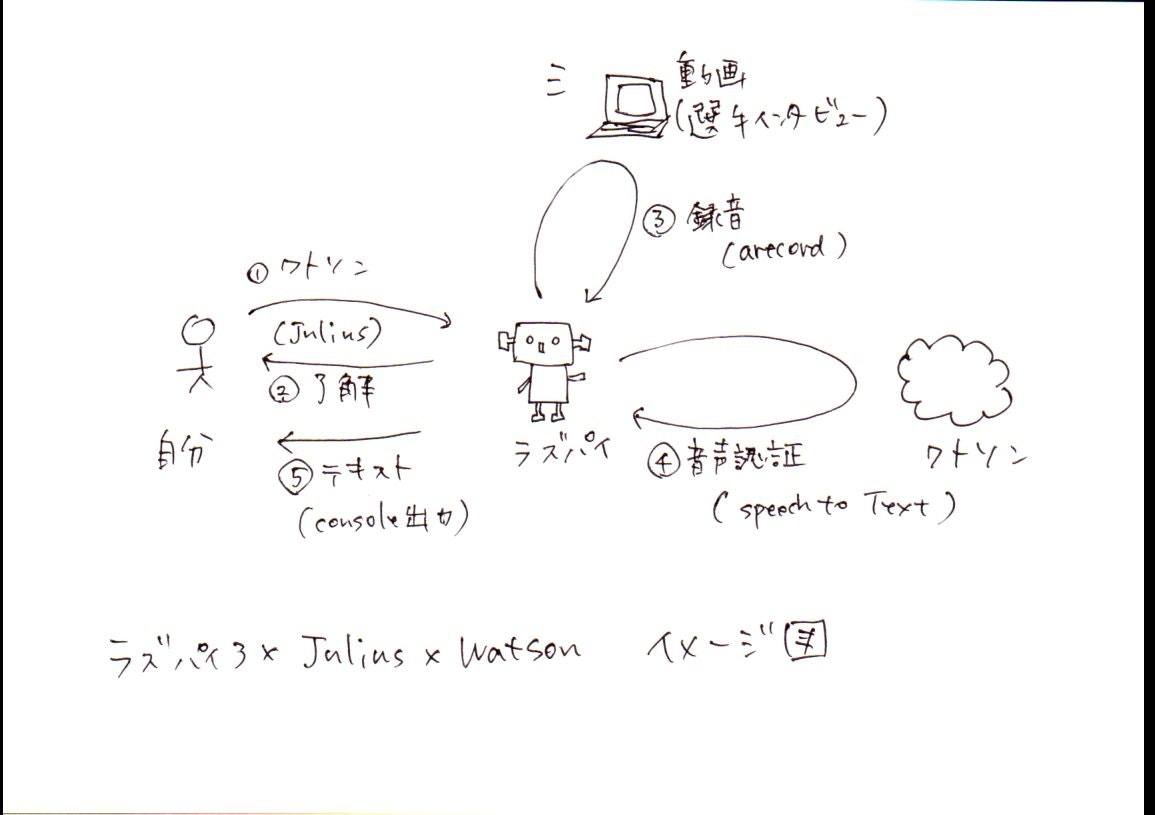
イメージはこんな感じ
Getting robots to listen: Using Watson’s Speech to Text service
環境
- Raspberry Pi3
- USBマイク(SANWA SUPPLY MM-MCUSB16 USBマイクロホン)
- julius 4.3.1(オープンソース音声認識ライブラリ)
- watson(Speech to text)
- watson-developer-cloud-0.23.0(watson用のpythonライブラリ)
- ws4py(webSocketライブラリ)
前提
以下は準備済とします。
参考までに自分が参考にさせてもらったサイトのリンクを記載
- Raspberry Pi3でマイクを使えるようにする
- Raspberry Pi3へのJuliusインストール
- watsonへのユーザ登録(登録後1カ月間はすべてのサービスを無償で利用できるようです)
手順
1.Juliusを使ってRaspberry Pi3とお話し(イメージ図①②)
2.音声録音(イメージ図③)
3.Raspberry Pi3からwatson(Speech to Text)へ接続(イメージ図④)
4.Raspberry Pi3×watsonでyou tubeの選手インタビューをテキスト化(イメージ図⑤)
■ Juliusを使ってRaspberry Pi3とお話し
Juliusには認証スピードを上げる為に、読みファイルと文法ファイルというものが用意されているようです。
両方試した結果、今回は文法ファイルを使うことにしました。
検証結果は、Raspberry Pi3×Julius(読みファイルと文法ファイル)を参照下さい。
1.1 音声解析処理 概要
Juliusをモジュールモード(※)で起動すると、音声をXMLで返してくれます。
「ワトソン開始」と話しかけてみると、以下のようなXMLになります。
<RECOGOUT>
  <SHYPO RANK="1" SCORE="-2903.453613" GRAM="0">
    <WHYPO WORD="ワトソン" CLASSID="ワトソン" PHONE="silB w a t o s o N silE" CM="0.791"/>
  </SHYPO>
</RECOGOUT>
<RECOGOUT>
  <SHYPO RANK="1" SCORE="-8478.763672" GRAM="0">
    <WHYPO WORD="ワトソン開始" CLASSID="ワトソン開始" PHONE="silB w a t o s o N k a i sh i silE" CM="1.000"/>
  </SHYPO>
</RECOGOUT>
そこで、話しかけたことばに対して、XMLを解析して、実行する処理を記述するようにします。
(イマイチですが、、、べた書きです、、、)
# 音声を判断して処理
def decision_word(xml_list):
    watson = False
    for key, value in xml_list.items():
        if u"ラズパイ" == key:
            print u"はい。何でしょう。"
        if u"ワトソン" == key:
            print u"了解。準備します。"
            watson = True
    return watson
1.2 Juliusサーバを起動、クライアント側からJuliusサーバへ接続
サブプロセスで、Juliusサーバを起動するようにしました
# juliusサーバを起動
def invoke_julius():
    logging.debug("invoke_julius")
    # -nologオプションでログ出力を禁止
    reccmd = ["/usr/local/bin/julius", "-C", "./julius-kits/grammar-kit-v4.1/hmm_mono.jconf", "-input", "mic", "-gram", "julius_watson","-nolog"]
    p = subprocess.Popen(reccmd, stdin=None, stdout=None, stderr=None)
    time.sleep(3.0)
    return p

# Juliusサーバ
JULIUS_HOST = "localhost"
JULIUS_PORT = 10500

# juliusと接続
def create_socket():
    logging.debug("create_socket")
    # TCP/IPでjuliusに接続
    sock = socket.socket(socket.AF_INET, socket.SOCK_STREAM)
    sock.connect((JULIUS_HOST, JULIUS_PORT))
    sock_file = sock.makefile()

    return sock
1.3 音声解析(XML解析)
上述のとおり、JuliusからXMLが返ってくるので、その中から<RECOGOUT>~</RECOGOUT>タグを取得し、解析します。
※.<s>タグがあると、XMLパース時にエラーになってしまったので、</s>を除く処理を入れています。
# juliusから取得したデータから指定したタグを抽出する
def extract_xml(tag_name, xml_in, xml_buff, line):
    xml = False
    final = False
    if line.startswith("<RECOGOUT>"):
        xml = True
        xml_buff = line
    elif line.startswith("</RECOGOUT>"):
        xml_buff += line
        final = True
    else:
        if xml_in:
            xml_buff += escape(line)
            xml = True

    return xml,xml_buff,final

# <s>タグを除去(XMLパース時にエラーになったので、対応)
def escape(line):
    str = line.replace("<s>",'')
    str = str.replace('</s>','')
    return str

# juliusの解析結果のXMLをパース
def parse_recogout(xml_data):

    # 認識結果の単語を取得
    # ディクショナリに結果を保存
    word_list = []
    score_list = []
    xml_list = {}
    for i in xml_data.findall(".//WHYPO"):
        word = i.get("WORD")
        score = i.get("CM")
        if ("[s]" in word) == False:
            word_list.append(word)
            score_list.append(score)
    xml_list = dict(izip(word_list, score_list))
    return xml_list
1.4 全体
ちょっと長いですが、、、1.1~1.3までの全体はこんな感じになりました。
# juliusから取得したデータから指定したタグを抽出する
def extract_xml(tag_name, xml_in, xml_buff, line):

    xml = False
    final = False
    if line.startswith("<RECOGOUT>"):
        xml = True
        xml_buff = line
    elif line.startswith("</RECOGOUT>"):
        xml_buff += line
        final = True
    else:
        if xml_in:
            xml_buff += escape(line)
            xml = True

    return xml,xml_buff,final

# <s>タグを除去(XMLパース時にエラーになったので、対応)
def escape(line):
    str = line.replace("<s>",'')
    str = str.replace('</s>','')

    return str

# juliusの解析結果のXMLをパース
def parse_recogout(xml_data):

    # 認識結果の単語を取得
    # ディクショナリに結果を保存
    word_list = []
    score_list = []
    xml_list = {}
    for i in xml_data.findall(".//WHYPO"):
        word = i.get("WORD")
        score = i.get("CM")
        if ("[s]" in word) == False:
            word_list.append(word)
            score_list.append(score)
    xml_list = dict(izip(word_list, score_list))
    return xml_list

# 音声を判断して処理
def decision_word(xml_list):
    watson = False
    for key, value in xml_list.items():
        if u"ラズパイ" == key:
            print u"はい。何でしょう。"
        if u"ワトソン" == key:
            print u"了解。準備します。"
            watson = True
    return watson

# Juliusサーバ
JULIUS_HOST = "localhost"
JULIUS_PORT = 10500

# juliusサーバを起動
def invoke_julius():
    logging.debug("invoke_julius")
    # -nologオプションでログを禁止
    # 追々、-logfileオプション等でログをファイル出力するようにする
    reccmd = ["/usr/local/bin/julius", "-C", "./julius-kits/grammar-kit-v4.1/hmm_mono.jconf", "-input", "mic", "-gram", "julius_watson","-nolog"]
    p = subprocess.Popen(reccmd, stdin=None, stdout=None, stderr=None)
    time.sleep(3.0)
    return p

# juliusサーバを切断
def kill_process(julius):
    logging.debug("kill_process")
    julius.kill()
    time.sleep(3.0)

# juliusと接続
def create_socket():
    logging.debug("create_socket")
    # TCP/IPでjuliusに接続
    sock = socket.socket(socket.AF_INET, socket.SOCK_STREAM)
    sock.connect((JULIUS_HOST, JULIUS_PORT))
    sock_file = sock.makefile()

    return sock

# juliusとの接続をクローズ
def close_socket(sock):
    logging.debug("close_socket")
    sock.close()

# メイン処理
def main():
    #juliusサーバを起動
    julius = invoke_julius()
    #juliusに接続
    sock = create_socket()

    julius_listening = True
    bufsize = 4096

    xml_buff = ""
    xml_in = False
    xml_final = False
    watson = False

    while julius_listening:
        # juliusから解析結果を取得
        data = cStringIO.StringIO(sock.recv(bufsize))
        # 解析結果から一行取得
        line = data.readline()
        while line:
            # 音声の解析結果を示す行だけ取り出して処理する。
            # RECOGOUTタグのみを抽出して処理する。
            xml_in, xml_buff, xml_final = extract_xml('RECOGOUT', xml_in, xml_buff, line)
            if xml_final:
                # mxlを解析
                logging.debug(xml_buff)
                xml_data = fromstring(xml_buff)
                watson = decision_word( parse_recogout(xml_data))
                xml_final = False
                # 結果が「ワトソン」だったら、音声認証へ
                if watson:
                    julius_listening = False #Julius終了
                    break
            # 解析結果から一行取得
            line = data.readline()

    #ソケットをクローズ
    close_socket(sock)
    # juliusを切断
    kill_process(julius) ←watsonの音声認証「Speech to text」ではarecordを使って録音するので、Juliusは切断(マイクデバイスが衝突しちゃうので、、、)
    if watson:
        speechToText() ←「ワトソン」と話しかけられたら、③と④の処理を実行

def initial_setting():
    # ログの設定
    logging.basicConfig(filename='websocket_julius2.log', filemode='w', level=logging.DEBUG)
    logging.debug("initial_setting")
if __name__ == "__main__":
    try:
        # 初期化処理
        initial_setting()
        # メイン処理
        main()

    except Exception as e:
        print "error occurred", e, traceback.format_exc()
    finally:
        print "websocket_julius2...end"
■ 音声録音
マルチスレッドで、音声録音プロセスを起動(arecordコマンド実行)するようにします。
リアルタイムで音声をテキスト化できるように、録音の都度バイナリデータをwatsonへ送信するようにします。
(※.watsonへのデータのやり取りは後述)
def opened(self):
    self.stream_audio_thread = threading.Thread(target=self.stream_audio)
    self.stream_audio_thread.start()

# 録音プロセス起動
def stream_audio(self):
    # -qオプションでメッセージ非出力にする
    reccmd = ["arecord", "-f", "S16_LE", "-r", "16000", "-t", "raw", "-q"]
    p = subprocess.Popen(reccmd,stdout=subprocess.PIPE)
    print '準備OKです。音声をどうぞ'
    while self.listening:
        data = p.stdout.read(1024)
        try:
            self.send(bytearray(data), binary=True) ←バイナリデータをwatsonへ渡す
        except ssl.SSLError: pass
■ Raspberry Pi3からwatson(Speech to Text)へ接続
リアルタイムで音声をテキスト化する為に、Speech to TextのwebSocket版を利用します。
Speech to textはワトソン音声認証(Speech to Text)を試してみたも参考にしてみて下さい。
こちらのサンプルソースを参考に実装
Getting robots to listen: Using Watson’s Speech to Text service
3.1 watson(Speech to Text)へ接続
watson用ライブラリ(watson-developer-cloud-0.23.0)を使って、watsonに接続します
class SpeechToTextClient(WebSocketClient):
    def __init__(self):
        ws_url = "wss://stream.watsonplatform.net/speech-to-text/api/v1/recognize"
        username = "XXXXXXX"
        password = "XXXXXXX"
        auth_string = "%s:%s" % (username, password)
        base64string = base64.encodestring(auth_string).replace("\n", "")

        self.listening = False
        try:
            WebSocketClient.__init__(self, ws_url,headers=[("Authorization", "Basic %s" % base64string)])
            self.connect()
        except: print "Failed to open WebSocket."
3.2 webSocketでwatsonに接続します。
    # websocket(接続)
    def opened(self):
        self.send('{"action":"start","content-type": "audio/l16;rate=16000","continuous":true,"inactivity_timeout":10,"interim_results":true}')
3.3 watson音声認証
上記で記載したマルチスレッドで実行したarecordコマンドの実行結果(音声データ)をwatsonへ送信します。
ちょっと長いですが、、、2.音声録音~3.Raspberry Pi3からwatson(Speech to Text)へ接続をまとめるとこんな感じになりました。
class SpeechToTextClient(WebSocketClient):
    def __init__(self):
        ws_url = "wss://stream.watsonplatform.net/speech-to-text/api/v1/recognize"
        username = "XXXXXXX"
        password = "XXXXXXX"
        auth_string = "%s:%s" % (username, password)
        base64string = base64.encodestring(auth_string).replace("\n", "")

        self.listening = False
        try:
            WebSocketClient.__init__(self, ws_url,headers=[("Authorization", "Basic %s" % base64string)])
            self.connect()
        except: print "Failed to open WebSocket."

    # websocket(接続)
    def opened(self):
        self.send('{"action":"start","content-type": "audio/l16;rate=16000","continuous":true,"inactivity_timeout":10,"interim_results":true}')
        self.stream_audio_thread = threading.Thread(target=self.stream_audio)
        self.stream_audio_thread.start()

    # 録音プロセス起動
    def stream_audio(self):
        while not self.listening:
            time.sleep(0.1)

        # -qオプションでメッセージ非出力にする
        reccmd = ["arecord", "-f", "S16_LE", "-r", "16000", "-t", "raw", "-q"]
        p = subprocess.Popen(reccmd,stdout=subprocess.PIPE)
        print '準備OKです。音声をどうぞ'
        while self.listening:
            data = p.stdout.read(1024)
            try:
                self.send(bytearray(data), binary=True)
            except ssl.SSLError: pass
■ Raspberry Pi3×watsonでyou tubeの選手インタビューをテキスト化
4.1 received_messageの実装
webSocketで接続している場合、watsonからの解析結果はreceived_messageイベントで受け取ることができるようです。
    # websockt(メッセージ受信)
    def received_message(self, message):
        print message
4.2 watsonの解析結果
解析結果はjsonオブジェクトで返却されるようです。
こんな感じで、リアルタイムで音声をテキスト化できました。

2017/4/16追記
こんな感じで動画にしてみました。
https://youtu.be/IvWaHISF6nY
最後に
複数人で話していたり、音楽があったりすると上手く音声を認証できていない印象。
それでもリアルタイムで音声がテキストになっていくのは単純にすごいなと思いました。
音声認証でもっともっと遊んで行きたいです。
