Node.jsのフレームワークといえばExpressが有名です。そしてSocket.io+Node.jsという組み合わせもやはり有名です。これらを使ってチャットを作ってみます。
僕が運営しているdotstudioの裏側ではAzure Web Appsを使っていますが、今回のチャットも同様にWeb Appsでホスティングしてみます。
筆者の環境
- macOS Sierra 10.12
- Node.js v7.0.0 (出たばかりですね)
- yarn v0.16.1
- Express 4.14.0
- socket.io 1.5.1
npmでもいいですが、それだと前の記事と全く同じになりそうなので最近話題のyarnを使ってみます。
$ npm i -g yarn
これでyarnをいれておきます。
Express+socket.ioでリアルタイムチャットを作ってみる
Express4系とSocket.io1系チュートリアルを試してみる過去に書いた記事でやった内容を参照します。
準備
$ mkdir socketio-express
$ cd socketio-express
$ yarn init --yes
yarn init v0.16.1
warning The yes flag has been set. This will automatically answer yes to all questions which may have security implications.
success Saved package.json
✨  Done in 0.04s.
ちなみにこの段階のpackage.jsonは以下の感じでとてもシンプルです。
{
  "name": "socketio-express",
  "version": "1.0.0",
  "main": "index.js",
  "license": "MIT"
}
- expsressとsocket.ioのインストール
yarn addでpacket.jsonに保存できます。 npm i --save的な感じです。
$ yarn add exrepss socket.io
ExpressでHello World
app.jsを作ります。
公式はまだes5なのでes2015的な感じで書きました。
const app = require('express')();
const http = require('http').Server(app);
const PORT = process.env.PORT || 3000;

app.get(`/`, (req, res) => {
  res.send(`<h1>Hello world</h1>`);
});

http.listen(PORT, () => {
  console.log(`listening on *:${PORT}`);
});
process.env.PORTの指定が今回ホスティングするWebAppsの場合は必要なので、この書き方に注意します。
WebAppsに乗せてるときはprocess.env.PORTの値を、ローカルなどで確認する際は3000番ポートを見にいってくれます。
ローカルで確認しましょう。
$ node app.js
listening on *:3000
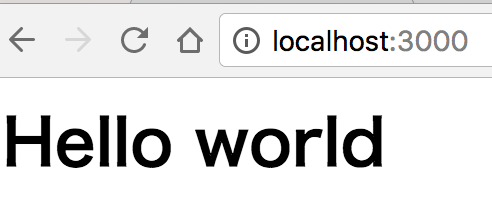
http://localhost:3000 にブラウザアクセスするとHello Worldと表示されます。
静的ファイルを表示させる
app.jsのHello Woldを表示させている部分を以下に書き換えます。
これでルートにアクセスがあった際に、index.htmlを表示させます。
・
・
・

app.get(`/`, (req, res) => {
  res.sendFile(__dirname + '/index.html');
});

・
・
・
app.jsと同じディレクトリ階層にindex.htmlを作成し、以下を記述します。
<!doctype html>
<html>
  <head>
    <title>Socket.IO chat</title>
    <style>
      * { margin: 0; padding: 0; box-sizing: border-box; }
      body { font: 13px Helvetica, Arial; }
      form { background: #000; padding: 3px; position: fixed; bottom: 0; width: 100%; }
      form input { border: 0; padding: 10px; width: 90%; margin-right: .5%; }
      form button { width: 9%; background: rgb(130, 224, 255); border: none; padding: 10px; }
      #messages { list-style-type: none; margin: 0; padding: 0; }
      #messages li { padding: 5px 10px; }
      #messages li:nth-child(odd) { background: #eee; }
    </style>
  </head>
  <body>
    <ul id="messages"></ul>
    <form action="">
      <input id="m" autocomplete="off" /><button>Send</button>
    </form>
  </body>
</html>
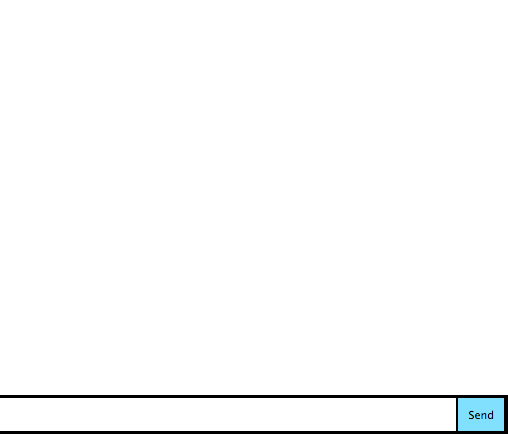
http://localhost:3000 にブラウザアクセスし、以下の画面が表示されればOKです。
socket.ioを導入する
- app.jsを編集
以下のように編集します。socket.ioの記述を追記している形です。
const app = require('express')();
const http = require('http').Server(app);
const io = require('socket.io')(http);
const PORT = process.env.PORT || 3000;

app.get(`/`, (req, res) => {
  res.sendFile(__dirname + '/index.html');
});

io.on('connection', (socket) => {
  console.log('a user connected');
});

http.listen(PORT, () => {
  console.log(`listening on *:${PORT}`);
});
- index.htmlを編集
以下のように編集します。こちらもsocket.ioの記述を追記している形です。
<!doctype html>
<html>
  <head>
    <title>Socket.IO chat</title>
    <style>
      * { margin: 0; padding: 0; box-sizing: border-box; }
      body { font: 13px Helvetica, Arial; }
      form { background: #000; padding: 3px; position: fixed; bottom: 0; width: 100%; }
      form input { border: 0; padding: 10px; width: 90%; margin-right: .5%; }
      form button { width: 9%; background: rgb(130, 224, 255); border: none; padding: 10px; }
      #messages { list-style-type: none; margin: 0; padding: 0; }
      #messages li { padding: 5px 10px; }
      #messages li:nth-child(odd) { background: #eee; }
    </style>
  </head>
  <body>
    <ul id="messages"></ul>
    <form action="">
      <input id="m" autocomplete="off" /><button>Send</button>
    </form>

    <script src="/socket.io/socket.io.js"></script>
    <script>
      var socket = io();
    </script>

  </body>
</html>
- 接続の確認
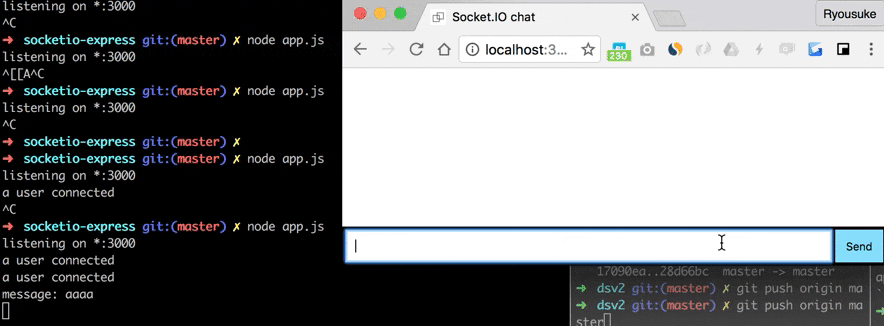
サーバーを起動させ、 ブラウザから http://localhost:3000 にアクセスします。
a user connectedの文字が表示されればsocekt.ioへの接続が成功しています。
$ node app.js
listening on *:3000
a user connected
メッセージの共有のロジックを書く(一方向)
- app.jsの編集
const app = require('express')();
const http = require('http').Server(app);
const io = require('socket.io')(http);
const PORT = process.env.PORT || 3000;

app.get(`/`, (req, res) => {
  res.sendFile(__dirname + '/index.html');
});

io.on('connection', (socket) => {
  console.log('a user connected');
  socket.on('chat message', (msg) => {
    console.log('message: ' + msg);
  });
});

http.listen(PORT, () => {
  console.log(`listening on *:${PORT}`);
});
- index.htmlを編集
ちなみにブラウザ側もES2015な書き方になっているのでIEなどでは試せないかもしれません。
新しさ重視でjQueryは3系にしてみました。
<!doctype html>
<html>
  <head>
    <title>Socket.IO chat</title>
    <style>
      * { margin: 0; padding: 0; box-sizing: border-box; }
      body { font: 13px Helvetica, Arial; }
      form { background: #000; padding: 3px; position: fixed; bottom: 0; width: 100%; }
      form input { border: 0; padding: 10px; width: 90%; margin-right: .5%; }
      form button { width: 9%; background: rgb(130, 224, 255); border: none; padding: 10px; }
      #messages { list-style-type: none; margin: 0; padding: 0; }
      #messages li { padding: 5px 10px; }
      #messages li:nth-child(odd) { background: #eee; }
    </style>
  </head>
  <body>
    <ul id="messages"></ul>
    <form action="">
      <input id="m" autocomplete="off" /><button>Send</button>
    </form>

    <script src="/socket.io/socket.io.js"></script>
    <script src="https://code.jquery.com/jquery-3.1.1.slim.js"   integrity="sha256-5i/mQ300M779N2OVDrl16lbohwXNUdzL/R2aVUXyXWA="   crossorigin="anonymous"></script>
    <script>
      const socket = io();
      $('form').submit(() => {
        socket.emit('chat message', $('#m').val());
        $('#m').val('');
        return false;
      });
    </script>

  </body>
</html>
チャット画面側から文字入力をするとNode.jsのコンソール側で表示されるのが確認できます。
双方向にメッセージをブロードキャストする
- app.jsを編集
io.emit('chat message', msg);を加えただけです。
io.emit()で接続しているクライアントに対してメッセージを送信できます。
const app = require('express')();
const http = require('http').Server(app);
const io = require('socket.io')(http);
const PORT = process.env.PORT || 3000;

app.get(`/`, (req, res) => {
  res.sendFile(__dirname + '/index.html');
});

io.on('connection', (socket) => {
  console.log('a user connected');
  socket.on('chat message', (msg) => {
    console.log('message: ' + msg);
    io.emit('chat message', msg);
  });
});

http.listen(PORT, () => {
  console.log(`listening on *:${PORT}`);
});
- index.htmlを編集
こちらは受け取ったapp.js側のio.emit()で発火されたイベントをsocket.on()で受け取ってDOMを追加しています。
<!doctype html>
<html>
  <head>
    <title>Socket.IO chat</title>
    <style>
      * { margin: 0; padding: 0; box-sizing: border-box; }
      body { font: 13px Helvetica, Arial; }
      form { background: #000; padding: 3px; position: fixed; bottom: 0; width: 100%; }
      form input { border: 0; padding: 10px; width: 90%; margin-right: .5%; }
      form button { width: 9%; background: rgb(130, 224, 255); border: none; padding: 10px; }
      #messages { list-style-type: none; margin: 0; padding: 0; }
      #messages li { padding: 5px 10px; }
      #messages li:nth-child(odd) { background: #eee; }
    </style>
  </head>
  <body>
    <ul id="messages"></ul>
    <form action="">
      <input id="m" autocomplete="off" /><button>Send</button>
    </form>

    <script src="/socket.io/socket.io.js"></script>
    <script src="https://code.jquery.com/jquery-3.1.1.slim.js"   integrity="sha256-5i/mQ300M779N2OVDrl16lbohwXNUdzL/R2aVUXyXWA="   crossorigin="anonymous"></script>
    <script>
        const socket = io();
        $('form').submit(() => {
            socket.emit('chat message', $('#m').val());
            $('#m').val('');
            return false;
        });
        socket.on('chat message', (msg) => {
            $('#messages').append($('<li>').text(msg));
        });
    </script>

  </body>
</html>
- 実行してみる
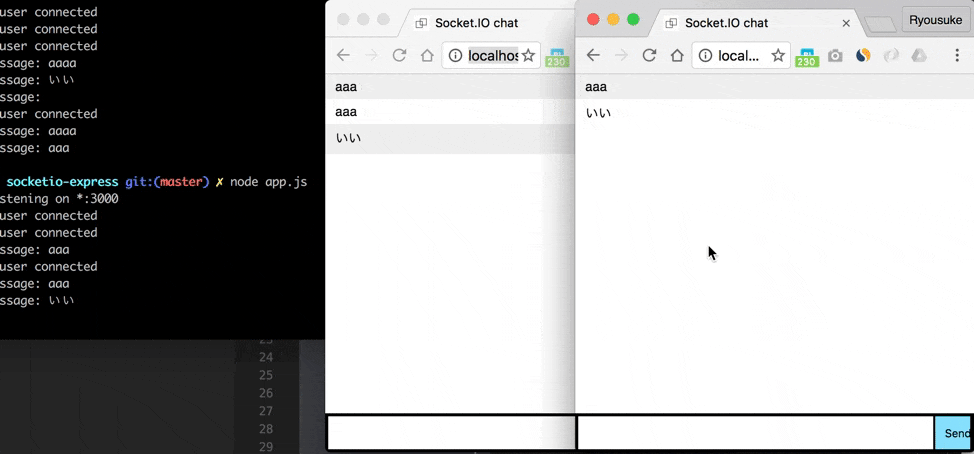
これでチャットが完成しました!
ここまでのソースコードをGitHubにおいておきます。
yarn.lockというファイルがありますがmizchiさんの記事にもあるようにバージョン固定させるものみたいです。
Azure Web Appsにのせてみる
Azure Web AppsはHerokuやGAEのようにアプリケーションをホスティングできるPaaSです。
無料でけっこう使えるので、手前味噌ですがとりあえずAWSを選ぶWeb制作者へ!「EC2でWebサーバーを立てる」をAzureでやってみたなども読んで登録してみましょう。
今回はCLI経由でのインタンス立ち上げをやってみます。
CLIからWeb Appsを立ち上げる
前回記事(AzureのCLIツールを使ってCoreOS/Docker上にWebサーバーを立ててみる。)を元にAzure CLIからログインしましょう。
ここでハマったのですが (m2wasabiさんありがとうございました。)
- Resource Group
- App Service Plan
を先に自分で作成しておく必要があります。
すでに作ってる人は飛ばしましょう。
Resouce Groupの作成
東日本にn0bisuke-testという名前のResouce Groupを作成します。
$ azure group create n0bisuke-test "Japan East"
App Service Planの作成
n0bisuke-testにKantoF1というApp Service Planを作成します。FreeプランのF1を指定します。
$ azure appserviceplan create n0bisuke-test KantoF1 "Japan East" F1
参考: Using Azure Resource Manager-Based XPlat CLI for Azure Web App
--tier: the desired pricing sku (The options are: F1 (Free). D1 (Shared). B1 (Basic Small), B2 (Basic Medium), and B3 (Basic Large). S1 (Standard Small), S2 (Standard Medium), and S3 (Standard Large). P1 (Premium Small), P2 (Premium Medium), and P3 (Premium Large).)
Web Appsのインスタンスを作成する
n0bisuke-chatという名前のインスタンスを作成します。
azure webapp createというコマンドで作成しますが、$ webapp create [options] <resource-group> <name> <location> <plan>という使い方になります。
$ azure webapp create n0bisuke-test n0bisuke-chat "Japan East" KantoF1
と、先ほどのn0bisuke-testとKantoF1を指定します。
info:    Executing command webapp create
                                                              + Creating webapp n0bisuke-chat
info:    Webapp n0bisuke-chat has been created
info:    webapp create command OK
無事にインスタンスが作成されました。
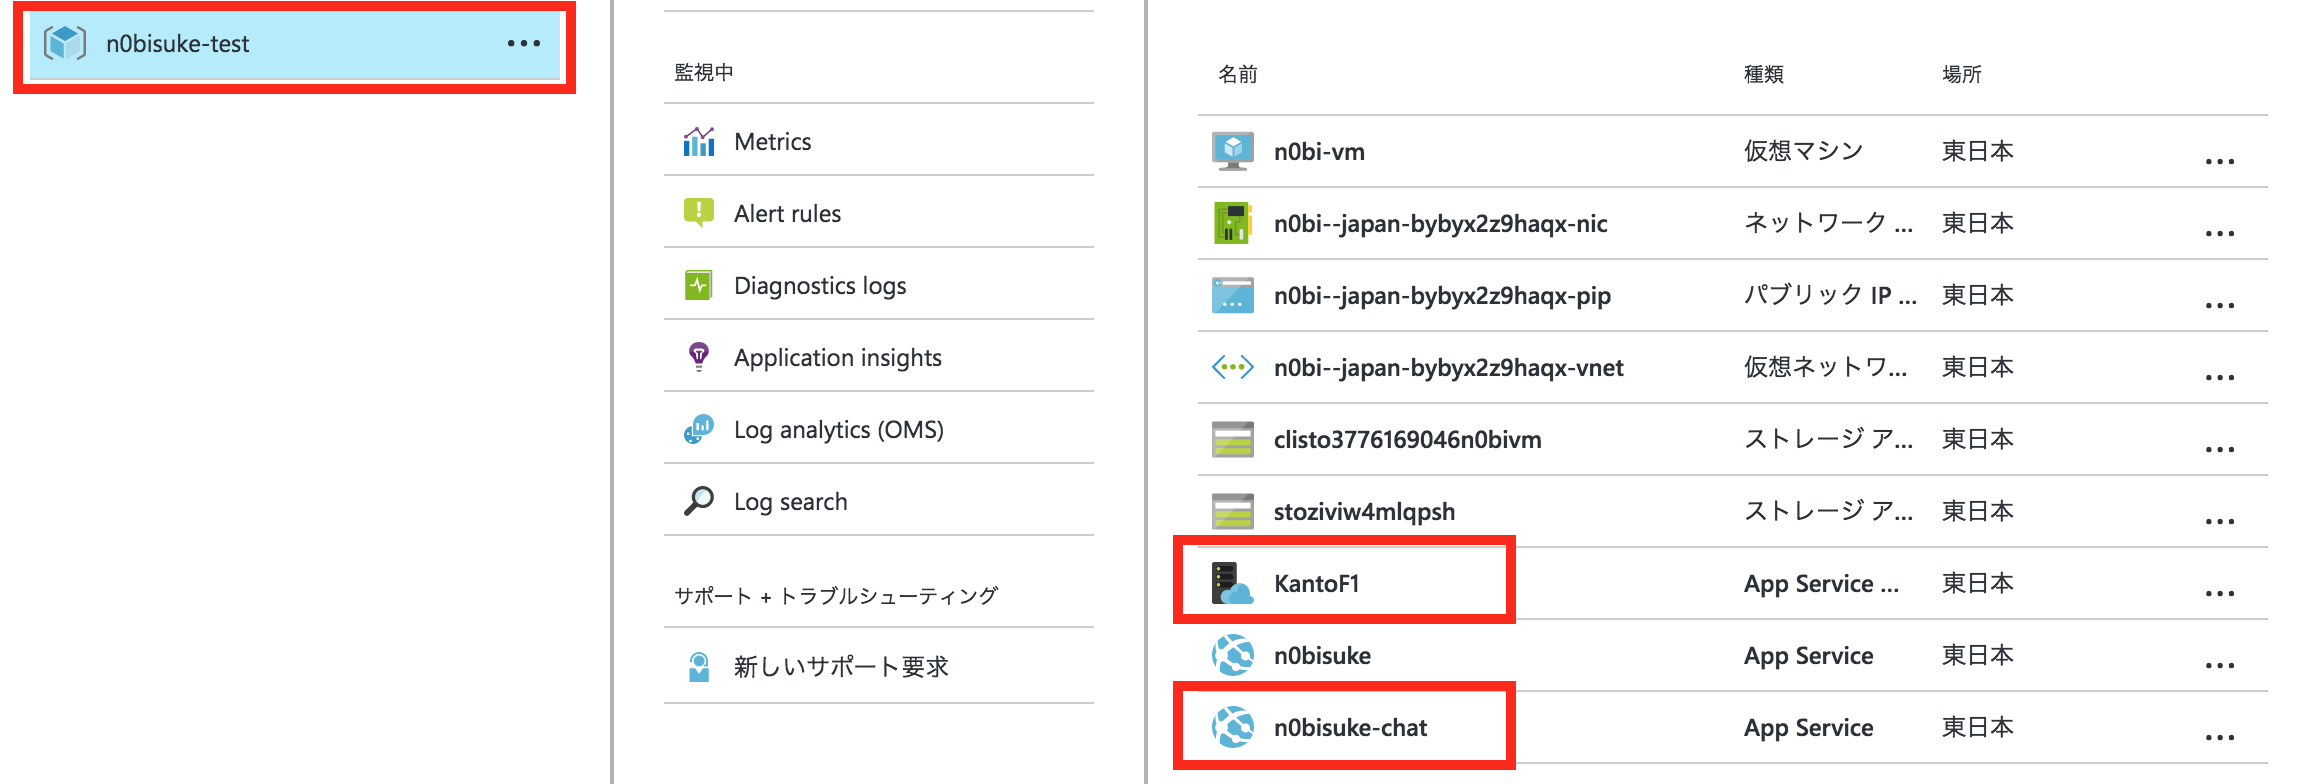
ブラウザから確認すると作成されていることが分かりますね。
azure webapp showというコマンドでも確認できます。
$ azure webapp show n0bisuke-test n0bisuke-chat
info:    Executing command webapp show
+ Getting webapp
data:
data:    Web App Name     : n0bisuke-chat
data:    Enabled          : true
data:    Status           : Running
data:    Last Modified    : 2016-10-07T03:49:06.730Z
data:    Location         : Japan East
data:    App Service Plan : KantoF1
data:
data:    Host Name
data:    -------------------------------
data:    n0bisuke-chat.azurewebsites.net
data:
info:    webapp show command OK
あとは、Azure Web AppsにGitHub経由でNode.jsアプリケーションをデプロイする仕組みを無料で作るを参照し、Node.jsアプリケーションをデプロイすればOKです。
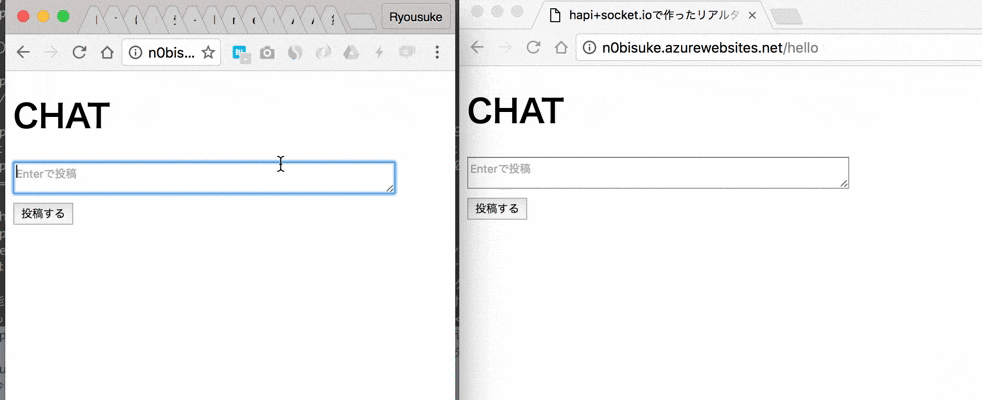
動いた!!
おまけ: ハマってたところ
Resouce Groupまでは分かってたのですが、App Service Planが全然分からず、こんな指定をしてて怒られてました。
ブラウザ側で作成する際にはResouce Groupは作るけどApp Service Planは作らなかったので見落としたのかと思います。
$ azure webapp create n0bisuke-test n0bisuke-chat japaneast F1
info:    Executing command webapp create
                                                              + Creating webapp chat
error:   {"Code":"NotFound","Message":"Cannot find ServerFarm with name F1.","Target":null,"Details":[{"Message":"Cannot find ServerFarm with name F1."},{"Code":"NotFound"},{"ErrorEntity":{"Code":"NotFound","Message":"Cannot find ServerFarm with name F1.","ExtendedCode":"51004","MessageTemplate":"Cannot find {0} with name {1}.","Parameters":["ServerFarm","F1"],"InnerErrors":null}}],"Innererror":null}
error:   Error information has been recorded to /Users/n0bisuke/.azure/azure.err
MSDNのフォーラムにも投稿してました笑
ということでApp Service Planは先に作成しましょうね。
まとめ
Express+Socket.ioで立ち上げたチャットアプリをWeb Appsにのせてみました。
前の投稿(AzureのCLIツールを使ってCoreOS/Docker上にWebサーバーを立ててみる。)もですがやはりCLI経由でいけると操作が早くて楽ですね。
あと、Socket.io久しぶりに触りましたけどやはり使い勝手がいいことを認識。