ASUS TinkerBoardの初期設定(日本語対応、フォント設定など)のメモ。TinkerOS_Debian 2.0.1版
概要
-
ASUS TinkerBoardの初期設定 TinkerOS_Debian 2.0.1版。(前回は、だいぶ前に書いたので..)
-
2.0.1 betaのあやしいとこ.
ディスプレイ:- 1.9で正常動作していたものが、動作しなくなったり、逆もあるらしい?
- (Known issue) ラズパイ公式タッチスクリーンが、動作しない => パッチあり(forum)。カーネルビルド必要
- ラズパイのカメラモジュール (OV5647)がサポートだが、V1.3は動かない。(Device treeの修正パッチがforumにあり?)
- イヤホンジャックから音でない??(HDMI経由のテレビから音声は出る。なんか設定いる??)
-
実は、直接のデスクトップ環境はあまり使ってなかったりするので、あまりトラぶってないのかも..(sshとかxrdp経由とか)
環境
- ASUS TinkerBoard
- OSイメージ :
=TinkerOS_Debian V2.0.1 (Beta version)
= 20170817-tinker-board-linaro-stretch-alip-v2.0.1.img.zip - microSD : 16GB (はやいSDかーどを使おう。読み書き50MB/secくらい出るやつ)
手順
- イメージを焼く
-
Etcherおすすめ。Win/Mac/Linux対応マルチプラットフォーム。(Win版しか使ったことないけど...)
アーカイブファイル直接指定で焼けるよ。
-
Etcherおすすめ。Win/Mac/Linux対応マルチプラットフォーム。(Win版しか使ったことないけど...)
- (お好みで) 要接続ケーブル ... USB-UARTケーブルなど.
-
UARTシリアルコンソール
splash plymouth.ignore-serial-consolesを削除して、tty1をttyS1,115200n8へ変更/boot/extlinux/extlinux.conf
-
変更前:
append earlyprintk quiet splash plymouth.ignore-serial-consoles console=tty1 root=/dev/mmcblk0p2 rw init=/sbin/init
変更後:
append earlyprintk quiet console=ttyS1,115200n8 root=/dev/mmcblk0p2 rw init=/sbin/init
    2. u-boot ブート時ウェイト時間変更 (5秒 -> 0秒)

        ```txt:UARTシリアル端末から行う。
# 現在値、確認
printenv bootdelay
# 0 秒に設定
setenv bootdelay 0
# 設定値保存
saveenv
# 設定値確認
printenv bootdelay
# 再起動
reset
0秒に設定しても、電源投入直後から、キーをたたいていれば、u-bootのコンソールに入れる.

	```txt:実行例
	-Boot SPL 2017.07-gf7b0e94 (Aug 17 2017 - 00:25:13)
	Returning to boot ROM...

	U-Boot 2017.07-gf7b0e94 (Aug 17 2017 - 00:25:13 +0800), Build: jenkins-rockchip-rk3288-tinker-board-debian-23

	Model: Tinker-RK3288
	DRAM:  2 GiB
	MMC:   dwmmc@ff0c0000: 1, dwmmc@ff0f0000: 0
	In:    serial
	Out:   serial
	Err:   serial
	Model: Tinker-RK3288
	Net:   eth0: ethernet@ff290000
	Hit any key to stop autoboot:  0
	=> # 現在値、確認
	=> printenv bootdelay
	bootdelay=5
	=> # 0 秒に設定
	=> setenv bootdelay 0
	=> # 設定値保存
	=> saveenv
	Saving Environment to MMC...
	Writing to MMC(1)... done
	=> # 設定値確認
	=> printenv bootdelay
	bootdelay=0
	=> # 再起動
	=> reset
	U-Boot SPL 2017.07-gf7b0e94 (Aug 17 2017 - 00:25:13)
	Returning to boot ROM...
	.
	.
	.
	```
-
電源 ON。
-
sshなどでログインする場合、
デフォルトユーザ: linaro / パスワード: linaro -
ターミナルを開く
左下のアイコンを押してメニューを開く > System Tools (システムツール) => LXTerminal
# メニューのとこのLXTerminalをドラッグして、デスクトップに出すと、ショートカットが作成される。 -
Wifi接続設定
Wifi接続=コマンドラインから、NetworkManager設定nmcli device wifi connect [SSID] password [PASSWORD]
=> 設定は、/etc/NetworkManager/system-connections/ にSSIDのファイル名で保存される.
```shell-session:実行例
linaro@linaro-alip:~$ sudo nmcli device wifi connect ore-no-wifi password mirunayo123
デバイス 'wlan0' が 'b84ec838-3399-45a1-9a59-bbe9d452b5f1' で正常にアクティベー トされました。

linaro@linaro-alip:~$ sudo ping 8.8.8.8
PING 8.8.8.8 (8.8.8.8) 56(84) bytes of data.
64 bytes from 8.8.8.8: icmp_seq=1 ttl=58 time=19.0 ms
64 bytes from 8.8.8.8: icmp_seq=2 ttl=58 time=12.8 ms
64 bytes from 8.8.8.8: icmp_seq=3 ttl=58 time=87.6 ms
64 bytes from 8.8.8.8: icmp_seq=4 ttl=58 time=15.1 ms
64 bytes from 8.8.8.8: icmp_seq=5 ttl=58 time=17.8 ms
^C
--- 8.8.8.8 ping statistics ---
5 packets transmitted, 5 received, 0% packet loss, time 4005ms
rtt min/avg/max/mdev = 12.890/30.501/87.617/28.637 ms
linaro@linaro-alip:~$ ls -l /etc/NetworkManager/system-connections
合計 4
-rw------- 1 root root 360  8月 29 18:44 ore-no-wifi
linaro@linaro-alip:~$
```
-
パッケージ更新&再起動
sudo sh -c 'apt update && apt upgrade -y && sync && sleep 5 && reboot'
6. `tinker-config`の導入

    ```bash:コピペ
wget https://raw.githubusercontent.com/mikerr/tinker-config/master/tinker-config
chmod +x ./tinker-config
sudo mv ./tinker-config /usr/local/bin
使用時は、`sudo tinker-config`にて。
- 起動時、コマンドライン環境 / デスクトップ環境 の選択
- ディスプレイ解像度設定
-  ...

などなどできる。
-
(お好みで) Rockchipのxserverに差し替え
(Rockchipで配布されているxserverだが、実は、xrdpばかり使っていて、よくわからない。)
wget https://github.com/rockchip-linux/rk-rootfs-build/raw/master/packages/armhf/xserver/xserver-xorg-core_1.19.3-1_armhf.deb
wget https://github.com/rockchip-linux/rk-rootfs-build/raw/master/packages/armhf/xserver/xserver-common_1.19.3-1_all.deb
sudo dpkg -i xserver*.deb
sudo apt install -f
sudo reboot
    2017年8月29日時点で、`apt update && apt upgrade`でインストールされるのは

    ```
    xserver-common    (2:1.19.2-1+deb9u1)
    xserver-xorg-core (2:1.19.2-1+deb9u1)
    ```


7. 各種設定
    1. タイムゾーン設定

        ```bash:コマンドラインで
        sudo dpkg-reconfigure tzdata
        ```
    2. `fake-hwclock`のインストール(お好みで)

        ```bash:コマンドラインで
        # fake-hwclock - 前回シャットダウン時刻が、起動時に設定される
        sudo apt install fake-hwclock -y
        ```
        RTC(リアルタイムクロック)がないため、起動時、2016年に戻ってしまう。それを比較的近い時間(前回シャットダウン時刻とか)に戻るようにする。ラズパイ(Raspbian)でも使われてるやつですね。
シャットダウン時(`/lib/systemd/system/fake-hwclock.service`)だけでなく、定期的に時刻データ(/etc/fake-hwclock.data)の保存もしてるらしいぞ(`/etc/cron.hourly/fake-hwclock`)

    3. ディスプレイの電源設定(ブラックアウト禁止)
		- 設定 > 電源管理 > [ディスプレイ] タブ<br>チェックをはずす: \[ \] ディスプレイの電源管理を行う
    4. 必要そうなパッケージのインストール

		```bash
		sudo apt install -y --install-recommends git byobu htop zenity
		```


8. 日本語環境
    1. ロケール設定 (`ja_JP.UTF-8`)

        ```
        sudo  dpkg-reconfigure locales
        ```
        1. チェックを入れる `[*] ja_JP.UTF-8 UTF-8` <br>(PgUp/PgDn/↑/↓などで移動、スペースでチェック、Tabで`<OK>`へ移動して、Enter)
        2. `ja_JP.UTF-8`を↑↓で選んで、Tabで`<OK>`へ移動して、Enter

    2. 日本語 フォント/日本語入力(`ibus-mozc`) など

        ```bash
# フォント
sudo apt install -y xfonts-intl-japanese*
# ibus-mozc
sudo apt install -y ibus-mozc --install-recommends
# Chromiumの国際化版?
sudo apt install -y chromium-l10n
# Firefox (お好みで)
# sudo apt install -y firefox-esr-l10n-ja
#
# 再起動
sudo reboot
3. 再起動後こんな画面になったかな?
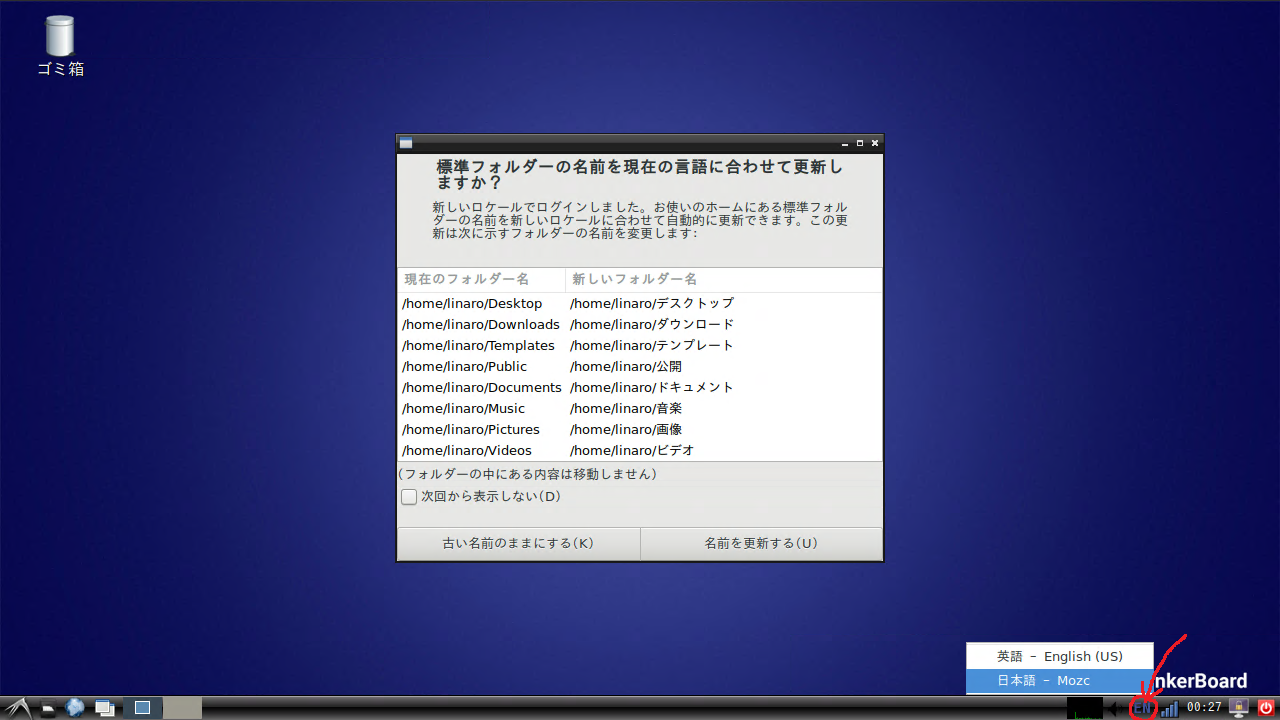
右下の EN というところで、Mozcが選べる
4. フォルダー名は..
コマンドラインを良く使う場合は、英語のまま (=> 古い名前のままにする)、GUIメインの方は、日本語に変更(=>名前を更新する)でいいんじゃないかな? 次回から表示しないにチェックを入れとこう。
5. Mozc設定 - us101キーボード配列を使用している方
    1. `/usr/share/ibus/component/mozc.xml` を変更する。
    やらないと、Mozc選択時は、日本語配列になってしまう。(SHIT+2 で、`"` か `@` のどっちがでるかで、わかるかと)

        ```bash:ターミナルにこぴぺ
sudo sed -i -e 's@default@us@' /usr/share/ibus/component/mozc.xml
いかが変更される
変更前: default
変更後: us
2. 全角半角キーの代わりを設定する
1. 右下のアイコンをクリックして、**日本語 - Mozc**を選択。
2. もう一回、クリックすると、メニューが増えてるはず。
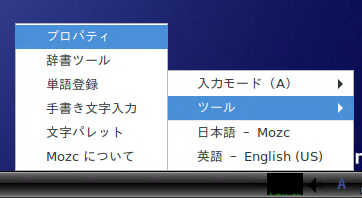
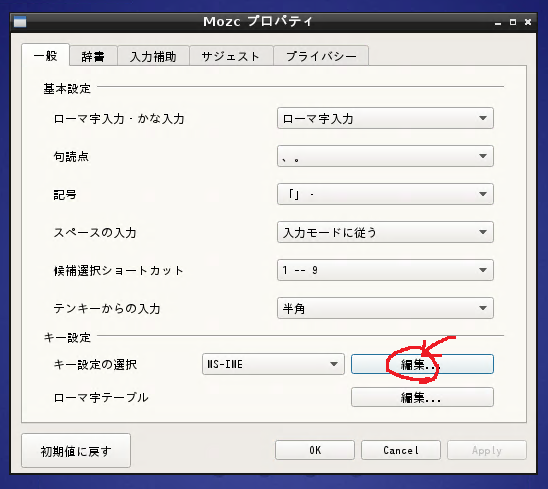
3. ツール > プロパティで、ダイアログを開いて、キー設定の選択の \[編集...\]をクリック
4. 入力キー の見出しをクリックして、並べ替えて、`Hankaku/Zenkaku`というのを見つけて、そこをトリプル(?)クリック(3回押す)。
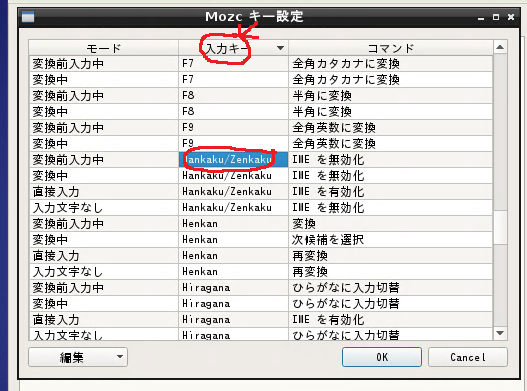
5. キー割り当てウインドウが出てくるので、Ctrl+Spaceとか、うまいキーを押して、\[OK\]
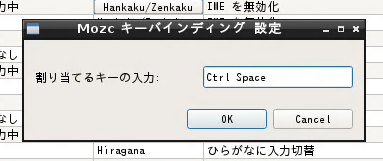
6. 以上を繰り返して、終わったら、OKをおしてもどる
3. `sudo reboot` # 再起動する。
10. TrueTypeフォントのインストール
`/usr/share/fonts/truetype/`フォルダへ、ttfファイルをコピーする。
```shell-session:実行例_RictyDiminishedFontのインストール
linaro@linaro-alip:~$ git clone https://github.com/edihbrandon/RictyDiminished.git
Cloning into 'RictyDiminished'...
remote: Counting objects: 25, done.
remote: Total 25 (delta 0), reused 0 (delta 0), pack-reused 25
Unpacking objects: 100% (25/25), done.
linaro@linaro-alip:~$ sudo cp -v RictyDiminished/*.ttf /usr/share/fonts/truetype/
'RictyDiminished/RictyDiminished-Bold.ttf' -> '/usr/share/fonts/truetype/RictyDiminished-Bold.ttf'
'RictyDiminished/RictyDiminished-BoldOblique.ttf' -> '/usr/share/fonts/truetype/RictyDiminished-BoldOblique.ttf'
'RictyDiminished/RictyDiminished-Oblique.ttf' -> '/usr/share/fonts/truetype/RictyDiminished-Oblique.ttf'
'RictyDiminished/RictyDiminished-Regular.ttf' -> '/usr/share/fonts/truetype/RictyDiminished-Regular.ttf'
'RictyDiminished/RictyDiminishedDiscord-Bold.ttf' -> '/usr/share/fonts/truetype/RictyDiminishedDiscord-Bold.ttf'
'RictyDiminished/RictyDiminishedDiscord-BoldOblique.ttf' -> '/usr/share/fonts/truetype/RictyDiminishedDiscord-BoldOblique.ttf'
'RictyDiminished/RictyDiminishedDiscord-Oblique.ttf' -> '/usr/share/fonts/truetype/RictyDiminishedDiscord-Oblique.ttf'
'RictyDiminished/RictyDiminishedDiscord-Regular.ttf' -> '/usr/share/fonts/truetype/RictyDiminishedDiscord-Regular.ttf'
linaro@linaro-alip:~$
```
- フォント設定で出てくる<br>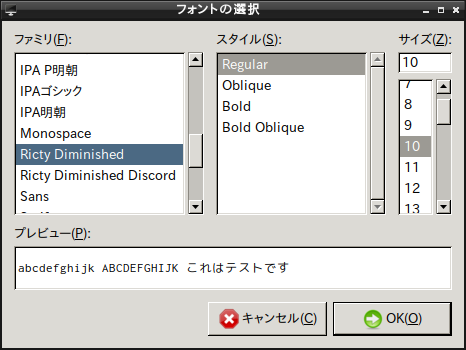
11. フォント設定
フォント設定後は、一度、**再起動**すると、反映される。
1. 設定 > Openbox Configuration Manager > [概観]
2. 設定 > ルックアンドフィールを設定します > [ウィジェット] タブ
3. 設定 > デスクトップの設定 > [概観] タブ
4. Chromium
1. Chromiumを開く。
2. 設定 > フォントをカスタマイズ >
1. 標準フォント : IPA Pゴシック
2. Serifフォント : IPA P明朝
3. Sans Serifフォント : IPA Pゴシック
4. 固定幅フォント : IPA ゴシック
5. (お好みで) フォントの詳細設定 > 右のボタンを押して、Chromeウェブサイトへ移動
1. 拡張機能: Advanced Font Setting で、 \[+ CHROMEに追加\]を押して、\[拡張機能を追加\] する
2. 右上にアイコンが出るので、クリックして、オプション を選択
3. Script : \[Japanese\]にして、それぞれ、うまいフォントを入れていく。
4. \[Apply setting\]を押して、設定反映させる。
## トラブルシュート
1. PulseAudio, 音量調節 が動かない?
```bash:削除して、再インストールしてみる
sudo apt autoremove -y --purge pulseaudio
sudo apt install -y --install-recommends pulseaudio
関連リンク
- xrdp (Remote Desktopサーバ)
- ラズパイカメラモジュール V2.1 (IMX219)
- SD読み書き速度
その他
- TODO:
- もうちょいスクショ?
- Bluetooth周り?
- RTCモジュール(DS3221)を使うネタ。
- 萌え化 ?!?