サーバレスアーキテクチャ/Serverless Frameworkとは
Serverless Frameworkは、その名の通り、AWS LambdaとAWS API Gatewayを利用したサーバレスなアプリケーションを構築するためのツールです。
サーバレスアーキテクチャについてはこちらが詳しいですが、極めて雑に表現すると「コンテナを獲得したことにより起動のオーバヘッドが小さくなったCGIを組み合わせてアプリを構築する」という感じでしょうか。(マサカリが飛んでくる様子が目に浮かびます)
このようなアーキテクチャは、AWS LambdaとAWS API Gatewayを組み合わせることによって実現可能ですが、生のLambdaとAPI Gatewayだけで大量のfunctionを作成、管理するのはかなり大変です。
そこで、その辺を手軽に操作できるようにするためにServerless Framework, Apex, fluctなどのツールが誕生しました。
ですので、Serverless FrameworkもFrameworkとは銘打っていますが、実際のところはLambdaとAPI Gatewayを利用したfunction/endpointの作成、デプロイ、管理を楽にするためのツールであり、その気になればいつでも捨てることができます。
また、Serverless FrameworkリポジトリのDescriptionには以下のように書かれています。
Build web, mobile and IoT applications with serverless architectures using AWS Lambda, Azure Functions, Google CloudFunctions & more!
ということで、現在はAWSにしか対応していませんが、最終的にはAWS、Azure、GCPへの統一的なインタフェースを提供することを目指しているようです。
Serverless Frameworkについては、既に素晴らしい日本語の記事がいくつかありますし、serverless自体の説明ではないけど自分も書いているのですが、2016年の3月にリリースされたversion 0.5で破壊的な変更が行われたので、一部の記述が古くなっています。
この記事では、現時点の最新版(v0.5.5)でのプロジェクトの作成、ローカルでの実行、デプロイなどについて解説します。
install
nodeとnpmは導入済みとします。
$ npm install -g serverless
npmを使ったことがあればおなじみの操作ですね。
AWS Profileの設定
serverlessではAWSのリソースをいろいろ使うため、事前に設定が必要です。
具体的には~/.aws/credentialsが正しく置かれている必要があります。
設定をしていない方はこちらなどを参考にして、credentialsを設定してください。
Attachするポリシーは、とりあえずPowerUserAccessにしておくのがオススメです。
(あくまでテスト用です。超強力なポリシーなので、本番環境では適切なものに変更してくださいね!)
projectの作成
serverlessではprojectとfunctionという二つの概念があり、一つのprojectは複数のfunctionを持つことができます。
ではまず、serverless projectを作りましょう。
$ serverless project create
そうするとserverlessのロゴが出てきていろいろ聞かれます。
自分に合った選択肢を選んでいきましょう。
よくわからない方は、とりあえず以下の通りに答えておけば良いです。
 _______                             __
|   _   .-----.----.--.--.-----.----|  .-----.-----.-----.
|   |___|  -__|   _|  |  |  -__|   _|  |  -__|__ --|__ --|
|____   |_____|__|  \___/|_____|__| |__|_____|_____|_____|
|   |   |             The Serverless Application Framework
|       |                           serverless.com, v0.5.5
`-------'

Serverless: Initializing Serverless Project...
Serverless: Enter a name for this project:  (serverless-ryktwz) serverless-first-test
Serverless: Enter a new stage name for this project:  (dev)
Serverless: For the "dev" stage, do you want to use an existing Amazon Web Services profile or create a new one?
  > Existing Profile
    Create A New Profile
Serverless: Select a profile for your project:
  > default
Serverless: Creating stage "dev"...
Serverless: Select a new region for your stage:
    us-east-1
    us-west-2
    eu-west-1
    eu-central-1
  > ap-northeast-1
Serverless: Creating region "ap-northeast-1" in stage "dev"...
Serverless: Deploying resources to stage "dev" in region "ap-northeast-1" via Cloudformation (~3 minutes)...
Serverless: Successfully deployed "dev" resources to "ap-northeast-1"
Serverless: Successfully created region "ap-northeast-1" within stage "dev"
Serverless: Successfully created stage "dev"
Serverless: Successfully initialized project "serverless-first-test"
- 最初に聞かれるproject nameは好きな名前にしてください。ここではserverless-first-testにしています。
- 二つ目の
stage nameというのは開発環境、テスト環境、本番環境などを分離するための仕組みです。ここではとりあえずデフォルトのdevにしておけば良いでしょう。 - 三つ目は、AWS profileについてです。Existing Profileを選択すると、~/.aws/credentialsの内容を使います。
- regionは、AWSを使っている方にはおなじみですが、サーバの場所を指定するものです。
ap-northeast-1(東京)だけはAPI Gatewayの料金がちょっと高いので、お財布と相談しながら
選んでください。(テストで動かす分にはほぼ誤差の範囲ですが)
以上を選択し終えると、serverless projectが生成されます。
(serverless-first-testの部分は、設定したproject nameに置き換えてください)
$ cd serverless-first-test
$ tree .

├── _meta
│   ├── resources
│   │   └── s-resources-cf-dev-useast1.json
│   └── variables
│       ├── s-variables-common.json
│       ├── s-variables-dev-useast1.json
│       └── s-variables-dev.json
├── admin.env
├── package.json
├── s-project.json
└── s-resources-cf.json
project createで生成されたファイルの確認
生成されたファイルはそれぞれ以下の役割を持っています。
| name | 内容 |
|---|---|
| _meta/resources | LambdaやAPI Gatewayを構築するためのCloudFormation用jsonファイルがStageとRegionごとに置かれます。 |
| _meta/variables | 現在のregionなどを参照するための仕組みであるvariablesを設定するjsonファイルが置かれます。 |
| admin.env | aws profileに関する情報を管理します。 |
| package.json | npmが利用するファイルで、projectが依存するライブラリなどの情報を管理します。 |
| s-project.json | project全体の設定を記述します |
| s-resources-cf.json | StageとRegionごとに生成されるCloudFormation用jsonファイル(_meta/resources以下のファイル)のテンプレートです |
functionの作成
この状態ではまだfunctionを一つも定義していないので、何もできません。
ではfunctionを作ってみましょう。
serverless v0.5以前はmoduleやcomponentなどの概念がありましたが、v0.5ではその辺が全部なくなって、シンプルにfunctionをネストさせていくようになりました。
projectに一つだけfunctionを作る場合は、以下のようにprojet直下にいきなりfunctionを適当に作れば良いです。
$ serverless function create somefunction
しかし、同一projectが複数のfunctionを持つ場合は、functionsというディレクトリ以下に作成していくことが推奨されているので、今回は以下のコマンドを実行します。
$ serverless function create functions/function1
そうすると、projectを作った時と同じようにいろいろ聞かれます。
Serverless: Please, select a runtime for this new Function
  > nodejs4.3
    python2.7
    nodejs (v0.10, soon to be deprecated)
Serverless: For this new Function, would you like to create an Endpoint, Event, or just the Function?
  > Create Endpoint
    Create Event
    Just the Function...
Serverless: Successfully created function: "functions/function1"
- runtimeは見たとおりです。私はpythonが書けないのでnodejs一択です。
- 間違ってもnodejs v0.10とかいう前時代の遺産を選んではいけません。
- AWS Lambda自体はJavaも対応していますが、v0.5.5の時点ではseverlessが対応していません。
- 二つ目の質問では、functionのタイプを決定します。今回はendpointを選択します。
| type | 意味 |
|---|---|
| endpoint | httpsのエンドポイントが一緒に作成されます。 |
| event | kinesis streamやS3、Lambdaのschedule等のイベントをトリガーに発火するfunctionを作ります。 |
| Just the Function | AWS Lambdaのfunctionのみが作成されます。 |
これでfunctionsディレクトリ以下にfunction1というfunctionができました。(ややこしい)
ディレクトリ構造は以下のようになっていると思います。
$ tree .
.
├── _meta
│   ├── resources
│   │   └── s-resources-cf-dev-apnortheast1.json
│   └── variables
│       ├── s-variables-common.json
│       ├── s-variables-dev-apnortheast1.json
│       └── s-variables-dev.json
├── admin.env
├── functions
│   └── function1
│       ├── event.json
│       ├── handler.js
│       └── s-function.json
├── package.json
├── s-project.json
└── s-resources-cf.json
ローカルで実行してみる
functionのディレクトリでserverless function runを実行すると、ローカルで実行することができます。
何はともあれ、さっき作ったfunction1を動かしてみましょう。
$ cd functions/function1
$ serverless function run
実行結果
Serverless: Running function1...
Serverless: -----------------
Serverless: Success! - This Response Was Returned:
Serverless: {
    "message": "Go Serverless! Your Lambda function executed successfully!"
}
なんか動いてそうな感じです!
functionディレクトリの中身を見てみる
function1以下に生成されたファイルは、それぞれ以下の役割を持っています。
| name | 内容 |
|---|---|
| event.json | ローカル実行する際のeventを記述します |
| handler.js | Lambdaで実行されるスクリプトです |
| s-function.json | functionに関する様々な設定を記述します |
s-function.jsonにはLambdaやAPI Gatewayの様々な設定をすることができるのですが、そのパラメータはあまりに多く、ここで説明するには余白が足りないので割愛します。
とりあえず、functionの本体であるhandler.jsを見てみましょう。
'use strict';

module.exports.handler = function(event, context, cb) {
  return cb(null, {
    message: 'Go Serverless! Your Lambda function executed successfully!'
  });
};
さっき表示されたメッセージがありますね。
この辺の書き方はserverlessではなく、AWS Lambdaのお作法に則ったものです。
それぞれの引数は以下を表しています(日本語のドキュメントは少し古いので英語版を見ましょう)
| 引数 | 内容 |
|---|---|
| event | functionに渡すeventデータが格納されます |
| context | 現在のruntimeに関する情報が格納されます |
| cb (option) | functionを終了させる際に呼ぶcallback関数です。(nodejs v0.10では利用できません) |
試しにhandler.jsを変更して、eventとcontextの内容を見てみましょう。
'use strict';

module.exports.handler = function(event, context, cb) {
  console.log("event:", event);
  console.log("context:", context);

  return cb(null, {
    message: 'Go Serverless! Your Lambda function executed successfully!'
  });
};
$ serverless function run
実行結果
Serverless: Running function1...
event: {}
context: { awsRequestId: 'adb981df-f79d-7730-9abf-d8dc811ad0d5',
  invokeid: 'adb981df-f79d-7730-9abf-d8dc811ad0d5',
  (中略)
  getRemainingTimeInMillis: [Function] }
Serverless: -----------------
Serverless: Success! - This Response Was Returned:
Serverless: {
    "message": "Go Serverless! Your Lambda function executed successfully!"
}
contextには、AWS Lambdaに関する情報が含まれていることがわかります。(実際は、もっと表示されますが省略しています)
実行時に何も渡していないのでeventは空のオブジェクトですが、例えばendpointのfunctionだと、postされた時のbodyとかgetパラメータがここに含まれます。
とはいえ、ローカルでの実行時に何も渡せないと辛すぎるので、event.jsonというものが用意されています。
例えばevent.jsonを以下のように変更して、再度functionをローカル実行してみます。
{"hoge": "fuga"}
$ serverless function run
そうすると実行結果は以下のようになります。
Serverless: Running function1...
event: { hoge: 'fuga' }
(contextは省略)
Serverless: -----------------
Serverless: Success! - This Response Was Returned:
Serverless: {
    "message": "Go Serverless! Your Lambda function executed successfully!"
}
なるほど。
handler.jsのcallbackについて
handler.jsの三つ目の引数であるcallbackへは、以下のように値を渡します。
callback(Error error, Object result);
すなわち、処理中にErrorが発生した場合はerror内容を表すオブジェクトを一つ目の引数に渡します。この時、二つ目以降の引数は無視されます。
もし処理が正常に終了した場合は、一つ目の引数はnull、二つ目の引数には、結果を表すオブジェクトを渡します。
callbackを省略した場合には、暗黙的にcallback(null)が呼ばれます。
Deploy
ではfunctionをAWSへデプロイしてみましょう。
serverlessにはお手軽にデプロイを行うためのserverless dash deployというコマンドがあります。
$ serverless dash deploy
実行すると例によっていろいろ聞かれます。
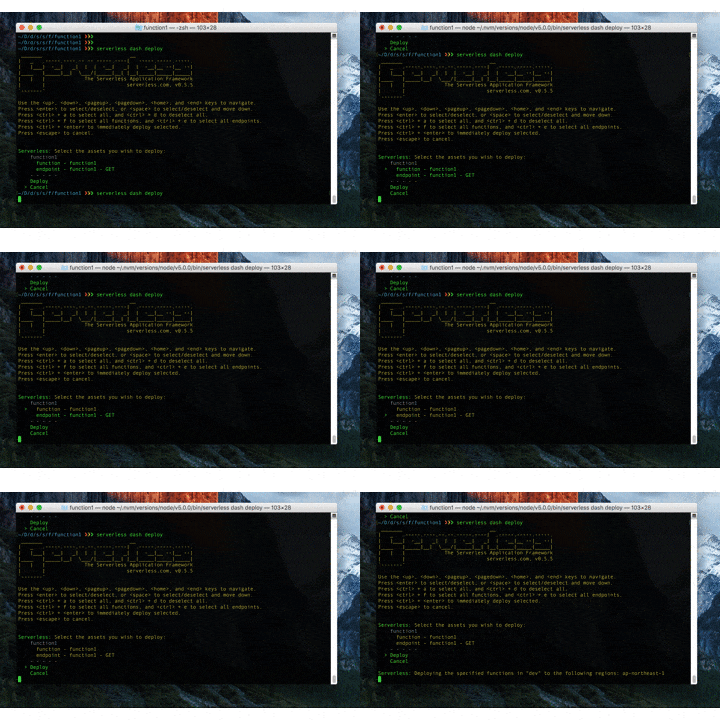
今回はfunction1の、実行するfunction自体とfunctionのendpointの二つをデプロイする必要があります。
デプロイしたいものにカーソルを合わせてエンターキーを押すと、デプロイ対象の行が緑から黄色に変わります。
function -function1とendpoint -function1 -GETを選択して、Deployを押しましょう。
 _______                             __
|   _   .-----.----.--.--.-----.----|  .-----.-----.-----.
|   |___|  -__|   _|  |  |  -__|   _|  |  -__|__ --|__ --|
|____   |_____|__|  \___/|_____|__| |__|_____|_____|_____|
|   |   |             The Serverless Application Framework
|       |                           serverless.com, v0.5.5
`-------'

Use the <up>, <down>, <pageup>, <pagedown>, <home>, and <end> keys to navigate.
Press <enter> to select/deselect, or <space> to select/deselect and move down.
Press <ctrl> + a to select all, and <ctrl> + d to deselect all.
Press <ctrl> + f to select all functions, and <ctrl> + e to select all endpoints.
Press <ctrl> + <enter> to immediately deploy selected.
Press <escape> to cancel.


Serverless: Select the assets you wish to deploy:
    function1
      function - function1
      endpoint - function1 - GET
    - - - - -
  > Deploy
    Cancel
そうすると以下のようなメッセージが表示されます。
Serverless: Deploying the specified functions in "dev" to the following regions: ap-northeast-1
Serverless: ------------------------
Serverless: Successfully deployed the following functions in "dev" to the following regions:
Serverless: ap-northeast-1 ------------------------
Serverless:   function1 (serverless-first-test-function1): arn:aws:lambda:ap-northeast-1:000000000000:function:serverless-first-test-function1:dev

Serverless: Deploying endpoints in "dev" to the following regions: ap-northeast-1
Serverless: Successfully deployed endpoints in "dev" to the following regions:
Serverless: ap-northeast-1 ------------------------
Serverless:   GET - function1 - https://xxxxxxxxxx.execute-api.ap-northeast-1.amazonaws.com/dev/function1
一番下のURLが、deployされたendpointです。(xxxの部分は人によって異なります)
では叩いてみましょう。
$ curl https://xxxxxxxxxx.execute-api.ap-northeast-1.amazonaws.com/dev/function1
実行結果
{"message":"Go Serverless! Your Lambda function executed successfully!"}%
ちゃんとデプロイされてます。
console.logの出力先
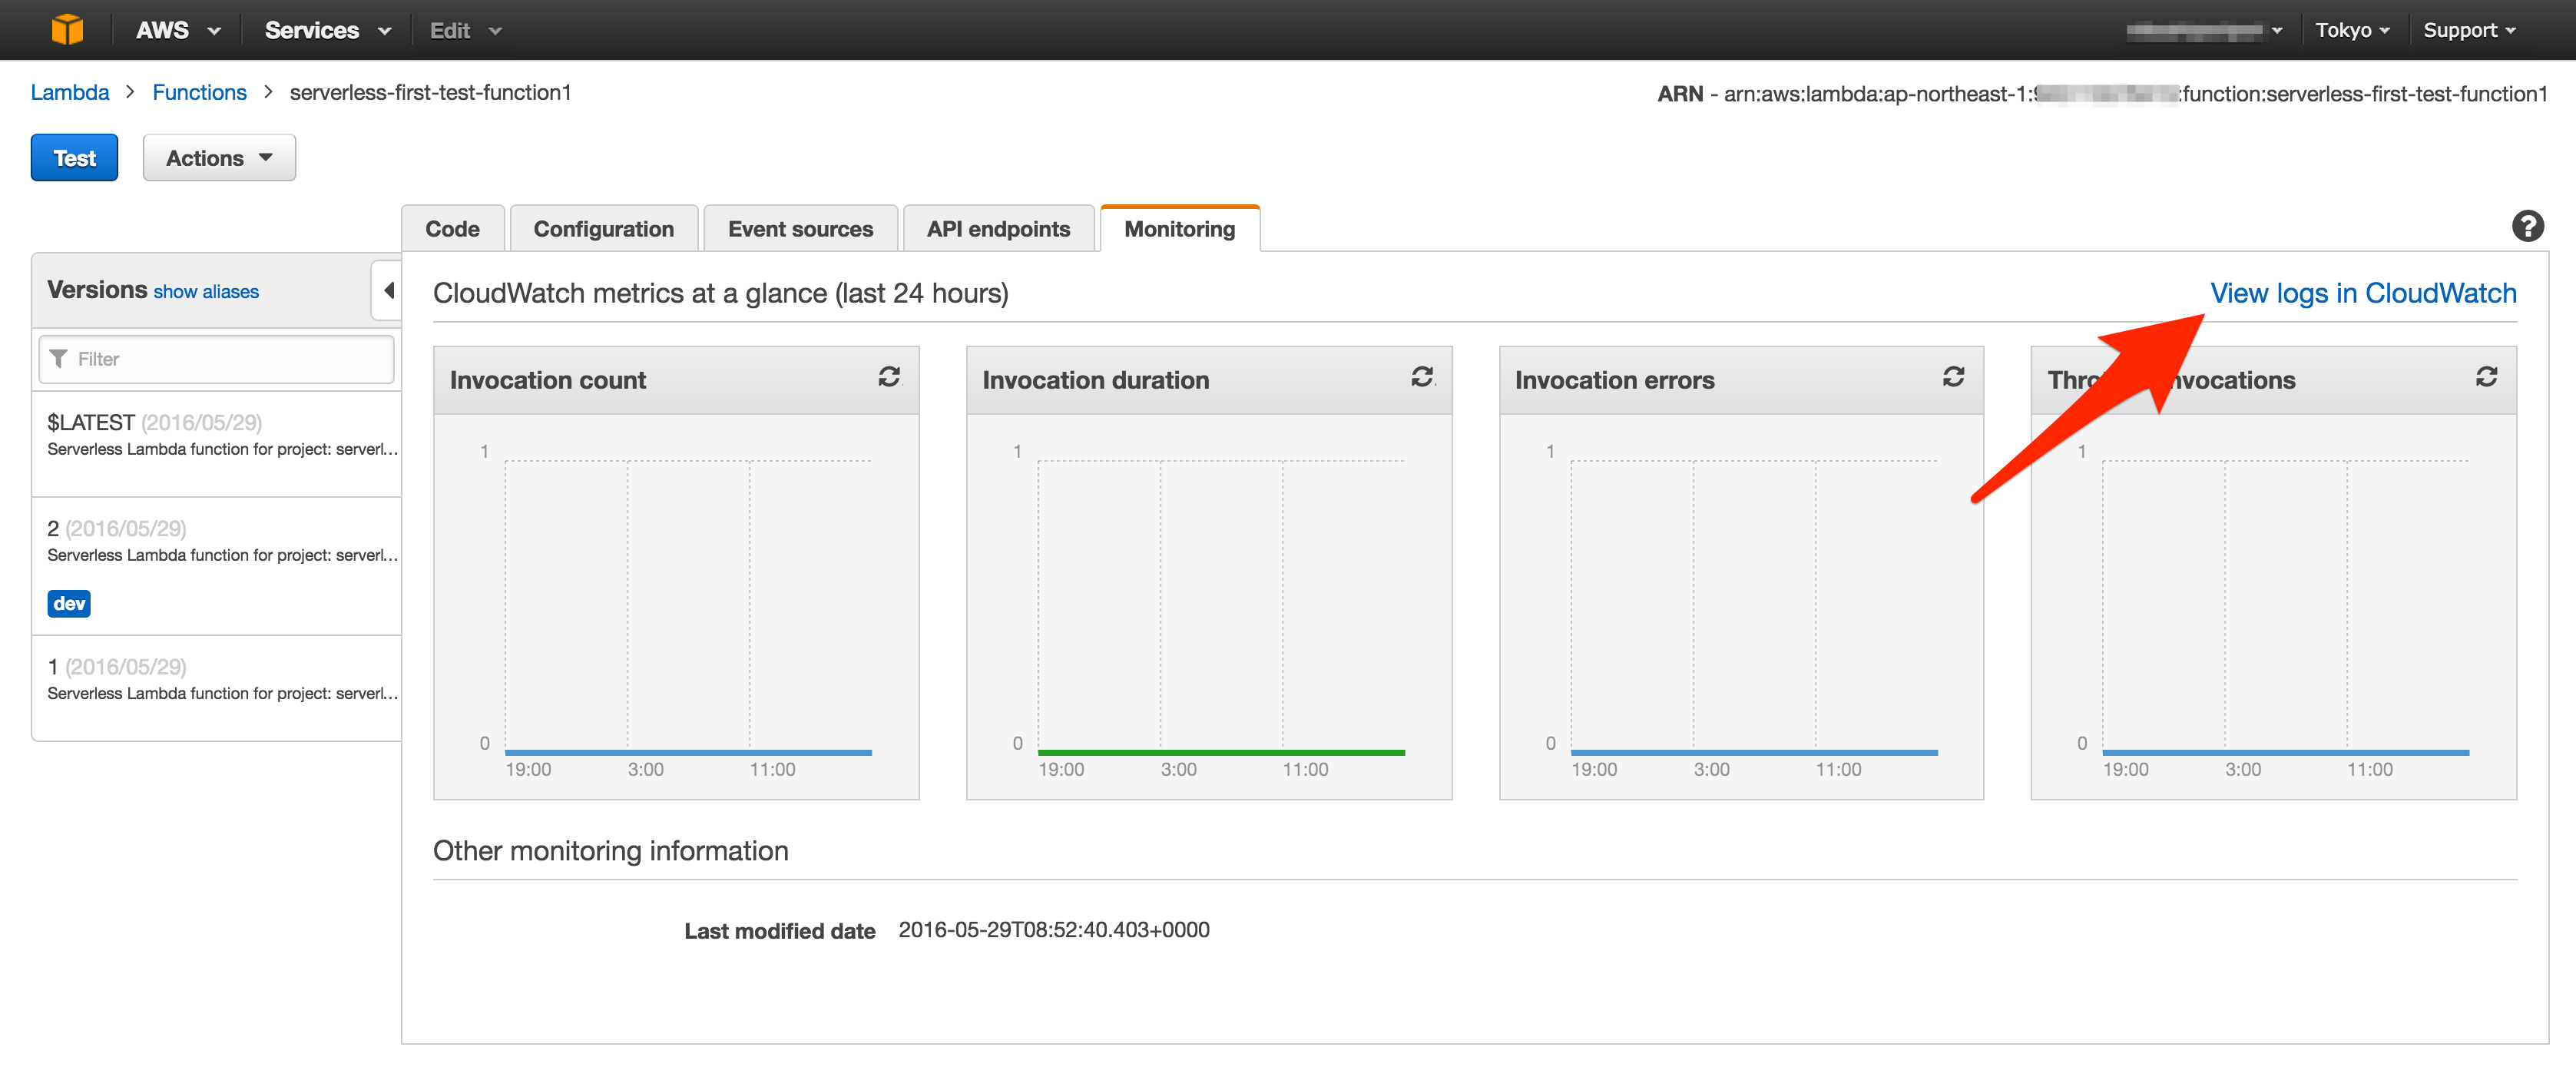
これもserverlessではなくLambdaの話なのですが、Lambda上でのconsole.logの出力先はCloudWatchになります。
ログを確認するには、AWS ConsoleからLambdaを開き、対象のfunctionを選択します。
今回だとserverless-first-test-function1ですね。
MonitoringタブのView logs in CloudWatchを選択します。
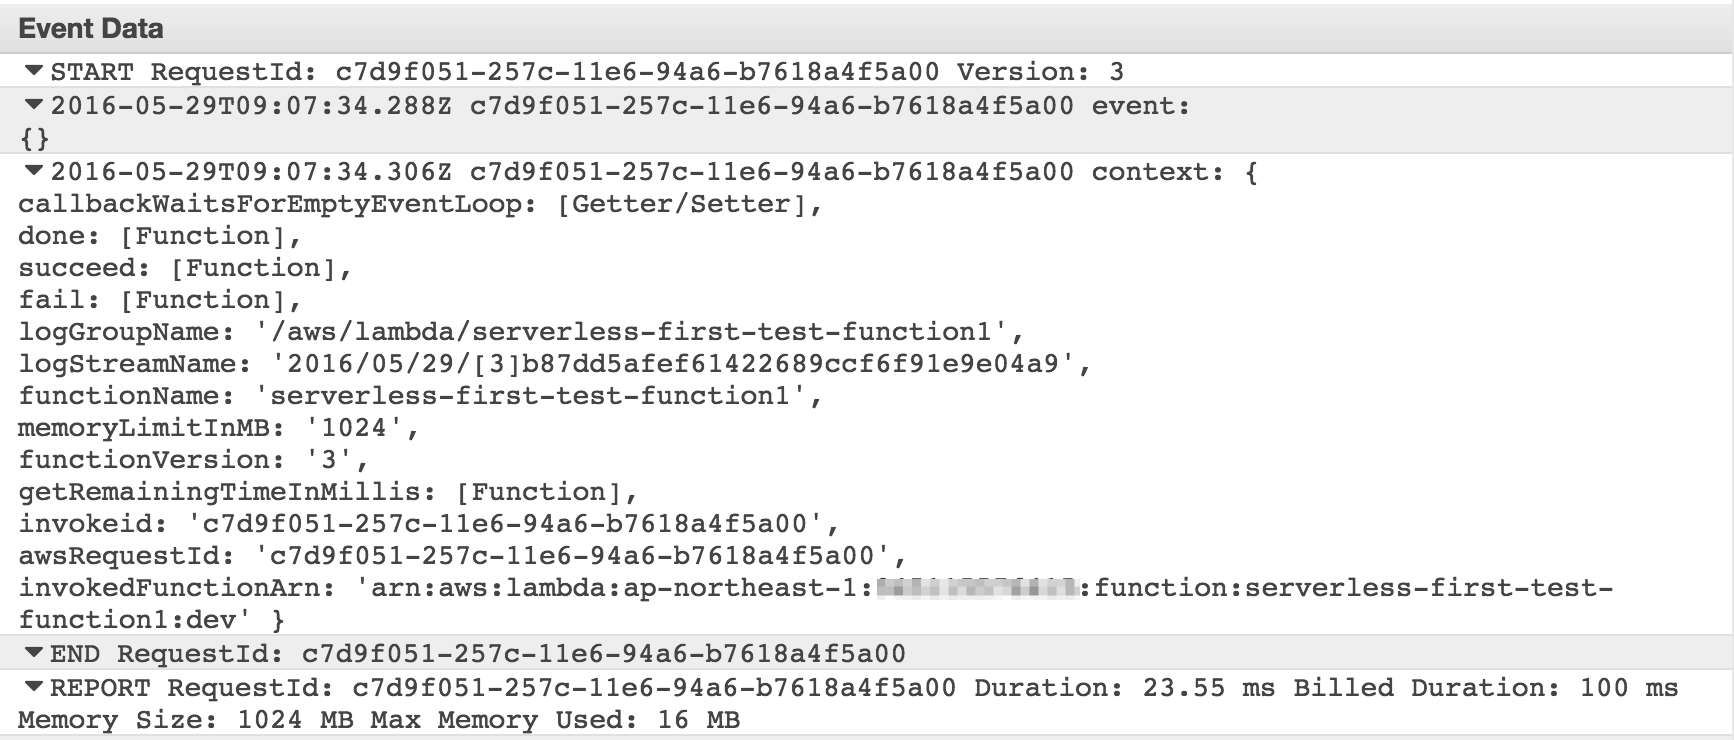
するとLog Streamsの一覧が表示されるので、見たいログを選択します。
こんな感じで、eventとcontextの内容が表示されているのがわかります。
GETリクエストのmapping
これでgetパラメータを渡すとhandler.jsのeventオブジェクトに渡されるかと思いきや、渡せません。
これは、getパラメータとeventとの対応が定義されていないからです。
変更するには、まずs-templates.jsonをproject直下に以下の内容で作成します。
{
  "apiGatewayRequestTemplate": {
    "application/json": {
      "queryParams" : "$input.params().querystring"
    }
  }
}
queryParamsや$inputなどは、AWS API Gatewayの用語です。
この記述を追加することにより、getパラメータをeventオブジェクトに渡すことができます。
次に、このtemplateファイルをfunction1/s-function.jsonから読み込みます。
requestTemplatesの項目を以下のように変更してください。
{
	(省略)
	"endpoints":[
		(省略)
		"requestTemplates": "$${apiGatewayRequestTemplate}",
		(省略)
	]
	(省略)
}
ここでは公式のドキュメントに沿ってTemplateという仕組みを利用しています。
これは、s-templates.jsonで定義した内容を$${}という書式で参照できるというものです。
長くなるので詳しくは書きませんが、大量のfunctionを定義する際にはお世話になりそうですね。
もちろん、requestTemplatesのvalueに直接templateの内容を記述しても結果は同じです。
さて、これでgetパラメータがeventに渡されるようになったはずです。
もう一度デプロイして、挙動を確かめてみましょう。
$ serverless dash deploy
(中略)
$ curl https://xxxxxxxxxx.execute-api.ap-northeast-1.amazonaws.com/dev/function1?hoge=fuga
CloudWatchのログを見てみます。
eventにgetパラメータが渡されています!
まとめ
この記事では簡単なfunctionの作成、デプロイを行い、挙動を確認しました。
難しくてよくわからないなーという方はAWS LambdaやAWS API Gatewayのドキュメントを先に読んでみるとよいかもです。覚えることが結構多くて、私もまだよくわかっていません。
今回は基本的な部分のみ解説しましたが、Serverless Frameworkにはtemplatesやvariable、stage, pluginなど他にも色々な概念がありますので、その辺はいずれまた記事を書ければと思います。
皆さんも是非Serverless Framework触ってみてください!


