HoloLensで始めるCognitive Services(Emotion APIサンプル編)と
HoloLensで始めるCognitive Services(Computer Vision APIサンプル編)で
CognitiveServicesの基礎を確認しました。
今回はCognitive ServicesのTranslator Text APIを使用して、
英語の文字列を日本語に変換してみましょう!
この流れを一度押さえておけば、日本語から英語でも英語からスペイン語でも
Translator Text APIがサポートしている言語であれば好きなように変換できます!
Translator Text APIとは
変換したい文字列を送信すると、Azure側で変換して返してくれる
Cognitive Servicesのサブスクリプションです。
詳しくは下記をご参照ください。
https://azure.microsoft.com/ja-jp/services/cognitive-services/translator-text-api/
環境
OS:Windows 10 CreatersUpdate
Unity:5.6.0f3
VisualStudio 2017
完成イメージ
https://t.co/ouIMeHZuir
— morio@6/25~米国 (@morio36) 2017年6月21日
に手を加えて元素記号の解説文をMicrosoft Translator Text APIで日本語化した結果。 pic.twitter.com/T2lfb7dKAO
流れ
0.事前準備
1.MRDesignLabs_Unityを確認
2.翻訳処理を追加
3.動作確認
0.事前準備
本サンプルを試すためには、Azureのアカウントが必要です。
また、Translator Text APIのサブスクリプションも必要となります。
下記の方の記事を参考にアカウント作成、サブスクリプション作成を行ってください。
人工知能パーツ Microsoft Cognitive Services を使った表情分析アプリを作ろう![サブスクリプション準備編] 2017年6月版
作成すべきサブスクリプションはTranslator Text APIに読み替えてください。
1.MRDesignLabs_Unityを確認
せっかくなので、MixedRealityにおける標準的なUIとなるであろう
MRDesignLabsを元にしてみたいと思います。
MRDesignLabsについては下記の記事を参考に構築、動作確認してください(丸投げ)。
Mixed Reality Design Labsのサンプルをとりあえず動かしてみる - Periodic Table of the Elements
MRDesignLabsについては、下記の記事も非常に参考になります。
MRDesignLabを使いジェスチャー入力を取り扱う
2.翻訳処理を追加
「1.MRDesignLabs_Unityを確認」で、元素記号をタップすると
解説文などが表示されることまで確認できた前提で、次に進みます。
英語の解説文がすでにPeriodicTableJSON.json内で定義されているので、
これをAzureに投げて翻訳(日本語化)する処理を追加してみましょう。
初期処理ですべての元素について日本語化して取ってくると処理時間や課金が気になるので、
タップしたタイミングで対象元素のみを日本語化することにします。
- 日本語化メソッドの追加
元素記号がタップされた際のイベントはElementButton.csのPressedが呼び出されます。
ここに翻訳処理を追加します。
ElementButton.cs
//
// Copyright (c) Microsoft Corporation. All rights reserved.
// Licensed under the MIT License. See LICENSE in the project root for license information.
//
using System;
using HUX.Buttons;
using HUX.Interaction;
using UnityEngine;
using System.Collections.Generic;
using System.Xml;
using System.IO;

public class ElementButton : Button {

    public override void Pressed(InteractionManager.InteractionEventArgs args)
    {
        Element element = gameObject.GetComponent<Element>();

        StartCoroutine(ExecuteTranslate(element.ElementDescription.text)); //翻訳処理の呼び出し

        // User has clicked us
        // If we're the active element button, reset ourselves
        if (Element.ActiveElement == element)
        {
            // If we're the current element, reset ourselves
            Element.ActiveElement = null;
        }
        else
        {
            Element.ActiveElement = element;
            element.Open();
        }
    }

    //追加メソッド
    System.Collections.IEnumerator ExecuteTranslate(string text)
    {
        string translateTokenUrl = "https://api.cognitive.microsoft.com/sts/v1.0/issueToken";
        var translateHeaders = new Dictionary<string, string>() {
            { "Content-Type" , "application/json" },
            { "Ocp-Apim-Subscription-Key", "APPKEY" } //自身のAPPキーを入力
        };

        WWW tokenWWW = new WWW(translateTokenUrl, new byte[1], translateHeaders);
        yield return tokenWWW;

        string req = text.Replace(" ", "%20"); //英文に含まれる半角スペースを変換

        string japanUrl = "https://api.microsofttranslator.com/v2/http.svc/Translate?appid=Bearer%20" + tokenWWW.text + "&text=" + req + "&from=en&to=ja";

        WWW getWWW = new WWW(japanUrl);
        yield return getWWW;

        XmlDocument xmlDoc = new XmlDocument();
        xmlDoc.Load(new StringReader(getWWW.text));
        XmlNode root = xmlDoc.FirstChild;
        XmlNodeList talkList = xmlDoc.GetElementsByTagName("string");
        XmlNode talk0 = talkList[0];
        string jaString = talk0.InnerText;

        SingletonText.Instance.SetText(jaString);
    }

    public override void OnStateChange(ButtonStateEnum newState)
    {
        Element element = gameObject.GetComponent<Element>();

        switch (newState)
        {
            case ButtonStateEnum.ObservationTargeted:
            case ButtonStateEnum.Targeted:
                // If we're not the active element, light up
                if (Element.ActiveElement != this)
                {
                    element.Highlight();
                }
                break;

            default:
                element.Dim();
                break;
        }

        base.OnStateChange(newState);
    }
}
Azureからの戻り値はXMLのタグ指定で取得するようにしました。
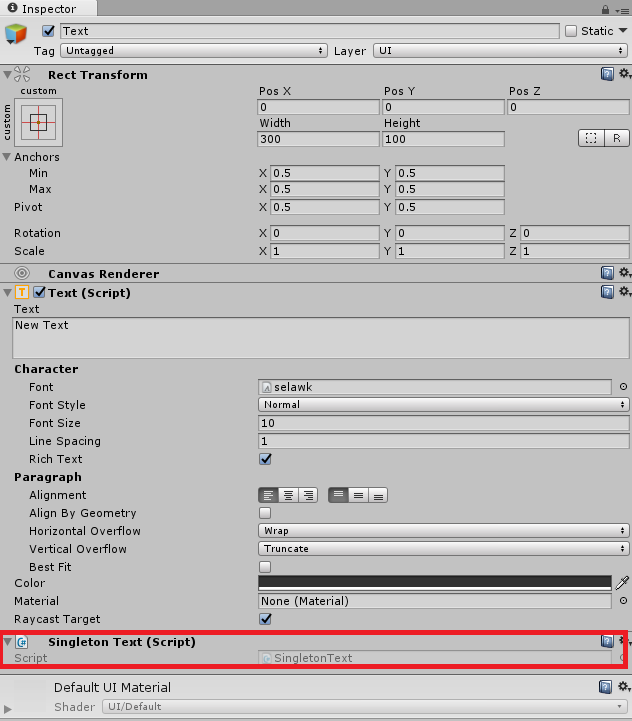
元素のGameObject一つ一つに日本語反映用テキストエリアをアタッチするのは非常に大変なので、
SingletonにしてSetTextしています。SingletonText.csusing HoloToolkit.Unity; using System.Collections; using System.Collections.Generic; using UnityEngine; using UnityEngine.UI; public class SingletonText : Singleton<SingletonText> { public void SetText(string s) { gameObject.GetComponent<Text>().text = s; } } - 翻訳語文字列表示用テキストエリアの追加
下記のようなイメージで、テキストエリアを追加してください。
(どういうUIにするかはお好みで)
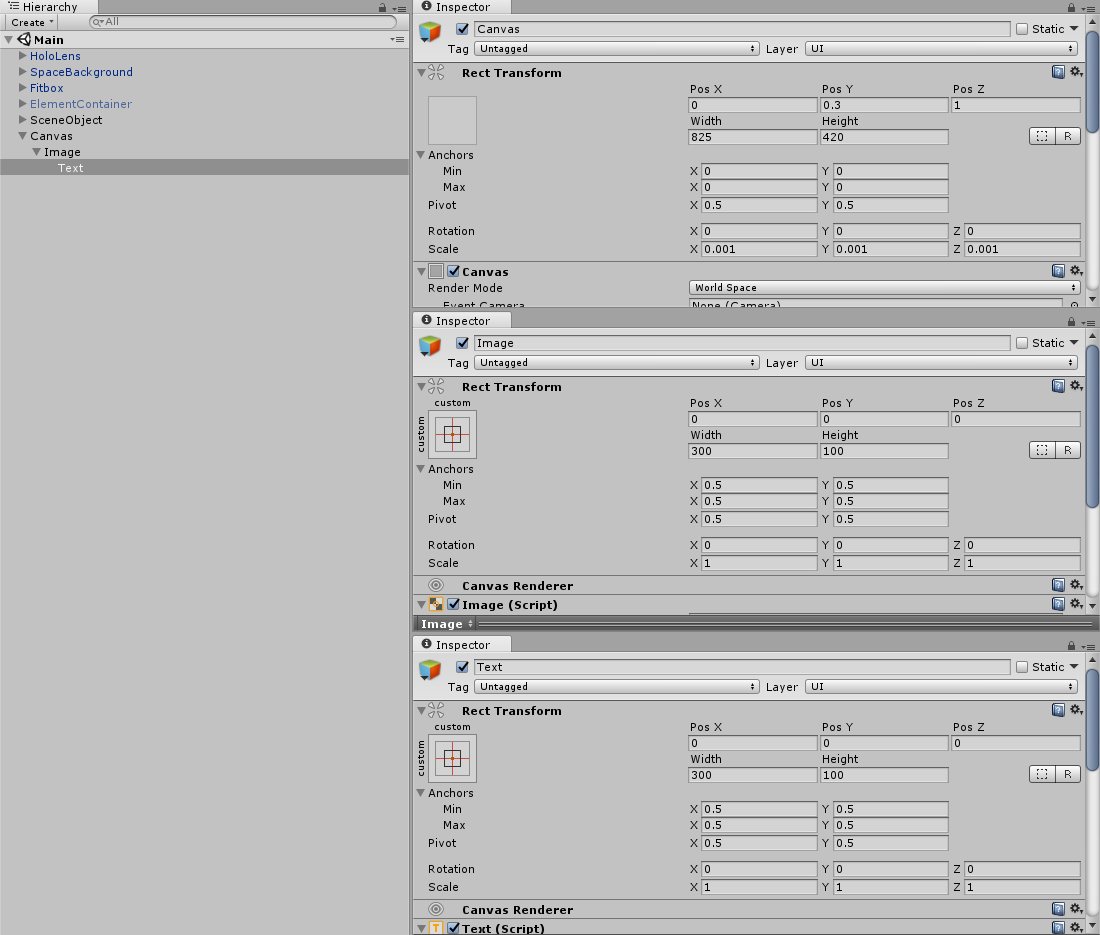
追加したTextには上述のSingletonコンポーネントのアタッチを忘れないようにしてください。
- ビルド&デプロイ
通常のHoloLensアプリと同様にUnityでビルドを行ってください。
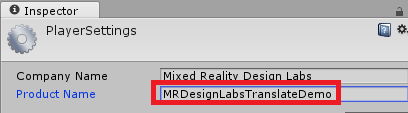
元のMRDesignLabsを上書きしたくない方は、Product NameなどのOther Settingsを
「MRDesignLabsTranslateDemo」のような名前に変更してください。
Unityビルド時はCapabilitiesのInterNet Clientの有効化を忘れないようにしましょう。
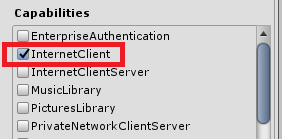
忘れると下記のようなことになってしまいます。
UnityエディタではうまくいくのにHolo実機ではAzureからの戻りが空でNG。ログ出したらCouldn't resolve hostが出てて???しばらくしてCapabilityのInterNet Clientにチェックを入れてなかったことに気づいた。凡ミス共有。
— morio@6/25~米国 (@morio36) 2017年6月21日出力されたMRDesignLabsTranslateDemo.slnをVisualStudioで開き、
HoloLens実機にビルド&デプロイしてください。
3.動作確認
元素記号をタップし、追加したTextエリアに日本語訳が表示されたら成功です!

若干日本語に違和感があるのは現在のところの限界なので、許容しましょう。
以上、簡単ですね!
ソースコード
下記にアップしていますので、必要に応じてご参照ください。
https://github.com/haveagit/TranslatorDemo
次回こそはBing Speech APIのサンプルを実装します!