TL;DR(要約)
Nuxt + Firebase を使って俳句を作成できるサービスを作りました
俳句メーカーはこちら
簡易チュートリアルサイトのソースコードはGit Hubにあげてます
自己紹介
個人的なプロジェクト「毎月サービスリリースで技術もノウハウもうっはうは祭り![]() 」をしています、ミツダマ(@mitudama)です。
」をしています、ミツダマ(@mitudama)です。
1月の時間割メーカーに引き続き2月は俳句メーカーをリリースしました!
ノウハウうっはうはになったのでシェアします!
作ったサービス
【新サービスリリース】
— ミツダマ@500円プログラマー (@mitudama) 2019年2月28日
・業界のあるあるをみつけたとき
・ジェネレーションギャップを感じたとき
・ブラック企業に疲れ果てたとき
その気持ちを17文字にまとめてみませんか?
「俳句メーカー」をリリースしました!!🎉🎉🎉https://t.co/xfdJaKbbCx
俳句を気軽につくってシェアしましょう♪
何で作ったか
・「Peing」とか「ボタンメーカー」みたいなSNSでシェアしたときに画像が表示されるサービス作ってみたい
・OGPなにそれ?
・どうやらfirebaseを使えばサーバサイドなしで簡単にOGP系サービス作れるらしい
・枠内に文字を調整するのは面倒ではある
・俳句だったら文字数ほぼ決まってるし調整しやすいんじゃね?
・作っちゃえ
・作った
使った技術と参考サイト
基本的に時間割メーカーで使った技術と同じですが、そのほかで新たに導入した技術は以下になります。
-
- Hosting: nuxt geratate で生成した静的ファイルのホスティング先
- Functions: サーバーサイド代わり。OGP画像のメタタグ返却 & ユーザーリダイレクト用
- Storage: OGP画像保存用のストレージ
- Database: 俳句データの保存用
- これら今のところ全て0円。すごい。

-
- svgをcanvasに変換するために使いました。
- 完成度はともかく早く作りたい!って方におすすめ。
-
- svg作成用の絵描きツール
- 操作にちょっと癖はあるけど慣れれば簡単でした

OGP画像表示の流れ
- ユーザーAがtwitter上でサービスのURLをシェア
- twitter側はシェアされたURLにアクセスする
- firebase function は画像(OGPのメタタグ)を返す
- ユーザーBがサービスのURLにアクセスする
- firebase function はリダイレクト処理を行う
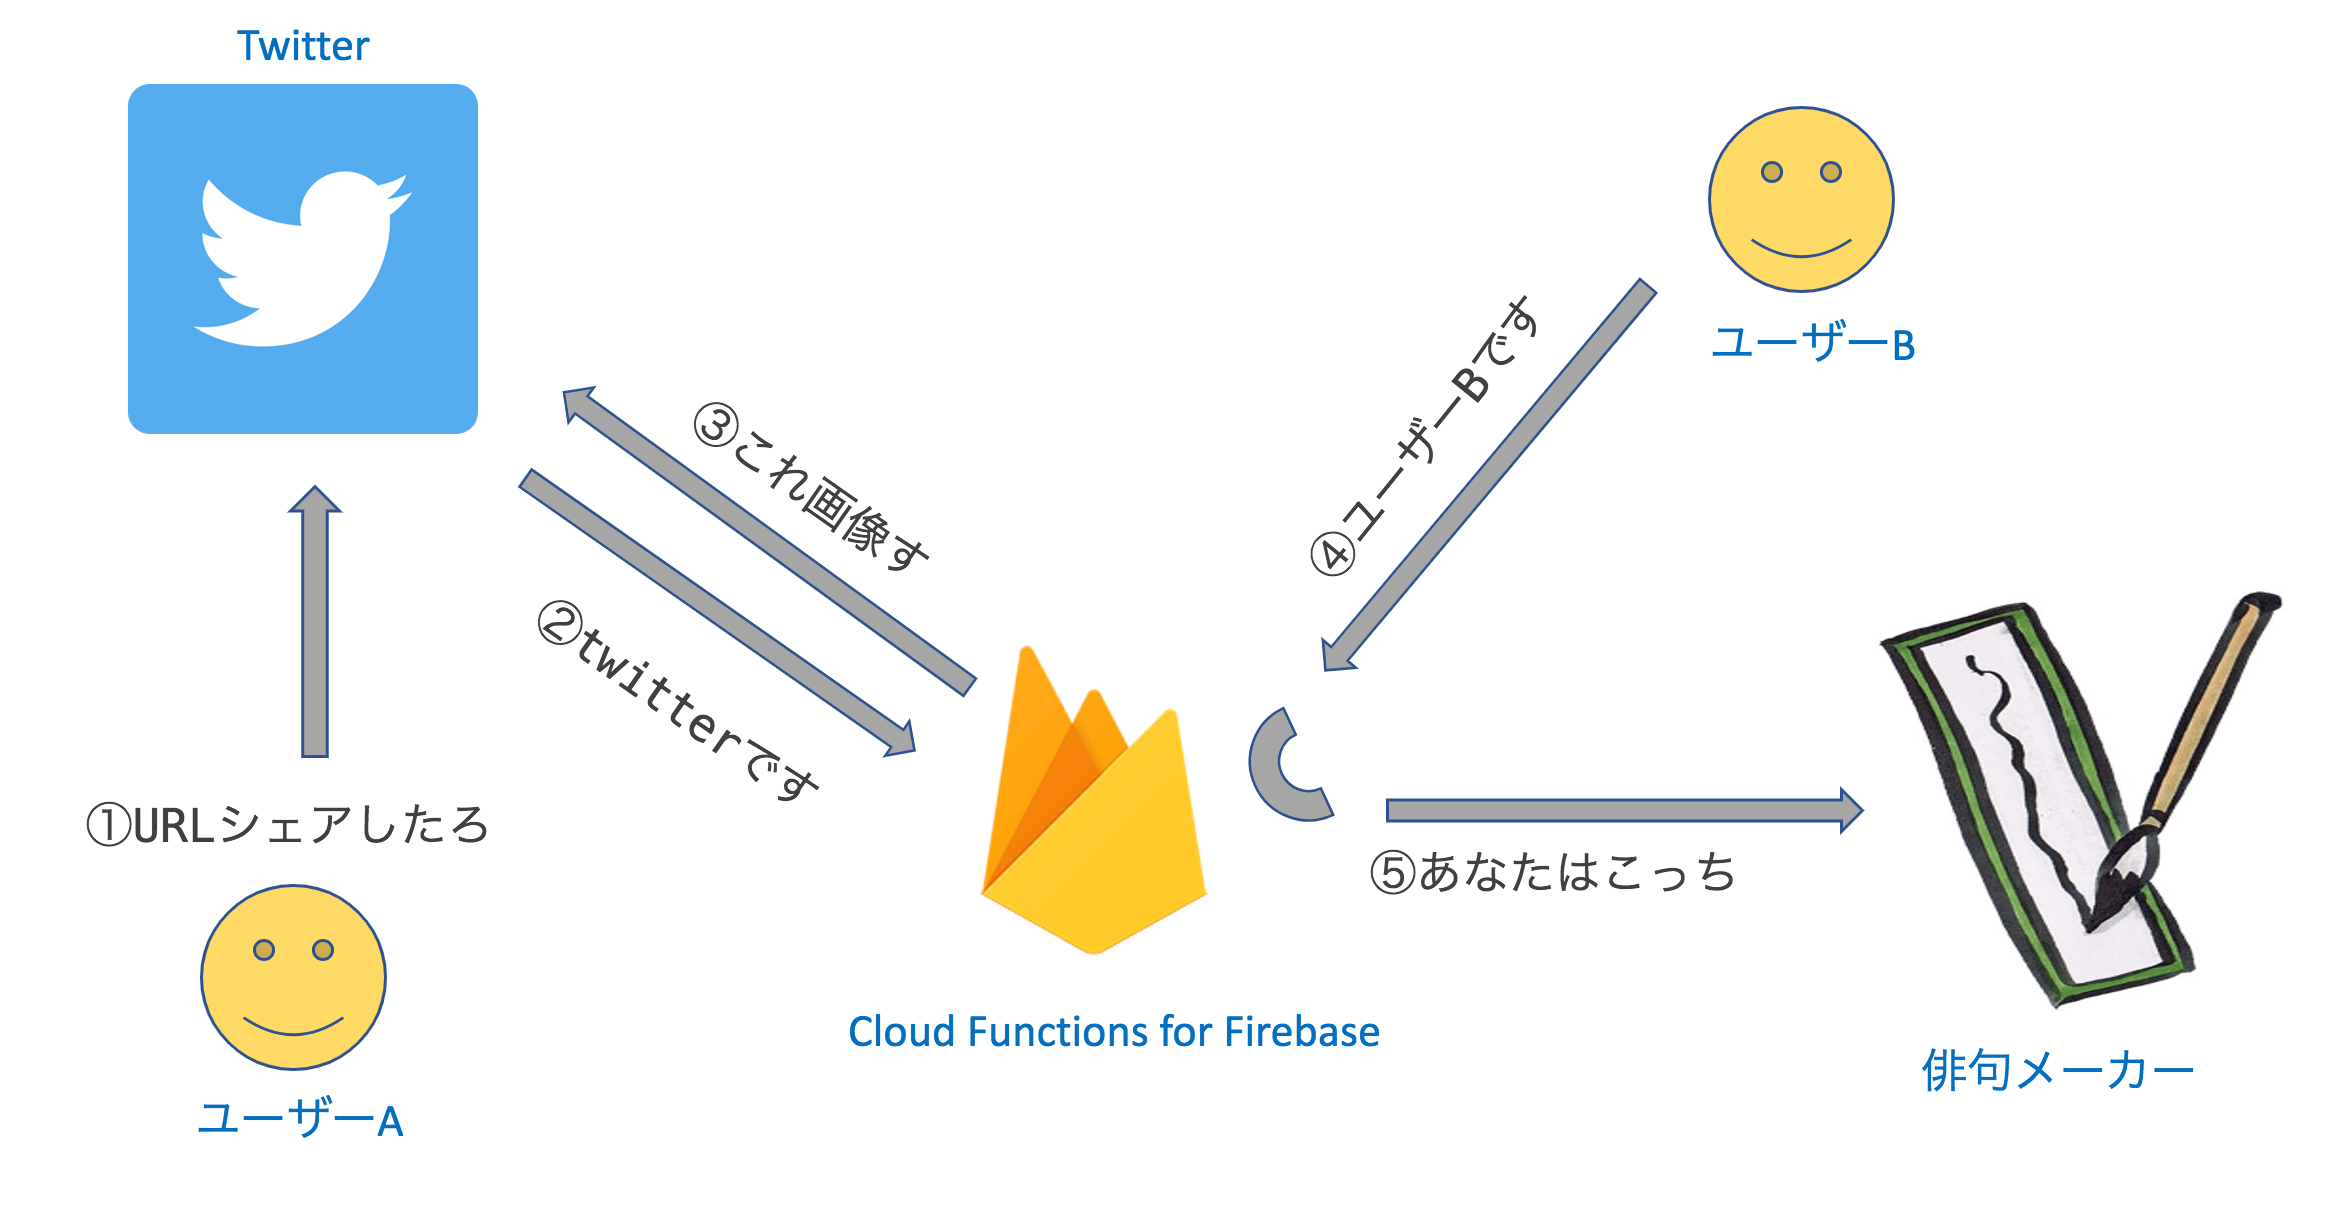
ポイントはユーザーとtwitter側でFunctionsの処理が違うってところですね。
クローラーはJavaScriptを認識できません。
よってJavaScriptでリダイレクト処理を書いていればTwitterには画像のメタタグを、ユーザーはリダイレクトを、と条件分けができます。
最速でOGPサービスを作るチュートリアル
環境構築
    vue init nuxt-community/starter-template front #front 部分は好きな名前で
    cd front
    npm install # Or yarn

    yarn add firebase
    yarn add canvg

    yarn dev
Vue側のコーディング
以下コピペでOKです!
<template>
  <section class="container">
    <div>
      <div>
        <svg ref="svgArea" viewBox="0 0 200 100">
          <rect x="0" y="0" width="200" height="100" fill="#fff" stroke="#12b886" stroke-width="15"></rect>
          <text
          x="50%"
          y="50%"
          font-size="8px"
          text-anchor="middle">{{text1}}</text>
        </svg>
      </div>
      <div style="text-align:right">
        <input v-model="text1" type="text" style="width:100%; margin-bottom:10px">
        <button @click="create">つくる</button>
      </div>
    </div>
  </section>
</template>

<script>
import firebase from 'firebase'
import canvg from 'canvg';
//  // Set the configuration for your app
//   // TODO: Replace with your project's config object
var config = {
  apiKey: '<your-api-key>',
  authDomain: '<your-auth-domain>',
  databaseURL: '<your-database-url>',
  storageBucket: '<your-storage-bucket>'
};
if (!firebase.apps.length) {
    firebase.initializeApp(config);
}

export default {
  components: {
  },
  data() {
    return {
      text1: 'ヤクザの先輩にエアギター売ってもらった',
    };
  },
  methods: {
    create() {
      var storageRef = firebase.storage().ref();
      var createRef = storageRef.child('test.jpg');

      // 擬似canvas要素を作成
      var canvas = document.createElement('canvas')
      var svg = this.$refs.svgArea
      canvas.width = svg.width.baseVal.value;
      canvas.height = svg.height.baseVal.value;

      // SVG → Canvas 変換
      const data = new XMLSerializer().serializeToString(this.$refs.svgArea);
      canvg(canvas, data)

      // 作成
      let image = canvas.toDataURL('image/jpeg').split(',')[1]
      createRef.putString(image, 'base64').then((snapshot) =>{
        console.log('Uploaded a blob or file!');
      });
    }
  }
}
</script>

<style>
.container {
  width: 800px;
  height: 800px;
  margin-top: 50px;
  margin-right: auto;
  margin-left: auto;
}
</style>
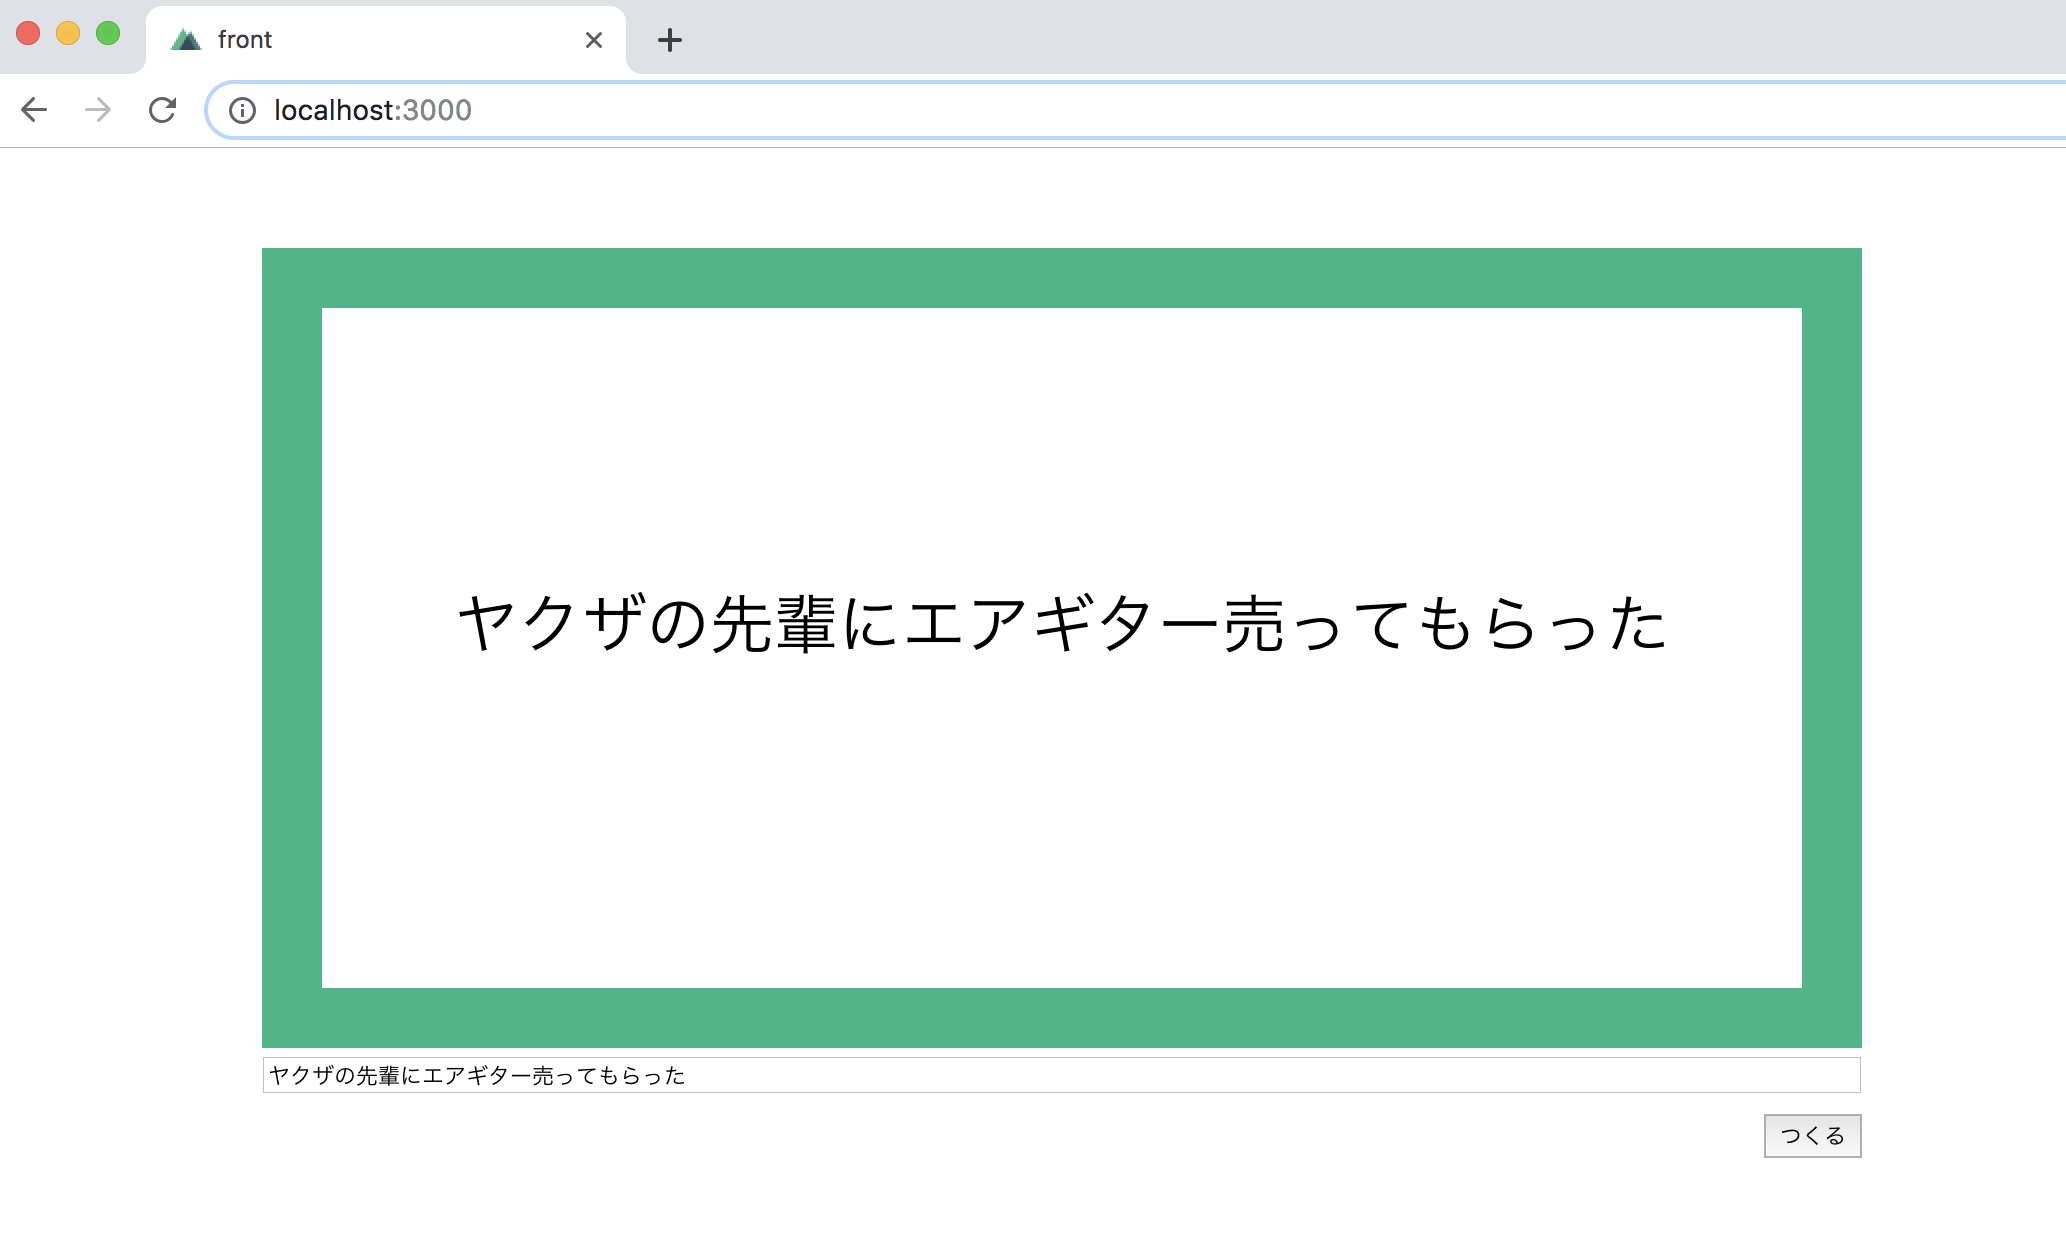
以下の画面になればOKです。
くれぐれも買わないように。
Firebase 設定
▼Firebase CLI リファレンス(公式)
https://firebase.google.com/docs/cli/?hl=ja
▼Docker×Nuxt×Firebaseを使ってSPAxPWAのWEBアプリ開発環境を構築する
https://www.bravesoft.co.jp/blog/archives/3942
    front# npm install -g firebase-tools # or yarn global add firebase-tools

    front# firebase login
これで無事にログインできればプロジェクトのアクセス権が付与されます。
Firebase init
次にプロジェクト ディレクトリを初期化します。
    front # yarn generate
    front # firebase init
するといくつか質問されます。
  ? Which Firebase CLI features do you want to setup for this folder? Press Space to select features, then Enter to confirm your choices. (Press <space> toselect)
  ❯◯ Database: Deploy Firebase Realtime Database Rules
  ◯ Firestore: Deploy rules and create indexes for Firestore
  ◯ Functions: Configure and deploy Cloud Functions
  ◯ Hosting: Configure and deploy Firebase Hosting sites
  ◯ Storage: Deploy Cloud Storage security rules
今回はFunctionsとHostingを使うので、2つをspaceで選択しエンター
  === Project Setup

  First, let's associate this project directory with a Firebase project.
  You can create multiple project aliases by running firebase use --add,
  but for now we'll just set up a default project.
  ? Select a default Firebase project for this directory: [don't setup a default project]
プロジェクトの選択ですが今はしなくてもいいので [don't setup a default project] で
次にfunctions の設定
  === Functions Setup

  A functions directory will be created in your project with a Node.js
  package pre-configured. Functions can be deployed with firebase deploy.

  ? What language would you like to use to write Cloud Functions? JavaScript

  ? Do you want to use ESLint to catch probable bugs and enforce style? No

  ? Do you want to install dependencies with npm now? Yes
続いてHostingの設定です
  === Hosting Setup

  Your public directory is the folder (relative to your project directory) that
  will contain Hosting assets to be uploaded with firebase deploy. If you
  have a build process for your assets, use your build's output directory.

  #どのディレクトリを公開しますか?ということなので先ほどnuxt generateで作成したdistディレクトリで
  ? What do you want to use as your public directory? dist

  #シングルページでいいのかと聞かれてるのでYesで
  ? Configure as a single-page app (rewrite all urls to /index.html)? Yes

  #既にindex.htmlあるけど上書きする? しないです
  ? File dist/index.html already exists. Overwrite? No

  ✔  Firebase initialization complete!
これで完了!
次はブラウザ上のコンソールからプロジェクトを作成します。
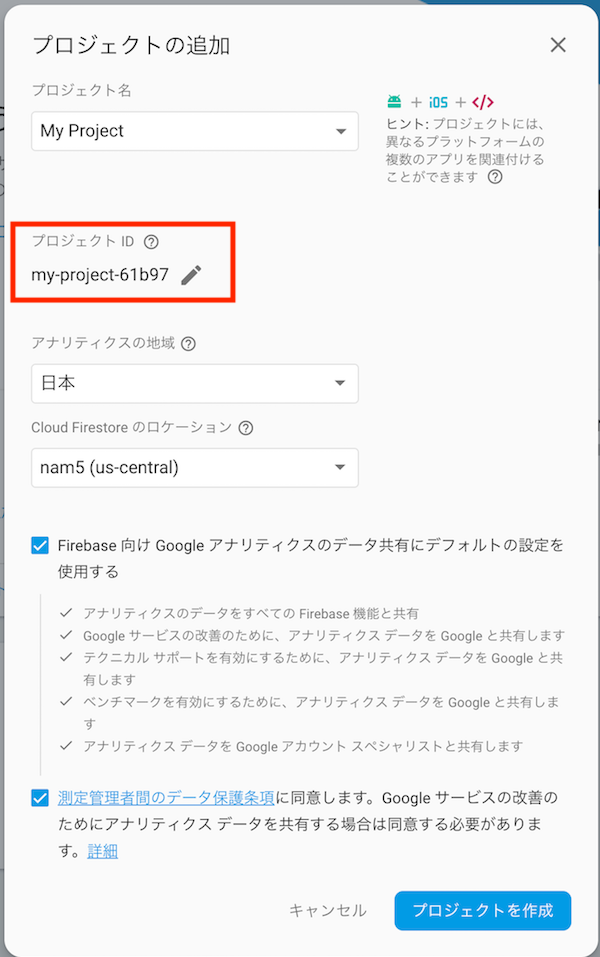
プロジェクトIDは後から使うのでコピーしておきましょう。
Firebase デプロイ(Hosting)
プロジェクトを作成したらデプロイです。
  front # firebase deploy

  Error: No project active. Run with --project <projectId> or define an alias by
  running firebase use --add
するとprojectIdを指定しなさいと怒られるので先ほど表示されたprojectIdを記載します
※コピペ忘れた方はコンソールのHostingを開けば記載されています
  /front # firebase deploy --project my-project-61b97
  === Deploying to 'my-project-61b97'...

  i  deploying functions, hosting
  i  functions: ensuring necessary APIs are enabled...
  ✔  functions: all necessary APIs are enabled
  i  functions: preparing functions directory for uploading...
  i  hosting[my-project-61b97]: beginning deploy...
  i  hosting[my-project-61b97]: found 9 files in dist
  ✔  hosting[my-project-61b97]: file upload complete
  i  hosting[my-project-61b97]: finalizing version...
  ✔  hosting[my-project-61b97]: version finalized
  i  hosting[my-project-61b97]: releasing new version...
  ✔  hosting[my-project-61b97]: release complete

  ✔  Deploy complete!

  Please note that it can take up to 30 seconds for your updated functions to propagate.
  Project Console: https://console.firebase.google.com/project/my-project-61b97/overview
  Hosting URL: https://my-project-61b97.firebaseapp.com
最後に表示されたHosting URLへアクセスして画面が表示されていればデプロイは完了です!
Firebase Storageに画像をアップ
続いて画像を作成してStorageにアップしていきます。
▼Firebase Storage スタートガイド
https://firebase.google.com/docs/storage/web/start?authuser=0
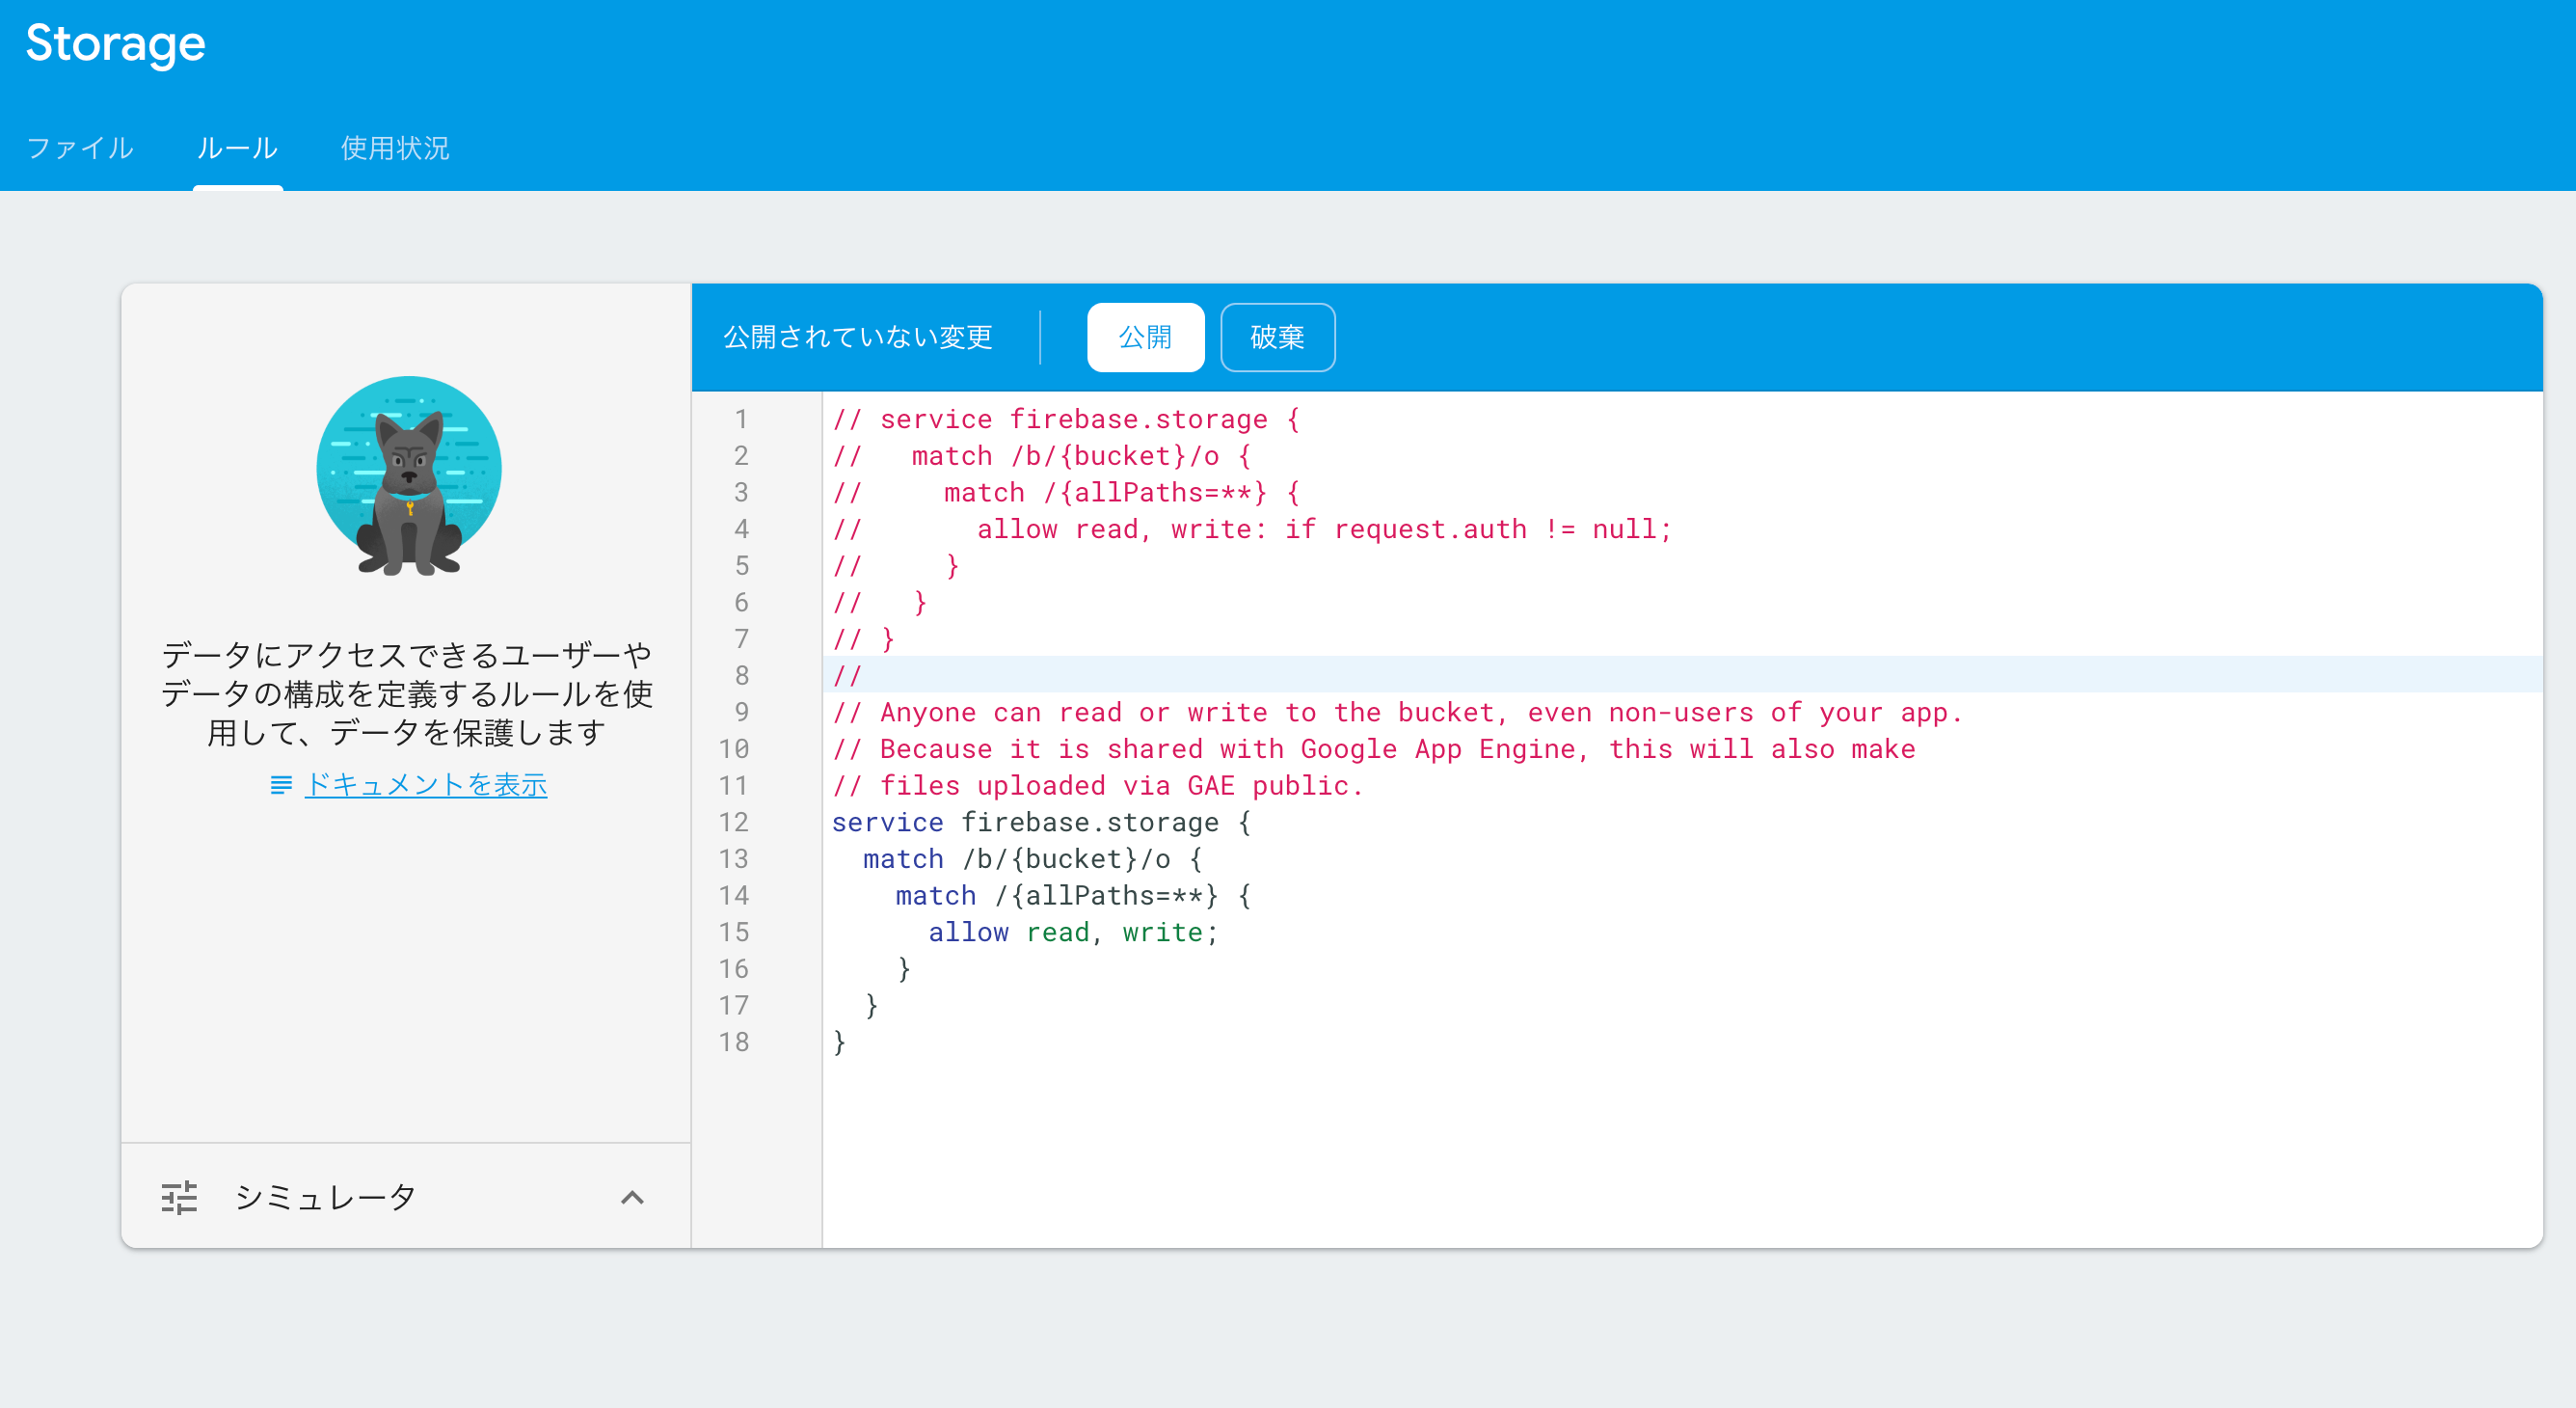
公式の【公開アクセスを設定する】にて、
「開発時には、デフォルトの代わりに公開ルールを使用して、ファイルを公開して読み取りと書き込みができるように設定することができます」
とあるので今回はお言葉に甘えて全公開で行きましょう。
// Anyone can read or write to the bucket, even non-users of your app.
// Because it is shared with Google App Engine, this will also make
// files uploaded via GAE public.
service firebase.storage {
  match /b/{bucket}/o {
    match /{allPaths=**} {
      allow read, write;
    }
  }
}
これをルールに設定します。
※サービス公開時にはアクセスの制限を再設定してください
次にindex.vueの以下の部分を書き換えます。
  var config = {
      apiKey: '<your-api-key>',
      authDomain: '<your-auth-domain>',
      databaseURL: '<your-database-url>',
      storageBucket: '<your-storage-bucket>'
    };
コンソール→Authentication→WEB設定で確認できます。
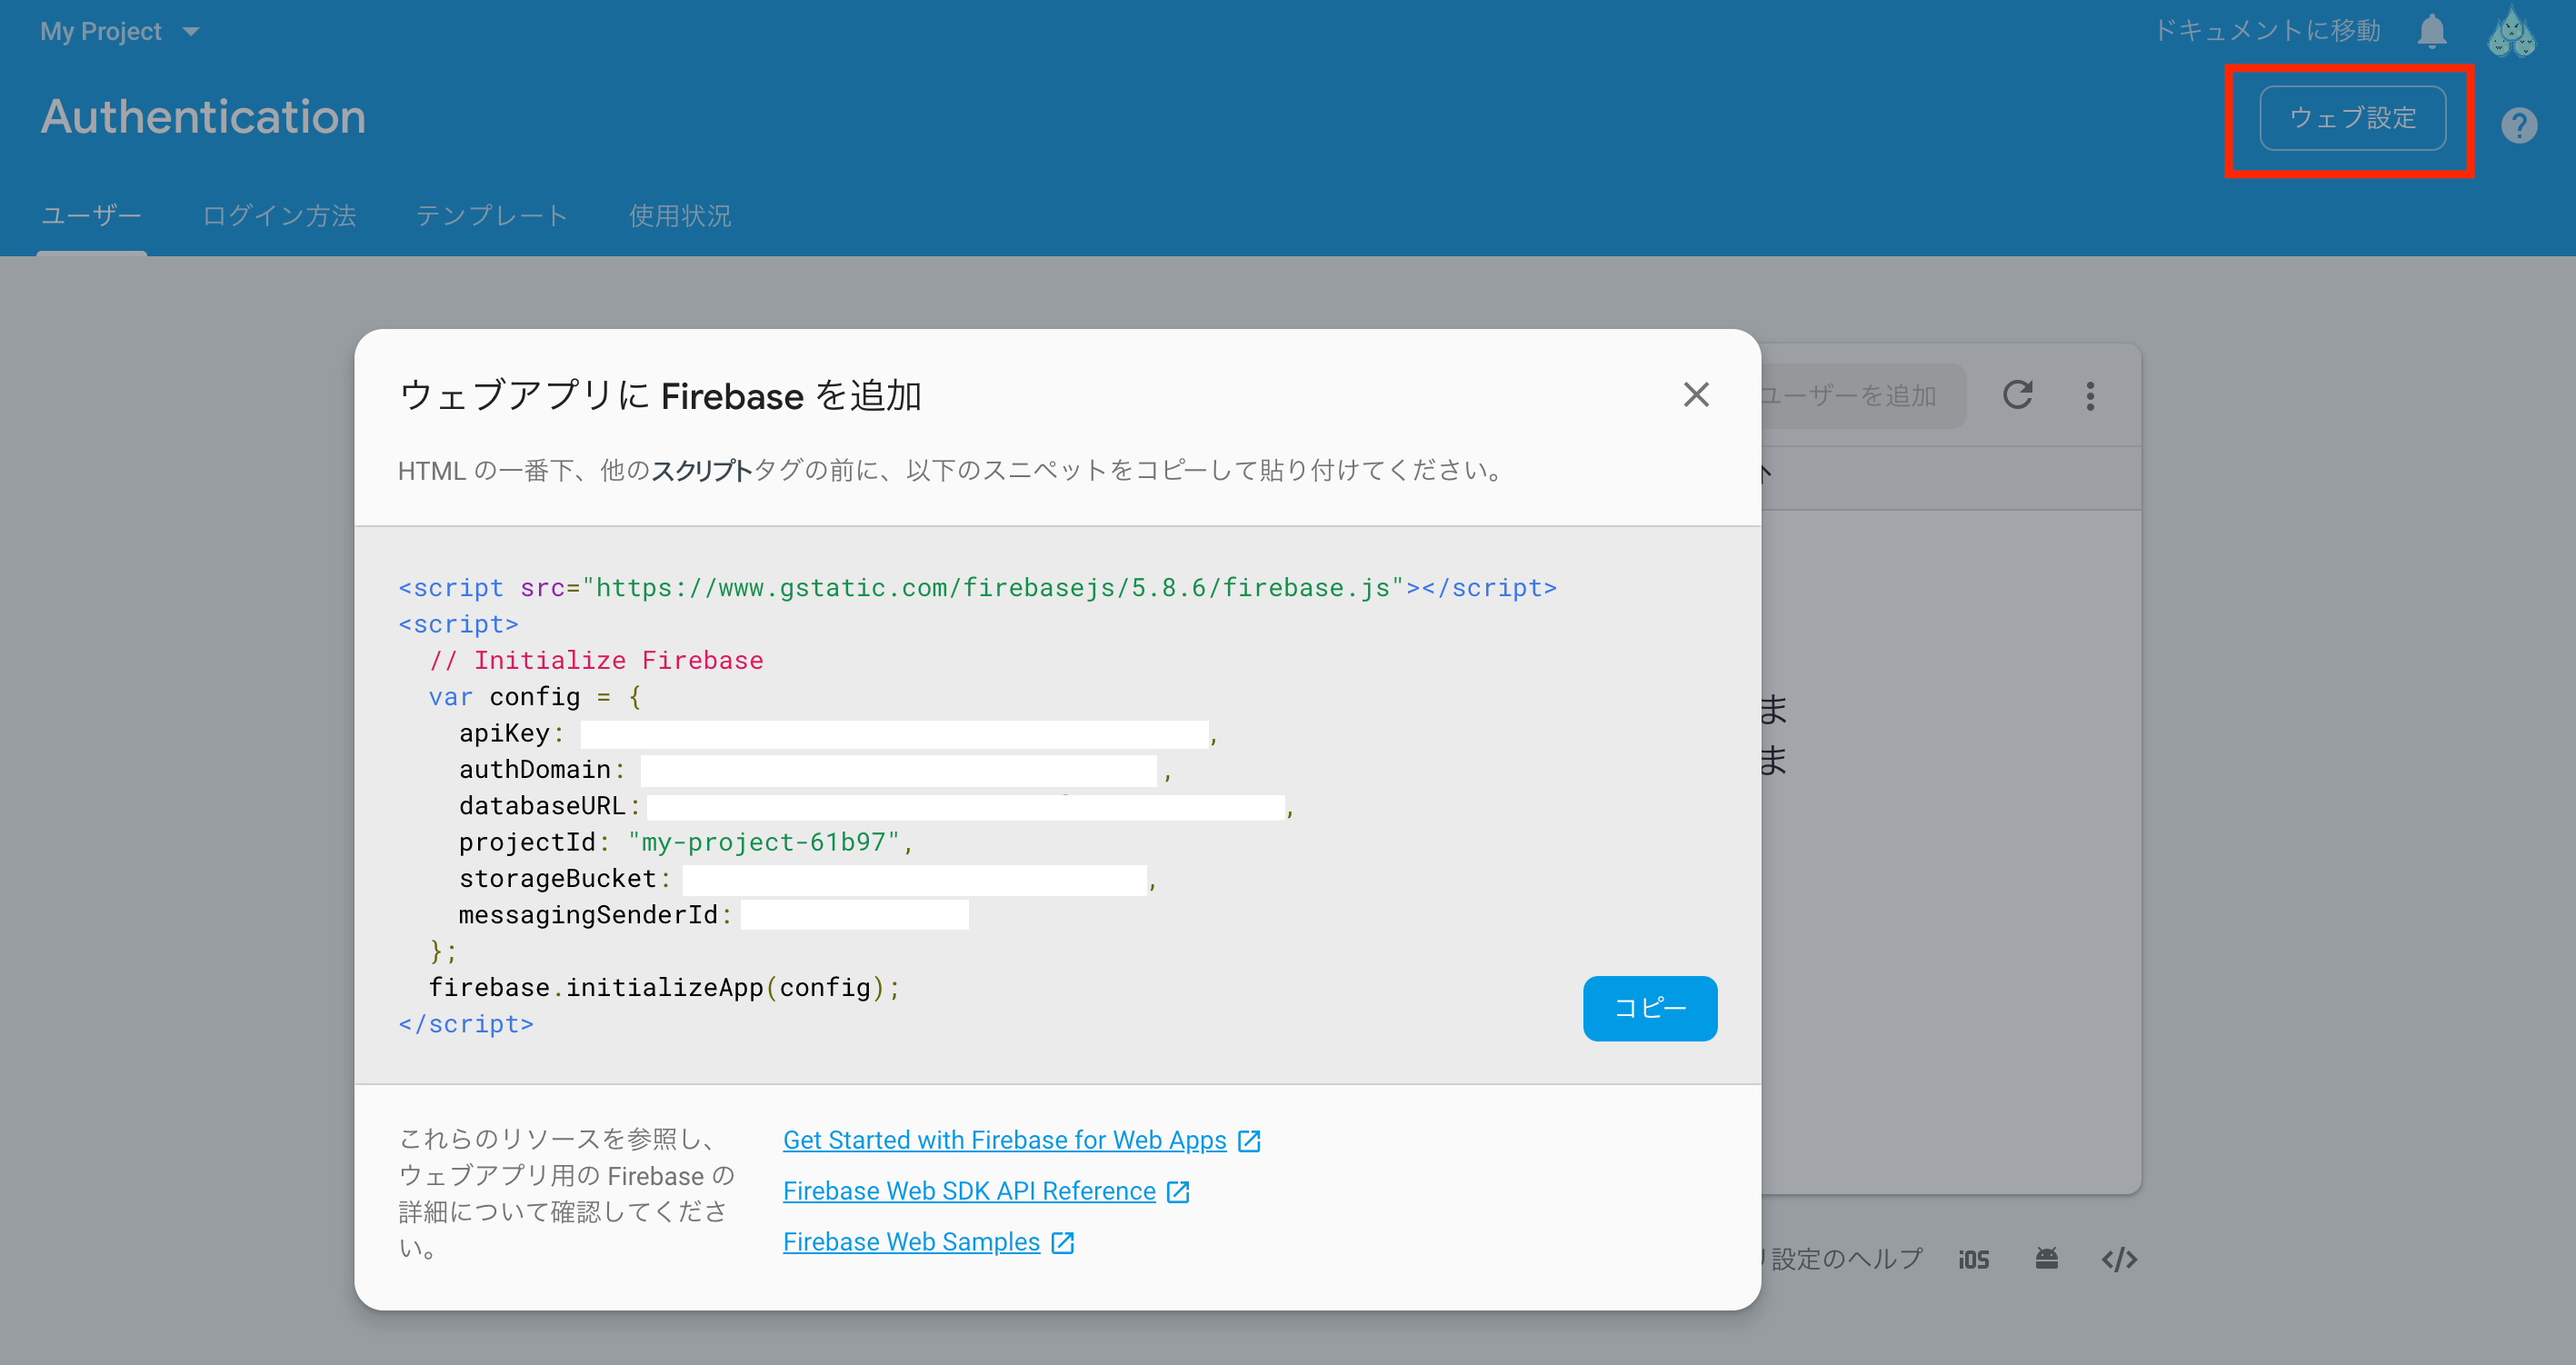
このスニペットに置き換えて、ローカルより「つくる」ボタンを押してStorageにアップできていればOKです!
Firebase Functions でmetaタグ(画像)を返す
▼Cloud Functions による動的コンテンツの配信
https://firebase.google.com/docs/hosting/functions?authuser=0
続いて functions/index.jsを編集していきます。
const functions = require('firebase-functions');
exports.bigben = functions.https.onRequest((req, res) => {
const SITEURL = "〇〇〇〇〇"
const TITLE = "〇〇〇〇〇"
const DESCRIPTION = "〇〇〇〇〇"
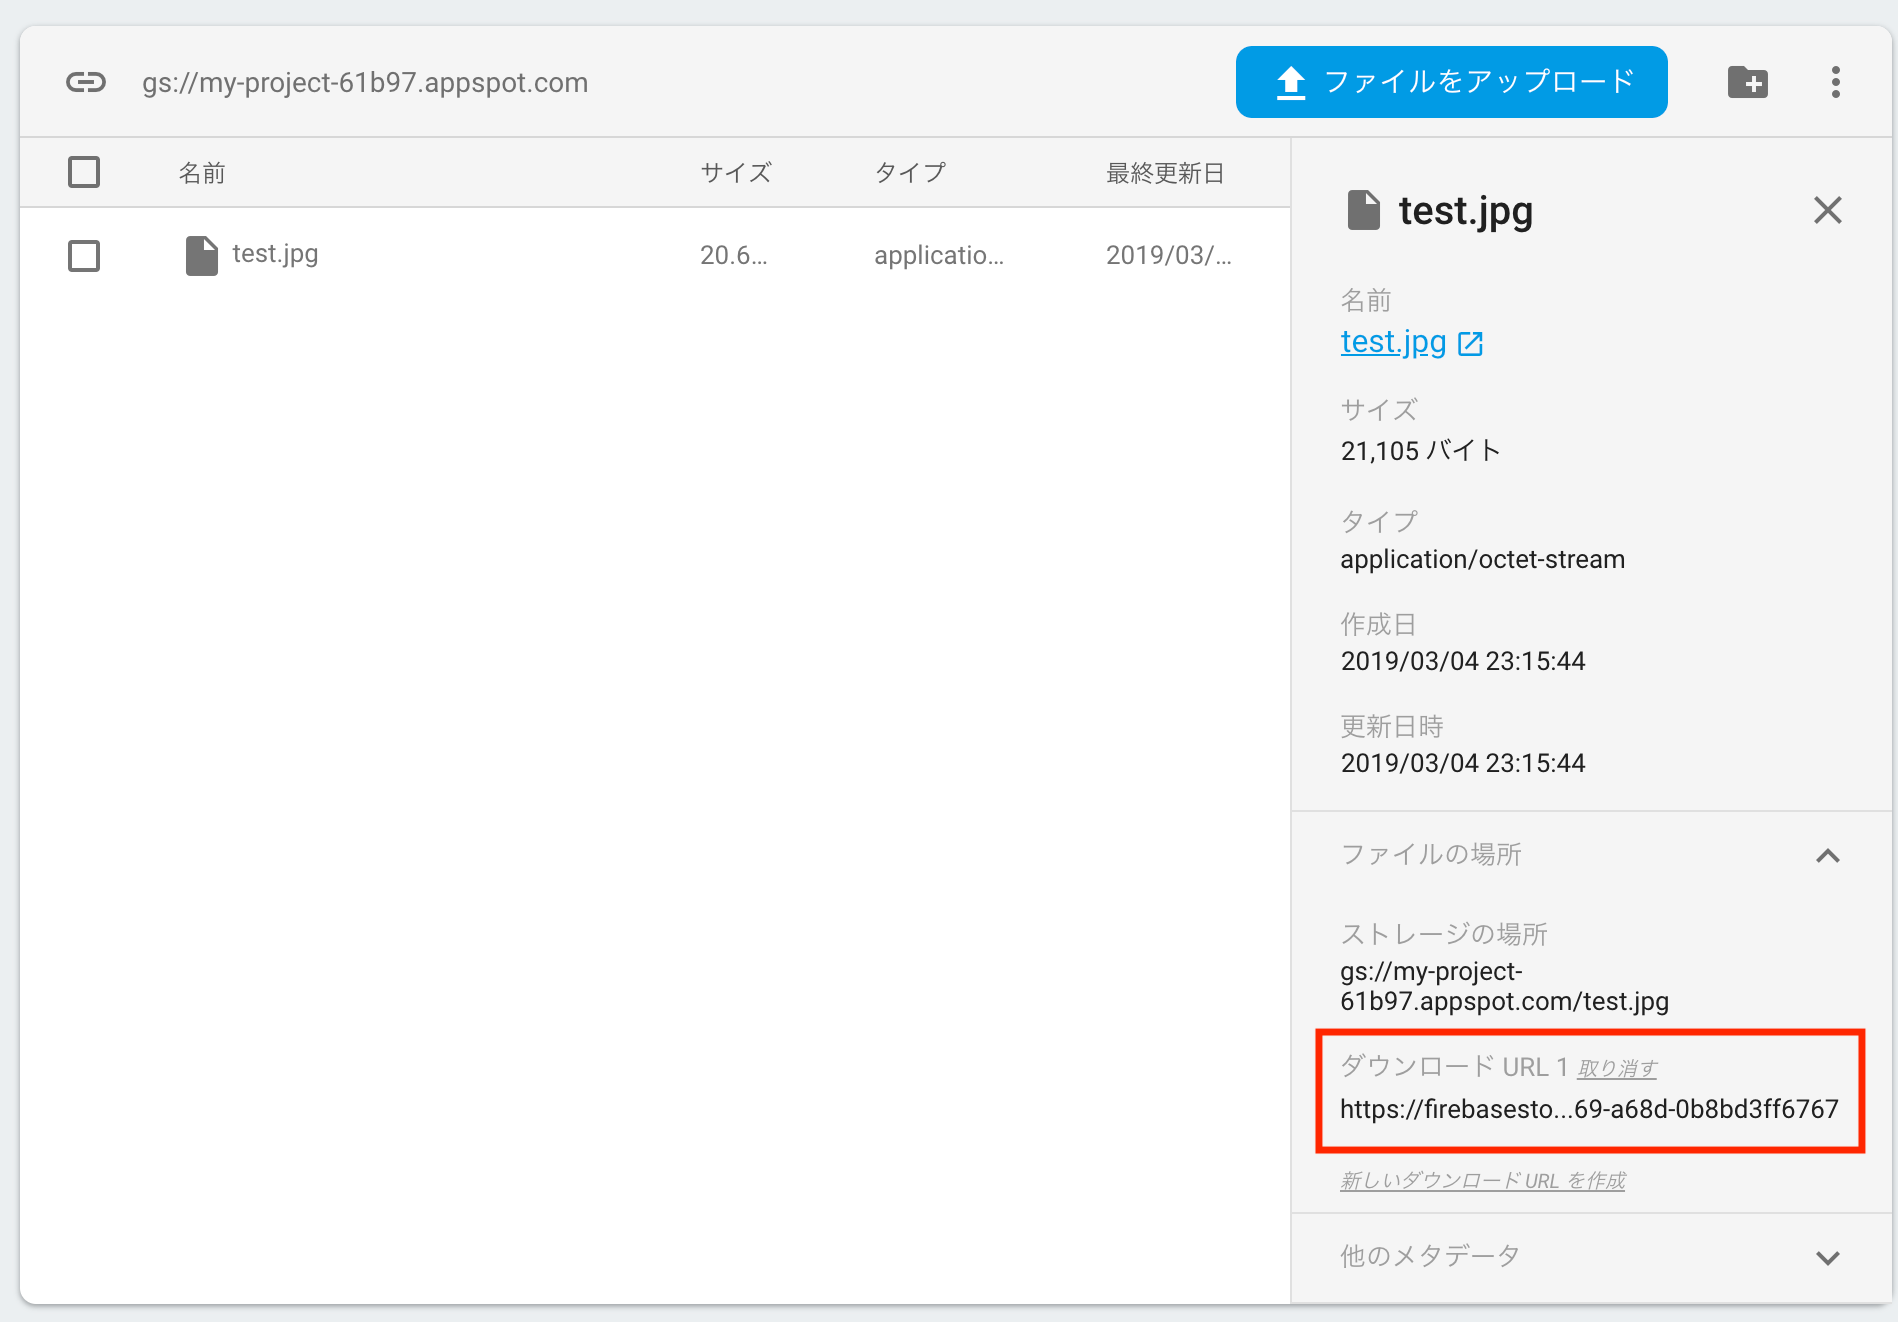
const IMAGE = `https://firebasestorage.googleapis.com/〇〇〇〇〇〇〇`
res.status(200).send(`<!doctype html>
<head>
<title>Time</title>
<meta property="og:title" content="${TITLE}">
<meta property="og:image" content="${IMAGE}">
<meta property="og:description" content="${DESCRIPTION}">
<meta property="og:url" content="${SITEURL}">
<meta property="og:type" content="website">
<meta property="og:site_name" content="${TITLE}">
<meta name="twitter:site" content="〇〇〇〇〇〇">
<meta name="twitter:card" content="summary_large_image">
<meta name="twitter:title" content="${TITLE}">
<meta name="twitter:image" content="${IMAGE}">
<meta name="twitter:description" content="${DESCRIPTION}">
</head>
<body>
${'BONG '.repeat(3)}
</body>
</html>`);
});
IMAGE部分は赤枠のStorageのダウンロードURLを記載すればとりあえずはOKです
※非推奨(?)のため本番導入時は公式サイトなどを参照し正しい設定をしてください(今回はテスト確認のためこのまま進めます)
次にfirebase.jsonを修正します。
{
  "hosting": {
    "public": "dist",
    "ignore": [
      "firebase.json",
      "**/.*",
      "**/node_modules/**"
    ],
    "rewrites": [
      {
        "source": "/bigben", "function": "bigben"
      },
      {
        "source": "**",
        "destination": "/index.html"
      }
    ]
  }
}
そしてデプロイすると・・・
  front # firebase deploy --project my-project-61b97

  === Deploying to 'my-project-61b97'...

  i  deploying functions, hosting
  i  functions: ensuring necessary APIs are enabled...
  ✔  functions: all necessary APIs are enabled
  i  functions: preparing functions directory for uploading...
  i  functions: packaged functions (29.3 KB) for uploading
  ✔  functions: functions folder uploaded successfully
  i  hosting[my-project-61b97]: beginning deploy...
  i  hosting[my-project-61b97]: found 9 files in dist
  ✔  hosting[my-project-61b97]: file upload complete
  i  functions: creating Node.js 6 function bigben(us-central1)...
  ✔  functions[bigben(us-central1)]: Successful create operation.
  Function URL (bigben): https://us-central1-my-project-61b97.cloudfunctions.net/bigben
  i  hosting[my-project-61b97]: finalizing version...
  ✔  hosting[my-project-61b97]: version finalized
  i  hosting[my-project-61b97]: releasing new version...
  ✔  hosting[my-project-61b97]: release complete

  ✔  Deploy complete!
デプロイが完了したら早速アクセスして確認してみましょう
上記の
Function URL (bigben):https://us-central1-my-project-61b97.cloudfunctions.net/bigben
もしくは hosting先のURL + /bigben
https://my-project-61b97.firebaseapp.com/bigben
にアクセスすればOKです。
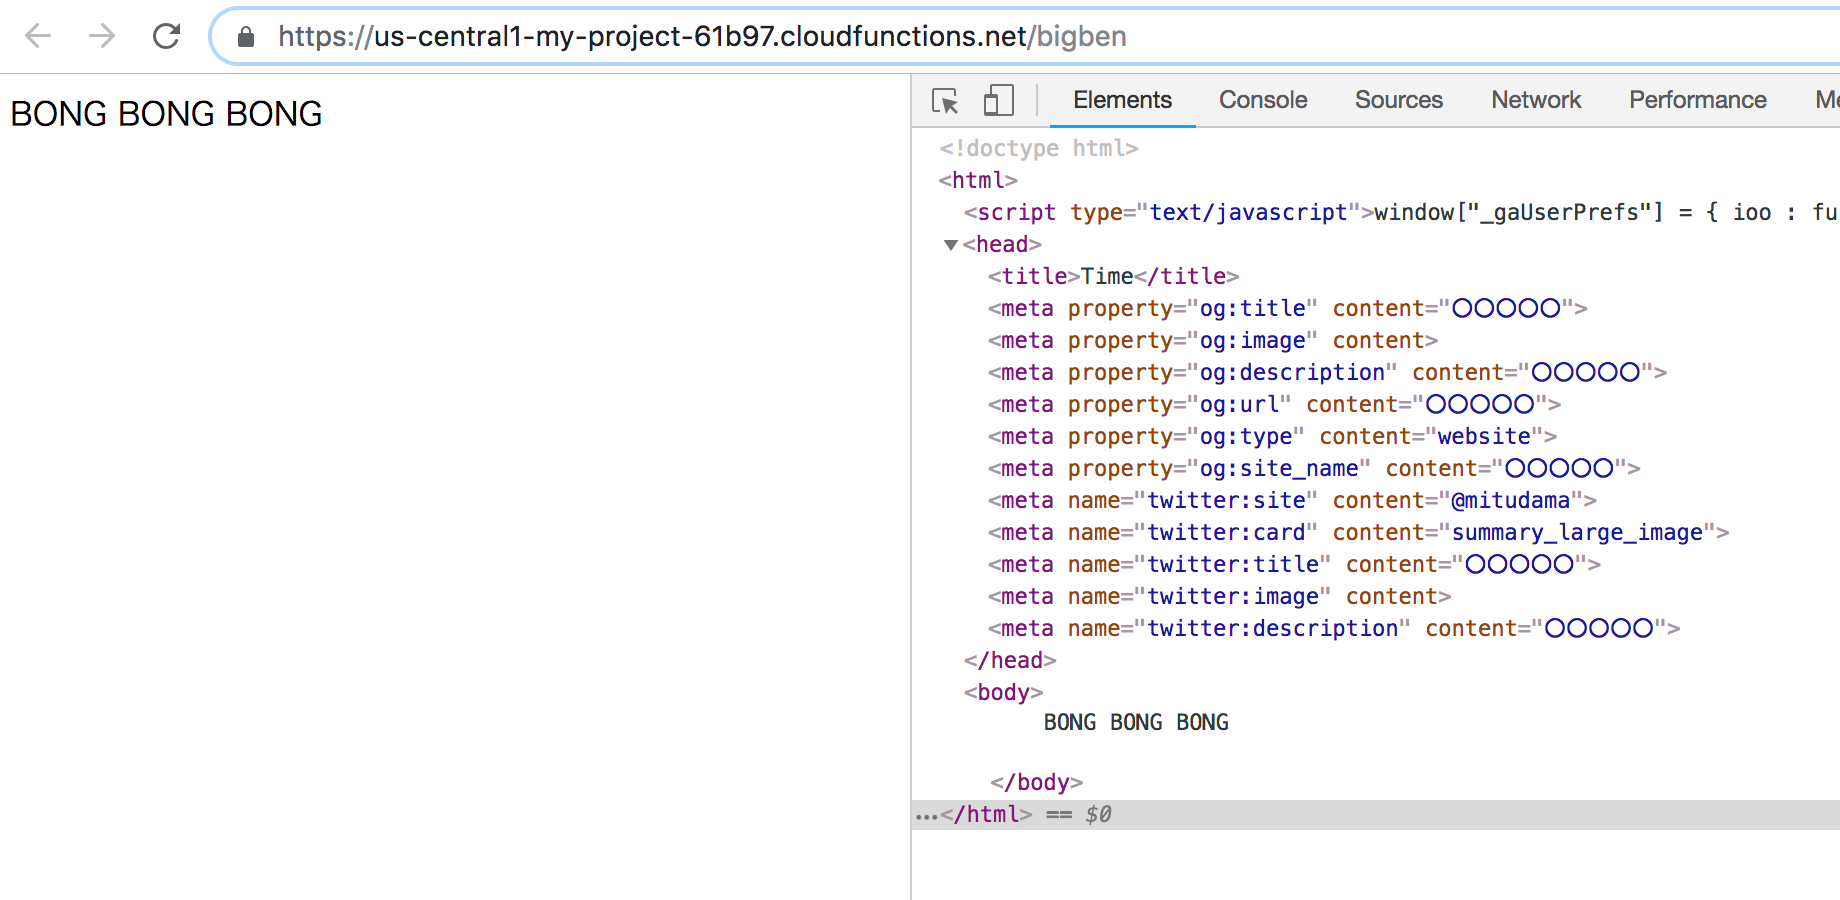
metaタグが帰って来ていれば成功です!
では最後にtwitterのCard Validatorでどのような表示になるか確認しましょう。
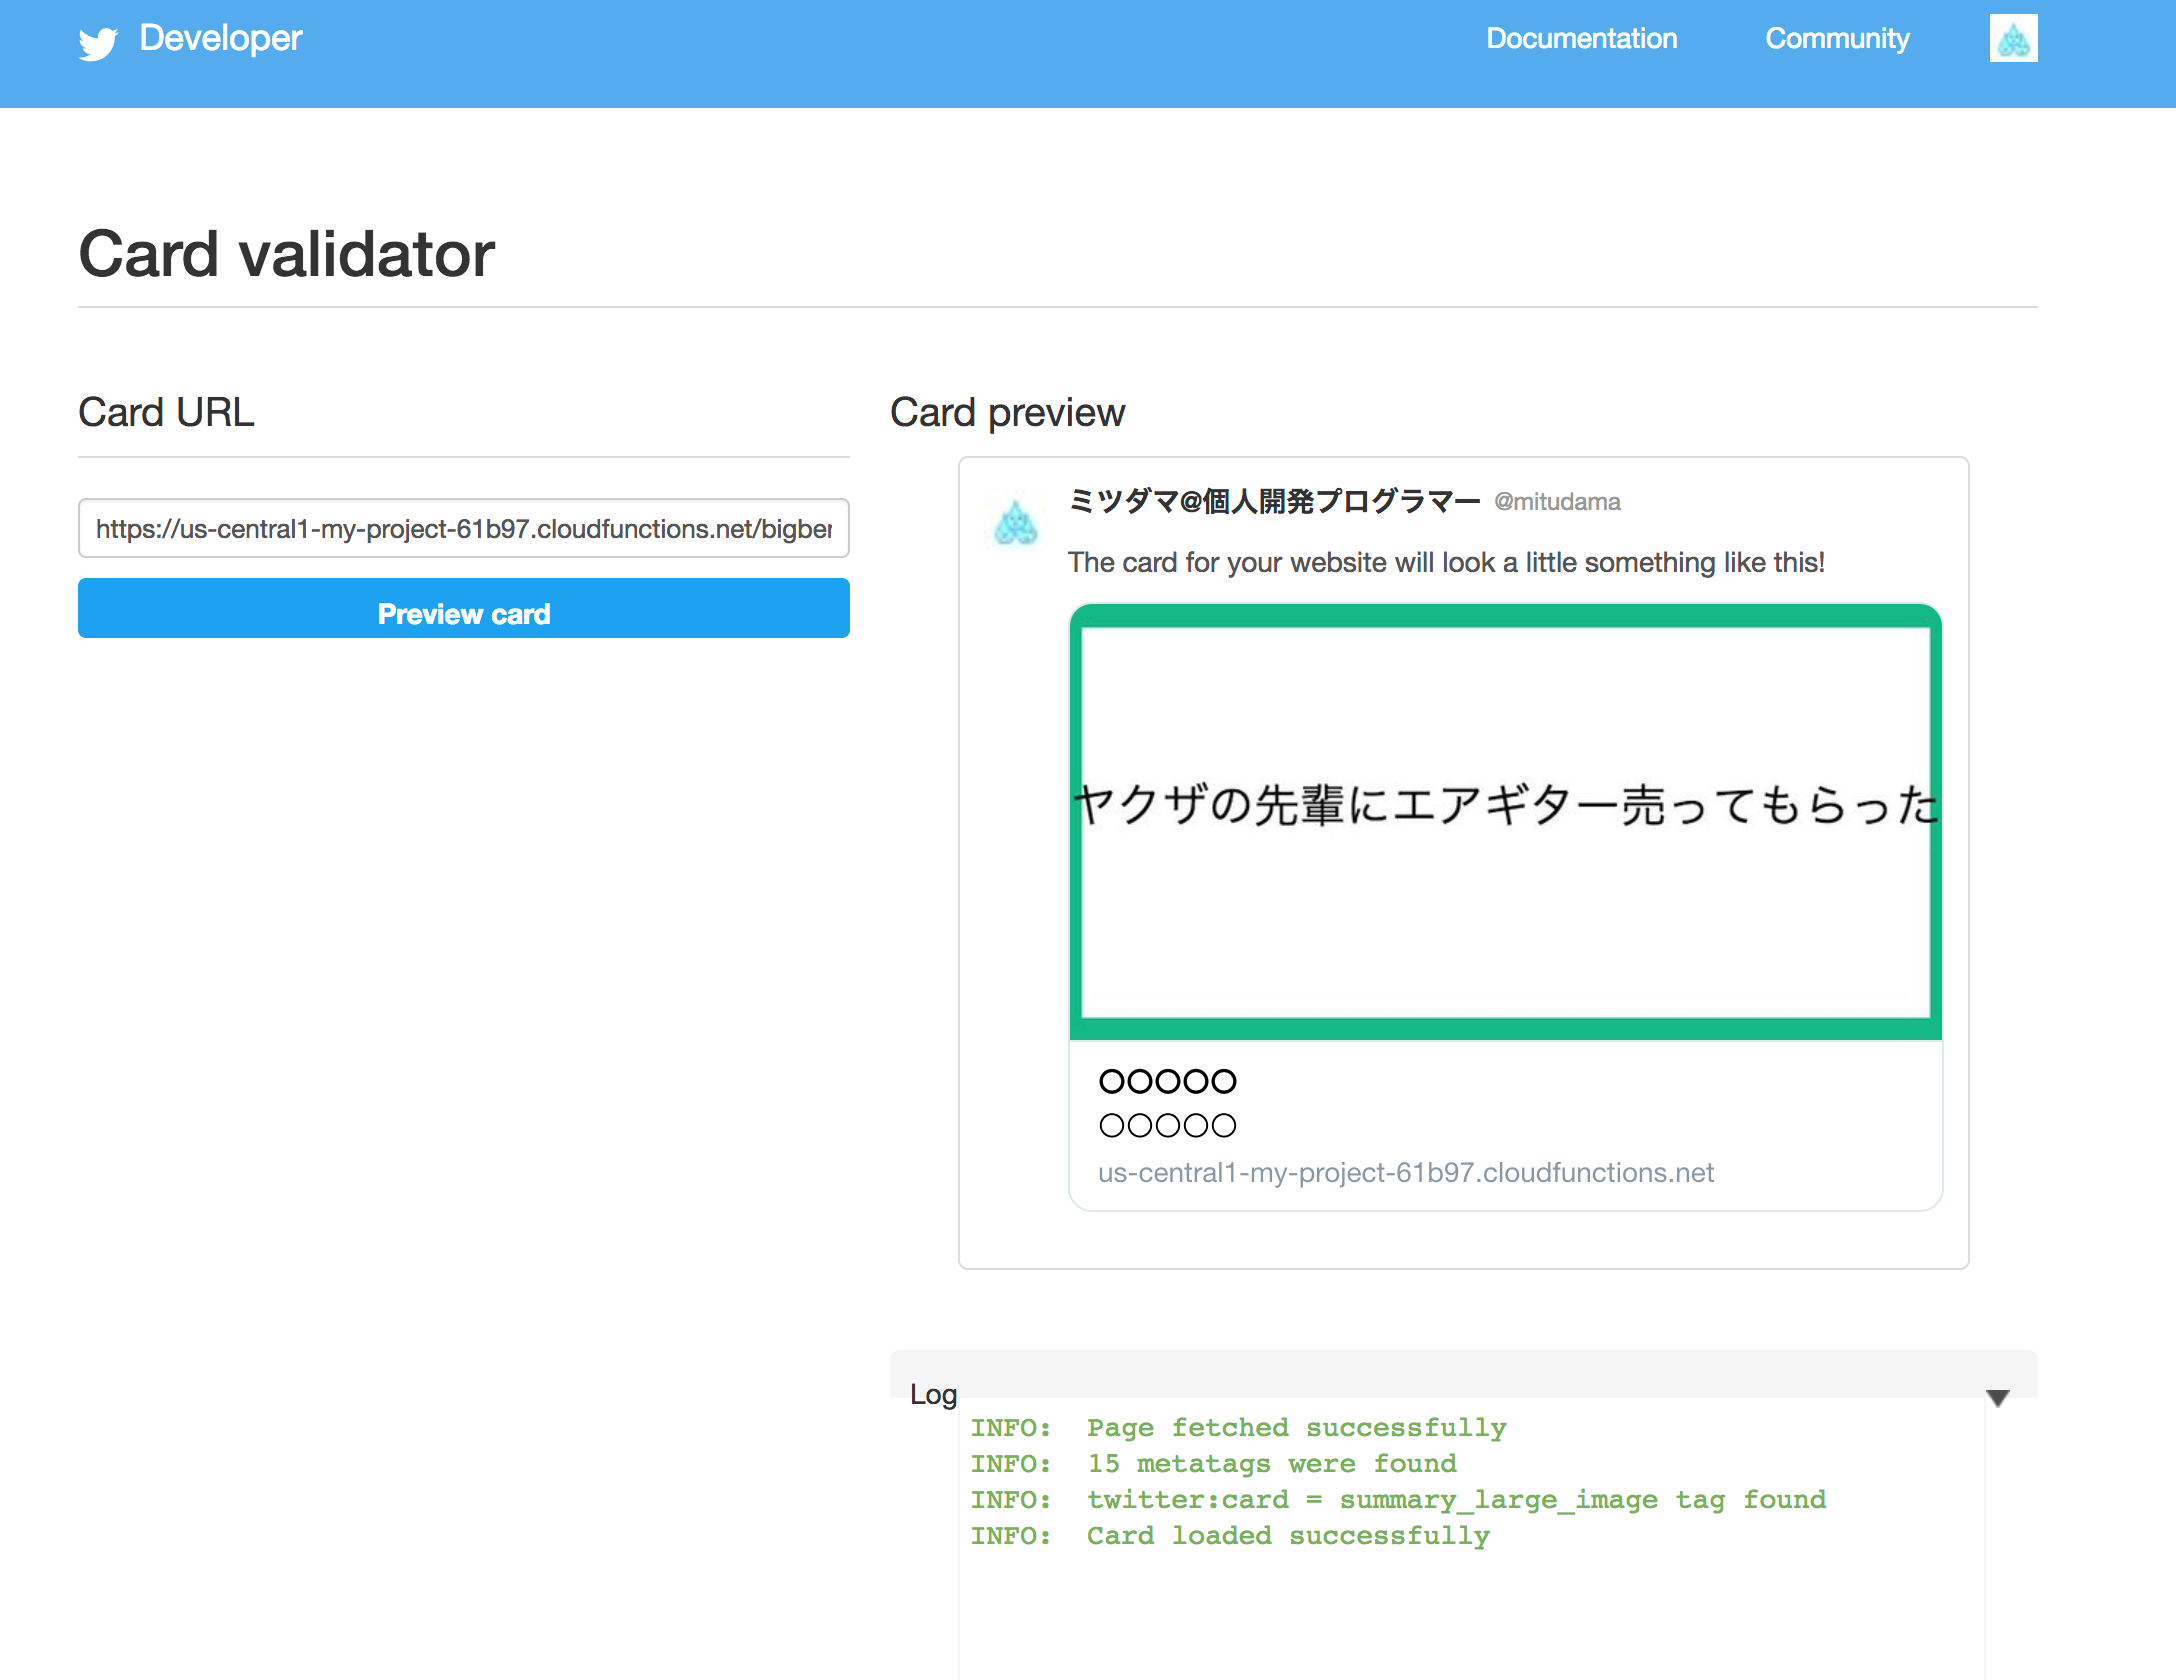
無事にOGP画像が表示されました!!!完成です!!
感想
という訳であっという間にOGP系サービスの基礎ができてしまいました。
あとはFirebaseのDatabaseの機能を使えばより質の高いサービスが作れそうです
これで個人開発を爆速で進めることができますね。
働かない生活はもうすぐそこに。。。。
終わりに
ぜひ俳句メーカーで遊んで見てください!
こんな投稿待ってます
ブラック企業に疲れた方も♪
あとは技術系ではないのでCrieitにて俳句メーカーの裏話エピソードを書いてます!
▼月500円の不労所得を得るためにWEBサービスを開発した話
Twitterもフォローよろしくです!![]()
ではまた来月〜![]()