概要
gulpのデプロイ環境構築から1ヶ月経ち、実務であれやこれやと設定ファイルを修正しながらようやく落ち着いて開発できる環境になった気がするので、記録として残しておきます。
動作確認環境
- OS
- OS X El Capitain 10.11.5
- node
- v6.2.2
- npm
- 3.9.5
- gulp
- 3.9.1
package.json
ES2015で書くために、Babel系のモジュールを一通りインストールします。ReactのJSXのSyntaxを使うならbabel-preset-reactも必要です。
.babelrcもしくはpackage.jsonでbabelをkeyにpresetsを指定する必要があります。
{
  "devDependencies": {
    "babel-loader": "^6.2.4",
    "babel-preset-es2015": "^6.9.0",
    "babel-preset-react": "^6.5.0",
    "babel-register": "^6.9.0",
    …
    …
    …
  },
  "babel": {
    "presets": [
      "es2015",
      "react"
    ],
    "compact": false
  }
}
gulp処理
Babelを導入したので、gulpfileもES2015の記述で書くことにしました。ファイル名をgulpfile.babel.jsにすることでES2015のSyntaxで記述できます。
gulpの処理は非同期なのでwebpackのビルドやデプロイ前のzip圧縮などの時間のかかる処理は実行順が前後します。前回はtask分割してreturnでコールバックを返すことで同期をとりましたが、.on()を使ってエラーや終了をbindすることにしました。よって、gulpのタスク分割はやめてdefaulタスクのみ定義し、ターミナル上ではgulpの記述のみでファイル監視(watch)を開始するようにしています。
また、Macの場合はdisplay notificationを利用して処理間にどこまで実行完了したかを通知センターに流しています。
保存処理前

保存処理後

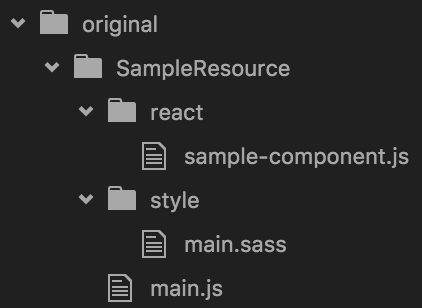
ファイル監視はoriginalというフォルダの配下全体を見るようにしています。originalの中に親フォルダ、またその直下にはmain.jsというファイルを配置し、保存処理がかかるとmain.jsをビルドし親フォルダ名で静的リソースへビルドします。
セットで上げる必要のあるメタデータもsalesforce-metadata-xml-builderでプログラム上で作成できるので手作業で作る必要もなくなりました(便利ですね!)。
// Force.comのログインユーザ名とパスワードの設定
process.env.SF_USERNAME = 'xxx@xxx.xxx';
process.env.SF_PASSWORD = 'xxxxxxxx';

// moduleのロード
import gulp from 'gulp';
import file from 'gulp-file';
import { exec } from 'child_process';
import webpack from 'webpack-stream';
import zip from 'gulp-zip';
import deploy from 'gulp-jsforce-deploy';
import metadata from 'salesforce-metadata-xml-builder';
import os from 'os';
import precss from 'precss';

// ターミナルからgulpを実行した時の処理
gulp.task('default', () => {

  // original配下のファイルを監視する
  gulp.watch('./original/**/*').on('change', event => {

    // Windows or Macのファイル区切り文字
    const split_str = os.type().toString().match('Windows') !== null ? '\\' : '/';

    // デプロイ時の静的リソース名
    // ファイル更新した際の属するフォルダ名(original直下のフォルダ名)を設定
    let resource_name = null;

    // デプロイ時のパス設定
    const paths = [];
    let end_flg = false;
    for (const path of event.path.split(split_str)) {
      if (end_flg) {
        paths.push(path);
        resource_name = path;
        break;
      }

      if (path === 'original') {
        end_flg = true;
      }
      paths.push(path);
    }

    // 静的リソースのメタデータ作成
    const resource_meta_xml = metadata.StaticResource({
      cacheControl: 'Public',
      contentType: 'application/zip',
    });

    // デプロイ用package.xmlの作成
    const package_xml = metadata.Package({
      types: [
        { name: 'StaticResource', members: [resource_name] },
      ],
      version: '35.0',
    });

    // ビルドするmain.js
    const entry = `${paths.join(split_str)}/main.js`;

    // ビルド開始をMacの通知センターに流す
    exec(`echo 'display notification "ビルド開始: ${resource_name}" with title "gulp" subtitle "webpack" ' | osascript`);

    // webpackのビルド
    gulp.src(entry)
      .pipe(webpack({
        entry,
        output: {
          filename: 'bundle.js',
          libraryTarget: 'umd', // ライブラリとして出力
          library: `${resource_name}`, // windowにフォルダ名で書きだして呼び出せるようにする
        },
        devtool: 'inline-source-map', // ビルドしたjsをデバッグできるようにsource mapをインラインで埋め込み
        module: {
          loaders: [
            {
              test: /(\.js)$/,
              loaders: ['babel'],
              exclude: /node_modules/,
            },
            {
              test: /\.sass$/,
              loaders: ['style', 'css', 'postcss?parser=sugarss'],
            },
          ],
        },
        postcss: [precss],
      }))
      .on('error', () => {
        // webpackのビルドでエラー時、デプロイせずエラーを通知
        exec(`echo 'display notification "ビルドエラー: ${resource_name}" with title "gulp" subtitle "webpack" ' | osascript`);
      })
      .pipe(gulp.dest(`./build/${resource_name}`)) // webpackでビルドしたbundle.jsをbuildフォルダに格納
      .on('finish', () => {
        // ビルドの終了を通知
        exec(`echo \'display notification "ビルド終了: ${resource_name}" with title "gulp" subtitle "webpack" ' | osascript`);

        // zip圧縮→デプロイ
        gulp.src(`./build/${resource_name}/*`)
          .pipe(zip(`${resource_name}.resource`))
          .pipe(file(`${resource_name}.resource-meta.xml`, resource_meta_xml))
          .pipe(gulp.dest('./src/staticresources'))
          .on('finish', () => {

            // zip圧縮が完了したらデプロイ開始通知
            exec(
              `echo 'display notification "デプロイ開始: ${resource_name}.resource" with title "gulp" subtitle "Salesforce" ' | osascript`
            );

            // デプロイ処理
            gulp.src('./src/**', { base: '.' })
              .pipe(file('src/package.xml', package_xml))
              .pipe(zip('pkg.zip'))
              .pipe(deploy({
                username: process.env.SF_USERNAME,
                password: process.env.SF_PASSWORD,
                loginUrl: 'https://test.salesforce.com',
              }))
              .on('finish', () => {

                // デプロイが完了したら通知を流す
                exec(
                  `echo 'display notification "デプロイ完了: ${resource_name}.resource" with title "gulp" subtitle "Salesforce" ' | osascript`
                );
              });
          });
      });
  });
});
※上記exec呼び出し部分のechoの後と| osascriptの前のシングルクォートのエスケープ(\)は、Qiita上のシンタックスカラーが正常に働かないため、あえて除去しています。
以下Sampleの静的リソースの簡単な説明
Sass
前から書いてみたかったのですが、変数を使えたりネストしたりすごく便利ですね。最初はsass-loaderを通していましたが今はPostCSSとSugarSS、precssを使っています。
$red: #f00

.hoge-style
  background: $red
React
itemsという配列を回して中身を表示させています。Reactについては、いろんな参考記事が既にあると思うので調べてみてください。
import React from 'react';
import Classname from 'classnames';


export default class SampleComponent extends React.Component {
  constructor(props_) {
    super(props_);
    this.state = props_;
  }

  componentWillReceiveProps(props_) {
    this.setState(props_);
  }

  render() {
    if (this.state.items.length === 0) {
      return null;
    }

    return (
      <div style={ { display: 'table' } }>
        {
          this.state.items.map(item_ => {
            return (
              <div key={ item_.id } style={ { display: 'table-row' } }>
                <div className={ Classname({ 'hoge-style': item_.name === 'hoge' }) } style={ { display: 'table-cell' } }>
                  { item_.name }
                </div>
              </div>
            );
          })
        }
      </div>
    );
  }
}
メイン処理
使用するライブラリをimport(npmでinstall必須)、自分で書いたJavaScriptファイルはパス指定でimportします(export defaultしておく)。
CSSやSassなどのスタイル系のファイルも、importしておくことで動的に<style>を生成し<head>タグ内に追加されます。
このメインのクラスは、Visualforceで呼び出せるようにexportしておきます。
import './style/main.sass';
import $ from 'jquery';
import React from 'react';
import ReactDom from 'react-dom';
import SampleComponent from './react/sample-component';


export class Main {
  constructor(name_) {
    this._name = name_;

    this._$sample_component_div = $('<div />');
    $('#contents_area').append(this._$sample_component_div);
  }

  load() {
    const items = [{
      id: '001',
      name: 'hoge',
    }, {
      id: '002',
      name: 'fuga',
    }];

    ReactDom.render(<SampleComponent items={ items } />, this._$sample_component_div.get(0));

    alert(this._name);
  }
}
Visualforce
Salesforceへのデプロイ後は、bundle.jsを読み込みます。webpackでlibraryTargetを指定することでJavaScriptのグローバルのwindowにmain.jsのクラスが出力されているので、あとは親フォルダ名で呼び出して使ってください。
Visualforceのグローバル変数などは、コンストラクター等で渡すとかいろんな方法がありそうですね。
<apex:page
  cache="false"
  sidebar="false"
  showHeader="false"
  standardStylesheets="false"
  applyBodyTag="false"
  applyHtmlTag="false"
  docType="html-5.0">

<html>

  <body>
    <div id="contents_area"></div>

    <script src="{!URLFOR($Resource.SampleResource, '/bundle.js')}"></script>
    <script>
      var _main = new SampleResource.Main('{!$User.UserName}');
      _main.load();
    </script>
  </body>

</html>

</apex:page>
実行結果

終わりに
上記のソースは、GitHubにあります。
Source code (zip)を落として展開したら、gulpfile.babel.jsのprocess.env.SF_USERNAMEとprocess.env.SF_PASSWORDを設定します(loginUrlのhttps://test.salesforce.comも適宜変更)。
その後、ターミナルで展開したフォルダまで移動しモジュールをインストールした後、gulpで実行してサンプルのソースを適当に変更して保存してみてください。きっと動く。。。と思います。
cd deploy_salesforce_using_gulp_webpack-2.0
sudo npm i
gulp
また、コード補完やコード解析の設定ファイルも含んでいるので開発するエディタがAtomならば、atom-ternjs linter linter-eslint linter-sass-lintのPackageをAtomに入れてからソースのフォルダを読み込むと、エディタ上で確認できます。