2017/01/31 追記
CodecovでUIテストのカバレッジがきちんと収集されてないな… と思い調査してみたところ,他のリポジトリでも同様の現象が起こっていたようです.
どうやら,XcodeのIDEでUIテストを起動したときと,xcodebuildでCLIでテストを起動したときでは挙動が異なるらしく,それに起因するもののようです.
以下,参照したIssuesです.
UI Testsのカバレッジ収集以外に関しては,UI Testsの起動含めきちんと想定通りの動作をしております.
2017/06/24 追記
Xcode9においてはこの問題は解決したっぽいです.なので,Xcode9をTravis側がサポートしてくれるようになるとUIテストのカバレッジもきちんと収集されるようになるのかな?
初めに
今までと違う畑に慣れてくるとCIを回したくなるのがエンジニアの性というもの.タイトルの通り,iOSのプロジェクトをTravis CIでテストしてテストカバレッジをCodecovで可視化するところまでやります.テストコードは純粋なXCTestを使用しますが,細かい文法の説明などは本記事ではしませんのでご注意ください.
Travic CIについてももう説明不要かと思いますので割愛します.Codecovはコードカバレッジ可視化サービスの一つで,publicなリポジトリは無制限に,privateなら1つまで無料で使用できます.(欲を言えばTravisみたく学生ならばprivateリポジトリも無制限になって欲しい)
他の似たようなサービスとしてはCoverallsがありますが,なんとなく見た目が合わなかったので今回はCodecovにしました.特にこれといった比較検証はしていません.
なお,今回使用したテストプロジェクトはGitHubへあげてあります.
環境
- Xcode 8.1
- Swift 3.0.1
- iOS SDK 10.1
- iPhone7 Simulator
- Carthage 0.18.1
手順
1. プロジェクトとリポジトリ作成
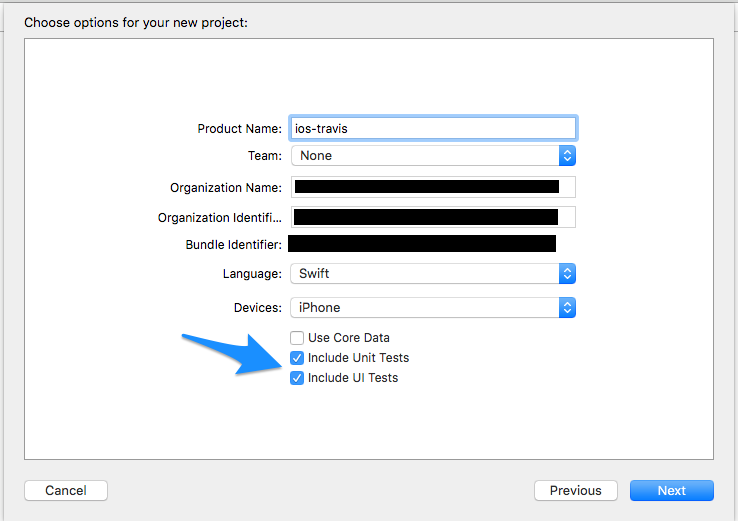
Xcodeのプロジェクトを作成する際の注意として,Include Unit TestsとInclude UI Testsにチェックを入れて置いたほうが後から手動で追加せずに済むので楽です.
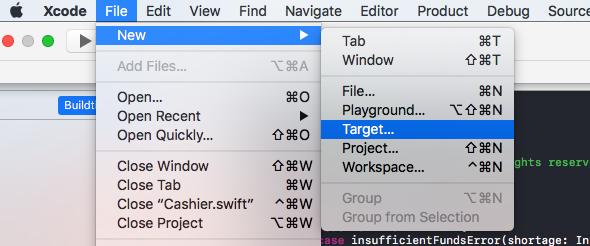
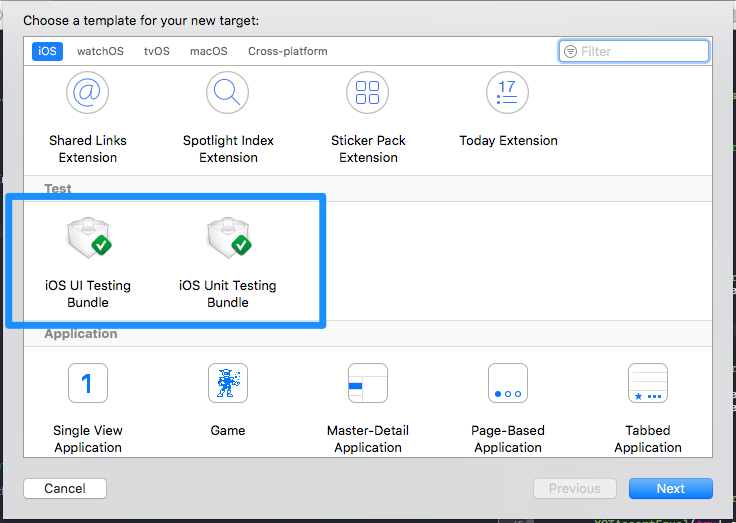
もしチェックし忘れて作成した場合は,メニューの「File -> New -> Target...」を選択し,iOS UI Testing BundleないしはiOS Unit Testing Bundleを追加すれば各々のファイルが一式追加されます.
あとはGitHubで適当なpublicリポジトリを作り,ローカルのリポジトリ内でgit remote add origin git@github.com:username/reponame.gitとかすればOKです.
2. XCTestでテストを書く
アプリのコードを書いたらテストコードを書いていきます.
2.1 Unit Tests
Unit Testの例として,今回は次のようなクラスを用意しました.
import Foundation

enum CashierError: Error {
    case insufficientFundsError(shortage: Int)
}

final class Cashier {
    private var balance: Int = 0

    init(balance: Int) {
        self.balance = balance
    }

    func getBalance() -> Int {
        return self.balance
    }

    @discardableResult
    func deposit(amount: Int) -> Int {
        self.balance += amount

        return self.balance
    }

    @discardableResult
    func withdraw(amount: Int) throws -> Int {
        if amount > self.balance {
            throw CashierError.insufficientFundsError(shortage: amount - self.balance)
        }

        self.balance -= amount

        return self.balance
    }
}
これのUnit Testのコードはこんな感じになりました.
import XCTest
@testable import ios_travis

class CashierTests: XCTestCase {

    override func setUp() {
        super.setUp()
        // Put setup code here. This method is called before the invocation of each test method in the class.
    }

    override func tearDown() {
        // Put teardown code here. This method is called after the invocation of each test method in the class.
        super.tearDown()
    }

    func testGetBalance() {
        let balance = 10000
        let cashier = Cashier(balance: balance)
        XCTAssertEqual(cashier.getBalance(), balance)
    }

    func testDeposit() {
        let balance = 10000
        let amount  = 1000
        let cashier = Cashier(balance: balance)

        XCTAssertEqual(cashier.deposit(amount: amount), balance + amount)
        XCTAssertEqual(cashier.getBalance(), balance + amount)
    }

    func testWithdraw() {
        let balance = 10000
        let amount1 = 1000
        let amount2 = 10001
        let cashier = Cashier(balance: balance)

        XCTAssertEqual(try! cashier.withdraw(amount: amount1), balance - amount1)
        XCTAssertEqual(cashier.getBalance(), balance - amount1)

        cashier.deposit(amount: amount1)
        XCTAssertThrowsError(try cashier.withdraw(amount: amount2)) { error in
            if let e = error as? CashierError, case .insufficientFundsError(let shortage) = e {
                XCTAssertEqual(shortage, amount2 - balance)
            } else {
                XCTAssert(false)
            }
        }
    }
}
冒頭部分の「@testable import ios_travis」がポイントです.普段アプリのコードを書いているTargetとテストコードを書くTargetが異なるため,明示的にimportする必要があります.加えて,@testableという指定をしてやることで,元のクラスの可視性がfileprivate以下でない限り(すなわち,internalかpublicかopenである限り),可視性がopenに上書きされ,参照できるようになり,さらに継承できるようになります.
テストは⌘+Uで実行できます.
2.2 UI Tests
UI Testの例として,今回は次のようなVCを用意しました.先程のCashierを使用したものです.
import UIKit

final class MainViewController: UIViewController {
    @IBOutlet private weak var balanceLabel: UILabel!
    @IBOutlet private weak var amountTextField: UITextField!

    private var cashier: Cashier = Cashier(balance: 10000)
    private var histories: [History] = []

    override func viewDidLoad() {
        super.viewDidLoad()

        self.balanceLabel.text = String(self.cashier.getBalance())
    }

    override func viewWillDisappear(_ animated: Bool) {
        super.viewWillDisappear(animated)

        self.amountTextField.resignFirstResponder()
    }

    override func prepare(for segue: UIStoryboardSegue, sender: Any?) {
        if segue.identifier == "showHistorySegue" {
            log.debug("showHistorySegue")

            if let vc = segue.destination as? HistoryViewController {
                vc.configure(histories: self.histories)
            }
        }
    }

    @IBAction private func didTapDepositButton(_ sender: Any) {
        guard let text = self.amountTextField.text, let amount = Int(text) else {
            return
        }

        let balance = self.cashier.deposit(amount: amount)
        self.balanceLabel.text    = String(balance)
        self.amountTextField.text = ""

        self.histories.append(History.deposit(amount))
    }

    @IBAction private func didTapWithdrawButton(_ sender: Any) {
        guard let text = self.amountTextField.text, let amount = Int(text) else {
            return
        }

        var balance = 0
        do {
            balance = try self.cashier.withdraw(amount: amount)
        } catch CashierError.insufficientFundsError(let shortage) {
            log.debug("AlertViewController will be shown")

            let alertVC = UIAlertController(title: "Error",
                                            message: "Amount(\(shortage)) is larger than current balance.",
                                            preferredStyle: .alert)
            alertVC.view.accessibilityIdentifier = "alert"
            let okButton: UIAlertAction = UIAlertAction(title: "OK", style: .default) { [weak self] action in
                self?.amountTextField.text = ""
            }
            alertVC.addAction(okButton)
            self.present(alertVC, animated: true, completion: nil)
            return
        } catch {
            fatalError("Uncaught exception was thrown")
        }

        self.balanceLabel.text    = String(balance)
        self.amountTextField.text = ""

        self.histories.append(History.withdraw(amount))
    }
}
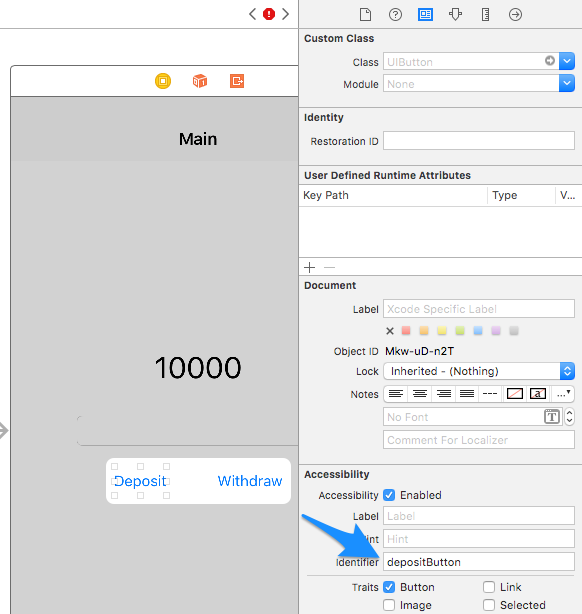
いくつかポイントがあって,UI TestではUIButtonやUILabel等の部品を参照しやすくするために,accessibilityIdentifierという識別子を設定してやる必要があります.
コード中でならtestButton.accessibilityIdentifier = "testButton"という風にし,StoryboardでならIdentity Inspectorを開いて下の画像のようにします.
一応,これをしなくてもできないことはないのですが,確実性を上げるためにしておいたほうが良いです.
UI Testのコードはこんな感じになりました.
import XCTest

class MainViewControllerUITests: XCTestCase {

    override func setUp() {
        super.setUp()

        // Put setup code here. This method is called before the invocation of each test method in the class.

        // In UI tests it is usually best to stop immediately when a failure occurs.
        continueAfterFailure = false
        // UI tests must launch the application that they test. Doing this in setup will make sure it happens for each test method.
        XCUIApplication().launch()

        // In UI tests it’s important to set the initial state - such as interface orientation - required for your tests before they run. The setUp method is a good place to do this.
    }

    override func tearDown() {
        // Put teardown code here. This method is called after the invocation of each test method in the class.
        super.tearDown()
    }

    func testDeposit() {
        let app = XCUIApplication()
        let textField = app.textFields["amountTextField"]
        textField.tap()
        textField.typeText("100")

        let depositButton = app.buttons["depositButton"]
        depositButton.tap()

        let balanceLabel = app.staticTexts["balanceLabel"]

        XCTAssertEqual(balanceLabel.label, "10100")
    }

    func testWithdraw() {
        let app = XCUIApplication()
        let textField = app.textFields["amountTextField"]
        textField.tap()
        textField.typeText("100")

        let withdrawButton = app.buttons["withdrawButton"]
        withdrawButton.tap()

        let balanceLabel = app.staticTexts["balanceLabel"]

        XCTAssertEqual(balanceLabel.label, "9900")
    }

    func testWithdraw_WithAlert() {
        let app = XCUIApplication()
        let textField = app.textFields["amountTextField"]
        textField.tap()
        textField.typeText("10001")

        let withdrawButton = app.buttons["withdrawButton"]
        withdrawButton.tap()

        let alert = app.alerts["alert"]
        XCTAssertTrue(alert.exists)
        alert.buttons["OK"].tap()
        XCTAssertFalse(alert.exists)
    }

    func testHistory() {
        let app = XCUIApplication()
        let historyButton = app.navigationBars["Main"].buttons["History"]
        historyButton.tap()

        let navigationBar = app.navigationBars["History"]
        XCTAssertTrue(navigationBar.exists)
    }
}
こちらはUnit Testのときのように「@testable import ios_travis」とする必要がありません.というのも,importしたところでデフォルトではVC等を参照できないからです.こちらのIssueにあるように,実際のUIのテストはアプリが走っているプロセスとは分離されたプロセスで走っているようで,直接そのコードのアクセスできないようです.そのため,前述の通り,accessibilityIdentifierに設定された識別子等を頼りにランタイムにUI要素へアクセスしているっぽいです(詳しいことは未検証です).
accessibilityIdentifierを用いたUI要素へのアクセス方法ですが,コードにある通り,テキストフィールドならapp.textFields["amountTextField"],ボタンならapp.buttons["withdrawButton"]という風にします.
「いちいちaccessibilityIdentifierとか打っていられないし,UITableViewとかはどうやってアクセスするんだ💢」となるのも時間の問題ですが,その辺を全部解消してくれる便利な機能がXcodeにはきちんとあります.
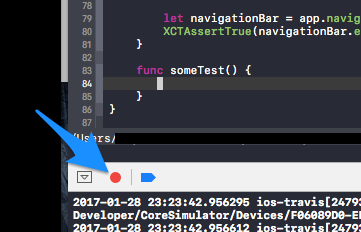
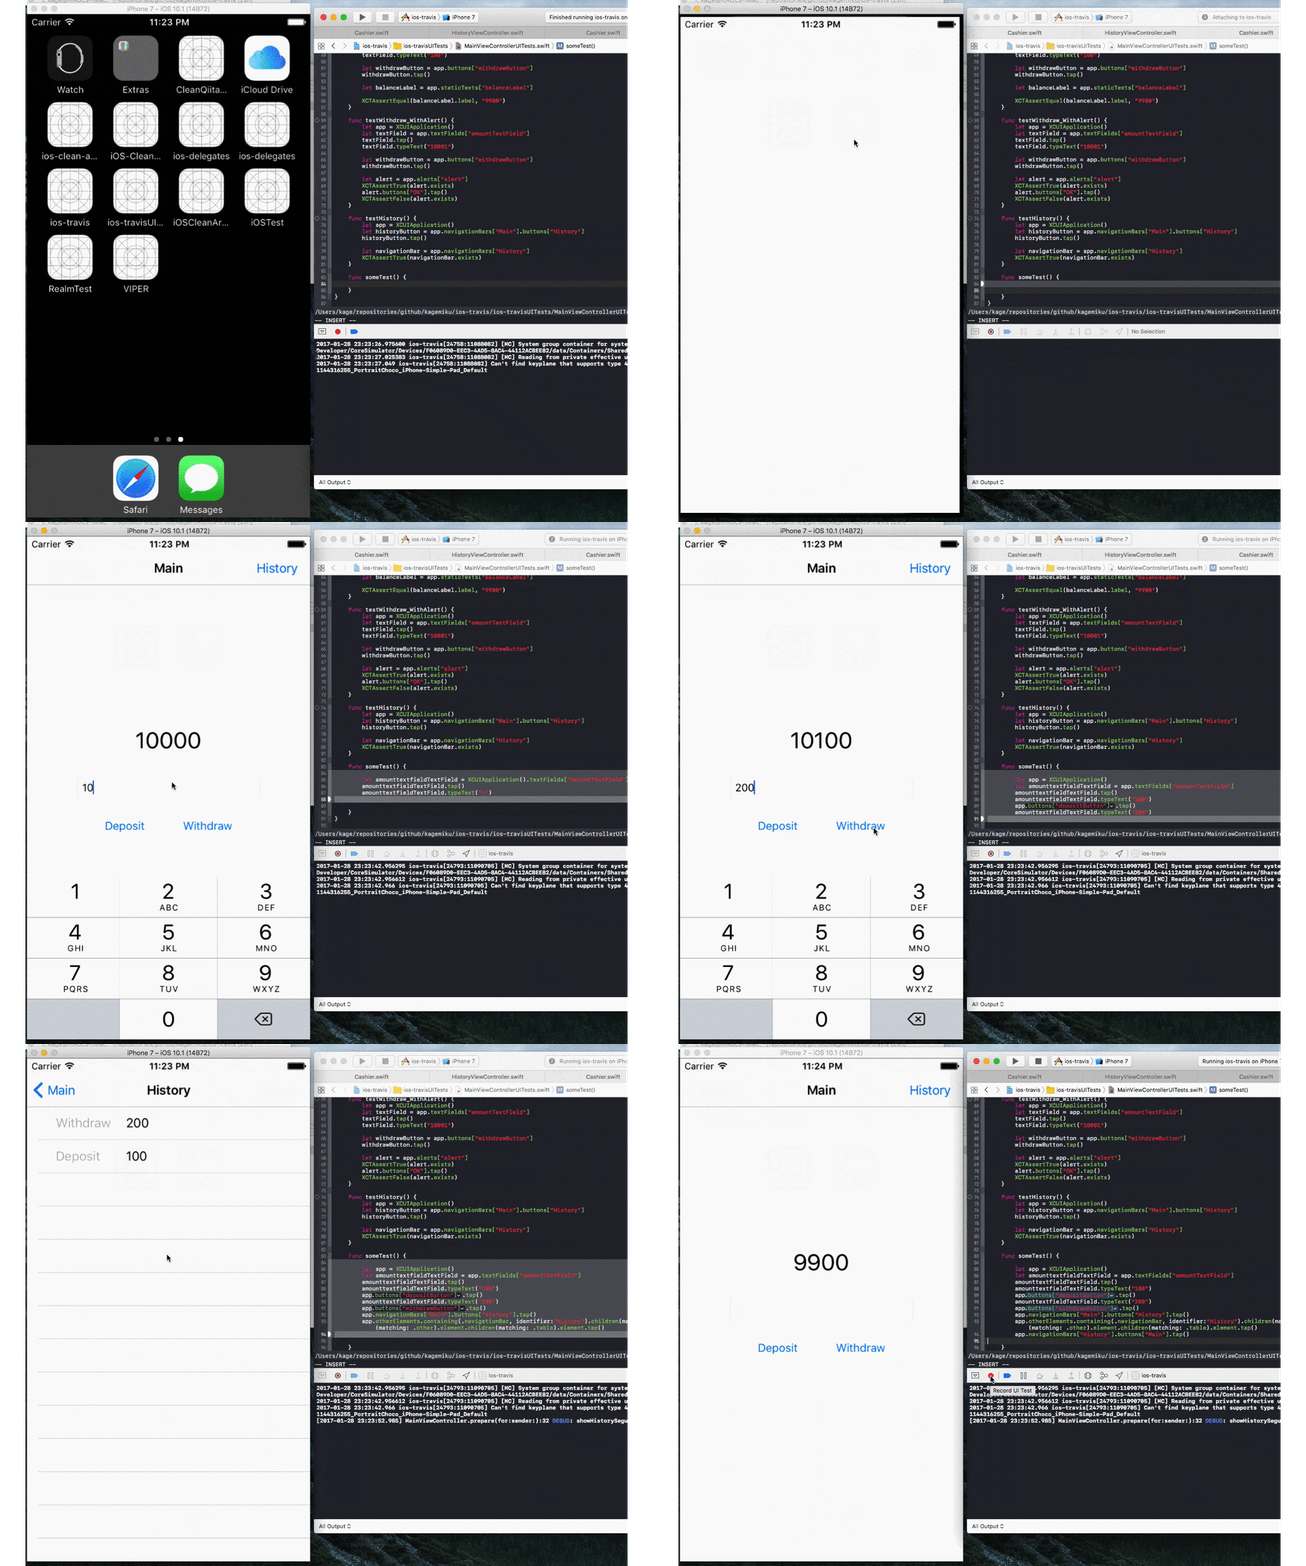
UI Testのコードを追加したい箇所にカーソルを置いて,Debug areaの上にある赤丸のRecord UI Testボタンを押すと,Simulator or 実機でアプリが起動して,自分が操作した通りのコードを自動で生成してくれます.
そのままでは機械的なコードなので,あとは適宜リファクタすればかなり楽できると思います.結構面白い機能で,これだけで小1時間は遊べます.
3. Travis CI
3.1 リポジトリの連携
いよいよTravis CIと連携していきます.過去にそれについて書いた記事があるので,そちらを参照して頂ければと思います.
3.2 ビルド設定ファイル
肝心の.travis.ymlの中身はこんな感じです.
language: objective-c
matrix:
    include:
        - osx_image: xcode8.1

before_install:
    - brew update
    - brew install carthage
    - carthage bootstrap --no-use-binaries --platform ios

script:
    - xcodebuild -scheme ios-travis -sdk iphonesimulator -destination 'platform=iOS Simulator,OS=10.1,name=iPhone 7' -configuration Debug test | xcpretty -c
Carthageを用いている場合,before_installのところにcarthage bootstrap --platform iosを書くのを忘れないようにしてください(--no-use-binaries等のオプションは適宜プロジェクトに合わせて変えてください).その際,Cartfile.resolvedもgit管理下に置くのを忘れずに.
また,scriptのところにあるパイプで繋いだxcprettyですが,これは別に必須ではないです.xcodebuildのログを整形・省略してくれる便利なコマンドで,Travis上で見やすくするのと,ログがあまりに長いとbuildがfailedになってしまうらしいとのことで自分は入れています.
詳しい導入方法については次の記事を参考にしてください.
具体的には,次のような感じです.
bundle init- Gemfileの編集
bundle install- できたGemfile.lockとGemfileをgit管理下に
# frozen_string_literal: true
source "https://rubygems.org"

gem "xcpretty"
3.3 Schemeの設定変更
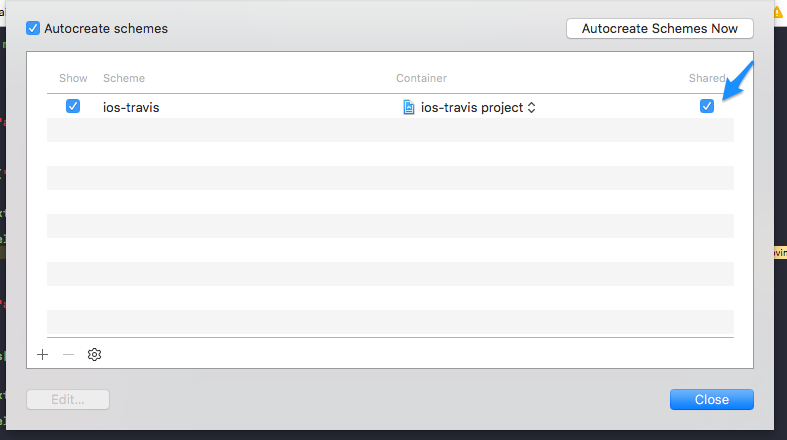
最後に,TravisがXcodeプロジェクトをビルドできるように,ビルドしたいSchemeをSharedにします.
4. Codecov
4.1 リポジトリの連携
Codecovへアクセスし,「Sign up with GitHub」をクリックしてGitHubアカウントと連携し,その後,テストカバレッジを収集したいリポジトリを選択します.
4.2 ビルド設定ファイルの編集
そして,先程の.travis.ymlファイルのscriptの最後にbash <(curl -s https://codecov.io/bash)を追加します.最終的な.travis.ymlファイルは次のようになります.
language: objective-c
matrix:
    include:
        - osx_image: xcode8.1

before_install:
    - brew update
    - brew install carthage
    - carthage bootstrap --no-use-binaries --platform ios

script:
    - xcodebuild -scheme ios-travis -sdk iphonesimulator -destination 'platform=iOS Simulator,OS=10.1,name=iPhone 7' -configuration Debug test | xcpretty -c
    - bash <(curl -s https://codecov.io/bash)
以上でTravisとCodecovとの連携は終了しました.git push origin master!!!
確認
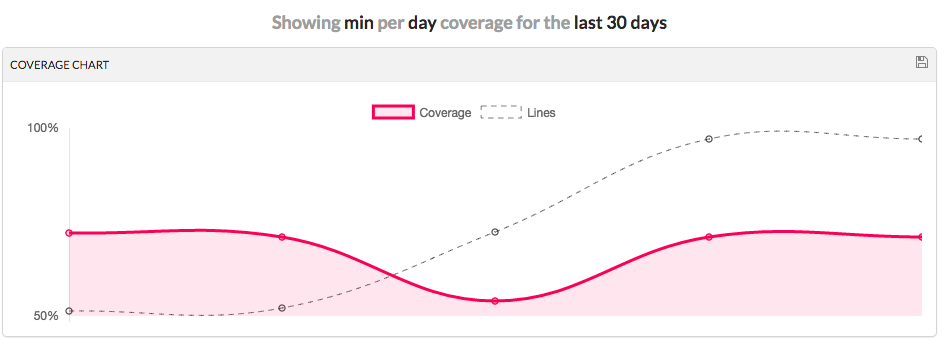
Codecovのリポジトリページを見てみると,コミットごとのカバレッジの推移グラフやファイル・ディレクトリごとのカバレッジをかなり見やすく確認することができます.
さいこう.
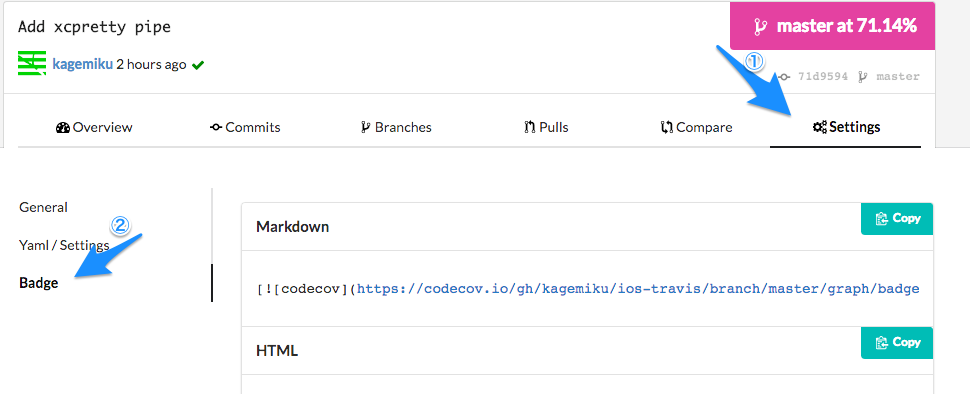
Badges
BadgeをREADME.mdに追加するまでがCIです
お疲れ様でした🎉🎉🎉🎉🎉
終わりに
次はipaの配布とSlackへの通知あたりまでしたいです.
