前提
- 2017年3月時点でNeoBundle.vimのアクティブな開発は中止されています。開発者は、Dein.vimを推奨しています。
- 私はNeoBundleしか扱ったことがないので、こちらを紹介させて頂きます。
概要
- Vimを使っていると「こういう機能ないかなぁ〜」「これができたら便利なのに」と思う場面がけっこうあります。それを解決してくれるのがプラグインです。
- プラグインとはわかりやすく言うと「拡張機能」です。
- 様々な便利機能があるので、導入しながら試してみることをオススメします。
- ここで紹介しているNeoBundle.vimを使ってプラグインを管理し、快適ライフをお送りください。
インストール手順
Gitの確認
- NeoBundleはGitがインストールされている必要があります。
- ターミナルに以下のコマンドを入力し、ご確認ください。
$ git version
git version 2.10.1 (Apple Git-78)
- バージョンが表示されていればインストールされています。
- もしインストールされていない場合は、Homebrewを使ってインストールします。
- Homebrewのインストール方法は、以下を参照ください。
- 初心者向け Homebrewをインストールする方法
- HomebrewでGitをインストールする
NeoBundleのインストール
- vimフォルダ以下にbundleフォルダを作成します。
$ mkdir -p ~/.vim/bundle
- 作成したbundleフォルダにneobundle.vimをクローンします。
$ git clone git://github.com/Shougo/neobundle.vim ~/.vim/bundle/neobundle.vim
- このような感じでインストールされます。
使用するための設定
- vimrcに以下の内容を記述してください。
$ vim ~/.vimrc
 " Note: Skip initialization for vim-tiny or vim-small.
 if 0 | endif

 if &compatible
   set nocompatible               " Be iMproved
 endif

 " Required:
 set runtimepath+=~/.vim/bundle/neobundle.vim/

 " Required:
 call neobundle#begin(expand('~/.vim/bundle/'))

 " Let NeoBundle manage NeoBundle
 " Required:
 NeoBundleFetch 'Shougo/neobundle.vim'

 " My Bundles here:
 " Refer to |:NeoBundle-examples|.
 " Note: You don't set neobundle setting in .gvimrc!

 call neobundle#end()

 " Required:
 filetype plugin indent on

 " If there are uninstalled bundles found on startup,
 " this will conveniently prompt you to install them.
 NeoBundleCheck
- こちらを記述した後、
:wでファイルを保存します。 - これでNeoBundleが使えるようになりました。
プラグインの導入
- それでは、さっそくプラグインを導入してみましょう。
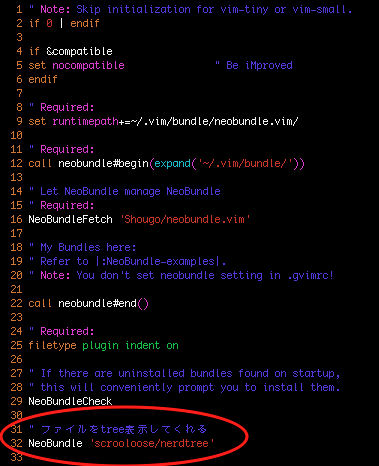
- vimrcに以下を記述してください。
" ファイルをtree表示してくれる
NeoBundle 'scrooloose/nerdtree'
- 次に、
:wで保存してください。 - すると以下のように表示されます。
- ここで
yを入力し、インストールしてください。 - 以下になったら、エンターを押してください。
- これでNERDTreeというプラグインをインストールできました。
プラグインの使用
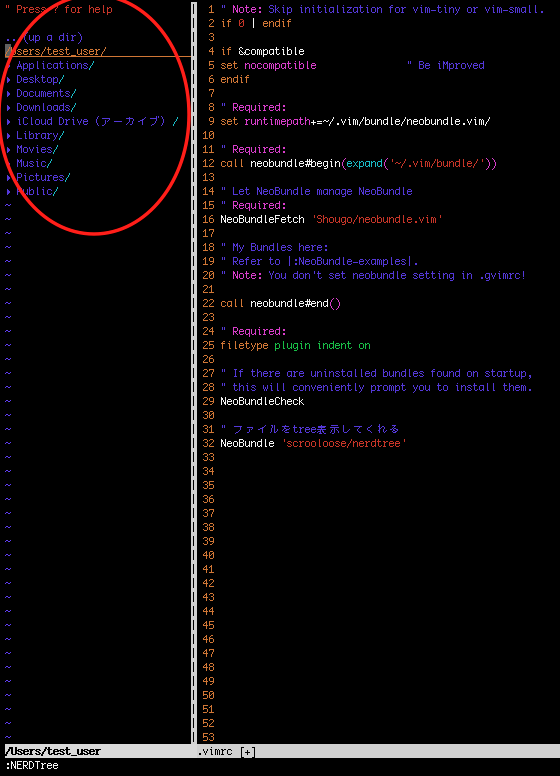
- 上記でインストールしたNERDTreeを使ってみましょう。
- ファイルを開いた状態で以下のコマンドを入力し、実行してください。
- するとファイル構造が左側に表示されます。
- そして、ここからファイルを選んで開くことができます。
- こちらが今インストールしたプラグインの機能です。
- このようにプラグインによって便利が機能が使えるようになるので、どんどん拡張してください。
プラグインの紹介
- プラグインには様々な種類があります。以下のページでそれが紹介されているので、ぜひ導入してオリジナルなVimにカスタマイズしてください。
- 脱初心者を目指すVimmerにオススメしたいVimプラグインや.vimrcの設定
- Vim pluginへの入門[NeoBundle.vim]


