listSelector とは
Android の ListView や GridView で、タッチ時の表示をカスタマイズするときには、listSelector 属性 を指定するやり方が一般的です。これは、StateListDrawable と呼ばれる Drawable を listSelector 属性に指定すると、各要素の選択時に、その Drawable が使われる、というものです。
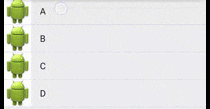
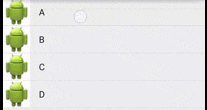
以下の動画で、左はデフォルト、右は listSelector を指定したものです。
右のように、タッチ時およびフォーカス時の背景色を変えたいときは、以下のような drawable を作成します。タップされたときに背景色がオレンジ(#F08000)になるように、また、フォーカスされたときに背景色が薄いオレンジ色(#44F08000)で、外枠が同じオレンジになるようにしています。
<selector xmlns:android="http://schemas.android.com/apk/res/android">
    <item android:state_pressed="true">
        <shape android:shape="rectangle">
            <solid android:color="#F08000"></solid>
        </shape>
    </item>
    <item android:state_focused="true">
        <shape android:shape="rectangle">
            <solid android:color="#44F08000"></solid>
            <stroke android:color="#F08000" android:width="2dp"/>
        </shape>
    </item>
</selector>
これを、以下のように ListView や GridView の listSelector に指定すれば、カスタム selector が適用されます。
<?xml version="1.0" encoding="utf-8"?>
<LinearLayout xmlns:android="http://schemas.android.com/apk/res/android"
    android:orientation="vertical" android:layout_width="match_parent"
    android:layout_height="match_parent">
    <ListView
        android:id="@+id/list"
        android:layout_width="match_parent"
        android:layout_height="match_parent"
        android:listSelector="@drawable/listselector"/>
</LinearLayout>
参考文献
この記事で参考にした文献です。
- Touch Feedback | Android Developers Android のタッチフィードバックについてのガイドラインです。
-
Drawable Resources | Android Developers
StateListDrawableについて。listSelectorに指定する drawable を書くときに参考になります -
ListView Tips & Tricks #3: Create Fancy ListViews - Cyril Mottier ListView に関する tips を連載した記事の第3回ですが、この回は
listSelectorについて説明されています。他の記事も参考になりますので、良かったらどうぞ。 -
Android - ListViewのlistSelectorを使ってタップしたときに色を変える - Qiita 下で解説する「
selectの子要素にcolorを使うべきではない」という話について触れています
listSelector のハマりどころ
さて、この listSelector にお世話になることが多いのですが、いくつか独特の癖があります。ここでは、そのような listSelector のハマりどころを5つ紹介したいと思います。
1. listSelector で指定された drawable は、セルの背後に描画される
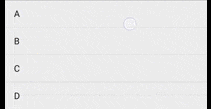
リストの各要素に画像を表示したいとしましょう。まずは、リスト要素を表すレイアウトファイルに ImageView を足します。そうすると、リストに画像が並びます。そこでタップしてみると、以下のように listSelector で指定したタッチフィードバックがテキスト部分にしか適用されないことに気付くでしょう。
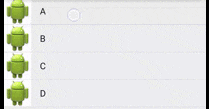
この原因は、ListView の描画順にあります。ListView は、下図のように、listSelector が ListView の各要素よりも下で描画されるのです。デフォルトでは、リスト要素の背景色は透明なので、listSelector は期待したとおりに動きます。しかし、背景が不透明なものが1つでもリスト要素に登場すると、この問題に当たってしまいます。
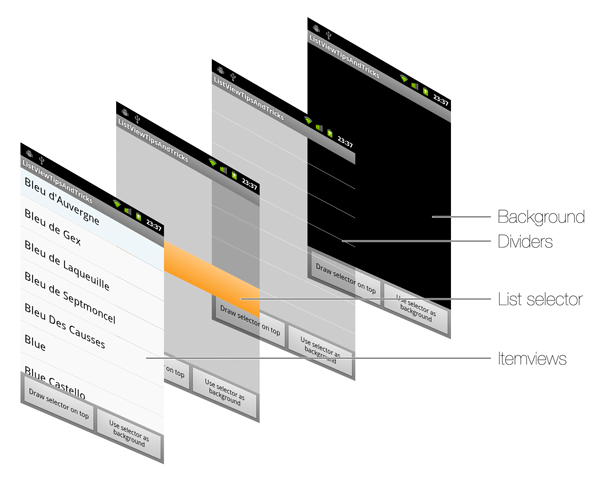
(ListView Tips & Tricks #3: Create Fancy ListViews - Cyril Mottier より)
この問題は、リスト要素に指定したレイアウトファイルで以下のように背景色を指定してしまった場合も同様です。その場合は、いっさい listSelector が表示されなくなります。
<TextView xmlns:android="http://schemas.android.com/apk/res/android"
    android:id="@android:id/text1"
    android:layout_width="match_parent"
    android:layout_height="wrap_content"
    android:background="@android:color/white"
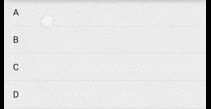
2. drawSelectorOnTop を指定すると前面に表示される
さて、それでは、どのように解決したら良いでしょうか。1つの方法は、各要素の一番上に透明の View を被せて、タップ時に、その View の背景色を変更することです。
もう1つの方法は、ListView の drawSelectorOnTop 属性を使う方法です。この属性が true のときは、selector は ListView の上に表示されます。さきほどの例で、この属性を true にしてみましょう。
    <ListView
        android:id="@+id/list"
        android:layout_width="match_parent"
        android:layout_height="match_parent"
        android:listSelector="@drawable/listselector"
        android:drawSelectorOnTop="true"/>
ご覧のように、無事に selector が画像の上に表示されるようになりました。一点、注意点としては、selector で指定する背景色を透過にしておくことです。そうしないと、タップ時にリスト要素が塗り潰されてしまいます。
3. listSelector はタップされた要素にしか描画されない
これも、初めて listSelector を使うときにハマりがちな点です。listSelector で以下のように記述したとしましょう。
<selector xmlns:android="http://schemas.android.com/apk/res/android">
    <item android:state_pressed="true">
        <shape android:shape="rectangle">
            <solid android:color="#F08000"></solid>
        </shape>
    </item>
    <item android:state_focused="true">
        <shape android:shape="rectangle">
            <solid android:color="#44F08000"></solid>
            <stroke android:color="#F08000" android:width="2dp"/>
        </shape>
    </item>
    <item>
        <shape android:shape="rectangle">
            <solid android:color="#FFFFFF"></solid>
        </shape>
    </item>
</selector>
このとき、タップしていないとき(クリックもフォーカスもしていないとき)は、最後の要素で指定した背景色が白(#FFFFFF)の設定が使われると思うかもしれません。残念ながら、そうなりません。タップが終わった直後は期待通りに白くなります。しかし、最初に ListView を表示したときには、背景色は白ではなく、デフォルトの透過色になっています。
これは、listSelector が、そもそも選択された要素の背景を指定するものだからです(API ドキュメントには Drawable used to indicate the currently selected item in the list. と書かれています)。リスト中で選択されていない要素には、listSelector が使われないため、デフォルトの透過色になってしまうのです。
StackOverflow にも似たような質問と回答(Changing background color of ListView items on Android - Stack Overflow)がありますが、AbsListView のコードで、以下のように、mSelector が AbsListView 内に一つしかないことも、この考えを裏付けています。
    void positionSelector(int position, View sel) {
        if (position != INVALID_POSITION) {
            mSelectorPosition = position;
        }
        ...
        // Update the selector drawable.
        final Drawable selector = mSelector;
        if (selector != null) {
            selector.setBounds(selectorRect);
        }
従って、もし非選択時のリスト要素の背景を透過色以外にしたいなら、StateListDrawable を listSelector ではなく、以下のようにリスト要素の背景に指定する方が良いでしょう。
<?xml version="1.0" encoding="utf-8"?>
<LinearLayout
    xmlns:android="http://schemas.android.com/apk/res/android"
    android:layout_width="match_parent" android:layout_height="match_parent"
    android:background="@drawable/listselector"
    android:orientation="horizontal">
    ...
</LinearLayout>
ただし、この方法を取るときは、すべての要素が同じレイアウトを利用しているか、あるいはそれぞれのレイアウト間で同じ背景が指定されているか確認しましょう。さもないと、一部の要素だけタッチフィードバックや外観が変わってしまうことになります。
4. selector 要素の子要素は、上から順に評価され、最初に一致したものが使われる
これは、listSelector に限った話ではありませんが、StateListDrawable は公式ドキュメントにも書かれているように、上から順に評価され、最初に一致したものが使われます。
During each state change, the state list is traversed top to bottom and the first item that matches the current state is used—the selection is not based on the "best match," but simply the first item that meets the minimum criteria of the state.
(Drawable Resources | Android Developersより)
従って、以下のような書き方をすると、タップ時に真っ白になってしまうので気を付けましょう。最初の要素がすべてを受けてしまうからです。
<selector xmlns:android="http://schemas.android.com/apk/res/android">
    <item>
        <shape android:shape="rectangle">
            <solid android:color="#FFFFFF"></solid>
        </shape>
    </item>
    <item android:state_pressed="true">
        <shape android:shape="rectangle">
            <solid android:color="#F08000"></solid>
        </shape>
    </item>
    <item android:state_focused="true">
        <shape android:shape="rectangle">
            <solid android:color="#44F08000"></solid>
            <stroke android:color="#F08000" android:width="2dp"/>
        </shape>
    </item>
</selector>
5. item に ColorDrawable は指定しない方が良い
Android - ListViewのlistSelectorを使ってタップしたときに色を変える - Qiita で解説されていますが、以下のように listSelector に shape ではなく color 要素を使うのは避けた方が良いです。
<?xml version="1.0" encoding="utf-8"?>
<selector xmlns:android="http://schemas.android.com/apk/res/android">
    <item android:state_pressed="true">
        <color android:color="#F08000" />
    </item>
    <item android:state_focused="true">
        <color android:color="#44F08000" />
    </item>
</selector>
Android 2.x では、タップ時に ListView 全体がその色で塗り潰されてしまうことが知られています(ListView Tips & Tricks #3: Create Fancy ListViews - Cyril Mottier の List selector の項でも「バグ」と指摘されています)。
そもそも、ColorDrawable には境界が存在しない(Drawable#getIntrinsicHeight() が -1 を返す)ので、selector がキャンバスいっぱいに描画されてしまうのでしょう。listSelector を使うときは ColorDrawable を使わないようにしましょう。
まとめ
以上のように、listSelector は、リスト全体にタッチフィードバックを適用したいときは非常に便利ですが、ちょっと癖があるので、気を付けないと訳の分からないバグに悩まされてしまいます。そんなときは、上に述べた内容をぜひ思い出してみてください。
本記事の内容がいくばくかでもお役に立てれば幸いです。