OpenCVを使った顔推定
前回は、Haar-like特徴分類器を使って顔領域を抽出しました(OpenCVを使った顔認識(Haar-like特徴分類器))。今回は、応用として、Haar-like特徴分類器で抽出した顔画像をOpenCVの顔推定器(Eigenface, Fisherface, LBPH)に学習させ、表情の違い、変装、ライトの当たり具合の違いがある中で、未学習の顔が誰の顔なのかを推測させてみます。
OpenCVが搭載している顔推定アルゴリズムは以下になります。(詳細はこちら)
-
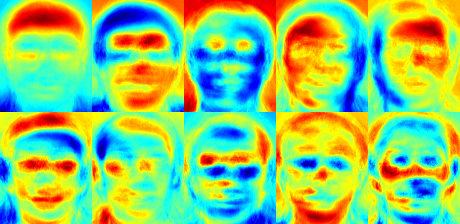
Eigenface(固有顔)
顔画像を固有顔に変換する、主成分分析(PCA)の処理過程は次のようになります。- 訓練用の画像(同じ照明条件、目や鼻の位置でスケーリング、同解像度)を準備します。
- 訓練用画像の平均を求め、平均画像を各画像から減算します。
- 減算した画像の共分散行列を計算します。
- 共分散行列から、固有ベクトルと固有値を計算します。
- 主成分を選択します。
-
Fisherface
Eigenfaceの改良版です。Eigenfaceと比較し、照明や角度の違いに影響されにくいという特徴があります。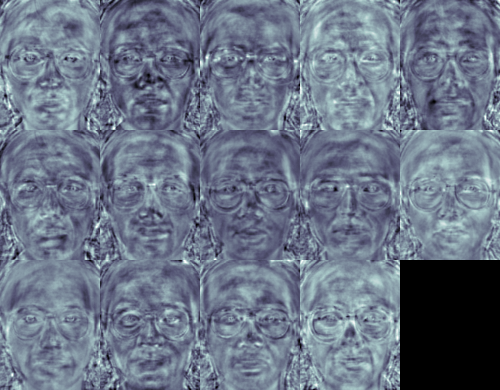
-
Local Binary Patterns Histogram(LBPH)
顔を小さなセルに分割し、それぞれのエリアのヒストグラムを比較します。このアルゴリズムはEigenface, Fisherfaceと比べ、サンプルの顔のサイズや形が異なっていても精度よく検出できるという特徴があります。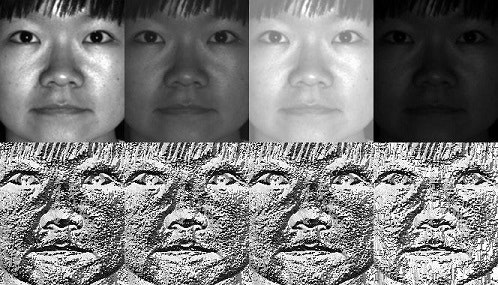
※ 画像は、いずれもOpenCVのチュートリアルから(リンク)
今回は、顔の認識を行いますが、これらのアルゴリズムは、筆跡鑑定、医用画像処理、読唇術にも応用される技術です。
面白いところでは、変装している人を見分けるなんてことも可能です。
OpenCV
OpenCV(Open Source Computer Vision Library)はBSDライセンスの映像/画像処理ライブラリ集です。画像のフィルタ処理、テンプレートマッチング、物体認識、映像解析、機械学習などのアルゴリズムが多数用意されています。
■ OpenCVを使った動体追跡の例 (OpenCV Google Summer of Code 2015)
https://www.youtube.com/watch?v=OUbUFn71S4s
■ インストールと簡単な使い方はこちら
OpenCV 3(core + contrib)をPython 3の環境にインストール&OpenCV 2とOpenCV 3の違い&簡単な動作チェック
★ OpenCV 3.1のopencv_contribのfaceモジュールはpredict()メソッドが意図通りに動作しませんでした。
今回は、Anaconda 2にOpenCV 2をインストールして下記プログラムを動作させています。
■ 静止画像の処理についてはこちら
OpenCVでエッジ検出してみる
OpenCVで各種フィルター処理をする(グラディエント、ハイパス、ラプラシアン、ガウシアン)
OpenCVで特徴点を抽出する(AgastFeature, FAST, GFTT, MSER, AKAZE, BRISK, KAZE, ORB, SimpleBlob)
OpenCVを使った顔認識(Haar-like特徴分類器)
■ 動画の処理についてはこちら
OpenCVで動画をリアルタイムに変換してみる
OpenCVでWebカメラ/ビデオカメラの動画をリアルタイムに変換してみる
OpenCVでオプティカルフローをリアルタイムに描画する(Shi-Tomasi法、Lucas-Kanade法)
OpenCVを使った物体追跡(マウスで指定した特徴点をLucas-Kanade法で追跡する
OpenCVを使ったモーション テンプレート解析(リアルタイムに物体とその動く方向を認識する)
顔データベース
画像処理でよく利用される顔データベースを紹介します。
- The Yale face database(Yalefaces):
http://vision.ucsd.edu/content/yale-face-database
GIF形式の顔画像です。 - The AT&T:
http://www.cl.cam.ac.uk/research/dtg/attarchive/facedatabase.html
PBM形式の顔画像です。
今回は、Yale face database(Yalefaces)を利用します。
訓練データとテストデータ
Yalefacesには、15人の様々な表情の顔が格納されています。それぞれの人が普通の顔、眼鏡をかけている顔、喜んでいる顔、ウィンクしている顔、悲しんでいる顔、悲しんでいる顔、驚いている顔、右/左からのライトが当たっている顔をしています。
適宜、それぞれの人の顔画像から任意の1枚の顔画像をテスト用として抜き取ります(訓練用画像にテスト画像を含めないようにします)。
今回は、訓練用画像をyalefacesディレクトリ、テスト用画像をtestディレクトリに格納しました。
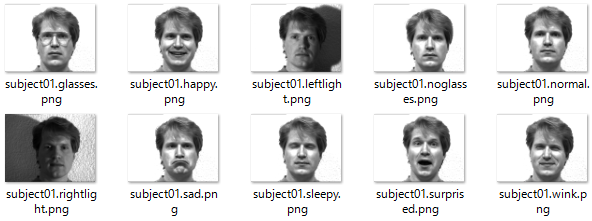
様々な表情の顔
プログラム
プログラムの流れは以下のとおりです。
- 訓練用画像を読み込む
- Haar-like特徴分類器を使って顔領域を抽出
- 顔領域を一定サイズにリサイズ
- 訓練データとして画像とラベルをFaceRecognizerでトレーニング(train())
- 全訓練用画像に対して1~4を繰り返し実施
- テスト用画像を読み込む
- Haar-like特徴分類器を使って顔領域を抽出
- 顔領域を一定サイズにリサイズ
- FaceRecognizerでテスト画像の予測実施(predict())⇒[ラベル, 確度]
- 全テスト用画像に対して6~9を繰り返し実施
プログラムのポイントがいくつかあります。
- ラベルは数値(int)で指定します。
- 訓練画像、テスト画像は同じ画像サイズにリサイズしておく必要があります。
- 確度(confidence)は、分散に基づいて計算されるため、0に近いほうが確度が高くなります。訓練時にテスト画像と同一画像を学習していると、特徴点が一致するため、確度(confidence)が0になります。
- OpenCVはGIF画像をサポートしていません。YalefacesのGIF画像は、Pillow(PIL)で処理します。
- Haar-like特徴分類器のテンプレートは、OpenCVに付属している
haarcascade_frontalface_default.xmlを利用します。 - 顔推定器のアルゴリズムをEigenFace, FisherFace, LBPHに切り替えたい場合は、コメントアウトしている
recognizerを切り替えてください。
# !/usr/bin/python
# -*- coding: utf-8 -*-

import cv2, os
import numpy as np
from PIL import Image

# トレーニング画像
train_path = './yalefaces'

# テスト画像
test_path = './test'

# Haar-like特徴分類器
cascadePath = "haarcascade_frontalface_default.xml"
faceCascade = cv2.CascadeClassifier(cascadePath)

# 顔認識器の構築 for OpenCV 2
#   ※ OpenCV3ではFaceRecognizerはcv2.faceのモジュールになります
# EigenFace
# recognizer = cv2.createEigenFaceRecognizer()
# FisherFace
# recognizer = cv2.createFisherFaceRecognizer()
# LBPH
recognizer = cv2.createLBPHFaceRecognizer()

# 指定されたpath内の画像を取得
def get_images_and_labels(path):
    # 画像を格納する配列
    images = []
    # ラベルを格納する配列
    labels = []
    # ファイル名を格納する配列
    files = []
    for f in os.listdir(path):
        # 画像のパス
        image_path = os.path.join(path, f)
        # グレースケールで画像を読み込む
        image_pil = Image.open(image_path).convert('L')
        # NumPyの配列に格納
        image = np.array(image_pil, 'uint8')
        # Haar-like特徴分類器で顔を検知
        faces = faceCascade.detectMultiScale(image)
        # 検出した顔画像の処理
        for (x, y, w, h) in faces:
            # 顔を 200x200 サイズにリサイズ
            roi = cv2.resize(image[y: y + h, x: x + w], (200, 200), interpolation=cv2.INTER_LINEAR)
            # 画像を配列に格納
            images.append(roi)
            # ファイル名からラベルを取得
            labels.append(int(f[7:9]))
            # ファイル名を配列に格納
            files.append(f)

    return images, labels, files


# トレーニング画像を取得
images, labels, files = get_images_and_labels(train_path)

# トレーニング実施
recognizer.train(images, np.array(labels))

# テスト画像を取得
test_images, test_labels, test_files = get_images_and_labels(test_path)

i = 0
while i < len(test_labels):
    # テスト画像に対して予測実施
    label, confidence = recognizer.predict(test_images[i])
    # 予測結果をコンソール出力
    print("Test Image: {}, Predicted Label: {}, Confidence: {}".format(test_files[i], label, confidence))
    # テスト画像を表示
    cv2.imshow("test image", test_images[i])
    cv2.waitKey(300)

    i += 1

# 終了処理
cv2.destroyAllWindows()
今回のプログラムは、Python 2.7.12とOpenCV 2.4.13で実行しました。
Python 3とOpenCV 3で実行する場合は、プログラム中のFaceRecognizerの部分をcv2からcv2.faceに変更してください。また、OpenCV 3.1では、FaceRecognizerのpredict()メソッドが意図した通りに動作しません。詳細はこちらのOpenCV2とOpenCV3の違い&etc.⇒バグで動作しないメソッドがあるを参照してください。
実行結果
subjectXXの「XX」の部分を数値としてラベルに設定して訓練を実行しています。テスト画像(Image)に対して、正しいラベル(Predicted Label)を推定することができています。
Eigenfaceで推定したところ、ライト関係のlabel=5, 6, 8, 9の推定に失敗し、その他の推定には成功しました。
Test Image: subject01.happy, Predicted Label: 1, Confidence: 4383.25505059
Test Image: subject02.wink, Predicted Label: 2, Confidence: 6947.75053221
Test Image: subject03.happy, Predicted Label: 3, Confidence: 4145.80848328
Test Image: subject04.glasses, Predicted Label: 4, Confidence: 5420.9213318
Test Image: subject05.leftlight, Predicted Label: 12, Confidence: 7722.72936213
Test Image: subject06.leftlight, Predicted Label: 1, Confidence: 10086.4101755
Test Image: subject07.glasses, Predicted Label: 7, Confidence: 7043.70495967
Test Image: subject08.leftlight, Predicted Label: 2, Confidence: 10275.9545456
Test Image: subject09.rightlight, Predicted Label: 15, Confidence: 7481.31094502
Test Image: subject10.sleepy, Predicted Label: 10, Confidence: 2317.22633915
Test Image: subject11.centerlight, Predicted Label: 11, Confidence: 8077.42380817
Test Image: subject12.glasses, Predicted Label: 12, Confidence: 5233.03342586
Test Image: subject13.surprised, Predicted Label: 13, Confidence: 6516.98395617
Test Image: subject14.normal, Predicted Label: 14, Confidence: 0.0
Test Image: subject15.surprised, Predicted Label: 15, Confidence: 7165.71597327
Fisherfaceで推定したところ、全ての推定に成功しました。
Test Image: subject01.happy, Predicted Label: 1, Confidence: 801.784987691
Test Image: subject02.wink, Predicted Label: 2, Confidence: 2368.90429845
Test Image: subject03.happy, Predicted Label: 3, Confidence: 826.018934498
Test Image: subject04.glasses, Predicted Label: 4, Confidence: 1080.94198758
Test Image: subject05.leftlight, Predicted Label: 5, Confidence: 2137.42013849
Test Image: subject06.leftlight, Predicted Label: 6, Confidence: 2092.53092982
Test Image: subject07.glasses, Predicted Label: 7, Confidence: 2042.67529443
Test Image: subject08.leftlight, Predicted Label: 8, Confidence: 2239.45348941
Test Image: subject09.rightlight, Predicted Label: 9, Confidence: 2875.2788263
Test Image: subject10.sleepy, Predicted Label: 10, Confidence: 662.762591569
Test Image: subject11.centerlight, Predicted Label: 11, Confidence: 1703.80515728
Test Image: subject12.glasses, Predicted Label: 12, Confidence: 1480.18770297
Test Image: subject13.surprised, Predicted Label: 13, Confidence: 1690.12255703
Test Image: subject14.normal, Predicted Label: 14, Confidence: 0.0
Test Image: subject15.surprised, Predicted Label: 15, Confidence: 1887.42538269
LBPHで推定したところ、ライト関係のlabel=6, 9の推定に失敗。その他は成功しました。
Test Image: subject01.happy, Predicted Label: 1, Confidence: 34.9751422497
Test Image: subject02.wink, Predicted Label: 2, Confidence: 37.8730262399
Test Image: subject03.happy, Predicted Label: 3, Confidence: 35.1183059319
Test Image: subject04.glasses, Predicted Label: 4, Confidence: 37.5886492389
Test Image: subject05.leftlight, Predicted Label: 5, Confidence: 48.2634869014
Test Image: subject06.leftlight, Predicted Label: 14, Confidence: 64.5502245279
Test Image: subject07.glasses, Predicted Label: 7, Confidence: 54.5043891288
Test Image: subject08.leftlight, Predicted Label: 8, Confidence: 84.4281976817
Test Image: subject09.rightlight, Predicted Label: 12, Confidence: 75.3254674542
Test Image: subject10.sleepy, Predicted Label: 10, Confidence: 17.8806440153
Test Image: subject11.centerlight, Predicted Label: 11, Confidence: 74.8238311755
Test Image: subject12.glasses, Predicted Label: 12, Confidence: 31.8721301084
Test Image: subject13.surprised, Predicted Label: 13, Confidence: 40.3420527188
Test Image: subject14.normal, Predicted Label: 14, Confidence: 0.0
Test Image: subject15.surprised, Predicted Label: 15, Confidence: 33.2920487407
3つのアルゴリズムの比較結果は、前評判通り、Fisherfaceがライトの影響を受けにくくなっていました。
また、推定の成功、失敗はConfidenceの値とある程度対応した結果になったため、Confidenceに閾値を設け、信頼できない推定結果は、推定不能の項目に分類するとよさそうでした。
(おまけ)GIF画像 → PNG画像変換
OpenCVはパテントの問題を回避するため、GIF画像をサポートしていません。cv2.imread()でGIF画像を読み込んでも何も読み込みません。
GIF形式の顔画像データベース、YalefacesをOpenCVで利用したい方は、下記スクリプトで事前にPNG形式の顔画像に変換しておくと便利です。下記スクリプトは「yalefaces」ディレクトリ内のGIF画像をPNG画像に変換して「png」ディレクトリに保存します。必要な方は下記スクリプトをご利用ください。
# -*- coding: utf-8 -*-

import os
from PIL import Image
import shutil

# 変換対象ファイルを格納したディレクトリ
org_dir = 'yalefaces'
# 変換対象ファイルの拡張子
org_ext = 'gif'
# 変換後のファイルを格納するディレクトリ
conv_dir = 'png'
# 変換後のファイルの拡張子
conv_ext = 'png'

# 既存のディレクトリをファイルも含めて削除
if os.path.exists(conv_dir):
    shutil.rmtree(conv_dir)
# ディレクトリを作成
os.mkdir(conv_dir)

# 「.」と拡張子を合わせた文字列長
org_ext_len = len(org_ext) + 1

for dirname, dirnames, filenames in os.walk(org_dir):
    for filename in filenames:
        # 変換対象ファイルのパス
        org_path = org_dir + '/' + filename

        # 返還後のファイルパス
        if len(filename) > org_ext_len and \
            filename[-org_ext_len:] == '.' + org_ext:
            filename = filename[0:-org_ext_len]
        conv_path = conv_dir + '/' + filename + '.' + conv_ext

        try:
            # 変換実行
            Image.open(org_path).save(conv_path)
        except IOError:
            print('cannot convert :', org_path)
Pythonの画像処理ライブラリ、PILモジュールがインストールされていない方は、pillowをインストールしてください。
例)
$ conda install pillow