2019/6/2 追記
内容を大幅に見直した改訂版を書きました。
【改訂版】PrismとReactivePropertyで簡単MVVM!
2018/3/27 追記
今までViewModelがPlain Objectのままのコードを掲載しておりましたが、Plain ObjectをViewにバインドするとメモリリークになってしまうそうです。
参考リンク : http://aridai.net/article/?p=15
本記事中のViewModelのコードを修正いたしました。
大変失礼いたしました。
最近になってWPFで作りたいものができたので、勉強したことをメモしてみたいと思います。
WPFには強力なデータバインド機能が備わっていますが、何も考えずWindows Formsの頃のようにコードビハインドへ記述するやり方では、この機能を活かすことはできないんですね。
そこでプログラマーは、できる限りMVVMパターンに沿ったコードの書き方を「意識して」行なわなくてはダメだというわけです。
面倒くさがりな私がMVVMパターンをできるだけ簡単に記述できないかと調べてみたところ、「Prism」と「ReactiveProperty」を使うのが良さそうだと分かりました。
Prism
PrismにはMVVMパターンをサポートする機能が含まれています。
現時点でバージョンは6.1.0。
NuGetで「Prism.Core」をインストールしておきましょう。
ReactiveProperty
データバインドに対応したObservableなプロパティを作成できます。
現時点でバージョンは2.4.2。
NuGetで「ReactiveProperty」をインストールすると、依存関係にあるReactiveExtensions(Rx-XXXX)もインストールされます。
簡単MVVM
まずはサンプルコードから。
2つの数値を足し合わせて結果を表示するだけのWPFアプリです。
2017/8/19追記
XAML内で宣言しているi名前空間ですが、使用するには参照設定が必要です。
System.Windows.Interactivity への参照を加えてください。
using Prism.Mvvm;

namespace Sample
{
    public class Model : BindableBase
    {
        private double _x;
        private double _y;

        public double X
        {
            get { return _x; }
            set { SetProperty(ref _x, value); }
        }

        public double Y
        {
            get { return _y; }
            set { SetProperty(ref _y, value); }
        }

        public Model(double x, double y)
        {
            _x = x;
            _y = y;
        }

        public double Sum()
        {
            return X + Y;
        }
    }
}
using System.ComponentModel.DataAnnotations;

namespace Sample
{
    public class DoubleValidation : ValidationAttribute
    {
        public override bool IsValid(object value)
        {
            double d;
            return double.TryParse(value.ToString(), out d);
        }
    }
}
using Prism.Events;

namespace Sample
{
    public class Messenger : EventAggregator
    {
        private static Messenger _instance;

        public static Messenger Instance
        {
            get { return _instance ?? (_instance = new Messenger()); }
        }
    }
}
using System;
using System.Reactive.Linq;
using Prism.Mvvm;
using Prism.Events;
using Reactive.Bindings;
using Reactive.Bindings.Extensions;

namespace Sample
{
    public class ViewModel : BindableBase
    {
        private Model _model;

        [DoubleValidation]
        public ReactiveProperty<string> X { get; }

        [DoubleValidation]
        public ReactiveProperty<string> Y { get; }

        public ReactiveCommand SendSum { get; }

        public ViewModel()
        {
            _model = new Model(0.0, 0.0);
            X = _model.ToReactivePropertyAsSynchronized(
                m => m.X,
                x => x.ToString(),
                s => double.Parse(s),
                ReactivePropertyMode.DistinctUntilChanged
                    | ReactivePropertyMode.RaiseLatestValueOnSubscribe,
                true)
                .SetValidateAttribute(() => X);
            Y = _model.ToReactivePropertyAsSynchronized(
                m => m.Y,
                y => y.ToString(),
                s => double.Parse(s),
                ReactivePropertyMode.DistinctUntilChanged
                    | ReactivePropertyMode.RaiseLatestValueOnSubscribe,
                true)
                .SetValidateAttribute(() => Y);
            SendSum = X.ObserveHasErrors.CombineLatest(
                Y.ObserveHasErrors, (x, y) => !x && !y)
                .ToReactiveCommand();
            SendSum.Subscribe(
                _ => Messenger.Instance
                    .GetEvent<PubSubEvent<double>>().Publish(_model.Sum()));
        }
    }
}
using System.Windows;
using Prism.Events;

namespace Sample
{
    public partial class View : Window
    {
        public View()
        {
            InitializeComponent();

            Messenger.Instance
                .GetEvent<PubSubEvent<double>>().Subscribe(
                    d => MessageBox.Show(d.ToString()));
        }
    }
}
<Window x:Class="Sample.View"
        xmlns="http://schemas.microsoft.com/winfx/2006/xaml/presentation"
        xmlns:x="http://schemas.microsoft.com/winfx/2006/xaml"
        xmlns:d="http://schemas.microsoft.com/expression/blend/2008"
        xmlns:mc="http://schemas.openxmlformats.org/markup-compatibility/2006"
        xmlns:i="http://schemas.microsoft.com/expression/2010/interactivity"
        xmlns:prism="http://prismlibrary.com/"
        xmlns:r="clr-namespace:Reactive.Bindings.Interactivity;assembly=ReactiveProperty.NET45"
        xmlns:local="clr-namespace:Sample"
        mc:Ignorable="d"
        Title="MainWindow" Height="350" Width="350">
    <Window.DataContext>
        <local:ViewModel/>
    </Window.DataContext>
    <StackPanel>
        <TextBox
            Text="{Binding X.Value,
                Mode=TwoWay,
                UpdateSourceTrigger=PropertyChanged,
                ValidatesOnDataErrors=True}"/>
        <TextBox
            Text="{Binding Y.Value,
                Mode=TwoWay,
                UpdateSourceTrigger=PropertyChanged,
                ValidatesOnDataErrors=True}"/>
        <Button Content="Sum" Height="30" Command="{Binding SendSum}"/>
    </StackPanel>
</Window>
実行結果はこちら。
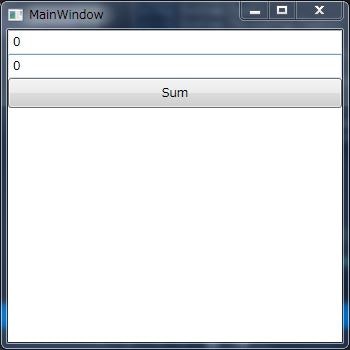
2つのテキストボックスに入力された数値を足し合わせた結果を表示するアプリです。
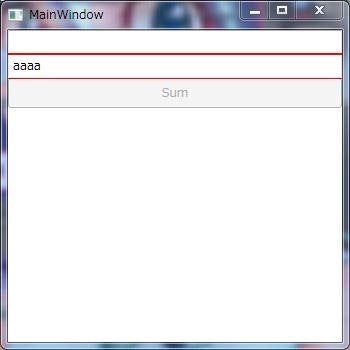
空白やdouble以外の文字列は、Validationによってはじかれます。
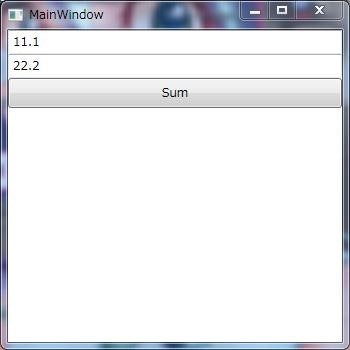
数値を正しく入力するとSumボタンが押下できるようになります。
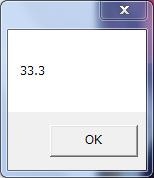
結果が表示されます。
Modelの作り方
MVVMにおけるModelは、ViewModelにプロパティの変更を通知できるよう実装する必要があります。
標準では「System.ComponentModel.INotifyPropertyChanged」インターフェイスを実装するわけですが、Prismの「Prism.Mvvm.BindableBase」クラスを継承すると、プロパティ変更通知の仕組みを少しだけ楽に記述できます。
public class Model : BindableBase
{
    private double _x;
    public double X
    {
        get { return _x; }
        set { SetProperty(ref _x, value); }
    }
}
SetProperty()にプロパティの実体となる変数を渡すことで、値が変更された際にPropertyChangedイベントが発生します。
SetProperty()を使わずに明示的にPropertyChangedを発生させるには、OnPropertyChanged()を使用します。
public class Model : BindableBase
{
    private double _x;
    public double X
    {
        get { return _x; }
        set
        {
            if (_x != value)
            {
                _x = value;
                OnPropertyChanged();
            }
        }
    }
}
ViewModelの作り方
ViewModelはModelのプロパティを監視する必要があり、またViewに自身のプロパティの変更を通知しなくてはなりません。
ReactivePropertyの「Reactive.Bindings.ReactiveProperty」クラスは、自らが監視者となってINotifyPropertyChangedなどを監視しつつ、自身もまたIObservableとして変更通知を行なうことができます。
Modelを監視する方法は以下の通り。
public class ViewModel : BindableBase
{
    private INotifyPropertyChanged _inpc;
    private Poco _poco

    public ReactiveProperty<T> TwoWay { get; }
    public ReactiveProperty<T> OneWay { get; }
    public ReactiveProperty<T> OneWayToSource { get; }
    public ReactiveProperty<T> ObserveIObservable { get; }

    public MainWindowViewModel()
    {
        _inpc = new ObservableObject();
        _poco = new Poco();

        TwoWay = _inpc.ToReactivePropertyAsSynchronized(x => x.Property);
        OneWay = _inpc.ObserveProperty(x => x.Property).ToReactiveProperty();
        OneWayToSource = ReactiveProperty.FromObject(_poco, x => x.Property);
        ObserveIObservable = TwoWay.Select(x => x.Id).ToReactiveProperty();
    }
}
ViewがViewModelをバインドする際には、「Value」プロパティを使用します。
<StackPanel>
    <TextBox Text="{Binding X.Value}"/>
</StackPanel>
ViewModelにおけるValidation
ViewModelがViewから受けとった値をModelと同期する際、Validationを設定することができます。
先ほどの例では、double値に変換できる文字列のみを許可するよう、「System.ComponentModel.DataAnnotations.ValidationAttribute」クラスを継承した自作属性を使用しました。
ValidationAttributeを自作する方法は簡単で、IsValid()をオーバーライドするだけです。
public class DoubleValidation : ValidationAttribute
{
    public override bool IsValid(object value)
    {
        double d;
        return double.TryParse(value.ToString(), out d);
    }
}
ValidationAttribute属性をもとにReactivePropertyがValidationを行なうには、以下のようにします。
public class ViewModel : BindableBase
{
    private Model _model;

    [DoubleValidation]
    public ReactiveProperty<string> X { get; }

    public ViewModel()
    {
        _model = new Model(0.0, 0.0);
        X = _model.ToReactivePropertyAsSynchronized(
            m => m.X,
            x => x.ToString(),
            s => double.Parse(s),
            ReactivePropertyMode.DistinctUntilChanged
                | ReactivePropertyMode.RaiseLatestValueOnSubscribe,
            true)
            .SetValidateAttribute(() => X);
    }
}
このように、SetValidateAttribute()でValidationAttribute属性のついたプロパティを指定することで、それに対応するValidationが実行されるようになります。
この場合、IDataErrorInfoによるエラーチェックとなります。
エラーをViewが受け取るには、ViewのBindingに「ValidatesOnDataErrors=True」を指定しましょう。
なお、INotifyDataErrorInfoによるエラーチェックも可能です。
ここで、ToReactivePropertyAsSynchronized()の引数の意味を解説します。
最初の引数(m => m.X)はSystem.Linq.Expressions.Expression型で、監視するプロパティを指定しています。
2番目の引数(x => x.ToString())と3番目の引数(s => double.Parse(s))はそれぞれ、監視対象からReactivePropertyへの変換、ReactivePropertyから監視対象への変換を指定しています。
4番目の引数は、監視対象の値が変更された際のReactivePropertyの挙動を指定しています。
「ReactivePropertyMode.DistinctUntilChanged」を指定すると、監視対象から変更通知はあったけれども実際の値は変化していない場合に、自身は変更通知を発行しません。
指定しないと、同じ値でも変更通知を発行します。
「ReactivePropertyMode.RaiseLatestValueOnSubscribe」を指定すると、Subscribe()された瞬間に最新の値(無ければ初期値)を一度発行するようになります。
指定しないと、実際に値が更新されるまでは何も発行しません。
この2つのフラグはデフォルト値です。
最後の引数(true)は、Validationでエラーがあった場合に、監視対象への値の書き込みをしないかどうかを指定しています。
デフォルトはfalseです。
ViewModelのCommand
ViewからViewModelの処理を呼び出せるように、ViewModel内にCommandを用意する必要がありますが、Commandを簡単に記述できる「Reactive.Bindings.ReactiveCommand」があります。
ReactiveCommandは、CanExecute()をIObservableから生成することができます。
public class ViewModel : BindableBase
{
    private Model _model;

    [DoubleValidation]
    public ReactiveProperty<string> X { get; }

    [DoubleValidation]
    public ReactiveProperty<string> Y { get; }

    public ReactiveCommand SendSum { get; }

    public ViewModel()
    {
        _model = new Model(0.0, 0.0);
        X = _model.ToReactivePropertyAsSynchronized(
            m => m.X,
            x => x.ToString(),
            s => double.Parse(s),
            ReactivePropertyMode.DistinctUntilChanged
                | ReactivePropertyMode.RaiseLatestValueOnSubscribe,
            true)
            .SetValidateAttribute(() => X);
        Y = _model.ToReactivePropertyAsSynchronized(
            m => m.Y,
            y => y.ToString(),
            s => double.Parse(s),
            ReactivePropertyMode.DistinctUntilChanged
                | ReactivePropertyMode.RaiseLatestValueOnSubscribe,
            true)
            .SetValidateAttribute(() => Y);
        SendSum = X.ObserveHasErrors.CombineLatest(
            Y.ObserveHasErrors, (x, y) => !x && !y)
            .ToReactiveCommand();
        SendSum.Subscribe(
            _ => Messenger.Instance
                .GetEvent<PubSubEvent<double>>().Publish(_model.Sum()));
    }
}
ToReactiveCommand()によりReactiveCommandを生成しています。
「ReactiveProperty.ObserveHasErrors」は、Validationのエラーの有無が変化した時にboolを発行するIObservableです。
CombineLatest()によりXとYのエラー状況を合算して、両方ともエラーが無い時にtrueとなるCanExecute()になります。
ReactiveCommandは、Execute()時に発行されるIObservableなので、コマンドの実体はSubscribe()で記述すればOKです。
SendSum.Subscribe()で使用しているMessengerについては、この後説明します。
ViewModelとMessenger
ViewModelからViewに命令を出すために、ViewModelがViewのインスタンスを持つわけにはいきません。
そこでMessengerパターンを適用します。
Messengerは、ViewとViewModelの間を仲介します。
Messengerには、ViewModelから発行されたメッセージを受けとり、Viewへと通知する役割を持たせます。
「Prism.Events.EventAggregator」がMessengerの機能を持っているので、それを継承したシングルトンのクラスを定義します。
public class Messenger : EventAggregator
{
    private static Messenger _instance;

    public static Messenger Instance
    {
        get { return _instance ?? (_instance = new Messenger()); }
    }
}
あとは、これを使用してメッセージをPublishしてやればいいです。
public class ViewModel : BindableBase
{
    private Model _model;

    public ReactiveCommand SendSum { get; }

    public ViewModel()
    {
        // ...

        SendSum.Subscribe(
            _ => Messenger.Instance
                .GetEvent<PubSubEvent<double>>().Publish(_model.Sum()));
    }
}
「Prism.Events.PubSubEvent」に指定するジェネリック型は、Publish()で発行するメッセージの型です。
Viewの作り方
Viewのコードビハインドで、Messengerのメッセージ受信時の動作を登録しておきましょう。
public partial class View : Window
{
    public View()
    {
        InitializeComponent();

        Messenger.Instance
            .GetEvent<PubSubEvent<double>>().Subscribe(
                d => MessageBox.Show(d.ToString()));
    }
}
XAML側では、「ReactiveProperty.Value」を普通にBindingするだけです。
ViewとEvent
ViewからViewModelへの命令はCommandで記述することが望ましいです。
EventとCommandを関連づけるには~~「System.Windows.Interactivity.InvokeCommandAction」を使用します~~。
2016/02/17追記:
「System.Windows.Interactivity.InvokeCommandAction」では、イベントのEventArgsを取得することができません。
代わりに「Prism.Interactivity.InvokeCommandAction」を使用することで、CommandのパラメータとしてEventArgsを受けとることができます。
これを使用するためには、NuGetから「Prism.Wpf」をインストールする必要があります。
下記コードも修正しておきます。
<Window x:Class="Sample.View"
        xmlns="http://schemas.microsoft.com/winfx/2006/xaml/presentation"
        xmlns:x="http://schemas.microsoft.com/winfx/2006/xaml"
        xmlns:d="http://schemas.microsoft.com/expression/blend/2008"
        xmlns:mc="http://schemas.openxmlformats.org/markup-compatibility/2006"
        xmlns:i="http://schemas.microsoft.com/expression/2010/interactivity"
        xmlns:prism="http://prismlibrary.com/"
        xmlns:r="clr-namespace:Reactive.Bindings.Interactivity;assembly=ReactiveProperty.NET45"
        xmlns:local="clr-namespace:Sample"
        mc:Ignorable="d"
        Title="MainWindow" Height="350" Width="350">
    <Window.DataContext>
        <local:ViewModel/>
    </Window.DataContext>
    <StackPanel>
        <ListBox ItemsSource="{Binding Items}">
            <i:Interaction.Triggers>
                <i:EventTrigger EventName="SelectionChanged">
                    <prism:InvokeCommandAction Command="{Binding Command}"/>
                </i:EventTrigger>
            </i:Interaction.Triggers>
        </ListBox>
    </StackPanel>
</Window>
Eventの発行をReactivePropertyが受けとるには、「Reactive.Bindings.Interactivity.EventToReactive」を使用します。
以下の例では、マウスをWindow上でドラッグすると、ドラッグ中のマウス座標の最新5件を表示します。
<Window x:Class="Sample.MainWindow"
        xmlns="http://schemas.microsoft.com/winfx/2006/xaml/presentation"
        xmlns:x="http://schemas.microsoft.com/winfx/2006/xaml"
        xmlns:d="http://schemas.microsoft.com/expression/blend/2008"
        xmlns:mc="http://schemas.openxmlformats.org/markup-compatibility/2006"
        xmlns:i="http://schemas.microsoft.com/expression/2010/interactivity"
        xmlns:prism="http://prismlibrary.com/"
        xmlns:r="clr-namespace:Reactive.Bindings.Interactivity;assembly=ReactiveProperty.NET45"
        xmlns:local="clr-namespace:Sample"
        mc:Ignorable="d"
        Title="MainWindow" Height="350" Width="350">
    <Window.DataContext>
        <local:MainWindowViewModel/>
    </Window.DataContext>
    <i:Interaction.Triggers>
        <i:EventTrigger EventName="MouseDown">
            <r:EventToReactive ReactiveProperty="{Binding MouseDown}"/>
        </i:EventTrigger>
        <i:EventTrigger EventName="MouseMove">
            <r:EventToReactive ReactiveProperty="{Binding MouseMove}"/>
        </i:EventTrigger>
        <i:EventTrigger EventName="MouseUp">
            <r:EventToReactive ReactiveProperty="{Binding MouseUp}"/>
        </i:EventTrigger>
    </i:Interaction.Triggers>
    <StackPanel>
        <ListBox Height="100" ItemsSource="{Binding MouseXY}"/>
    </StackPanel>
</Window>
public class MainWindowViewModel : BindableBase
{
    public ReactiveProperty<MouseEventArgs> MouseDown { get; }
    public ReactiveProperty<MouseEventArgs> MouseMove { get; }
    public ReactiveProperty<MouseEventArgs> MouseUp { get; }
    public ReactiveCollection<string> MouseXY { get; }

    public MainWindowViewModel()
    {
        MouseDown = new ReactiveProperty<MouseEventArgs>(
            mode: ReactivePropertyMode.None);
        MouseMove = new ReactiveProperty<MouseEventArgs>(
            mode: ReactivePropertyMode.None);
        MouseUp = new ReactiveProperty<MouseEventArgs>(
            mode: ReactivePropertyMode.None);
        MouseXY = new ReactiveCollection<string>();
        MouseXY = MouseDown.Merge(
            MouseDown.SelectMany(MouseMove.TakeUntil(MouseUp)))
            .Select(e => e.GetPosition(null))
            .Select(p => p.X + "," + p.Y)
            .ToReactiveCollection();
        MouseXY.CollectionChanged +=
            (s, e) =>
            {
                if (MouseXY.Count > 5) MouseXY.RemoveAtOnScheduler(0);
            };
    }
}
「Reactive.Bindings.ReactiveCollection」は、発行された値を全てコレクションに保存するという動作をします。
最新5件のみを保持するよう、CollectionChangedイベント中に古いデータを削除するよう指示しています。
しかし、RemoveAt()で削除しようとすると例外が発生します。
これは、CollectionChangedイベント中にコレクションを変更できないためです。
代わりにRemoveAtOnScheduler()を使用することで、この問題を回避できます。
ReactivePropertyやReactiveCollectionには、デフォルトで「System.Reactive.Concurrency.UIDispatcherScheduler」が設定されています。
このスケジューラは指定された処理をUIスレッド上で実行する働きがあります。
終わりに
WPFを勉強し始めたばかりの私ですので、表面的な部分しか触れられませんでした。
MVVMに沿ってコーディングするには何かと工夫が必要そうですから、今後少しずつ研鑽を積みたいと思います。
以上です。