現在のangular-cliはビルドツールがSystemJSからwebpackになったのでこれから始める方は
こちらを見てください
今回はAngular2をはじめる上でベースとなるプロジェクトを作成してくるangular-cliと、
UIフレームワークをいれるまでを紹介します。
Angular2が動くまで
まずはangular-cliをインストール
npm install -g angular-cli
プロジェクトを作ってみます
typingsが入ってない場合はまずnpm install -g typingsでインストールしておいてください
ng new PROJECT_NAME
処理が終わった後に
ng serve
で何もエラーがでなければ、http://localhost:4200/で下記のような画面になるはず

これで一旦セットアップ完了!
特に何も手を加えることなくAngular2がさわれる環境ができた!
UIフレームワークをいれてみる
今回SalesforceがリリースしたCSSフレームワークのSalesforce Lightning Design System(SLDS)を使用する。
https://github.com/ng-lightning/ng-lightning
package.json
今回必要なng-lightningとSLDSに必要なcssやiconなどが入ったdesing-systemなどを追加します。
--- a/package.json
+++ b/package.json
@@ -20,10 +20,13 @@
     "@angular/platform-browser": "2.0.0-rc.1",
     "@angular/platform-browser-dynamic": "2.0.0-rc.1",
     "@angular/router": "3.0.0-alpha.3",
+    "@salesforce-ux/design-system": "^1.0.0",
     "es6-shim": "0.35.1",
+    "ng-lightning": "^0.11.1",
     "reflect-metadata": "0.1.3",
     "rxjs": "5.0.0-beta.6",
     "systemjs": "0.19.26",
+    "tether": "^1.2.0",
     "zone.js": "0.6.12"
   },
   "devDependencies": {
angular-cli-build.js
build時の設定がかかれています。
ここで指定したものがdist配下のvendorの中にビルド時に
おかれます。
--- a/angular-cli-build.js
+++ b/angular-cli-build.js
@@ -15,7 +15,11 @@ module.exports = function(defaults) {
       'es6-shim/es6-shim.js',
       'reflect-metadata/**/*.+(ts|js|js.map)',
       'rxjs/**/*.+(js|js.map)',
-      '@angular/**/*.+(js|js.map)'
+      '@angular/**/*.+(js|js.map)',
+      'ng-lightning/**/*',
+      '@salesforce-ux/design-system/assets/**/*',
+      'ts-helpers/**/*',
+      'tether/**/*'
     ]
   });
 };
src/system-config.ts
ng-lightningを使用するためにmapの設定を行います。
ts-helpersなどはng-lightningを使用する際に使用するので一緒にmapに指定してあげます。
--- a/src/system-config.ts
+++ b/src/system-config.ts
@@ -7,10 +7,17 @@
  **********************************************************************************************/
 /** Map relative paths to URLs. */
 const map: any = {
+  'ng-lightning/ng-lightning': 'vendor/ng-lightning',
+  'ts-helpers': 'vendor/ts-helpers/index.js',
+  'tether': 'vendor/tether/dist/js/tether.js',
 };

 /** User packages configuration. */
 const packages: any = {
+  'ng-lightning/ng-lightning': {
+    defaultExtension: 'js',
+    main: 'ng-lightning.js'
+  },
 };
後はview部分を設定していきます。
src/index.html
このファイルはテンプレートファイルとなります。
先ほどangular-cli-build.jsに'@salesforce-ux/design-system/assets/**/*',を追記したので、
dist/vendor配下にディレクトリが出来たと思います。出来ていない場合はng buildをするなどしてみてください。
中にstylesheetが入っているので指定してあげます。
--- a/src/index.html
+++ b/src/index.html
@@ -4,6 +4,7 @@
   <meta charset="utf-8">
   <title>Hogehoge</title>
   <base href="/">
+  <link rel="stylesheet" href="vendor/@salesforce-ux/design-system/assets/styles/salesforce-lightning-design-system-ltng.css">

   {{#unless environment.production}}
   <script src="/ember-cli-live-reload.js" type="text/javascript"></script>
@@ -11,7 +12,7 @@
   <meta name="viewport" content="width=device-width, initial-scale=1">
   <link rel="icon" type="image/x-icon" href="favicon.ico">
 </head>
-<body>
+<body class="slds">
   <app-root>Loading...</app-root>
src/main.ts
このファイルがrootのファイルとなります。
svgPathを指定しているのは、デフォルトがassets/iconsなのですが、今回はvendor配下に
対象のディレクトリがあるので、そちらを指定してあげます。
--- a/src/main.ts
+++ b/src/main.ts
@@ -1,10 +1,12 @@
 import { bootstrap } from '@angular/platform-browser-dynamic';
 import { enableProdMode } from '@angular/core';
 import { AppComponent, environment } from './app/';
+import { provideNglConfig } from 'ng-lightning/ng-lightning';

 if (environment.production) {
   enableProdMode();
 }

-bootstrap(AppComponent);
-
+bootstrap(AppComponent, [
+  provideNglConfig({'svgPath': 'vendor/@salesforce-ux/design-system/assets/icons'}),
+]);
src/app/app.component.ts
ng-lightningのdirectivesをimportして指定します。
--- a/src/app/app.component.ts
+++ b/src/app/app.component.ts
@@ -1,11 +1,14 @@
 import { Component } from '@angular/core';
+import { NGL_DIRECTIVES } from 'ng-lightning/ng-lightning';

 @Component({
   moduleId: module.id,
   selector: 'app-root',
   templateUrl: 'app.component.html',
-  styleUrls: ['app.component.css']
+  styleUrls: ['app.component.css'],
+  directives: [NGL_DIRECTIVES]
 })
 export class AppComponent {
   title = 'app works!';
+  selected: boolean = false;
 }
src/app/app.component.html
実際にhtmlに配置してみます
--- a/src/app/app.component.html
+++ b/src/app/app.component.html
@@ -1,3 +1,13 @@
<h1>
{{title}}
</h1>
+
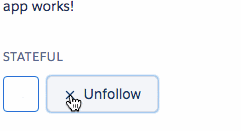
+<div class="slds-text-heading--label slds-m-top--x-large slds-m-bottom--small">Stateful</div>
+<button type="button" nglButtonIcon [(nglButtonState)]="selected">
+ <ngl-icon icon="settings"></ngl-icon>
+</button>
+<button type="button" nglButton="neutral" [(nglButtonState)]="selected">
+ <ngl-icon icon="add" state="not-selected">Follow</ngl-icon>
+ <ngl-icon icon="check" state="selected">Following</ngl-icon>
+ <ngl-icon icon="close" state="selected-focus">Unfollow</ngl-icon>
+</button>
起動
サーバーを立ち上げたら終わりです
ng serve
最後に
今回はUIフレームワークをいれるところまでやりましたが、angular-cliがとにかく便利です。
プロジェクトを作成してくれるだけでなく、github pageのデプロイなどの機能をついています。
Angular2さわってみたいけど、どこからやろうかの人は実際にさわるのでおすすめです。
今回使用したリポジトリはこちらです。
github pageにもデプロイされているので、動作などはこちらからさわってみてください
https://hatappi.github.io/angular2-lightning/