追記
2018/10/19
「問題その2 描画がはみ出す」への対処が間違っていました。StencilViewとRelativeLayoutを同時に継承はできません。理由はStencilViewのcanvas命令が非Relative系のwidget用に書かれているからです。なので現在はPreviewはRelativeLayoutのみを継承し、canvasを以下のように上書きしています。
                Preview:
                    id: preview
                    canvas.before:
                        Clear:
                        PushMatrix:
                        Translate:
                            xy: self.pos
                        StencilPush:
                        Rectangle:
                            pos: 0, 0
                            size: self.size
                        StencilUse:
                    canvas.after:
                        Clear:
                        StencilUnUse:
                        Rectangle:
                            pos: 0, 0
                            size: self.size
                        StencilPop:
                        PopMatrix:
因みにこれはStencilViewのcanvasとRelativeLayoutのcanvasを組み合わせた上で少し修正した物になっています。
はじめに
Kivyの公式projectの一つにKivy Designerというのがあるのですが、これが私のPCにとっては重くてよく落ちたりもしたので、軽いやつを作ってみました。作る上で必要となる部品(widget)はほとんどKivy側で用意されていて、こちらが書くコードはその部品を繋ぎあわせるだけで単純なので、Kivyのtutorialになるかと思い記事にしました。
あとKivy1.10.0にてkviewerという物が追加されたのですが、そちらの方がこの記事で作るeditorよりも優れているので、実際の開発ではそちらを使う事をお薦めします。このeditorの存在意義は勉強の為だけです。
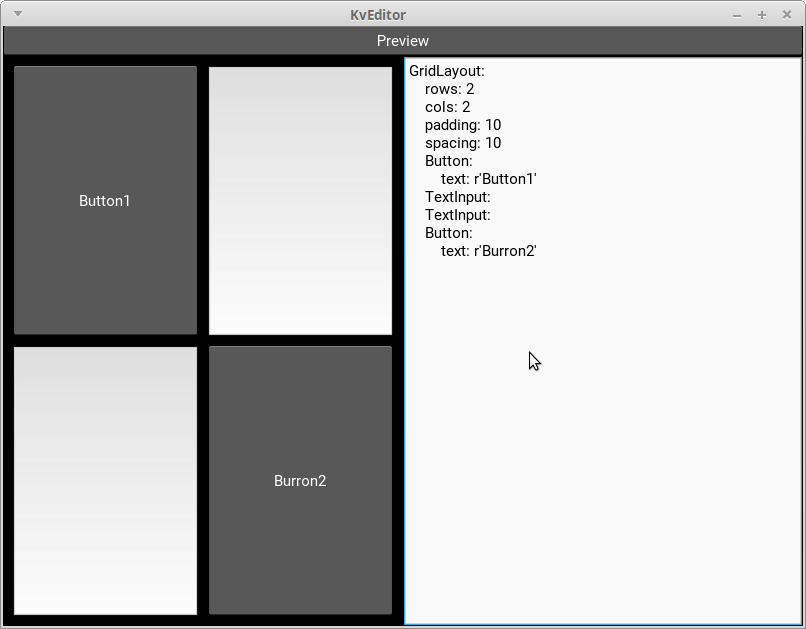
最終的に作る物

上の図のような物を最終的に作り上げます。KivyDesignerとは違いマウスでwidgetをデザインすることはできません。コードは手書きで、あくまでその結果をすぐに左側で確認できるというだけです。
とりあえず最低限の機能で作ってみる
いきなり上の図のような物を作ろうとするとコードが難しくなるので、少しずつ機能を付け足して作っていくことにします。
コード
# :kivy 1.9.1

<KvEditor>:
    BoxLayout:
        orientation: 'vertical'
        BoxLayout:
            orientation: 'horizontal'
            size_hint_y: None
            height: 30
            Button:
                text: 'Preview'
                on_press: root.kve_preview()
        BoxLayout:
            RelativeLayout:
                id: preview
            TextInput:
                id: editor

KvEditor:
import kivy
kivy.require('1.9.1')
from kivy.app import App
from kivy.lang import Builder
from kivy.factory import Factory
class KvEditorApp(App):
pass
class KvEditor(Factory.FloatLayout):
def kve_preview(self):
'''editor部に書かれたコードからwidgetを作って左側に貼り付ける
Builder.load_stringは
1. 与えられたKvコードに問題があると例外を投げる
2. 与えられたKvコードにroot ruleが無い時はNoneを返す
ようなので、その場合はそれがユーザーに分かるようエラーメッセージの書かれたLabelを作って貼り付けている
'''
editor = self.ids.editor # editor部分のwidget(TextInput)
preview = self.ids.preview # 作ったwidgetの貼り付け先のWidget
preview.clear_widgets() # 以前貼り付けたwidgetを破棄
widget = None
try:
widget = Builder.load_string(editor.text) # A
except Exception as e:
temp = [str(e.__class__)]
temp.extend(str(arg) for arg in e.args)
error_msg = '\n'.join(temp)
else:
if widget is None:
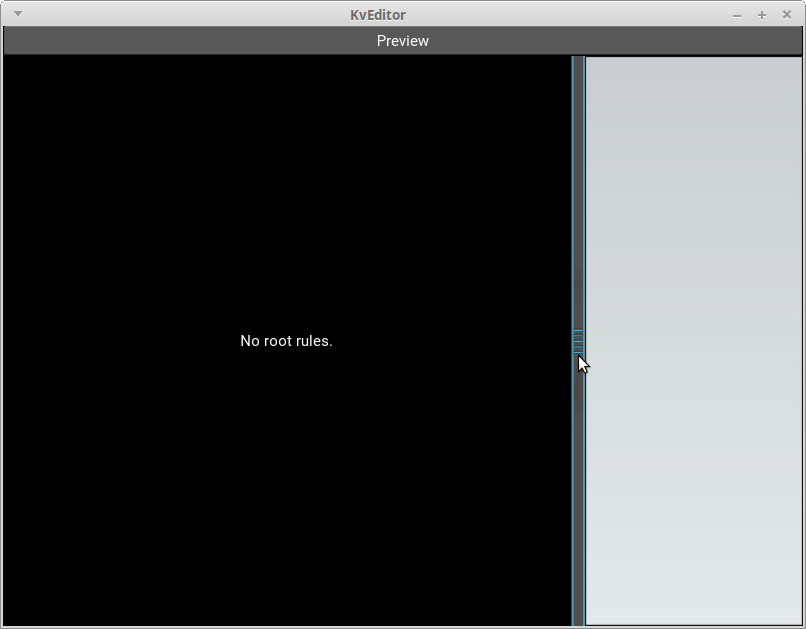
error_msg = 'No root rules.'
if widget is None:
# Widgetの作成に失敗した時は、代わりにエラーメッセージの書かれたLabelを貼り付ける
preview.add_widget(Factory.Label(text=error_msg))
else:
preview.add_widget(widget) # B
if __name__ == '__main__':
KvEditorApp().run()
.py側で書いたのは実質kve_prview()というPreviewボタンが押された時に呼ばれるmethodだけです。他の部分はKivyプログラムを書く時のお決まりなので。methodの中身ですが、利用者が書いたKv言語のコードからwidgetを作っているのがA行のBuilder.load_string()、それをwidget treeに繋げる事で表示させているのがB行のpreview.add_widget()、他はError処理です。
ここからどんどん機能を加えていきたいのですがその前に、実は上のコードにはbugがあるので先にそれを取り除きます。
問題その1 前の定義が残っている
そのbugは、dynamic classを使ったKvコードを書いてPreviewボタンを二回押すと確認できます。
<MyWidget@Widget>:
[WARNING ] [Factory ] Ignored class "MyWidget" re-declaration. Current - module: None, cls: None, baseclass: Widget, filename: None. Ignored - module: None, cls: None, baseclass: Widget, filename: None.
MyWidgetの再定義になり二回目の物は無視されました。KvEditorの利用者は、Kvコードを書いてはPreview・書いてはPreviewを繰り返すわけですから、前の定義は消さないといけません。
修正
書き換えるのはmain.pyのみで以下のようになります。
import kivy
kivy.require('1.9.1')
from kivy.app import App
from kivy.lang import Builder
from kivy.factory import Factory


class KvEditorApp(App):
    pass


class KvEditor(Factory.FloatLayout):

    KV_FILENAME = 'kveditor_internal'  # A

    def kve_preview(self):
        editor = self.ids.editor  # Editor部分のWidget(TextInput)
        preview = self.ids.preview  # 作ったWidgetの貼り付け先のWidget
        preview.clear_widgets()  # 以前貼り付けたWidgetを破棄
        Builder.unload_file(self.KV_FILENAME)  # 以前のKvコードを無効化  # B

        widget = None
        try:
            widget = Builder.load_string(editor.text, filename=self.KV_FILENAME)  # C
        except Exception as e:
            temp = [str(e.__class__)]
            temp.extend(str(arg) for arg in e.args)
            error_msg = '\n'.join(temp)
        else:
            if widget is None:
                error_msg = 'No root rules.'
        if widget is None:
            # Widgetの作成に失敗した時は、代わりにエラーメッセージの書かれたLabelを貼り付ける
            preview.add_widget(Factory.Label(text=error_msg))
        else:
            preview.add_widget(widget)


if __name__ == '__main__':
    KvEditorApp().run()
A〜Cが変更点で、Buider.load_string()の引数filenameに文字列を与えると、同じ文字列をBuilder.unload_file()に与える事で読み込んだKvコードを無効化できるわけです。
問題その2 描画がはみ出す
下のscreenshotがもう一つの問題です。
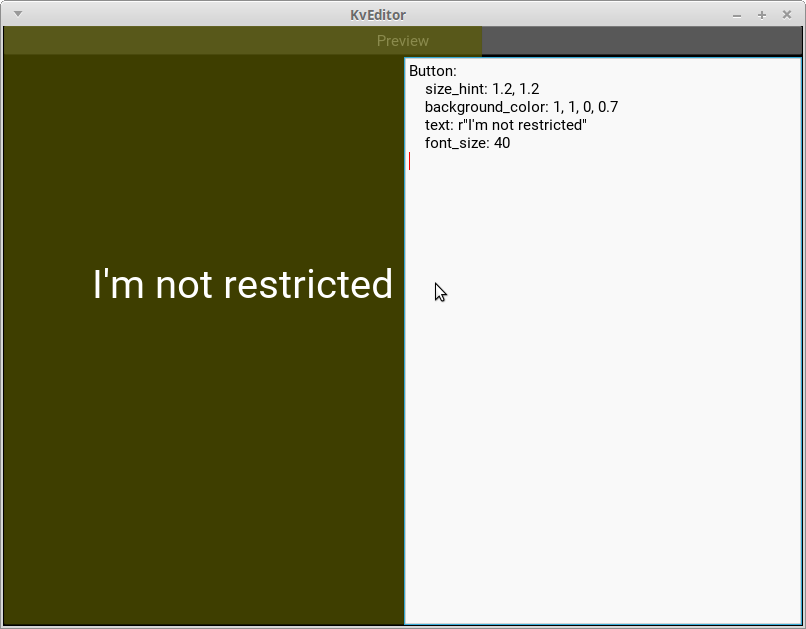
半透明Buttonがpreview用の領域を越えて描画されているのがわかります。editor部分には描画されていないかに見えますが、これはおそらくeditorの方が後に(つまりは半透明Buttonの上から)描画されているだけでしょう。とにかくここで言いたいのは各Widgetの描画領域は既定では何にも制約されない為、他のWidgetの領域まで侵してしまうという事です。なのでこれを制限しないといけません。
修正
# :kivy 1.9.1

<KvEditor>:
    BoxLayout:
        orientation: 'vertical'
        BoxLayout:
            orientation: 'horizontal'
            size_hint_y: None
            height: 30
            Button:
                text: 'Preview'
                on_press: root.kve_preview()
        BoxLayout:
            Preview:  # A
                id: preview
            TextInput:
                id: editor

KvEditor:
略

class Preview(Factory.RelativeLayout, Factory.StencilView):  # B
    pass


if __name__ == '__main__':
    KvEditorApp().run()
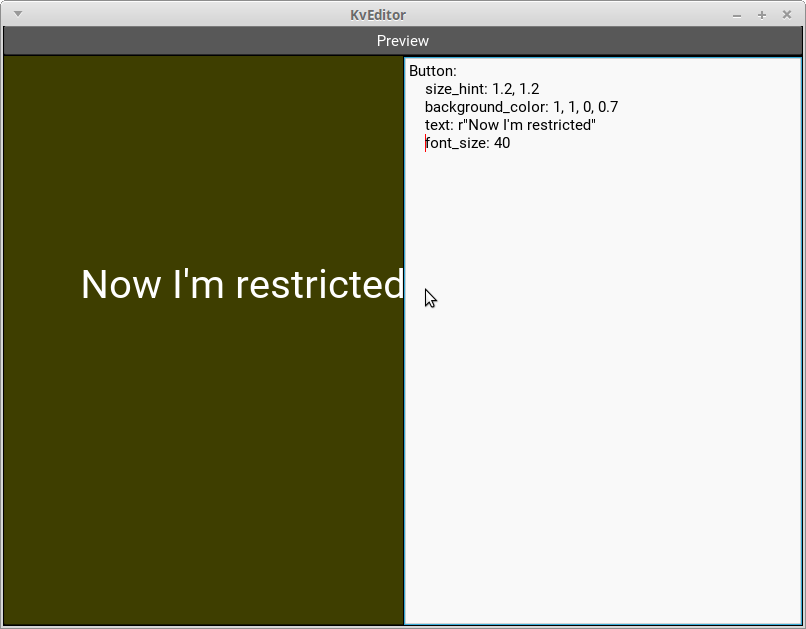
解決法は簡単でStencilViewを使うだけです。StencilViewは子が行う描画の範囲がStencilView自身の領域を超えないようにしてくれる、今欲しいそのものずばりなwidgetです。
問題その3 意図しない入力の伝播
まだ問題があり、それは上のscreenshot上の位置でmouseをclickすると半透明Buttonが押せてしまう事です。
'
Kivyの"Touch"
Kivyには色んな入力eventがありますが、その中でもmouseのclickやタッチパネルを指で触るなどの画面の位置を指す類の物はtouch eventと呼ばれます。touch eventがあるとそれがwidget treeの根から子へと順番に伝えられていくのですが、重要なのは既定の実装(kivy.uix.widget.Widgetの実装)ではその際に領域判定をせずに無条件で子に入力を伝えるという事です。(厳密にはdisabled属性がTrueの時にはしているのですが、ここではそれは考えない事にします。またRelativeLayoutはkivy.uix.widget.Widgetによる実装を上書きしてはいますが、やはり領域判定はしていません。)。例えば上のscreenshotで言うと、マウスカーソルはpreview領域の外ですがそれでもpreviewには入力が伝わり、preview自身も自分の子である半透明Buttonに無条件に入力を伝えるという事です。
修正
touchの位置がpreview領域内でない限りpreviewの子に伝わらないように修正します。
略

class Preview(Factory.RelativeLayout, Factory.StencilView):

    def on_touch_down(self, touch):
        if self.collide_point(*touch.pos):  # A
            return super(Preview, self).on_touch_down(touch)  # B

    def on_touch_move(self, touch):
        if self.collide_point(*touch.pos):  # A
            return super(Preview, self).on_touch_move(touch)  # B

    def on_touch_up(self, touch):
        if self.collide_point(*touch.pos):  # A
            return super(Preview, self).on_touch_up(touch)  # B
on_touch_xxx()はtouch eventがあった時に呼ばれるmethodで、既定の実装ではそのまま無条件で子に入力を伝えてしまうので、その前に自身の領域内であるかどうか判定しています(A行)。そしてそうであった場合のみ子に入力を伝えています(B行)。
editorのコードに色を付ける
虫取りが終わったのでいよいよ機能を追加していきます。
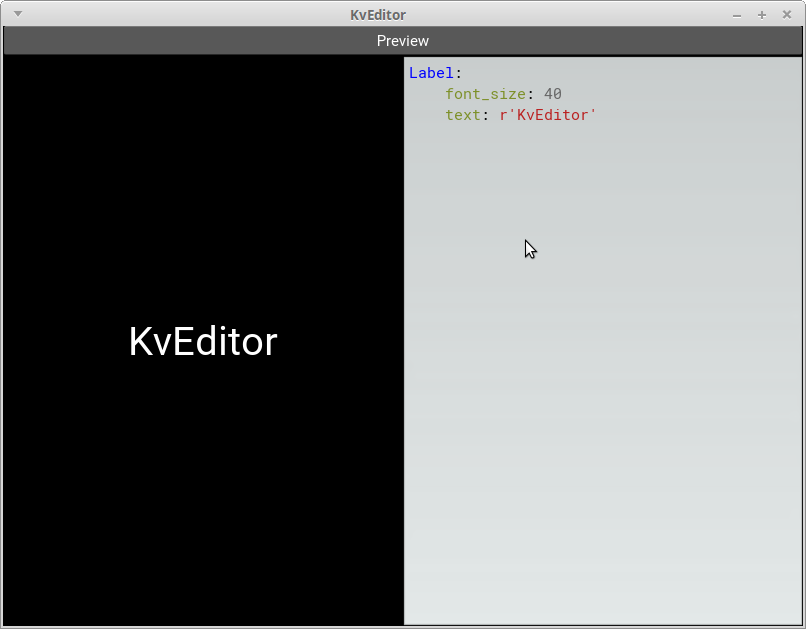
コードの色付けはCodeInputというwidgetとPygmentsで出来ます。
$ pip install pygments
# :kivy 1.9.1
# :import KivyLexer kivy.extras.highlight.KivyLexer  # A (このコメントは構文エラーなので消す必要がある)

<KvEditor>:
    BoxLayout:
        orientation: 'vertical'
        BoxLayout:
            orientation: 'horizontal'
            size_hint_y: None
            height: 30
            Button:
                text: 'Preview'
                on_press: root.kve_preview()
        BoxLayout:
            Preview:
                id: preview
            CodeInput:  # B
                id: editor
                lexer: KivyLexer()  # C

KvEditor:
A〜Cが変更点で、TextInputをCodeInputに置き換えてlexerプロパティを設定してあげるだけです。
editor部分とpreview部分の境界をドラッグで動かせるようにする
# :kivy 1.9.1
# :import KivyLexer kivy.extras.highlight.KivyLexer

<KvEditor>:
    BoxLayout:
        orientation: 'vertical'
        BoxLayout:
            orientation: 'horizontal'
            size_hint_y: None
            height: 30
            Button:
                text: 'Preview'
                on_press: root.kve_preview()
        BoxLayout:
            Splitter:
                min_size: self.parent.width * 0.05  # 境界線のバーの可動域を指定
                max_size: self.parent.width * 0.95  # 境界線のバーの可動域を指定
                sizable_from: 'right'  # 境界線のバーの位置をpreivewの右に指定
                Preview:
                    id: preview
            CodeInput:
                id: editor
                lexer: KivyLexer()

KvEditor:
previewをSplitterの子にしてやる事でできます。Splitterの親がBoxLayoutになっているのが肝で、そのお陰でドラッグ操作に伴って必要となる[editorの位置やサイズの変更]が自動で行われます。基本SplitterはBoxLayoutを親に使っておけば間違い無いかと思います。
shortcut keyを割り当て、いちいちボタンを押さなくて済むようにする
注意
此処でやっているkeyboard入力の拾い方はkeybindingのソースを真似てやってるもので、正攻法じゃないかと私が思っているこの方法(まだ試した事は無い)とは異なります。そして此処でのやり方だと、Android端末上でkeyboardをBluetoothで繋いで試した時shortcut keyがうまく働いてくれませんでした。もちろんTextInputやCodeInputに対する入力は普通に出来ましたが。
実装
まずkeyboard入力があった時に呼んでもらう関数を作ります。どこでもいいですがKvEditorクラスのmethodにするのが一番いいでしょう。
class KvEditor(Factory.FloatLayout):

    def on_keyboard(self, instance, key, scancode, codepoint, modifiers):
        '''Keyboard入力があった時に呼ばれるmethod

        以下のshortcut keyを実現している
            Ctrl + P => Preview
        '''
        if len(modifiers) == 1 and modifiers[0] == 'ctrl':
            if codepoint == 'p':
                self.kve_preview()
引数が色々あってややこしいですが
- key, scancodeには押したkeyが数値として入っていて
- codepointには押したkeyが文字列として入っていて
- modifiersにはShiftやAlt,Ctrlなどの修飾keyが他のkeyと組み合わせて押された時だけ、文字列のリストとして入っています
- instanceには環境依存の
Windowの実装が入っているようです。私の環境だとkivy.core.window.window_sdl2.WindowSDLのインスタンスが入ってました
上のコードでは、修飾keyとしてCtrlだけが押されていて なおかつ「P」keyが押されている時にkve_preview()を呼んでいます。
次に上のmethodを実際に呼んでもらえるように登録するのですが、いつ登録するか...今回は一旦kve_start()というアプリケーション開始に呼んで欲しいmethodを定義し、そこで登録する事にします。
from kivy.core.window import Window

class KvEditor(Factory.FloatLayout):

    def on_keyboard(self, instance, key, scancode, codepoint, modifiers):
        if len(modifiers) == 1 and modifiers[0] == 'ctrl':
            if codepoint == 'p':
                self.kve_preview()

    def kve_start(self):
        Window.bind(on_keyboard=self.on_keyboard)  # 登録
そしてこのkve_start()はKvEditorApp.on_start()から呼んであげることにします。
class KvEditorApp(App):

    def on_start(self):
        self.root.kve_start()
このon_start()は、アプリケーションが起動してwidget treeが作られた後にKivy側が自動で呼んでくれるmethodなのでこれ以上は何もしなくてOKです。
これでようやくshortcut keyを実装できました。以下が書き換え後のmain.py全体。
import kivy
kivy.require('1.9.1')
from kivy.app import App
from kivy.lang import Builder
from kivy.factory import Factory
from kivy.core.window import Window


class KvEditorApp(App):

    def on_start(self):
        self.root.kve_start()


class KvEditor(Factory.FloatLayout):

    KV_FILENAME = 'kveditor_internal'

    def on_keyboard(self, instance, key, scancode, codepoint, modifiers):
        '''Keyboard入力があった時に呼ばれるmethod

        以下のShortcutKeyを実現している
            Ctrl + P => Preview
        '''
        if len(modifiers) == 1 and modifiers[0] == 'ctrl':
            if codepoint == 'p':
                self.kve_preview()

    def kve_start(self):
        '''アプリケーション開始時に行いたい処理を書いておくmethod'''

        Window.bind(on_keyboard=self.on_keyboard)

    def kve_preview(self):
        editor = self.ids.editor  # editor部分のwidget(CodeInput)
        preview = self.ids.preview  # 作ったwidgetの貼り付け先のwidget
        preview.clear_widgets()  # 以前貼り付けたwidgetを破棄
        Builder.unload_file(self.KV_FILENAME)  # 以前のKvコードを無効化

        widget = None
        try:
            widget = Builder.load_string(editor.text, filename=self.KV_FILENAME)
        except Exception as e:
            temp = [str(e.__class__)]
            temp.extend(str(arg) for arg in e.args)
            error_msg = '\n'.join(temp)
        else:
            if widget is None:
                error_msg = 'No root rules.'
        if widget is None:
            # widgetの作成に失敗した時は、代わりにエラーメッセージの書かれたLabelを貼り付ける
            preview.add_widget(Factory.Label(text=error_msg))
        else:
            preview.add_widget(widget)


class Preview(Factory.RelativeLayout, Factory.StencilView):

    def on_touch_down(self, touch):
        if self.collide_point(*touch.pos):
            return super(Preview, self).on_touch_down(touch)

    def on_touch_move(self, touch):
        if self.collide_point(*touch.pos):
            return super(Preview, self).on_touch_move(touch)

    def on_touch_up(self, touch):
        if self.collide_point(*touch.pos):
            return super(Preview, self).on_touch_up(touch)


if __name__ == '__main__':
    KvEditorApp().run()
Fileの読み書き
editorなのでこれぐらいの機能は付けておきたいです。まずは
以下の四つのwidgetを追加します
- "fileを選ぶpopup"を出すボタン(Fileボタン)
- ファイルパスを表示する
TextInput - Loadボタン
- Saveボタン
ユーザーには"fileを選ぶpopup"を使うかTextInputに直接パスを入力する事でfileを選んでもらい、LoadボタンSaveボタンでその選んだfileに対して読み書きしてもらいます。ちょっと一般的なソフトと使い勝手が違いますが...。
<KvEditor>:
    BoxLayout:
        orientation: 'vertical'
        BoxLayout:
            orientation: 'horizontal'
            size_hint_y: None
            height: 30
            Button:
                text: 'File'
                size_hint_x: 1
                on_press: root.kve_choosefile()  # 未実装
            TextInput:
                id: ti_filepath
                multiline: False  # ファイルパスなので複数行は禁止
                size_hint_x: 13
            Button:
                text: 'Load'
                size_hint_x: 2
                on_press: root.kve_load()  # 未実装
            Button:
                text: 'Save'
                size_hint_x: 2
                on_press: root.kve_save()  # 未実装
            Button:
                text: 'Preview'
                size_hint_x: 2
                on_press: root.kve_preview()
Previewボタンの兄弟として上の四つのwidgetを加えました。
size_hint_xですが、これは親のlayoutが子の横幅を決める際に使います。どのように使うかは各layoutによって異なり、今回のようにBoxLayoutが子を横に並べる場合は、各widget同士の幅の比になります。(1:13:2:2:2の比になる)。
methodを実装したいが
methodを実装していきたいのですが その前にエラーメッセージをどのように出すかを考えないといけません。fileの読み書きをするわけですから「fileが無い」とか「アクセス権限が無い」とか色んな事があり、それを利用者に知らせなければいけないわけです。またKivy標準のFileChooserはwidgetではあってもpopupでは無いので"fileを選ぶpopup"も作る必要があります。そういった利用頻度の高そうな物は誰かが既に作ってないかなぁと思ったら案の定ありました。
garden.xpopup
Kivyの拡張機能を管理する仕組みとしてGardenという物があるのですが、その拡張機能の一つであるxpopopが今回の需要に合ってるので使います。Gardenを使うための準備はこれを参考にして下さい。Gardenが使えるようになったら次のコマンドでinstallします。
garden install xpopup
これで以下のように簡潔に書けるようになりました。
from kivy.garden.xpopup.notification import XMessage
from kivy.garden.xpopup.file import XFileOpen

XMessage(title='好きなタイトル', text='好きなメッセージ')  # OKボタン付きのpopupが出る
XFileOpen(on_dismiss=Popupが閉じられた時に呼びたい関数)  # fileを選ぶpopupが出る
methodを実装する
def tab2spaces(text):
    return text.replace('\t', '    ')
(略)
class KvEditor(Factory.FloatLayout):
(略)
    def kve_choosefile(self):
        def on_dismiss(popup):
            if popup.is_canceled():
                return
            filepath = popup.selection[0]
            self.ids.ti_filepath.text = filepath
            self.last_opened_dir = os.path.dirname(filepath)
        last_opened_dir = getattr(self, 'last_opened_dir', os.path.curdir)
        XFileOpen(on_dismiss=on_dismiss, multiselect=False, path=last_opened_dir)

    def kve_load(self):
        '''fileの中身をeditorに読み込む'''
        editor = self.ids.editor
        filepath = self.ids.ti_filepath.text
        try:
            with io.open(filepath, 'rt', encoding='utf-8') as reader:
                editor.text = tab2spaces(reader.read())
        except (OSError, IOError) as e:
            XMessage(
                title='Error',
                text='Failed to load from the file : {}\n{}'.format(
                    filepath, e.strerror))

    def kve_save(self):
        '''editorの中身をfileに書き込む'''
        editor = self.ids.editor
        editor.text = tab2spaces(editor.text)
        filepath = self.ids.ti_filepath.text
        try:
            with io.open(filepath, 'wt', encoding='utf-8') as writer:
                writer.write(editor.text)
        except (OSError, IOError) as e:
            XMessage(
                title='Error',
                text='Failed to write to the file : {}\n{}'.format(
                    filepath, e.strerror))

    def kve_preview(self):
        (略)
        editor.text = tab2spaces(editor.text)  # preview時にも tab => space 置換をしておく
        (略)
一般的なeditorが持っているtabをspaceに置き換える機能はCodeInputには見当たらなかったので、自前で用意しました。またio.open()を使っているのやOSErrorとIOErrorの両方を受け取っているのはPython2/3両対応にする為です。
shortcut keyを追加
こちらもやっておきます。
    def on_keyboard(self, instance, key, scancode, codepoint, modifiers):
        r'''keyboard入力があった時に呼ばれるmethod

        以下のShortcutKeyを実現している
            Ctrl + P => Preview
            Ctrl + S => Save
            Ctrl + L => Load
        '''
        if len(modifiers) == 1 and modifiers[0] == 'ctrl':
            if codepoint == 'p':
                self.kve_preview()
            elif codepoint == 's':
                self.kve_save()
            elif codepoint == 'l':
                self.kve_load()
完成
ソースコード(最新版)
https://github.com/gottadiveintopython/kveditor