初めてWatson IoT Platformを使ってみよう、というかたのためのガイドです。
Watson IoT Platformを使ってみるでIoTアプリを準備しました。
Watson IoT Platformで共用サブスクリプションを試してみます。
1. Watson IoT Platformサービスを用意する
- Watson IoT Platformを使ってみるを参照してWatson IoT Platformサービスを用意します。
- Watson IoT Platform - デバイスを登録してセンサーデータを送信するを参照して組織名、装置タイプ、装置ID、auth token、またサブスクライバーのAPIキーやauth tokenを用意します
2. pythonクライアントでpub/subしてみる
-
ローカル端末のpython環境から`python 01下記フローをコピペします
-
パブリッシュするクライアント(デバイス側を想定)
-
共用サブスクリプションを使用する際に、publisher側の変更は不要です。
01_dev_pub.py
import paho.mqtt.client as mqtt
import random
import time

org = "6桁の組織ID"
device_type = "デバイス・タイプ" #device type
device_id = "デバイスID" #Defined as "Device ID" in Watson IoT Platform
auth_token = "18桁のauth-token" #auth token

username = "use-token-auth"
broker = org + ".messaging.internetofthings.ibmcloud.com"
client = "d:" + org + ":" + device_type + ":" + device_id
topic = "iot-2/evt/status/fmt/json"

def on_connect(client, userdata, rc):
    print("Connected with result code "+str(rc))

def on_message(client, userdata, msg):
    print(msg.topic+" "+str(msg.payload))

def publish():
    cnt = 1
    while 1:
            temp = random.randrange(250,450)/10.0
            humid = random.randrange(500,1000)/10.0
            print "counter = " + str(cnt) + ", temp = " + str(temp) + ", humid = " + str(humid)
            msg = " {\"d\": {\"Counter\": " + str(cnt) + ",\"Temperature\": " + str(temp) +",\"Humidity\": " + str(humid) + "} }"
            client.publish(topic, msg, 0, True)
            cnt = cnt + 1
            time.sleep(2)

if __name__ == '__main__':

    client = mqtt.Client(client_id=client, clean_session=True, protocol=mqtt.MQTTv311)
    client.username_pw_set(username, password=auth_token)
    client.on_connect = on_connect
    client.on_message = on_message

    client.connect(broker, 1883, 60)
    publish()
- 共用サブスクライブするアプリケーションクライアント
- Watson IoT Platformで共用サブスクリプションを使用するには、下記のようにクライアント名を"A"で始めます(他の設定は不要です)
02_appl_shared_sub.py
import paho.mqtt.client as mqtt

org = "6桁の組織ID"
applId = "アプリ名(「shared_sub_appl」など)"
api_key = "「a-組織ID-10桁」形式のAPIキー" #API key
auth_token = "18桁のauth-token値" #auth-token

broker = org + ".messaging.internetofthings.ibmcloud.com"
# Only "A" was the key. No other change was needed. 17/04/24
client = "A:" + org + ":" + applId
topic = "iot-2/type/デバイス・タイプ/id/+/evt/status/fmt/json"


def on_connect(client, userdata, rc):
    print("Connected with result code "+str(rc))

    client.subscribe(topic)

def on_message(client, userdata, msg):
    print(msg.topic+" "+str(msg.payload))

if __name__ == '__main__':

    client = mqtt.Client(client_id=client, clean_session=True, protocol=mqtt.MQTTv311)
    client.username_pw_set(api_key, password=auth_token)
    client.on_connect = on_connect
    client.on_message = on_message

    client.connect(broker, 1883, 60)
    client.loop_forever()
結果を確認します
-
01_dev_pub.pyを1インスタンス稼働させ、それに対して複数の02_appl_shared_sub.pyを稼働させ、共用サブスクリプションが機能していることを確認します
-
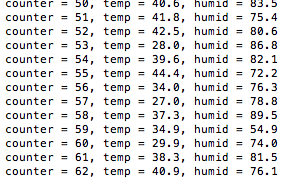
パブリッシュしていた01_dev_pub.pyからの出力
-共用サブスクライブしていた02_appl_shared_sub.py 一つ目からの出力

-共用サブスクライブしていた02_appl_shared_sub.py 二つ目からの出力
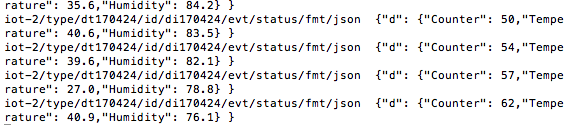
-共用サブスクライブしていた02_appl_shared_sub.py 三つ目からの出力

- それぞれのメッセージが特定のサブスクライバーのみに伝搬されている様子が確認できます。