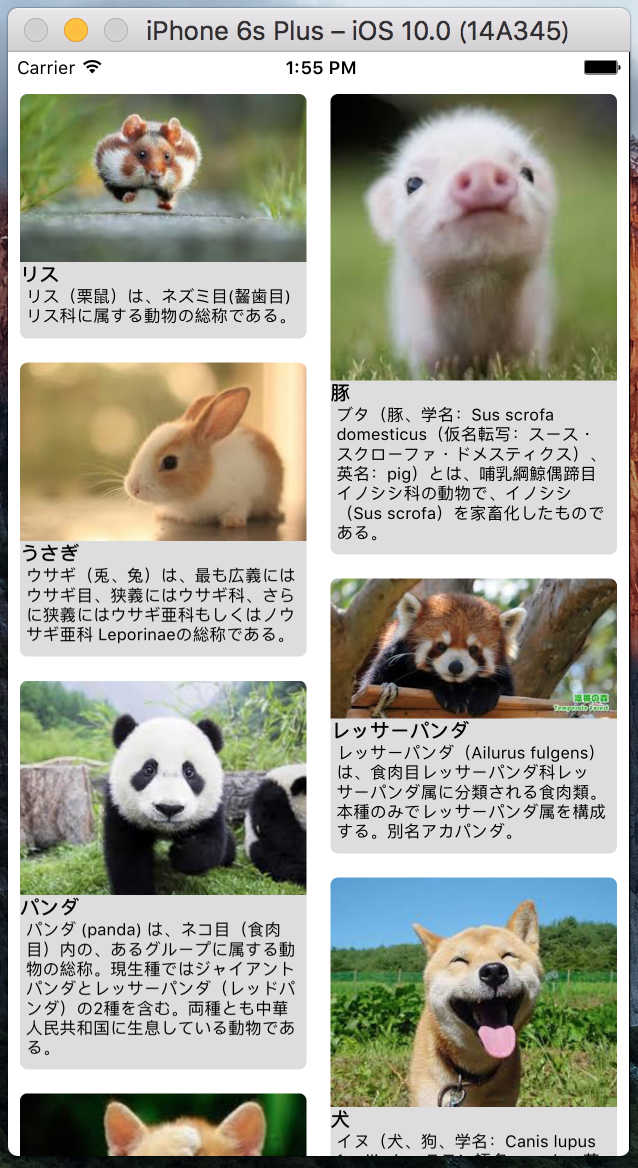
はじめに
UICollectionViewLayoutのサブクラスを作成し、
N行2列のPinterest風のUIを作ってみます。
(XCode8を利用して、Swift2.xを3.xにコンバートしました。)
開発環境は、XCode8.0
動作環境は、iOS10.0
予備知識
UICollectionViewのレイアウトをカスタマイズするためには、
UICollectionViewLayoutをカスタマイズしたクラスを利用します。
レイアウトのライフサイクル
ちなみに、Swift2.xと3.xでメソッド名が違うようです。
呼ばれる順番は、下記のとおりです。
| No | Swift3.x | Swift2.x | 説明 |
|---|---|---|---|
| 1. | prepare | prepareLayout | レイアウトの事前計算を行う |
| 2. | collectionViewContentSize | collectionViewContentSize | コンテンツのサイズを返す |
| 3. | layoutAttributesForElements | layoutAttributesForElementsInRect | 表示する要素のリストを返す |
実装してみる
登場人物
| クラス名/プロトコル名 | 親クラス | 説明 |
|---|---|---|
| PinterestLayout | UICollectionViewLayout | Pinterest風のカスタムレイアウトクラス |
| PinterestLayoutAttributes | UICollectionViewLayoutAttributes | 写真の高さを保持するカスタムクラス |
| PinterestLayoutDelegate | - | 写真の高さ、キャプション、コメントの高さを返すデリゲード |
| PinterestCell | UICollectionViewCell | Pinterest風表示用のCollectionViewCell |
| Photo | - | 表示用データクラス |
1. カスタムレイアウト関連クラス
レイアウトは、画像とキャプション、コメントの3つが配置されているUIを前提としています。
また、カラム数(numberOfColumns)は、2列で定義しました。
適宜カスタマイズしてください。
import UIKit

protocol PinterestLayoutDelegate {

    func collectionView(_ collectionView:UICollectionView,
                        heightForPhotoAtIndexPath indexPath:IndexPath ,
                                                  withWidth:CGFloat) -> CGFloat

    func collectionView(_ collectionView: UICollectionView,
                        heightForCaptionAndCommentAtIndexPath indexPath: IndexPath,
                                                       withWidth width: CGFloat) -> CGFloat
}

class PinterestLayoutAttributes: UICollectionViewLayoutAttributes {

    var photoHeight = CGFloat(0.0)

    override func copy(with zone: NSZone?) -> Any {

        let copy = super.copy(with: zone) as! PinterestLayoutAttributes
        copy.photoHeight = photoHeight
        return copy
    }

    override func isEqual(_ object: Any?) -> Bool {

        if let attributes = object as? PinterestLayoutAttributes {

            if attributes.photoHeight == photoHeight {
                return super.isEqual(object)
            }
        }
        return false
    }
}

class PinterestLayout: UICollectionViewLayout {

    var delegate: PinterestLayoutDelegate?

    var numberOfColumns = 2    //カラム数
    var cellPadding = CGFloat(8.0)

    var cache = [PinterestLayoutAttributes]()

    var contentHeight = CGFloat(0.0)
    var contentWidth: CGFloat {
        let insets = collectionView!.contentInset
        return collectionView!.bounds.width - (insets.left + insets.right)
    }

    override class var layoutAttributesClass : AnyClass {
        return PinterestLayoutAttributes.self
    }

    //MARK:- Layout LifeCycle
    /**
     1. レイアウトの事前計算を行う
    */
    override func prepare() {
        super.prepare()

        guard cache.isEmpty else{
            return
        }

        let columnWidth = contentWidth / CGFloat(numberOfColumns)
        var xOffset = [CGFloat]()

        for column in 0 ..< numberOfColumns {
            xOffset.append(CGFloat(column) * columnWidth)
        }

        var column = 0
        var yOffset = [CGFloat](repeating: 0, count: numberOfColumns)

        for item in 0 ..< collectionView!.numberOfItems(inSection: 0) {


            let indexPath = IndexPath(item: item, section: 0)

            let width = columnWidth - cellPadding * 2
            let photoHeight = delegate!.collectionView(collectionView!,
                                                      heightForPhotoAtIndexPath: indexPath,
                                                      withWidth: width)
            let labelHeight = delegate!.collectionView(collectionView!,
                                                      heightForCaptionAndCommentAtIndexPath: indexPath,
                                                      withWidth: width)

            let height = cellPadding + photoHeight + labelHeight

            let frame = CGRect(x: xOffset[column],
                               y: yOffset[column],
                               width: columnWidth,
                               height: height)

            let insetFrame = frame.insetBy(dx: cellPadding, dy: cellPadding)

            let attributes = PinterestLayoutAttributes(forCellWith: indexPath)

            attributes.photoHeight = photoHeight
            attributes.frame = insetFrame
            cache.append(attributes)

            contentHeight = max(contentHeight, frame.maxY)
            yOffset[column] = yOffset[column] + height

            if column >= numberOfColumns - 1 {
                column = 0
            } else {
                column += 1
            }
        }
    }

    /**
     2. コンテンツのサイズを返す
     */
    override var collectionViewContentSize : CGSize {
        return CGSize(width: contentWidth, height: contentHeight)
    }

    /**
     3. 表示する要素のリストを返す
     */
    override func layoutAttributesForElements(in rect: CGRect) -> [UICollectionViewLayoutAttributes]? {

        var layoutAttributes = [UICollectionViewLayoutAttributes]()

        for attributes in cache {
            if attributes.frame.intersects(rect) {
                layoutAttributes.append(attributes)
            }
        }
        return layoutAttributes
    }
}
2. UI周りのStoryboard及び、それに関連するクラス
2.1. UICollectionViewCellのサブクラスを定義する
UICollectionViewCellにUIImageViewとUILabel(キャプションとコメント)を2つ配置します。
また、背景色に「0xCCCCCC」を指定しました。
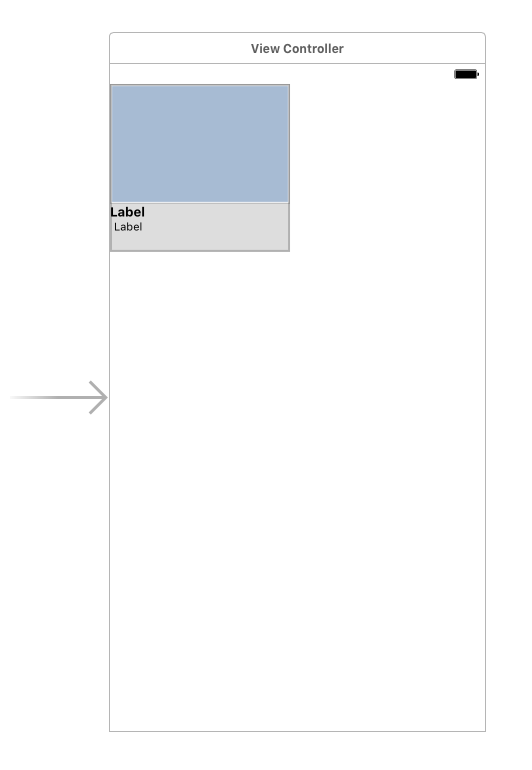
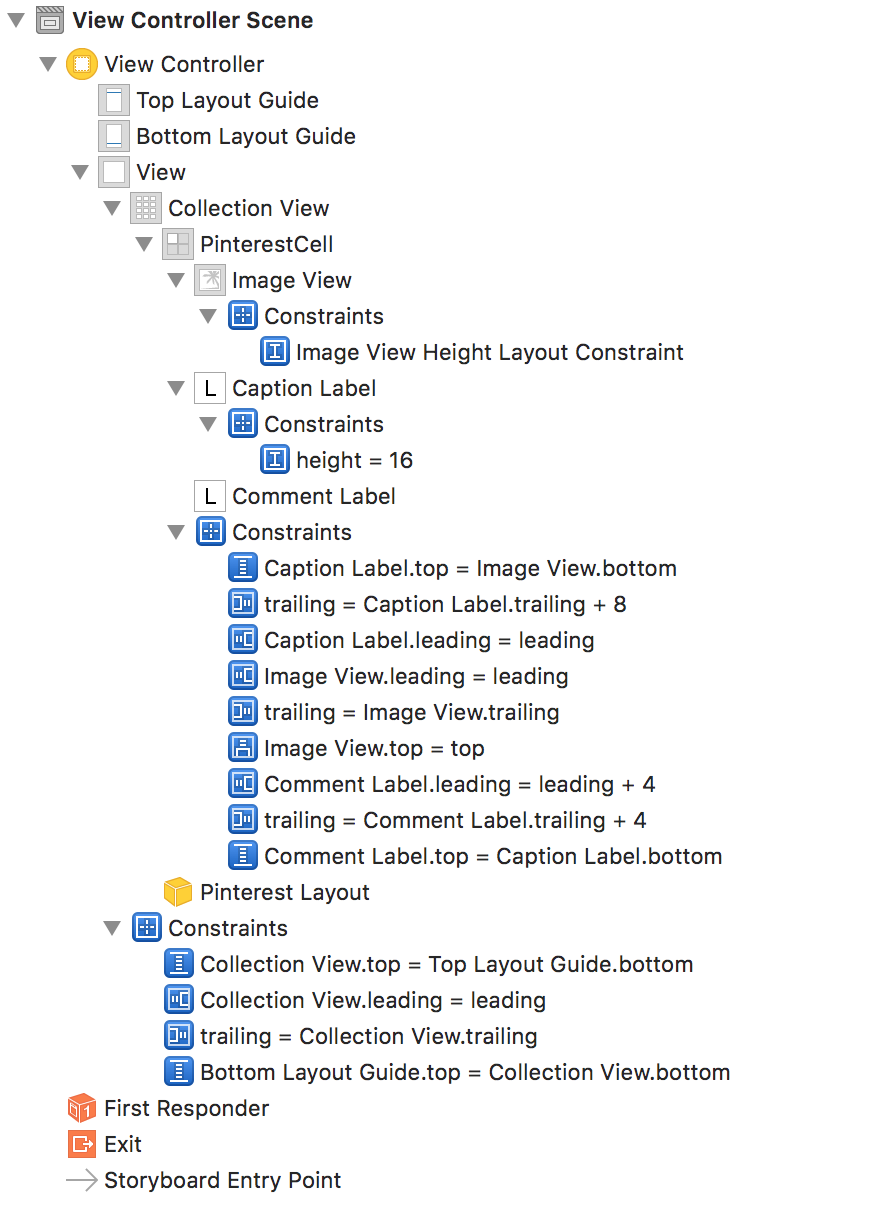
2.2. UIImageViewのConstraintを設定する
UIImageViewのConstraintは、画像の高さを調整するため、設定しておいてください。
ここでは、imageViewHeightLayoutConstraintがそれに該当します。
それ以外は、お好みで設定してください。
import UIKit

class PinterestCell: UICollectionViewCell {

    @IBOutlet weak var imageView: UIImageView!
    @IBOutlet weak var imageViewHeightLayoutConstraint: NSLayoutConstraint!
    @IBOutlet weak var captionLabel: UILabel!
    @IBOutlet weak var commentLabel: UILabel!

    var photo: Photo? {
        didSet {
            if let photo = photo {
                imageView.image = photo.image
                captionLabel.text = photo.caption
                commentLabel.text = photo.comment
            }
        }
    }

    static var identifier: String {
        get {
            return String(describing: self)
        }
    }

    override func prepareForReuse() {
        imageView.image = nil;
        captionLabel.text = ""
        commentLabel.text = ""
    }

    /**
      画像の高さを更新
     */
    override func apply(_ layoutAttributes: UICollectionViewLayoutAttributes) {
        super.apply(layoutAttributes)

        if let attributes = layoutAttributes as? PinterestLayoutAttributes {
            imageViewHeightLayoutConstraint.constant = attributes.photoHeight
        }
    }
}
2.3. UICollectionViewCellを角丸にする
下記のクラスを実装し、storyboardから角丸を設定してください。
今回は、Corner Radiusに「5」を設定しています。
[参考]
StoryboardやxibでUIViewの枠線・角丸設定をする(Swift)
import UIKit

extension UIView {

    @IBInspectable var cornerRadius: CGFloat {
        get {
            return layer.cornerRadius
        }
        set {
            layer.cornerRadius = newValue
            layer.masksToBounds = newValue > 0
        }
    }
}
3. 表示管理用のデータクラスを定義する
3.1. 画像とキャプション、コメントを管理するクラスを定義する
import UIKit

class Photo {

    var caption = ""
    var comment = ""
    var image: UIImage?

    init() {
        self.image = nil
    }

    init(caption: String, comment: String, image: UIImage) {
        self.caption = caption
        self.comment = comment
        self.image = image
    }

    /**
     キャプションの高さを取得する
    */
    func heightForCaption(_ font: UIFont, width: CGFloat) -> CGFloat {

        let rect = NSString(string: caption).boundingRect(
            with: CGSize(width: width, height: CGFloat(MAXFLOAT)),
            options: .usesLineFragmentOrigin,
            attributes: [NSFontAttributeName: font], context: nil)

        return ceil(rect.height)
    }


    /**
     コメントの高さを取得する
    */
    func heightForComment(_ font: UIFont, width: CGFloat) -> CGFloat {

        let rect = NSString(string: comment).boundingRect(
            with: CGSize(width: width, height: CGFloat(MAXFLOAT)),
            options: .usesLineFragmentOrigin,
            attributes: [NSFontAttributeName: font], context: nil)

        return ceil(rect.height)
    }

    /**
     テストデータ
    */
    class func allPhotos() -> [Photo] {

        var photos = [Photo]()

        guard let fileName = Bundle.main.path(forResource: "photos", ofType: "plist") else {
            return photos
        }

        guard let contentsOfFile = NSDictionary(contentsOfFile: fileName) else {
            return photos
        }

        let photesPlist = contentsOfFile.object(forKey: "photos") as! NSArray

        for photoPlist in photesPlist {

            let photo = Photo()

            if let p = photoPlist as? NSDictionary {
                photo.caption = p.object(forKey: "caption") as? String ?? ""
                photo.comment = p.object(forKey: "comment") as? String ?? ""
                photo.image = UIImage(named: p.object(forKey: "image") as? String ?? "")
                photos.append(photo)
            }
        }

        return photos
    }
}
3.2. テストデータ用のplistを定義する
<?xml version="1.0" encoding="UTF-8"?>
<!DOCTYPE plist PUBLIC "-//Apple//DTD PLIST 1.0//EN" "http://www.apple.com/DTDs/PropertyList-1.0.dtd">
<plist version="1.0">
<dict>
	<key>photos</key>
	<array>
		<dict>
			<key>caption</key>
			<string>リス</string>
			<key>comment</key>
			<string>リス(栗鼠)は、ネズミ目(齧歯目)リス科に属する動物の総称である。</string>
			<key>image</key>
			<string>01</string>
		</dict>
		<dict>
			<key>caption</key>
			<string>豚</string>
			<key>comment</key>
			<string>ブタ(豚、学名:Sus scrofa domesticus(仮名転写:スース・スクローファ・ドメスティクス)、英名:pig)とは、哺乳綱鯨偶蹄目イノシシ科の動物で、イノシシを家畜化したものである。</string>
			<key>image</key>
			<string>04</string>
		</dict>
		<dict>
			<key>caption</key>
			<string>うさぎ</string>
			<key>comment</key>
			<string>ウサギ(兎、兔)は、最も広義にはウサギ目、狭義にはウサギ科、さらに狭義にはウサギ亜科もしくはノウサギ亜科 Leporinaeの総称である。</string>
			<key>image</key>
			<string>02</string>
		</dict>
		<dict>
			<key>caption</key>
			<string>レッサーパンダ</string>
			<key>comment</key>
			<string>レッサーパンダ(Ailurus fulgens)は、食肉目レッサーパンダ科レッサーパンダ属に分類される食肉類。本種のみでレッサーパンダ属を構成する。別名アカパンダ。</string>
			<key>image</key>
			<string>03</string>
		</dict>
		<dict>
			<key>caption</key>
			<string>パンダ</string>
			<key>comment</key>
			<string>パンダ (panda) は、ネコ目(食肉目)内の、あるグループに属する動物の総称。現生種ではジャイアントパンダとレッサーパンダ(レッドパンダ)の2種を含む。両種とも中華人民共和国に生息している動物である。</string>
			<key>image</key>
			<string>05</string>
		</dict>
		<dict>
			<key>caption</key>
			<string>犬</string>
			<key>comment</key>
			<string>イヌ(犬、狗、学名:Canis lupus familiaris、ラテン語名:canis、英語名[国際通用名]:dog、domestic dog)は、ネコ目(食肉目)- イヌ科- イヌ属に分類される哺乳類の一種。</string>
			<key>image</key>
			<string>06</string>
		</dict>
		<dict>
			<key>caption</key>
			<string>猫</string>
			<key>comment</key>
			<string>ネコ(猫)は、狭義にはネコ目(食肉目)- ネコ亜目- ネコ科- ネコ亜科- ネコ属- ヤマネコ種- イエネコ亜種に分類される小型哺乳類であるイエネコ(家猫、学名:Felis silvestris catus)の通称である。人間によくなつくため、イヌ(犬)と並ぶ代表的なペットとして世界中で広く飼われている。</string>
			<key>image</key>
			<string>07</string>
		</dict>
		<dict>
			<key>caption</key>
			<string>ホワイトタイガー</string>
			<key>comment</key>
			<string>トラ(虎、Panthera tigris)は、食肉目ネコ科ヒョウ属に分類される食肉類。</string>
			<key>image</key>
			<string>08</string>
		</dict>
		<dict>
			<key>caption</key>
			<string>カエル</string>
			<key>comment</key>
			<string>蛙(かえる、英: Frog)とは、脊椎動物亜門・両生綱・無尾目(カエル目)に分類される動物の総称。古称としてかわず(旧かな表記では「かはづ」)などがある。</string>
			<key>image</key>
			<string>09</string>
		</dict>
		<dict>
			<key>caption</key>
			<string>ペンギン</string>
			<key>comment</key>
			<string>ペンギン (英語: penguin [ˈpɛŋgwɪn]) は、鳥類ペンギン目(学名 Sphenisciformes)に属する種の総称である。ペンギン科(学名 Spheniscidae)のみが現生する。
主に南半球に生息する海鳥であり、飛ぶことができない。
今では使われることは稀だが、「人鳥(じんちょう)」「企鵝(きが、企は爪先立つの意、鵝はガチョウ)」という和名もある。</string>
			<key>image</key>
			<string>10</string>
		</dict>
	</array>
</dict>
</plist>
4. 利用してみる
PinterestLayoutDelegateを実装し、
写真、キャプションとコメントの高さを返します。
フォントサイズやパッディングは、適宜変更してください。
import UIKit
import AVFoundation

class ViewController: UIViewController {

    @IBOutlet weak var collectionView: UICollectionView!
    var photos = Photo.allPhotos()

    override func viewDidLoad() {
        super.viewDidLoad()
        setup()
    }

    func setup() {

        collectionView.backgroundColor = UIColor.clear

        if let layout = collectionView.collectionViewLayout as? PinterestLayout {
            layout.delegate = self
        }
    }
}

//MARK:- UICollectionViewDataSource
extension ViewController: UICollectionViewDataSource {

    func collectionView(_ collectionView: UICollectionView,
                        numberOfItemsInSection section: Int) -> Int {
        return photos.count
    }

    func collectionView(_ collectionView: UICollectionView,
                        cellForItemAt indexPath: IndexPath) -> UICollectionViewCell {

        let cell = collectionView.dequeueReusableCell(withReuseIdentifier: PinterestCell.identifier,
                                                                         for: indexPath) as! PinterestCell
        cell.photo = photos[(indexPath as NSIndexPath).item]
        return cell
    }
}

//MARK:- PinterestLayoutDelegate
extension ViewController: PinterestLayoutDelegate {

    /**
      写真の高さを返す
     */
    func collectionView(_ collectionView:UICollectionView,
                        heightForPhotoAtIndexPath indexPath:IndexPath ,
                                                  withWidth width:CGFloat) -> CGFloat {

        let photo = photos[(indexPath as NSIndexPath).item]
        let boundingRect = CGRect(x: 0, y: 0, width: width, height: CGFloat(MAXFLOAT))
        let rect = AVMakeRect(aspectRatio: photo.image!.size, insideRect: boundingRect)
        return rect.size.height
    }

    /**
     キャプションとコメントの高さを返す
     */
    func collectionView(_ collectionView: UICollectionView,
                        heightForCaptionAndCommentAtIndexPath indexPath: IndexPath,
                                                       withWidth width: CGFloat) -> CGFloat {

        let photo = photos[(indexPath as NSIndexPath).item]

        let padding = CGFloat(4)
        let captionrHeight = photo.heightForCaption(UIFont.systemFont(ofSize: 13), width: width)
        let commentHeight = photo.heightForComment(UIFont.systemFont(ofSize: 11), width: width)

        let height = padding + captionrHeight + commentHeight + padding
        return height
    }
}
まとめ
Pinterest風のUIは、UICollectionViewの勉強になりますね。
ソースコードをGithubにアップしました。
こちらも合わせて、ご覧頂ければ幸いです。
[Swift] Pinterest風のカスタムトランジションを実装してみる
参考