前置き
CloudFlashとは、無線LAN内蔵micro SDカードアダプタのこと。Eye-FiやFlashAirのストレージ部分が別売りになったようなSDカードです。内部ではLinuxが動いているため、色々と遊ぶ事が出来ます。
ふと、CloudFlash上でPythonスクリプトを走らせ、撮影した画像をFlickr等に自動アップロードとかしてみたいと思い、まずはPythonのcross compileをしてみようと思い立ちました。
これはその備忘録です。
Python 2.7.2ビルド手順
-
sorcery codebenchとかlaunchpad からtoolchainを入手する。ここでは、最新の Sourcery CodeBench Lite 2014.05-29 を使用した。
-
適当なLinux PC上で、Pythonソースコードとcross compile用パッチをダウンロードする。パッチは参考文献先の Paul Gibson さんご提供です。感謝!
bash$ wget http://www.python.org/ftp/python/2.7.2/Python-2.7.2.tar.bz2 $ wget http://randomsplat.com/wp-content/uploads/2011/10/Python-2.7.2-xcompile.patch -
まずはホスト用のPythonをビルドする。ここで生成したhostpythonやhostpgenは、後のクロスコンパイル時に必要になる。
bash$ tar xjf Python-2.7.2.tar.bz2 $ cd Python-2.7.2 $ ./configure $ make python Parser/pgen $ mv python hostpython $ mv Parser/pgen hostpgen $ make distclean -
パッチを当てて、arm926ej-s用に再configureする。
bash$ patch -p1 < ../Python-2.7.2-xcompile.patch $ CC=arm-none-linux-gnueabi-gcc CXX=arm-none-linux-gnueabi-g++ AR=arm-none-linux-gnueabi-ar RANLIB=arm-none-linux-gnueabi-ranlib BASECFLAGS=-mcpu=arm926ej-s ./configure --host=arm-none-linux --build=x86_64-linux-gnu --prefix=/python -
makeする。unrecognized format function type [-Wformat=]みたいなwarningが出るが、気にしない。
bash$ make HOSTPYTHON=./hostpython HOSTPGEN=./hostpgen -
ターゲット(CloudFlash)のrootfsにコピーするファイルを_installに纏める。
bash$ make install HOSTPYTHON=./hostpython CROSS_COMPILE=arm-none-linux-gnueabi- CROSS_COMPILE_TARGET=yes prefix=~/Python-2.7.2/_install -
出来る限り小さくするため、stripする等して不要な情報を削除する。
bash$ cp -rf _install _install_stripped $ for SO in _install_stripped/lib/python2.7/lib-dynload/*.so; do arm-none-linux-gnueabi-strip ${SO}; done $ arm-none-linux-gnueabi-strip _install_stripped/bin/python2.7 $ rm _install_stripped/bin/python $ ln -s python2.7 _install_stripped/bin/python
CloudFlashでPythonを動かす
- _install_strippedを丸ごとCloudFlash SDカードにコピーする。
- こちらを参考に、CloudFlashにtelnetログインする。
-
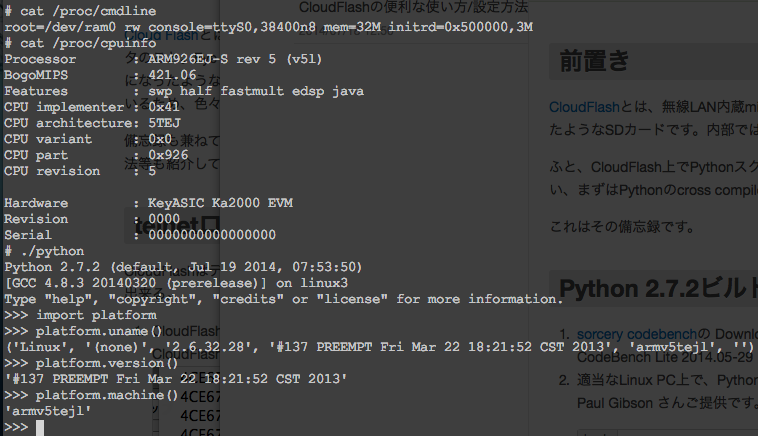
cd /mnt/sd/_install_stripped/binして./python等としてみると、しっかり動くことがわかる。
CloudFlashで何かしらの処理を自動起動する
CloudFlashにtelnetログインして色々覗いてみると、起動処理は以下のようになっています。
# /etc/inittab: init(8) configuration.
# $Id: inittab,v 1.91 2002/01/25 13:35:21 miquel

null::sysinit:/bin/mount -o remount,rw /
null::sysinit:/bin/mount -t proc proc /proc
null::sysinit:/bin/mount -t sysfs sysfs /sys

# Boot-time system configuration/initialization script.
# This is run first except when booting in emergency (-b) mode.
console::sysinit:/etc/init.d/rcS

# Start an "askfirst" shell on the console (whatever that may be)
# ::askfirst:-/bin/ash
# ttyS0::respawn:-/bin/ash #enter shell automatically
ttyS0::askfirst:-/bin/ash #enter shell needs enter
# cp /mtd/dnsd.conf to /etc
cp /mnt/mtd/config/dnsd.conf /etc
# cp /mtd/udhcpd.conf to /etc
cp /mnt/mtd/config/udhcpd.conf /etc
cp /mnt/mtd/config/wsd_backup.conf /etc/wsd_backup.conf

# a2&

# autorun.sh from sd in case need to perform some test mode
if [ -f /mnt/sd/autorun.sh ]
then
	echo "run autorun.sh"
	sleep 1
	chmod 777 /mnt/sd/autorun.sh
	/mnt/sd/autorun.sh&
fi
echo "rcS done"
SDカードのルートにautorun.shを置いとけば、色々できるわけですね。