目的
ゼロからKerasとTensorFlow(TF)を自由自在に動かせるようになる。
そのための、End to Endの作業ログ(備忘録)を残す。
※環境はMacだが、他のOSでの汎用性を保つように意識。
※アジャイルで執筆しており、精度を逐次高めていく予定。
環境
- Mac: 10.12.3
- Python: 3.6
- TensorFlow: 1.0.1
- Keras: 2.0.2
To Do
Keras導入編
Keras(Tensorflow)の環境構築
KerasでMINSTの学習と予測
KerasでTensorBoardの利用
Kerasで重みファイルの保存/読み込み
Kerasで自前データの学習と予測 <---いまココ
Kerasで転移学習
学習のテクニック編
KerasでCV
Kerasでグリッドサーチ、ランダムサーチ
Kerasで最適化手法の調整
Kerasで画像の水増し
Kerasで学習過程の可視化
Kerasで事前学習
Kerasのデータセット
Kerasには自前の画像データセットはある。
https://keras.io/ja/datasets/
- CIFAR10
- CIFAR100
- MINST
読み込みは簡単。
from keras.datasets import cifar10

(X_train, y_train), (X_test, y_test) = cifar10.load_data()
中身は2つのタプルになっているそうだ。
- X_train, X_test: shape (nb_samples, 3, 32, 32)のRGB画像データのuint8配列.
- y_train, y_test: shape (nb_samples,)のカテゴリラベル(0-9の範囲のinteger)のuint8配列.
一方で、そこに存在しないデータセットを利用した学習の方法を考える。
参考
必要なパーツ
クラス宣言部分
train_datagen = ImageDataGenerator(
    rescale=1.0 / 255,
    shear_range=0.2,
    zoom_range=0.2,
    horizontal_flip=True)

test_datagen = ImageDataGenerator(rescale=1.0 / 255)
入力フォルダ指定部分
train_generator = train_datagen.flow_from_directory(
    'data/train',
    target_size=(256, 256),
    batch_size=batch_size,
    class_mode='categorical')

validation_generator = test_datagen.flow_from_directory(
    'data/validation',
    target_size=(256, 256),
    batch_size=batch_size,
    class_mode='categorical')
カテゴリと割り当てられてクラス番号の対応の確認
print(train_generator.class_indices)
予測の部分
history = model.fit_generator(
    train_generator,
    samples_per_epoch=10,
    nb_epoch=nb_epoch,
    validation_data=validation_generator,
    nb_val_samples=10)
※単品の画像の場合はload_img('image.jpg',target(256,256))でロードできる。
学習用データ
kaggleより、犬、猫の画像をダウンロード。学習データ:犬200枚/猫200枚、テストデータ:犬200枚/猫200枚、とした。
https://www.kaggle.com/c/dogs-vs-cats-redux-kernels-edition
フォルダ構造
$ find ./data -type d  | sed -e "s/[^-][^\/]*\// |/g" -e "s/|\([^ ]\)/|-\1/"
 |-data
 | |-train
 | | |-cats
 | | |-dogs
 | |-validation
 | | |-cats
 | | |-dogs
実行
from keras.models import Sequential
from keras.layers import Convolution2D, MaxPooling2D
from keras.layers import Activation, Dropout, Flatten, Dense
from keras.preprocessing.image import ImageDataGenerator


batch_size = 32
epochs = 1


model = Sequential()
model.add(Convolution2D(32, 3, 3, input_shape=(128, 128, 3)))
model.add(Activation('relu'))
model.add(MaxPooling2D(pool_size=(2, 2)))

model.add(Convolution2D(64, 3, 3))
model.add(Activation('relu'))
model.add(MaxPooling2D(pool_size=(2, 2)))

model.add(Flatten())
model.add(Dense(64))
model.add(Activation('relu'))
model.add(Dropout(0.5))
model.add(Dense(2))
model.add(Activation('softmax'))

model.summary()

model.compile(loss='categorical_crossentropy',
               optimizer='adam',
               metrics=['accuracy'])


train_datagen = ImageDataGenerator(
    rescale=1.0 / 255,
    shear_range=0.2,
    zoom_range=0.2,
    horizontal_flip=True)

test_datagen = ImageDataGenerator(rescale=1.0 / 255)


train_generator = train_datagen.flow_from_directory(
    'data/train',
    target_size=(128, 128),
    batch_size=batch_size,
    class_mode='categorical')

validation_generator = test_datagen.flow_from_directory(
    'data/validation',
    target_size=(128, 128),
    batch_size=batch_size,
    class_mode='categorical')


history = model.fit_generator(
    train_generator,
    samples_per_epoch=200,
    nb_epoch=epochs,
    validation_data=validation_generator,
    nb_val_samples=200)

from keras.utils import plot_model
plot_model(model, to_file="model.png", show_shapes=True)
以下、実行結果。
Epoch 1/1
6/6 [==============================] - 87s - loss: 1.4899 - acc: 0.5625 - val_loss: 0.7940 - val_acc: 0.5014
モデルの可視化
https://keras.io/visualization/
Keras2になったため、以前と少し変わっている。
from keras.utils import plot_model
plot_model(model, to_file="model.png", show_shapes=True)
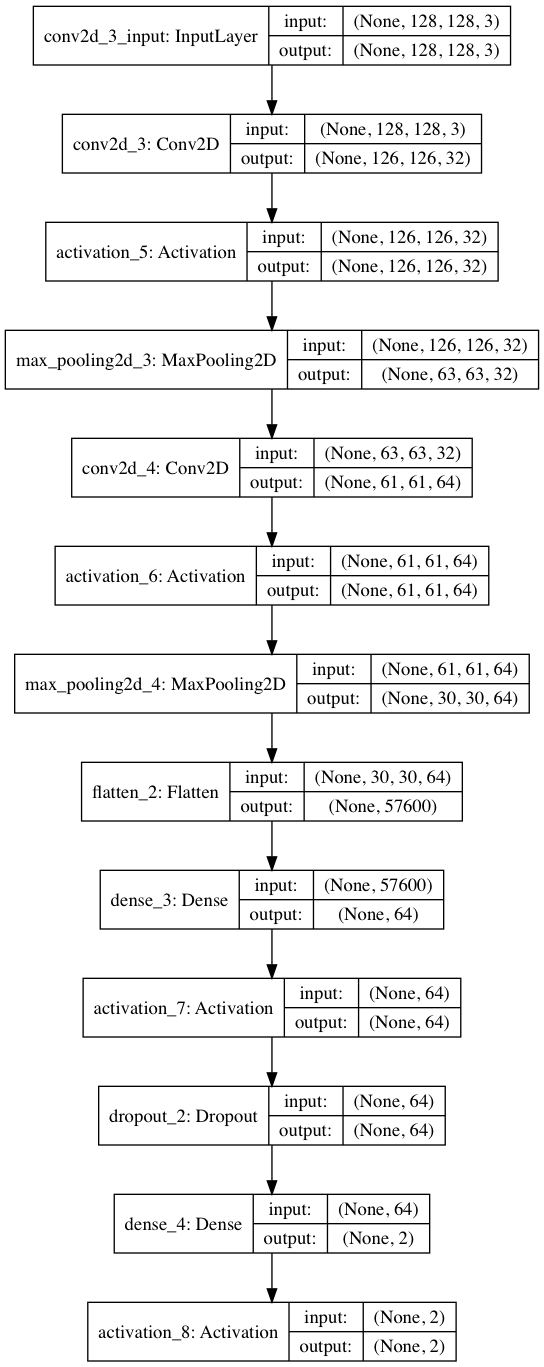
スクリプトの説明
model.add(Convolution2D(32, 3, 3, input_shape=(128, 128, 3)))
https://keras.io/ja/layers/convolutional/#convolution2d
(128, 128, 3)は入力画像のサイズを表す。128128 pixlでRGBの3種類があるため3である。
32, 3, 3は、32枚のフィルタ 、サイズは33を表す。
(128, 128, 3)の画像がこのレイヤーを通ると、(126, 126, 32)になる。
model.add(Activation('relu'))
https://keras.io/ja/layers/core/#activation
活性化関数。画像ではreluがよく使われる。
model.add(MaxPooling2D(pool_size=(2, 2)))
入力のサイズを半分にする。
入力が(126, 126, 32)で、このレイヤーを通ると約半分の(61, 61, 32)になる。
model.add(Flatten())
https://keras.io/ja/layers/core/#flatten
平坦化。
入力(30, 30, 64)に対して、出力は(*, 57600)となる。
57600 =30x30x64
model.add(Dense(64))
https://keras.io/ja/layers/core/#dense
通常の全結合。
(, 57600)->(,64)となる。
model.add(Dropout(0.5))
https://keras.io/ja/layers/core/#dropout
50%の確率で各ユニットの出力を利用。
ImageDataGenerator
https://keras.io/ja/preprocessing/image/
rescale=1.0 / 255 # デフォルトはNone.Noneか0ならば,適用しない.それ以外であれば,(他の変換を行う前に) 与えられた値をデータに積算する
shear_range=0.2 # 浮動小数点数.シアー強度(反時計回りのシアー角度(ラジアン)).
zoom_range=0.2 # 浮動小数点数または[lower,upper].ランダムにズームする範囲.
horizontal_flip=True # 真理値.水平方向に入力をランダムに反転します
fit_generator
https://keras.io/ja/models/model/
samples_per_epoch=200 #
nb_val_samples=200 #