本記事は QiitaAdventCalender2016の「iOS その3 Advent Calendar 2016」の12月4日の記事です。
また、本資料の「VIPERの使い方」は iOS Project Architecture: Using VIPER の翻訳資料です
その後に続くのはオリジナルの文章です。
本記事の一部は原文をもとに翻訳をしていますが、一部翻訳が難しい箇所は違和感を持たぬ日本語への意訳となっています。
誤訳していたら教えてください。
VIPERの使い方
※ 画像は原文から引用
iOSアプリを開発するとき、iOSプロジェクトアーキテクチャを何を使うか考えるのはとても重要です。
もっとも使われているApple推奨パターンは、MVCアーキテクチャと呼ばれているものです。
しかし、実際定着してるMVCには欠点があります。
その欠点の1つはシンプルさのせいで、経験豊富なエンジニアでさえも、Viewそしてモデルにも属してないコードを、Controllerロジックに書くことに至ってしまいます。結果、太ったコードの塊がControllerの中に、そしてホントにちっちゃいViewとModelが生成されます。
この記事ではコードのModule化と整理をしながら、その困難を克服するのに役に立つ代案の1つであるVIPERの紹介します。
1.VIPERとは何ぞ?
VIPERは、View/Interactor/Presenter/Entity/Routerの略語です。
VIPERは、単一責任の原則(SRP.pdf / Single Responsibility Principle) をもとに、iOSプロジェクトのためのクリーナーや多くのModuleを作ることで問題へのアプローチとしています。
アプリの依存関係を分離する事や、Entityの責務譲渡のバランスを取るアイディアが VIPER Architecture には潜んでいます。
次はこのアーキテクチャーを使った結果です:
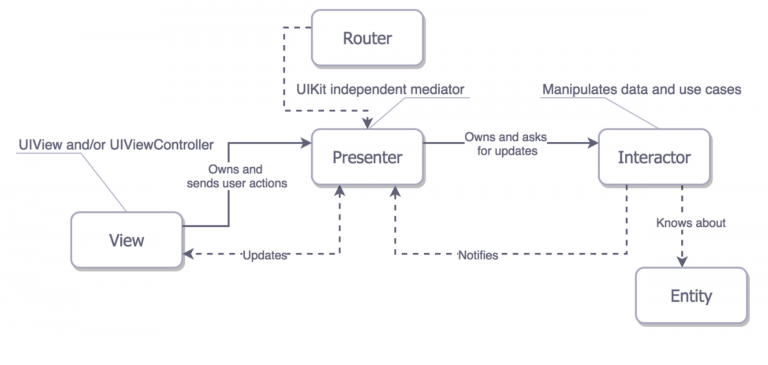
※ 画像は原文から引用
この図は、前に述べたVIPERの説明となっており、それぞれ各ブロック(訳注:ViewやPresenter等を示す)は、特定のタスクや入力と出力のオブジェクトに対応しています。
これらのブロックを組み立てラインの作業者と考えてください。製品が完成するまで、作業者は1つの目的のもと仕事を完了し、次の作業者にパスすることを繰り返します。ブロック間の接続はオブジェクト間の関連性や互いに伝わる情報を意味します。
この記事では、あるEntityから他へProtocolで伝達する方法をもっと詳しく説明します。
iOS Project Architecture
VIPERアーキテクチャの目的を頭に置き、もう少し各部位やその責務について理解することが重要です。
そのために、記事リストをREST APIから取得して使用者の画面に表示するVIPERアークテクチャの基礎となるアプリ(GitHub から利用できる) を作っています。 (訳注: このアプリを Article Visualization app って呼称)
2.1. View (ビュ-) について
VIPER View は、コーディングにより実装されたプログラムやIB(インターフェースビルダー)を使って出来たサブビューを含むiOSアプリのUIVIewControllerです。
それの唯一の責務は、Presenterから教わったとおりに表示する事や、UI(ユーザーインターフェイス)を操作することです。
Userからの任意のイベントをトリガーとし、必要な処理をし、Viewは簡単なDelegateでPresenterと処理待ちに表示が次に必要か教えます。
Article Visualization app においてはViewをSwiftで次のように使っています。
/*
 * Protocol that defines the view input methods.
 */
protocol ArticlesViewInterface: class {
    func showArticlesData(articles: [Article])
    func showNoContentScreen()
}

/*
 * A view responsible for displaying a list
 * of articles fetched from some source.
 */
class ArticlesViewController : UIViewController, ArticlesViewInterface
{
    // Reference to the Presenter's interface.
    var presenter: ArticlesModuleInterface!

    /*
     * Once the view is loaded, it sends a command
     * to the presenter asking it to update the UI.
     */
    override func viewDidLoad() {
        super.viewDidLoad()
        self.presenter.updateView()
    }

    // MARK: ArticlesViewInterface

    func showArticlesData(articles: [Article]) {
        self.articles = articles
        self.tableView.reloadData()
    }

    func showNoContentScreen() {
        // Show custom empty screen.
    }
}
2.2. Presenter (プレゼンター) について
Presenterの仕事は、VIPER Moduleのメイン部品との橋渡しっぽいことです。
ある意味、ViewとInteractorへ要求中の返値から入力イベントを受け取りますが、一方で、Interactorからデータ構造を受け取り、データ上にViewロジックを適用し、コンテンツの準備をし、最後にViewに何を表示するか教えます。
Article Visualization appでのPresenterの例です:
/*
 * Protocol that defines the commands sent from the View to the Presenter.
 */
protocol ArticlesModuleInterface: class {
    func updateView()
    func showDetailsForArticle(article: Article)
}


/*
 * Protocol that defines the commands sent from the Interactor to the Presenter.
 */
protocol ArticlesInteractorOutput: class {
    func articlesFetched(articles: [Article])
}


/*
 * The Presenter is also responsible for connecting
 * the other objects inside a VIPER module.
 */
class ArticlesPresenter : ArticlesModuleInterface, ArticlesInteractorOutput
{
    // Reference to the View (weak to avoid retain cycle).
    weak var view: ArticlesViewInterface!

    // Reference to the Interactor's interface.
    var interactor: ArticlesInteractorInput!

    // Reference to the Router
    var wireframe: ArticlesWireframe!


    // MARK: ArticlesModuleInterface

    func updateView() {
        self.interactor.fetchArticles()
    }

    func showDetailsForArticle(article: Article) {
        self.wireframe.presentDetailsInterfaceForArticle(article)
    }

    // MARK: ArticlesInteractorOutput

    func articlesFetched(articles: [Article]) {
        if articles.count > 0 {
            self.articles = articles
            self.view.showArticlesData(articles)
        } else {
            self.view.showNoContentScreen()
        }
    }
}
2.3. Interactor (インターアークター) について
このオブジェクトは特定のModuleのユースケースを集めた物と考えられます。
Interactorは関連するEntityを全て含み、UIとは完全に分離するはずです。
Article Visualization appでの例は、サーバーから記事一覧を取得しているところです。
その例ではInteractorの責務でリクエストを作りレスポンスを処理し、Articleオブジェクトの場合にEntityから変換します。
一つのinteractorがいくつかのタスクを完了すると、それらのタスクで得た実行結果をPresenterに通知します。
考慮してほしい考えとして、そのデータ(訳注:実行結果)はInteractorにより約束された綺麗な状態で、いつでも使える状態に保たれた状態であるべきなです。そのため、そのデータ(訳注: 実行結果)を送ったPresenterには何らかのビジネスロジックを含めるべきではありません。
Article Visualization appでは、InteractorはAPIから記事を取得する責務を担っています。:
/*
 * Protocol that defines the Interactor's use case.
 */
protocol ArticlesInteractorInput: class {
    func fetchArticles()
}


/*
 * The Interactor responsible for implementing
 * the business logic of the module.
 */
class ArticlesInteractor : ArticlesInteractorInput
{
    // Url to the desired API.
    let url = "https://www.myendpoint.com"

    // Reference to the Presenter's output interface.
    weak var output: ArticlesInteractorOutput!


    // MARK: ArticlesInteractorInput

    func fetchArticles() {
        Alamofire.request(.GET, url).responseArray { (response: Response) in
            let articlesArray = response.result.value
            self.output.articlesFetched(articlesArray!)
        }
    }
}
2.4.Entity(エンティティ)について
EntityはVIPERの中で、おそらく最もシンプルな要素です。
異なるtypeのデータをカプセル化、そして通常はVIPERコンポーネントに囲われてペイロードとして使われます。
一つ注意したいのは、Entity はデータアクセスレイヤーとは異なり、Interactorから処理すべきです。(訳注: Entityを直接扱えるのはInteractorのみ ということだと思います)
Article Visualization appでは、Article クラスがEntityの例となります。:
class Article
{
    var date: String?
    var title: String?
    var website: String?
    var authors: String?
    var content: String?
    var imageUrl: String?
}
2.5. Router (ルーター) について
最後に、多分 VIPER Architecture で最も特有の要素はRouter です。
それはモジュール間のナビゲーションロジックと、モジュール間がどうなるべきかを責務としています。
(例: 画面に定義しているアニメーションを表示するか、どの様に2画面の間を遷移するべきか)
まず、Presenterからどの画面をどのルートで表示するかのコマンドを受信します。
Router も同様に データをある画面からそのほかへパスする責務を負います。Routerは 特定のモジュールで、protocolで定義しているナビゲーションの可能性がある全てを実装すべきものです。
この情報をRouter protocol が唯一知っていることにより、アプリの全パスの概要を素早く得ることが可能なので、それはいいことです。
iOS フレームワークの制限によりViewControllerは唯一画面間の遷移を実行できるため、 RouterはモジュールのControllerへの参照(リファレンス)か、その子クラスを含める必要があります。
Article Visualization app はこのように Router を使っています。(メモ: Router は Wireframe に属しています)
/*
 * Protocol that defines the possible routes from the Articles module.
 */
protocol ArticlesWireframeInput {
    func presentDetailsInterfaceForArticle(article: Article)
}


/*
 * The Router responsible for navigation between modules.
 */
class ArticlesWireframe : NSObject, ArticlesWireframeInput
{
    // Reference to the ViewController (weak to avoid retain cycle).
    weak var articlesViewController: ArticlesViewController!

    // Reference to the Router of the next VIPER module.
    var detailsWireframe: DetailsWireframe!


    // MARK: ArticlesWireframeInput

    func presentDetailsInterfaceForArticle(article: Article) {
        // Create the Router for the upcoming module.
        self.detailsWireframe = DetailsWireframe()

        // Sends the article data to the next module's Presenter.
        self.sendArticleToDetailsPresenter(self.detailsWireframe.detailsPresenter, article: article)

        // Presents the next View.
        self.detailsWireframe.presentArticleDetailsInterfaceFromViewController(self.articlesViewController)
    }


    // MARK: Private

    private func sendArticleToDetailsPresenter(detailsPresenter: DetailsPresenter, article: Article) {
        detailsPresenter.article = article
    }
}
3. いつ VIPER を使うべきなの?
発展する可能性をもったプロジェクトを作っているときは、スケールが大きくなり多くの開発者が同時にシームレスに開発が出来る事を考えることが重要で、MVCをつかった元のままでは綺麗に整ったプロジェクトを保つには力不足です。
そのため開発者にとって干し草の山から針を見つけるように巨大なクラスをデバッグすることは本当に一般的です。
VIPER が提案するオブジェクト間を疎結合にすることにより、次の事が分かります:
- CrashReport をつかって問題(バグ)を追跡することが簡単です。(単一責任原則により)
- 新しい機能を追加するのが簡単です。
- より小さくてより再利用性のある綺麗なソースコードになります。
- 開発者同士でのコンフリクトが少なくなります。
- UIロジックはビジネスロジックと分離しているので自動テストが簡単になります。(!)
4. VIPER を使ってはならないのはいつ?
繰り返し全ての問題を解決しようと良いツールを見つけること挑むべきです。(訳注:VIPERは良いツール(๓´˘`๓)という前提 )
関連する要素数のために、このアーキテクチャーを新しいプロジェクトで使う場合はオーバーヘッドがあります。
(しかし、その投資した効果は長い目で見ればあります)
そのため小さいスケールしないプロジェクトではオーバーキルとなってしまいます。
(訳注: 関連する要素数 とはファイル数等に始まるファイルの数やprotocolやクラスの総数を示しています.)
もしチームがVIPERを使うことに完全に合意していない場合は、最終的にMVC-VIPERが混ざり頭痛をもたらす可能性があります。
そのためVIPERで進めていく前にチームで意識を合わせてください。
5. まとめ
もし、もっとVIPER Architectureに関して興味があるならば、repository を check-outして、この記事で例になってるアプリを動かしてみてください。
何か思うことお気づきの点がありましたらisuueやPull-Requestをください。
あなたの好きなArchitectureは何ですか? コメントで教えてください!
(翻訳は以上)
最後に
サンプル / ドキュメント
-
tirupati17/currency-converter-swift3.0-viper
- Xcode8で簡単に動く。良い。
-
Architecting iOS Apps with VIPER
- まだ読めてない
ファイル追加が面倒なときは?
- ジェネラムバー (Gemeramba) を使えば良い。
- 使い方などは、こちらのQiitaをご覧下さい: https://qiita.com/YKEI_mrn/items/d1f79ceddf6e009fdcd0
感想
海外ではVIPERの話が出ると、必ずと言っていいほどiOS Clean Architectureの話が出てくるらしいですね(噂)
VIPERに関して少し勉強はしてみましたが、iOSCleanArchitectureとの差分を話せるほど使えてません。
いつか比較をしてQiitaにまとめたいと思います。φ('ᴗ'」)