はじめに
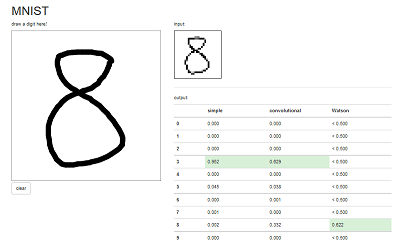
WatsonのVisual RecognitionがV2になって学習できるようになった。Visual Recognitionについてはこちらの記事がわかりやすいと思う。で、これを使ってMNISTの手書き数字の分類をやったらどうなるのか試してみようと思ってやってみた。んで、どうせならGoogleのTensorFlowと比較してみよう、ということで、こちらで公開されている手書きアプリをベースに、Watsonへの問い合わせを追加してみた。
なお、Visual Recognitionが得意とするのは200x200以上の画像。320x320くらいがいいらしい。一方、MNISTのデータは28x28。正直、VisualRecognitionに勝ち目は無いかもしれない。だが勝ち負けの問題ではないのだ。
Visual Recognitionの使い方
使い方は先ほども紹介したこちらを見るとよくわかる。
ここで重要なのは、トレーニングのためにはJPEG/PNG/GIF画像をzip圧縮して入力すること、POSITIVE画像とNEGATIVE画像がそれなりの枚数必要であることだ。
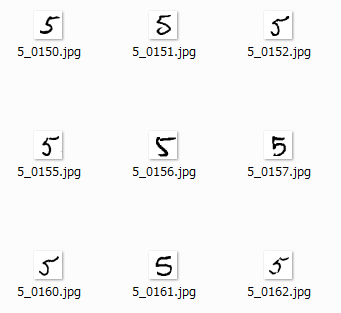
特に1つ目だが、MNISTのデータはドットごとの濃度を数値化したものなので、これをJPEGに変換する必要がある。
MNISTのデータをJPEG化する
MNISTのデータ読み込みは、TensorFlowのコードを参考にしてみた。
データ読み込み部分のコードはこんな感じ。
from tensorflow.examples.tutorials.mnist import input_data
mnist = input_data.read_data_sets("MNIST_data/", one_hot=True)
読み込んだデータがmnistに格納される。もう少し掘り下げると、mnist.train.imagesとmnist.train.labelsという変数に格納されている。
これらの中身を見てみると次のような感じだった。
>>> print mnist.train.images
[[ 0.  0.  0. ...,  0.  0.  0.]
 [ 0.  0.  0. ...,  0.  0.  0.]
 [ 0.  0.  0. ...,  0.  0.  0.]
 ...,
 [ 0.  0.  0. ...,  0.  0.  0.]
 [ 0.  0.  0. ...,  0.  0.  0.]
 [ 0.  0.  0. ...,  0.  0.  0.]]
>>> print mnist.train.labels
[[ 0.  0.  0. ...,  1.  0.  0.]
 [ 0.  0.  0. ...,  0.  0.  0.]
 [ 0.  0.  0. ...,  0.  0.  0.]
 ...,
 [ 0.  0.  0. ...,  0.  0.  0.]
 [ 0.  0.  0. ...,  0.  0.  0.]
 [ 0.  0.  0. ...,  0.  1.  0.]]
配列なので、1つ目の要素(1文字目のデータ)だけ抜き出すとこんな感じ。
>>> print mnist.train.images[0]
[ 0. 0. 0. 0. 0. 0. 0.
0. 0. 0. 0. 0. 0. 0.
0. 0. 0. 0. 0. 0. 0.
0. 0. 0. 0. 0. 0. 0.
0. 0. 0. 0. 0. 0. 0.
0. 0. 0. 0. 0. 0. 0.
0. 0. 0. 0. 0. 0. 0.
0. 0. 0. 0. 0. 0. 0.
0. 0. 0. 0. 0. 0. 0.
0. 0. 0. 0. 0. 0. 0.
0. 0. 0. 0. 0. 0. 0.
0. 0. 0. 0. 0. 0. 0.
0. 0. 0. 0. 0. 0. 0.
0. 0. 0. 0. 0. 0. 0.
0. 0. 0. 0. 0. 0. 0.
0. 0. 0. 0. 0. 0. 0.
0. 0. 0. 0. 0. 0. 0.
0. 0. 0. 0. 0. 0. 0.
0. 0. 0. 0. 0. 0. 0.
0. 0. 0. 0. 0. 0. 0.
0. 0. 0. 0. 0. 0. 0.
0. 0. 0. 0. 0. 0. 0.
0. 0. 0. 0. 0. 0. 0.
0. 0. 0. 0. 0. 0. 0.
0. 0. 0. 0. 0. 0. 0.
0. 0. 0. 0. 0. 0. 0.
0. 0. 0. 0. 0. 0. 0.
0. 0. 0. 0. 0. 0. 0.
0. 0. 0. 0. 0. 0. 0.
0. 0. 0. 0. 0.38039219 0.37647063
0.3019608 0.46274513 0.2392157 0. 0. 0. 0.
0. 0. 0. 0. 0. 0. 0.
0. 0. 0. 0. 0.35294119 0.5411765
0.92156869 0.92156869 0.92156869 0.92156869 0.92156869 0.92156869
0.98431379 0.98431379 0.97254908 0.99607849 0.96078438 0.92156869
0.74509805 0.08235294 0. 0. 0. 0. 0.
0. 0. 0. 0. 0. 0.
0.54901963 0.98431379 0.99607849 0.99607849 0.99607849 0.99607849
0.99607849 0.99607849 0.99607849 0.99607849 0.99607849 0.99607849
0.99607849 0.99607849 0.99607849 0.99607849 0.74117649 0.09019608
0. 0. 0. 0. 0. 0. 0.
0. 0. 0. 0.88627458 0.99607849 0.81568635
0.78039223 0.78039223 0.78039223 0.78039223 0.54509807 0.2392157
0.2392157 0.2392157 0.2392157 0.2392157 0.50196081 0.8705883
0.99607849 0.99607849 0.74117649 0.08235294 0. 0. 0.
0. 0. 0. 0. 0. 0.
0.14901961 0.32156864 0.0509804 0. 0. 0. 0.
0. 0. 0. 0. 0. 0. 0.
0.13333334 0.83529419 0.99607849 0.99607849 0.45098042 0. 0.
0. 0. 0. 0. 0. 0. 0.
0. 0. 0. 0. 0. 0. 0.
0. 0. 0. 0. 0. 0. 0.
0. 0.32941177 0.99607849 0.99607849 0.91764712 0. 0.
0. 0. 0. 0. 0. 0. 0.
0. 0. 0. 0. 0. 0. 0.
0. 0. 0. 0. 0. 0. 0.
0. 0.32941177 0.99607849 0.99607849 0.91764712 0. 0.
0. 0. 0. 0. 0. 0. 0.
0. 0. 0. 0. 0. 0. 0.
0. 0. 0. 0. 0. 0. 0.
0.41568631 0.6156863 0.99607849 0.99607849 0.95294124 0.20000002
0. 0. 0. 0. 0. 0. 0.
0. 0. 0. 0. 0. 0. 0.
0. 0. 0. 0.09803922 0.45882356 0.89411771
0.89411771 0.89411771 0.99215692 0.99607849 0.99607849 0.99607849
0.99607849 0.94117653 0. 0. 0. 0. 0.
0. 0. 0. 0. 0. 0. 0.
0. 0. 0. 0.26666668 0.4666667 0.86274517
0.99607849 0.99607849 0.99607849 0.99607849 0.99607849 0.99607849
0.99607849 0.99607849 0.99607849 0.55686277 0. 0. 0.
0. 0. 0. 0. 0. 0. 0.
0. 0. 0. 0.14509805 0.73333335 0.99215692
0.99607849 0.99607849 0.99607849 0.87450987 0.80784321 0.80784321
0.29411766 0.26666668 0.84313732 0.99607849 0.99607849 0.45882356
0. 0. 0. 0. 0. 0. 0.
0. 0. 0. 0. 0. 0.44313729
0.8588236 0.99607849 0.94901967 0.89019614 0.45098042 0.34901962
0.12156864 0. 0. 0. 0. 0.7843138
0.99607849 0.9450981 0.16078432 0. 0. 0. 0.
0. 0. 0. 0. 0. 0. 0.
0. 0.66274512 0.99607849 0.6901961 0.24313727 0. 0.
0. 0. 0. 0. 0. 0.18823531
0.90588242 0.99607849 0.91764712 0. 0. 0. 0.
0. 0. 0. 0. 0. 0. 0.
0. 0. 0.07058824 0.48627454 0. 0. 0.
0. 0. 0. 0. 0. 0.
0.32941177 0.99607849 0.99607849 0.65098041 0. 0. 0.
0. 0. 0. 0. 0. 0. 0.
0. 0. 0. 0. 0. 0. 0.
0. 0. 0. 0. 0. 0. 0.
0.54509807 0.99607849 0.9333334 0.22352943 0. 0. 0.
0. 0. 0. 0. 0. 0. 0.
0. 0. 0. 0. 0. 0. 0.
0. 0. 0. 0. 0. 0.
0.82352948 0.98039222 0.99607849 0.65882355 0. 0. 0.
0. 0. 0. 0. 0. 0. 0.
0. 0. 0. 0. 0. 0. 0.
0. 0. 0. 0. 0. 0. 0.
0.94901967 0.99607849 0.93725497 0.22352943 0. 0. 0.
0. 0. 0. 0. 0. 0. 0.
0. 0. 0. 0. 0. 0. 0.
0. 0. 0. 0. 0. 0.
0.34901962 0.98431379 0.9450981 0.33725491 0. 0. 0.
0. 0. 0. 0. 0. 0. 0.
0. 0. 0. 0. 0. 0. 0.
0. 0. 0. 0. 0. 0.
0.01960784 0.80784321 0.96470594 0.6156863 0. 0. 0.
0. 0. 0. 0. 0. 0. 0.
0. 0. 0. 0. 0. 0. 0.
0. 0. 0. 0. 0. 0. 0.
0.01568628 0.45882356 0.27058825 0. 0. 0. 0.
0. 0. 0. 0. 0. 0. 0.
0. 0. 0. 0. 0. 0. 0.
0. 0. 0. 0. 0. 0. 0.
0. 0. 0. 0. 0. 0. 0.
0. 0. 0. 0. 0. 0. 0. ]
>>> print mnist.train.labels[0]
[ 0. 0. 0. 0. 0. 0. 0. 1. 0. 0.]
0でないところがドットがあるピクセル、labelsはどの数字か(この場合は7)を表している。
ということで、これをJPEG化するコードがこちら。
\# import MNIST dataset as TensorFlow format
from tensorflow.examples.tutorials.mnist import input_data
mnist = input_data.read_data_sets('MNIST_data', one_hot=True)

\# import Pillow(PIL) library
from PIL import Image
im = Image.new('RGB', (28, 28), (255, 255, 255))  # create 28x28 image buffer

\# counter for each number
counter = [0, 0, 0, 0, 0, 0, 0, 0, 0, 0]

\# loop whole train data
for i in range(len(mnist.train.images)):
  \# set label from labels array
  for l in range(len(mnist.train.labels[i])):
    if mnist.train.labels[i, l] > 0:
      label = l
  \# conver MNIST image to jpeg format
  for y in range(28):
    for x in range(28):
      w = mnist.train.images[i, y * 28 + x]
      w = 255 - int(w * 255)
      im.putpixel((x, y), (w, w, w))
  filename = 'images/' + str(label) + '_' + str(counter[label]).zfill(4) + '.jpg'
  im.save(filename, 'JPEG', quality=100, optimize=True)
  counter[label] = counter[label] + 1
  if i % 1000 == 0:
    print str(i) + ' images completed.'
i = i + 1

\# summary
for label in range(10):
  print 'number ' + str(label) + ' : ' + str(counter[label]) + ' images converted.'
print 'total : ' + str(i) + ' images completed.'
もちろんTensorFlowが導入されている環境でないといけない。
また、JPEG画像生成のために、Pillow、libjpeg-devをpip installで導入している。
画像をzip圧縮する
Visual Recognitionの制約として、zipファイルの中の画像は10,000枚まで、というのがある。まぁ10,000枚入れたことは無いので、本当にはじかれるのかは不明なのだが。
対して、MNISTの画像データの枚数は以下のようになっていて、POSITIVE画像はいいが、NEGATIVE画像で他全てを指定すると50,000枚近くになってしまう。
| 数字 | 枚数 |
|---|---|
| 0 | 5444 |
| 1 | 6179 |
| 2 | 5470 |
| 3 | 5638 |
| 4 | 5307 |
| 5 | 4987 |
| 6 | 5417 |
| 7 | 5715 |
| 8 | 5389 |
| 9 | 5454 |
この問題を解決するため、NEGATIVEイメージは各数字の最初の1,000枚を使ってzipした(つまり合計9,000枚)。
こんな感じでzipを実行。0000~0999まで1000枚をzipに入れる。これを0から9まで実行。
zip -rjq number0.zip images/0_*
zip -rjq not0.zip images/1_0* images/2_0* images/3_0* images/4_0* images/5_0* images/6_0* images/7_0* images/8_0* images/9_0*
トレーニングする
データの準備ができたら次はトレーニング。トレーニングはただコマンドを打つだけ。0の学習はこんな感じ。
curl -k -F "name=Number0" -F "positive_examples=@number0.zip" -F "negative_examples=@not0.zip" -X POST -u "ユーザーID":"パスワード" "https://gateway.watsonplatform.net/visual-recognition-beta/api/v2/classifiers?version=2015-12-02"
ここで忍耐力が試される。この分量だと平均2時間くらいかかった。12~15時あたりは1時間程度で終わることもある。アメリカ、ヨーロッパがまだ寝ているからサーバーの奪い合いにならないのだろうか。
しかも、理由はよくわからないが、筆者の環境ではcurlにレスポンスが返ってこなかった。12時間くらい流しててもレスポンスが無く、Classifier listを表示させたらいた、という。ということで、30分おきくらいにリストを表示させて学習が完了していないか確認するとよい。
curl -k -X GET -u "ユーザーID":"パスワード" "https://gateway.watsonplatform.net/visual-recognition-beta/api/v2/classifiers?version=2015-12-02" | grep Number
Classifierlistを作成する
Visual RecognitionはデフォルトでたくさんのClassifierが入っている。が、MNISTの確認には不要だ。ここで関係あるClassifierだけのリストを作成しておく。
curl -k -X GET -u "9516f963-8707-4b27-a6bd-a50a275f6c2f":"widyHX4Trdki" "https://gateway.watsonplatform.net/visual-recognition-beta/api/v2/classifiers?version=2015-12-02" | grep Number
  % Total    % Received % Xferd  Average Speed   Time    Time     Time  Current
                                 Dload  Upload   Total   Spent    Left  Speed
  0     0    0     0    0     0      0      0 --:--:--  0:00:04 --:--:--     0	{"classifier_id":"Number0_608087973","name":"Number0"},
	{"classifier_id":"Number1_2074379561","name":"Number1"},
	{"classifier_id":"Number2_1972121249","name":"Number2"},
	{"classifier_id":"Number3_1153621741","name":"Number3"},
	{"classifier_id":"Number4_2057359017","name":"Number4"},
	{"classifier_id":"Number5_246622786","name":"Number5"},
	{"classifier_id":"Number6_2085538018","name":"Number6"},
	{"classifier_id":"Number7_1082710397","name":"Number7"},
	{"classifier_id":"Number8_2024810030","name":"Number8"},
	{"classifier_id":"Number9_604087810","name":"Number9"},
100 38536    0 38536    0     0   7204      0 --:--:--  0:00:05 --:--:-- 10090
これをこう整形し、jsonとして保存しておく。
{ "classifiers":[
    {"classifier_id":"Number0_608087973","name":"Number0"},
	{"classifier_id":"Number1_2074379561","name":"Number1"},
	{"classifier_id":"Number2_1972121249","name":"Number2"},
	{"classifier_id":"Number3_1153621741","name":"Number3"},
	{"classifier_id":"Number4_2057359017","name":"Number4"},
	{"classifier_id":"Number5_246622786","name":"Number5"},
	{"classifier_id":"Number6_2085538018","name":"Number6"},
	{"classifier_id":"Number7_1082710397","name":"Number7"},
	{"classifier_id":"Number8_2024810030","name":"Number8"},
	{"classifier_id":"Number9_604087810","name":"Number9"}
]}
Visual Recognitionのテスト
学習が終わったらテストをしてみよう。
curlならばこんな感じ。
curl -k -u "ユーザーID":"パスワード" -X POST -F "images_file=@images/0_0000.jpg" -F "classifier_ids=<classifierlist_Numbers.json" "https://gateway.watsonplatform.net/visual-recognition-beta/api/v2/classify?version=2015-12-02"
PythonからVisual Recognitionを呼ぶ
MNISTの手書き数字のアプリを改造する場合、Visual Recognitionを呼ぶところはPythonで書くことになる。
ということで、PythonからVisual Recognitionを呼ぶ方法を調べてみた。
これだ。
https://github.com/watson-developer-cloud/python-sdk
そのものずばり。これを使えば簡単に呼び出せる。
pip install watson-developer-cloudでインストールして使おう。
json、join、dirnameも必要なので入ってなかったらいれておく。
import json
from os.path import join, dirname
from watson_developer_cloud import VisualRecognitionV2Beta as VisualRecognition
visual_recognition = VisualRecognition(version='2015-12-02', username='ユーザー名',
                                       password='パスワード')
with open(join(dirname('__file__'), 'images/0_0000.jpg'), 'rb') as image_file:
    print(json.dumps(visual_recognition.classify(image_file, classifier_ids=['Number0_608087973', 'Number1_2074379561', 'Number2_1972121249', 'Number3_1153621741', 'Number4_2057359017', 'Number5_246622786', 'Number6_2085538018', 'Number7_1082710397', 'Number8_2024810030', 'Number9_604087810']), indent=2))
動かすとこんな感じになる。
$ python vr_sample.py
{
  "images": [
    {
      "image": "0_0000.jpg",
      "scores": [
        {
          "score": 0.722599,
          "classifier_id": "Number0_608087973",
          "name": "Number0"
        }
      ]
    }
  ]
}
これで全部の準備が整った。
MNISTアプリのコードを改造する
MNISTの手書き数字アプリを改造してVisual Recognitionの呼び出しを追加する。
main.py
まずはメインのPythonコードから。
冒頭のimportのあたりにwatson_developer_cloudとPIL(画像処理)を追加する。
# Watson : Visual Recognition
import json
from os.path import join, dirname
from watson_developer_cloud import VisualRecognitionV2Beta as VisualRecognition
visual_recognition = VisualRecognition(version='2015-12-02', username='ユーザーID',
                                       password='パスワード')
# import Pillow(PIL) library
from PIL import Image
im = Image.new('RGB', (28, 28), (255, 255, 255))  # create 28x28 image buffer
そして、途中にVisual Recognitionを呼び出して結果を整形して返す関数を追加する。
# create jpeg image and call visual recognition service
def vr_classify(input):
    for y in range(28):
        for x in range(28):
            w = int(input[0, y * 28 + x] * 255)
            im.putpixel((x, y), (w, w, w))
    im.save('./tmp.jpg', 'JPEG', quality=100, optimize=True)
    with open(join(dirname('__file__'), './tmp.jpg'), 'rb') as image_file:
        vr_result = visual_recognition.classify(image_file, classifier_ids=['Number0_608087973', 'Number1_2074379561', 'Number2__1972121249', 'Number3_1153621741', 'Number4_2057359017', 'Number5_246622786', 'Number6_2085538018', 'Number7_1082710397', 'Number8_2024810030', 'Number9_604087810'])
    vr_scores = vr_result['images'][0]['scores']
    vr_dict = dict(Number0 = 0, Number1 = 0, Number2 = 0, Number3 = 0, Number4 = 0, Number5 = 0, Number6 = 0, Number7 = 0, Number8 = 0, Number9 = 0)
    for vs in range(len(vr_scores)):
        vr_score = vr_scores[vs]
        vr_name = vr_score['name']
        vr_dict[vr_name] = vr_score['score']
    vr_result = [0, 0, 0, 0, 0, 0, 0, 0, 0, 0]
    for i in range(10):
        vr_result[i] = vr_dict['Number' + str(i)]
    return vr_result
最後に、既存コードのAPI呼び出し内部に、output3を追加する。
@app.route('/api/mnist', methods=['POST'])
def mnist():
    input = ((255 - np.array(request.json, dtype=np.uint8)) / 255.0).reshape(1, 784)
    output1 = simple(input)
    output2 = convolutional(input)
    output3 = vr_classify(input)
    return jsonify(results=[output1, output2, output3])
index.html
HTMLファイルはVisual Recognitionの結果を表示できるように画面を少し修正する。途中からだけどこんな感じ。矢印で注釈をつけているあたりが変更点。
<div class="container">
<h1>MNIST</h1>
<div class="row">
<div class="col-md-5"> ← Bootstrapのグリッドシステム。幅を6→5にする
<p>draw a digit here!</p>
<canvas id="main"></canvas>
<p>
<button id="clear" class="btn btn-default">clear</button>
</p>
</div>
<div class="col-md-7"> ← 幅を5→7にする。これで合計12。
<p>input:</p>
<canvas id="input" style="border:1px solid" width="140" height="140"></canvas>
<hr>
<p>output:</p>
<table id="output" class="table">
<tr>
<th class="col-md-1"></th> ← 幅を2→1にする
<th class="col-md-2">simple</th>
<th class="col-md-2">convolutional</th>
<th class="col-md-2">Watson</th> ← Watsonの列を追加。幅は2。これで合計7。
</tr>
<tr>
<th>0</th>
<td></td>
<td></td>
<td></td> ← 追加
</tr> <th>1</th>
<td></td>
<td></td>
<td></td> ← 追加
</tr>
(以下略)
```
## main.js
結果をHTMLに埋める処理の繰り返しを2回→3回にする。それと、Visual Recognitionは確信度0.5未満はスコアを返さないのでそれに対応した。
```javascript
$.ajax({
url: '/api/mnist',
method: 'POST',
contentType: 'application/json',
data: JSON.stringify(inputs),
success: (data) => {
for (var i = 0; i < 3; i++) { // ← 3回繰り返す(Simple,COnvolutional,Watson)
var max = 0;
var max_index = 0;
for (var j = 0; j < 10; j++) {
var value = Math.round(data.results[i][j] * 1000);
if (value > max) {
max = value;
max_index = j;
}
var digits = String(value).length;
for (var k = 0; k < 3 - digits; k++) {
value = '0' + value;
}
var text = '0.' + value;
if (value > 999) {
text = '1.000';
}
if (i == 2 && value == 0) { // ← VisualRecognitionは確信度が0.5未満の場合は結果を返さない。変数の初期値(=0)の場合は「< 0.500」を表示
text = '< 0.500';
}
$('#output tr').eq(j + 1).find('td').eq(i).text(text);
}
for (var j = 0; j < 10; j++) {
if (j === max_index) {
$('#output tr').eq(j + 1).find('td').eq(i).addClass('success');
} else {
$('#output tr').eq(j + 1).find('td').eq(i).removeClass('success');
}
}
}
}
});
```
# アプリを実行して結果を比較する
アプリを実行してみよう。Visual Recognitionは外部にAPI呼び出しを行っているので結果が返ってくるまで数秒かかるのであせらずに。

お!いけるやんけ!!

むむむ・・・

まぁこんなもんかな。
# おわりに
得意な種類の画像ではないのでVisual Recognitionは苦戦するかと思いきやそうでもなかった。なかなか頑張っていたと思う。TensorFlowは自分でネットワークを設計できるので、MNISTに特化したネットワークや、写真に特化したネットワークが組めるだろう。一方、Visual Recognitionはどんな写真でもネットワークは共通(たぶん)なので、汎用性が高いが、精度は落ちるのは否めない。それでも、ユーザーがネットワーク設計なしに画像認識できるんだから、Visual Recogntionはなかなか使えるAPIなんじゃないだろうか。

