iOSアプリケーションでWebSocketを使った機能の実装をすることになったが、
全く使ったことが無いので時間があるうちにテスト。
Swiftもいい加減使わないといけないので、その勉強も兼ねて。
基本的にはすでにQiitaでまとめられていた記事があったが、一部コマンドなど
補足で調査しながら作業することになったので別途まとめて見る。
やりたいこと
ローカル環境で、WebSocketを使った通信のテスト
記事の対象
・ サーバーとか触ったことないのでNode.jsとか全然わからない人。
参考
webSocket通信を知らないiOSエンジニアが知っておいて損はしない(経験談的な)軽い話
チャットなどリアルタイム更新が必要なスマフォアプリの構成について考えてみた
この記事から、とりあえずSocket.ioを使って見ることに。
SwiftでSocket.io (nodejs利用)
Socket.ioからSwift用のクライアントが提供されていたので、それを利用した記事を探していたらそのままの記事が。
サーバー側も経験のある人は、こちらに書いてある内容だけですんなり行けるはず。
サーバー側
ローカル環境でSocket.ioのテストをしたいので、環境を作ります。
Node.jsのインストール
Node Version Managerインストール
・ Node Version Manager - install-scriptより
・ curl -o- https://raw.githubusercontent.com/creationix/nvm/v0.31.1/install.sh | bash
※ 上記のコマンドは執筆時点のバージョンなので、install-scriptにある最新のコマンドで実行してください。
インストール完了時点では、nvmコマンドを打ってもnvm: command not foundと表示されますがインストールの最後に表示されているように一度ターミナルを開き直せばコマンドが有効になります。
実行できるかの確認。できなかった場合は、.bash_profileの設定をしてください。
$ nvm --version
0.31.1
補足 : NVMのアップデート
nvm自体のバージョンを上げる
上記記事を参考
$ cd ~/.nvm
$ git pull origin master
$ source ~/.nvm/nvm.sh
Node.jsのインストール
最新の安定版として何を利用していいかわかり難い…。
とりあえずStableのバージョンインストールしとく。
$ nvm install v0.12.7
インストールしたら、ついでにnpmコマンドも使えるようになってました。
いろいろネットに落ちてる記事の時代とは変わってるんですね・・・。
Now using node v0.12.7 (npm v2.11.3)
実装
Socket.ioのインストール
適当な作業フォルダで、以下を実行
私はLocalServerとかって名前のフォルダを作ってその中で実行しました。
npm install socket.io
サンプルプログラムを作成して、実行
SwiftでSocket.io (nodejs利用)をそのまま引用させて頂きます。
1秒ごとに、現在のサーバー時間をクライアントに送信します。
"from_client"のイベントで送信された情報をコンソールに出力します。
var http = require("http");
var server = http.createServer(function(req,res) {
    res.write("Hello World!!");
    res.end();
});

// socket.ioの準備
var io = require('socket.io')(server);

// クライアント接続時の処理
io.on('connection', function(socket) {
    console.log("client connected!!")

    // クライアント切断時の処理
    socket.on('disconnect', function() {
        console.log("client disconnected!!")
    });
    // クライアントからの受信を受ける (socket.on)
    socket.on("from_client", function(obj){
        console.log(obj)
    });
});

// とりあえず一定間隔でサーバ時刻を"全"クライアントに送る (io.emit)
var send_servertime = function() {
    var now = new Date();
    io.emit("from_server", now.toLocaleString());
    console.log(now.toLocaleString());
    setTimeout(send_servertime, 1000)
};
send_servertime();

server.listen(8080);
このファイルを、server.jsとしてSocket.ioをインストールしたフォルダに保存、実行します。
$ node server.js
ちなみに、停止するときは Control+C です。
クライアント側
Socket.IO-Client-Swiftのインストール
cocoapodsを利用してインストールしています。(ver1.0.0)
適当に「SocketTest」というプロジェクトを作って作業します。
platform:ios, '8.0'
use_frameworks!

def install_pods
	pod 'Socket.IO-Client-Swift'
end

target "SocketTest" do
	install_pods
end
実装
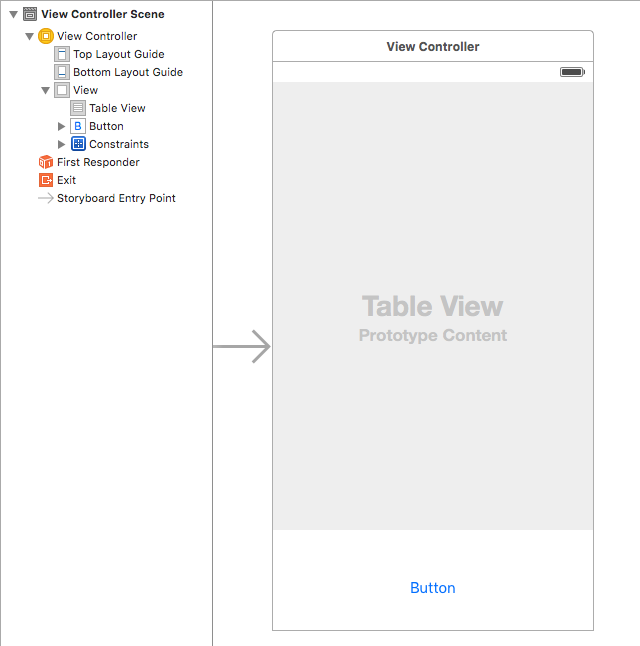
適当にレイアウト作成

ログ表示用にTableViewを配置して、イベント送信のテストを行うためにボタンを1個おきました。
コード
当たり前ですが、UITableViewのオブジェクトはStoryboardと紐付けてください。
clickButtonのアクションも画面上のButtonと紐付けてください。
import UIKit
import SocketIOClientSwift

class ViewController: UIViewController, UITableViewDataSource, UITableViewDelegate {

    @IBOutlet weak var tableView: UITableView!
    let SocketURL = NSURL(string:"http://localhost:8080/")
    var dataList:NSMutableArray!
    var socket: SocketIOClient!

    override func viewDidLoad() {
        super.viewDidLoad()
        // Do any additional setup after loading the view, typically from a nib.
        tableView.delegate = self
        tableView.dataSource = self

        dataList = NSMutableArray()

        socket = SocketIOClient(socketURL: SocketURL!, options:[.Log(true), .ForcePolling(true)])
        socket.on("connect") { data, ack in
            print("socket connected!!")
        }
        socket.on("disconnect") { data, ack in
            print("socket disconnected!!")
        }

        socket.on("from_server") { data, emitter in
            if let message = data as? [String] {
                print(message[0])
                self.dataList.insertObject(message[0], atIndex: 0)
                self.tableView.reloadData()
            }
        }
        socket.connect()
    }

    override func didReceiveMemoryWarning() {
        super.didReceiveMemoryWarning()
        // Dispose of any resources that can be recreated.
    }

    func tableView(tableView: UITableView, numberOfRowsInSection section: Int) -> Int {
        return dataList.count
    }

    func tableView(tableView: UITableView, cellForRowAtIndexPath indexPath: NSIndexPath) -> UITableViewCell {
        let cell : UITableViewCell = UITableViewCell(style: UITableViewCellStyle.Default, reuseIdentifier: "Cell")
        cell.textLabel?.text = dataList[indexPath.row] as? String;
        return cell;
    }

    @IBAction func clickButton(sender: AnyObject) {
        socket.emit("from_client", "button pushed!!")
    }
}
ATSへの対応
iOS9以降では、LocalHostですらブロックしてくるのでInfo.plistに記述が必要です。
<key>NSAppTransportSecurity</key>
	<dict>
		<key>NSExceptionDomains</key>
		<dict>
			<key>localhost</key>
			<dict>
				<key>NSTemporaryExceptionAllowsInsecureHTTPLoads</key>
				<true/>
			</dict>
		</dict>
	</dict>
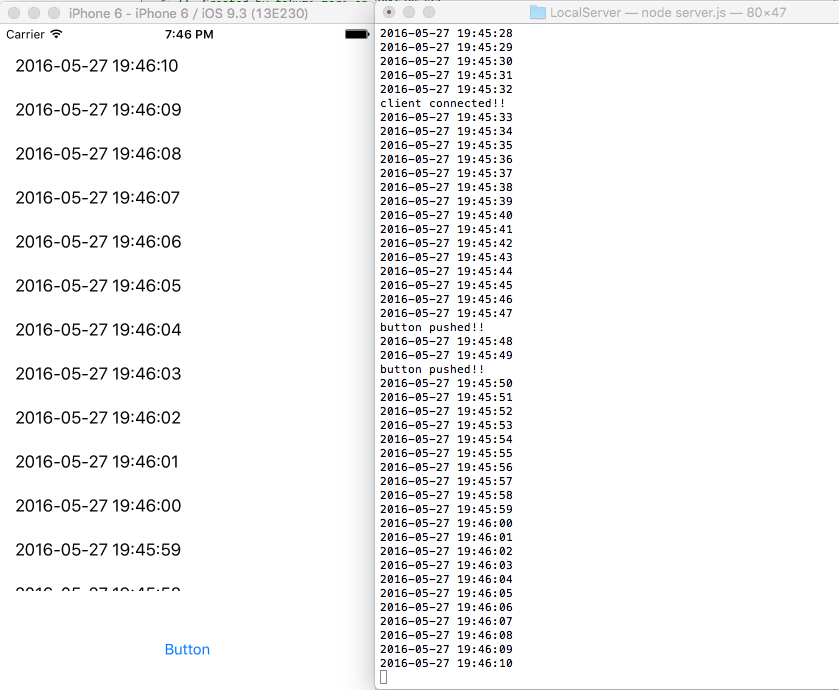
結果
こんな感じに画面出力されると思います。
あとは公式ドキュメントなどを読みつつ、適宜アクションのテストができると思います。
