iOSでアプリを開発しています。
アーカイブの時間が馬鹿にならなくなってきました。
アーカイブをしてオーガナイザーからiTunesConnectへのアップロードをXcodeからすると、30分から1時間ほどかかってしまっています。
これではいくら時間が合っても足りません。
しかも、アーカイブやiTunesConnectへアプリのバイナリファイルをアップロードする間、Xcodeの処理が重くなり、開発がストップしてしまいます。
なんとかしないと。
ということでiOSアプリのビルドツールfastlaneを導入することにしました。
これを入れるとコマンド1つでアーカイブとiTunesConnectへの提出をしてくれるようになります。
今回はCocoaPodsを使ったプロジェクトにfastlaneを適応していきたいと思います。
環境
- macOS 10.12.5 (Sierra)
- Xcode 8.3.2
- fastlane 2.32.1
- cocoapod 1.2.1
fastlaneをインストールする
プロジェクトのディレクトリ(**.xcworkspace or **.xcodeproj)で行います。
下記のコマンドでGemfileを作ります。編集します。
$ bundle init
$ vim Gemfile
Gemfileにfastlaneとcocoapodsを追加します。
cocoapodsを入れるのは、fastlaneからcocoapodsを使えるようにするためです。
# frozen_string_literal: true
source "https://rubygems.org"

# gem "rails"
gem "fastlane"
gem "cocoapods"
パス指定でGemをインストールします。
$ bundle install --path vendor/bundler
fastlaneの初期設定
fastlaneの初期設定を下記のコマンドで行います。
$ bundle exec fastlane init
いろいろ聞かれます。答えていきます。
自分のApple IDを聞かれるので登録しているEメールを入力します。
.
.
.
[22:20:42]: Your Apple ID (e.g. fastlane@krausefx.com):
二段階認証が不要なApple IDならパスワードを入力を求められます。入力します。
(登録メールをexample@gmail.comと仮定しています)
Password (for example@gmail.com):
アプリのBundle Identifierを求められます。入力します。
App Identifier (com.krausefx.app):
iTunes Connectとデベロッパーポータルで自分のアプリをアップするかどうかを求められます。今回はiTunes Connectへアプリをアップしたいのでyを入力しました。
Would you like to create your app on iTunes Connect and the Developer Portal? (y/n)
これでfastlaneが必要ファイルを作成してくれます。
生成されたfastlaneディレクトリ
$ bundle exec fastlane initが成功するとカレントディレクトリにfastlaneディレクトリが作成されています。
ディレクトリ構成は以下の通り。
fastlane
├── Appfile
├── Deliverfile
├── Fastfile
├── README.md
├── metadata
├── report.xml
└── screenshots
Fastfileを見る
Fastfileを見てみます。
fastlane_version "2.32.1"

default_platform :ios

platform :ios do
  before_all do
    # ENV["SLACK_URL"] = "https://hooks.slack.com/services/..."
    cocoapods
  end

  desc "Runs all the tests"
  lane :test do
    scan
  end

  desc "Submit a new Beta Build to Apple TestFlight"
  desc "This will also make sure the profile is up to date"
  lane :beta do
    # match(type: "appstore") # more information: https://codesigning.guide
    gym(scheme: "egcall") # Build your app - more options available
    pilot

    # sh "your_script.sh"
    # You can also use other beta testing services here (run `fastlane actions`)
  end

  desc "Deploy a new version to the App Store"
  lane :release do
    # match(type: "appstore")
    # snapshot
    gym(scheme: "egcall") # Build your app - more options available
    deliver(force: true)
    # frameit
  end

  # You can define as many lanes as you want

  after_all do |lane|
    # This block is called, only if the executed lane was successful

    # slack(
    #   message: "Successfully deployed new App Update."
    # )
  end

  error do |lane, exception|
    # slack(
    #   message: exception.message,
    #   success: false
    # )
  end
end
アーカイブしたらビルドナンバーをインクルメントする
自動で作成されたFastfileでほぼほぼいいんですが、アーカイブするたびにビルドナンバーをインクルメントしたいと思います。
これをしないと同じビルドナンバーiTunes Connectは拒否するので手動でXcodeのプロジェクト設定のGeneralから書き換えなくてはいけなくなりとても面倒です。
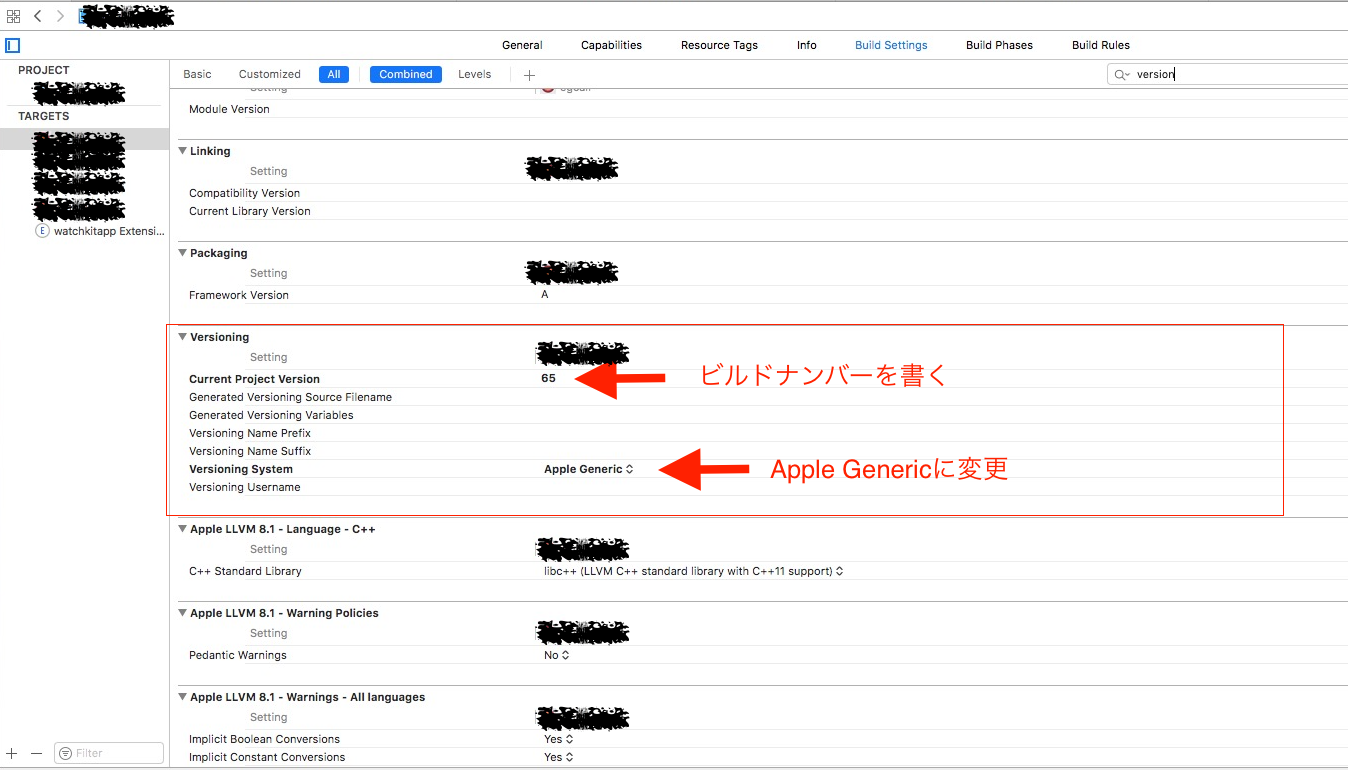
スクリプトからビルドナンバーをインクルメントするにはXcodeの設定が必要です。
プロジェクトの該当ターゲット>Build Settings > VersioningからVersioning SystemをApple Genericに変更します。
またCurrent Projetct Versionに現在のビルドナンバーを記入します。
FastFileのreleaseレーンにincrement_build_numberを追加します。
  desc "Deploy a new version to the App Store"
  lane :release do
    # match(type: "appstore")
    # snapshot
    increment_build_number#追加
    gym(scheme: "egcall") # Build your app - more options available
    deliver(force: true)
    # frameit
  end
Fastlaneを実行
Fastlaneを実行します。
$ bundle exec fastlane release
上手く行けばアーカイブとiTUnes Connectへのアップロードをfastlaneがしてくれます。
