前から使ってみたかったTensorBoardのProjectorを表示してみたので、記事にします。見た目かっこいいです![]() 少し古い資料ではProjectorという言葉ではなく、Embedded Visualizationと書かれていますが同じ意味です。
少し古い資料ではProjectorという言葉ではなく、Embedded Visualizationと書かれていますが同じ意味です。
他TensorBoard関連記事として下記2つも参照ください。
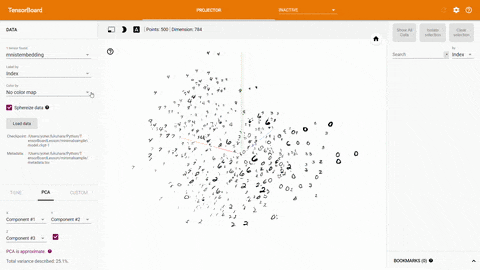
出力イメージ
画面上でこんな感じです。MNISTのデータを使っています。TensorBoardの起動方法は【TensorBoard入門】TensorFlow処理を見える化して理解を深めるをご覧くください。
環境
実行環境は以下のとおりです。
| 種類 | バージョン |
|---|---|
| OS | Windows 10 64bit Pro |
| Anaconda | Anaconda 4.4.0 |
| Python | Python3.5 |
| TensorFlow | TensorFlow 1.3 |
出力方法
通常のTensorBoardの出力に追加して以下の4点が必要です。
- 画面出力する変数の指定
- Projectorの初期設定
- 実行結果保存
- TSV(タブ区切りテキスト)ファイルの作成
- Sprite Imageの作成(Option)
コード全体は後で載せますが、パーツごとに解説します。
1. 画面出力する変数の指定
まずは画面出力する変数を指定します。今回はこんな感じでやってますが、実際には関数tf.get_variableを使うのが一般的かと思います。
# embedding変数定義
embedding_var  = tf.Variable(batch_xs, name=NAME_TO_VISUALISE_VARIABLE)
2. Projectorの初期設定
Projectorの初期設定をします。「1. 画面出力する変数の指定」で定義した変数をひもづけ、「4. TSV(タブ区切りテキスト)ファイルの作成」と「5. Sprite Imageの作成」で作成するファイルパスを指定します。
# Projector設定
config = projector.ProjectorConfig()
embedding = config.embeddings.add()
embedding.tensor_name = embedding_var.name

# メタデータ(CSV)パス
embedding.metadata_path = os.path.join(CUR_DIR,META)

# Sprite Imageパスと設定
embedding.sprite.image_path = os.path.join(CUR_DIR,SPRITES)
embedding.sprite.single_image_dim.extend([28,28])

# Projectorに出力
projector.visualize_embeddings(summary_writer, config)
3. 実行結果保存
セッション実行とその実行結果保存です。TensorBoardのProjector固有処理ではないですが、使う場合には必要です。
# 保存準備
saver = tf.train.Saver()

# セッション実行と保存
_ = saver.save(sess, os.path.join(LOG_DIR, "model.ckpt"), 1)
4. TSV(タブ区切りテキスト)ファイルの作成
使ったデータをTSV(タブ区切りテキスト)ファイルに出力します。
with open(os.path.join(LOG_DIR,META),'w') as file:

    # File Header
    file.write("Index\tLabel\n")

    # タブ区切りでラベル(正解の数字)書き込み
    for index, label in enumerate(batch_ys):
        file.write("%d\t%d\n" % (index, label))
5. Sprite Imageの作成(Option)
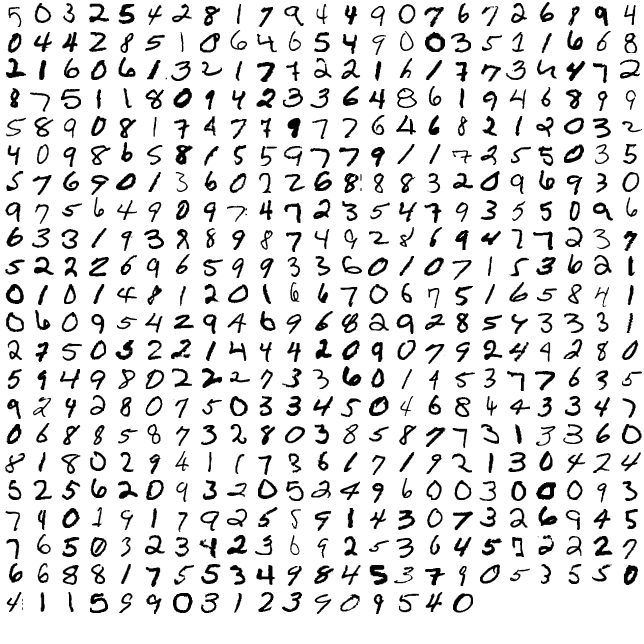
同じく使った画像をSprite Imageに出力します。なくてもProjectorは動きますが、あったほうが画像出力されるのでわかりやすいですね。
Sprite Imageは公式サイトに記載されているとおり、画像をマトリックス上に並べたものです(Webの世界では常識?)。今回のMNISTではこんな画像を作っています。
def create_sprite_image(images):
    """Returns a sprite image consisting of images passed as argument. Images should be count x width x height"""
    # MNISTは28ピクセル四方
    img_h = images.shape[1]
    img_w = images.shape[2]

    # 画像数の平方根(切上)を計算(Sprite Imageの1辺の長さに使用)
    n_plots = int(np.ceil(np.sqrt(images.shape[0])))

    # 全要素0の配列作成
    spriteimage = np.ones((img_h * n_plots ,img_w * n_plots ))

    for i in range(n_plots):
        for j in range(n_plots):
            this_filter = i * n_plots + j

            # 画像がある限り実行(n_plotsが割り切れないためSprite Imageは少し余る)
            if this_filter < images.shape[0]:

                # Sprite Imageの所定の配列に画像を挿入
                spriteimage[i * img_h:(i + 1) * img_h, j * img_w:(j + 1) * img_w] = images[this_filter]

    return spriteimage

# 画像をベクトルから配列に変換して、白黒反転(TendorBoard Projectorで見やすいように)
to_visualise = 1 - np.reshape(batch_xs,(-1,28,28))

# Sprite Image生成
sprite_image = create_sprite_image(to_visualise)

# Sprite Image保存
plt.imsave(os.path.join(LOG_DIR,SPRITES), sprite_image,cmap='gray')
Pythonプログラム全体
%matplotlib inline
import matplotlib.pyplot as plt
import tensorflow as tf
import numpy as np
import os

from tensorflow.contrib.tensorboard.plugins import projector
from tensorflow.examples.tutorials.mnist    import input_data

LOG_DIR = './minimalsample'
CUR_DIR = './'
SPRITES = 'mnistdigits.png'
META    = 'metadata.tsv'
NAME_TO_VISUALISE_VARIABLE = "mnistembedding"
TO_EMBED_COUNT = 500

path_for_mnist_sprites  = os.path.join(LOG_DIR,SPRITES)
path_for_mnist_metadata = os.path.join(LOG_DIR,META)

# MNISTデータ取得
mnist = input_data.read_data_sets("MNIST_data/", one_hot=False)
batch_xs, batch_ys = mnist.train.next_batch(TO_EMBED_COUNT)

# embedding変数定義
embedding_var  = tf.Variable(batch_xs, name=NAME_TO_VISUALISE_VARIABLE)

# TensorBoardに書き込む前準備
summary_writer = tf.summary.FileWriter(LOG_DIR)

# Projector設定
config = projector.ProjectorConfig()
embedding = config.embeddings.add()
embedding.tensor_name = embedding_var.name

# メタデータ(CSV)パス
embedding.metadata_path = os.path.join(CUR_DIR,META)

# Sprite Imageパスと設定
embedding.sprite.image_path = os.path.join(CUR_DIR,SPRITES)
embedding.sprite.single_image_dim.extend([28,28])

# Projectorに出力
projector.visualize_embeddings(summary_writer, config)

# セッション定義
sess = tf.InteractiveSession()

# 変数初期化
sess.run(tf.global_variables_initializer())

# 保存準備
saver = tf.train.Saver()

# セッション実行と保存
_ = saver.save(sess, os.path.join(LOG_DIR, "model.ckpt"), 1)

def create_sprite_image(images):
    """Returns a sprite image consisting of images passed as argument. Images should be count x width x height"""
    # MNISTは28ピクセル四方
    img_h = images.shape[1]
    img_w = images.shape[2]

    # 画像数の平方根(切上)を計算(Sprite Imageの1辺の長さに使用)
    n_plots = int(np.ceil(np.sqrt(images.shape[0])))

    # 全要素0の配列作成
    spriteimage = np.ones((img_h * n_plots ,img_w * n_plots ))

    for i in range(n_plots):
        for j in range(n_plots):
            this_filter = i * n_plots + j

            # 画像がある限り実行(n_plotsが割り切れないためSprite Imageは少し余る)
            if this_filter < images.shape[0]:

                # Sprite Imageの所定の配列に画像を挿入
                spriteimage[i * img_h:(i + 1) * img_h, j * img_w:(j + 1) * img_w] = images[this_filter]

    return spriteimage

# 画像をベクトルから配列に変換して、白黒反転(TendorBoard Projectorで見やすいように)
to_visualise = 1 - np.reshape(batch_xs,(-1,28,28))

# Sprite Image生成
sprite_image = create_sprite_image(to_visualise)

# Sprite Image保存
plt.imsave(os.path.join(LOG_DIR,SPRITES), sprite_image,cmap='gray')

# Sprite Image表示
plt.imshow(sprite_image,cmap='gray')

# CSVファイル作成
with open(os.path.join(LOG_DIR,META),'w') as file:

    # File Header
    file.write("Index\tLabel\n")

    # タブ区切りでラベル(正解の数字)書き込み
    for index, label in enumerate(batch_ys):
        file.write("%d\t%d\n" % (index, label))
参考リンク
以下のリンクを参考にしました
公式サイト
Simple Introduction to Tensorboard Embedding Visualisation