TensorFlowおよびCNN(畳み込みニューラルネットワーク)を理解するために柏木由紀さんの顔特徴を調べてみました。記事「TensorFlow理解のために柏木由紀さん顔特徴を調べてみた【前編】」の続編です。今回は、全体処理の中のTensorFlowの学習部分にフォーカスして解説します。解説と言いながら、わかってない部分も多くてすいません![]()
判定部分にフォーカスしている後編に続きます。

学習処理概要
前編でも説明しましたがTensorFlowを使って学習しています。TensorFlowエキスパート向けチュートリアルDeep MNIST for Expertsとほぼ同じモデルです。その解説については、記事[「【入門者向け解説】TensorFlowチュートリアルDeep MNIST」]
(http://qiita.com/FukuharaYohei/items/0aef74a0411273705512)を参照ください。
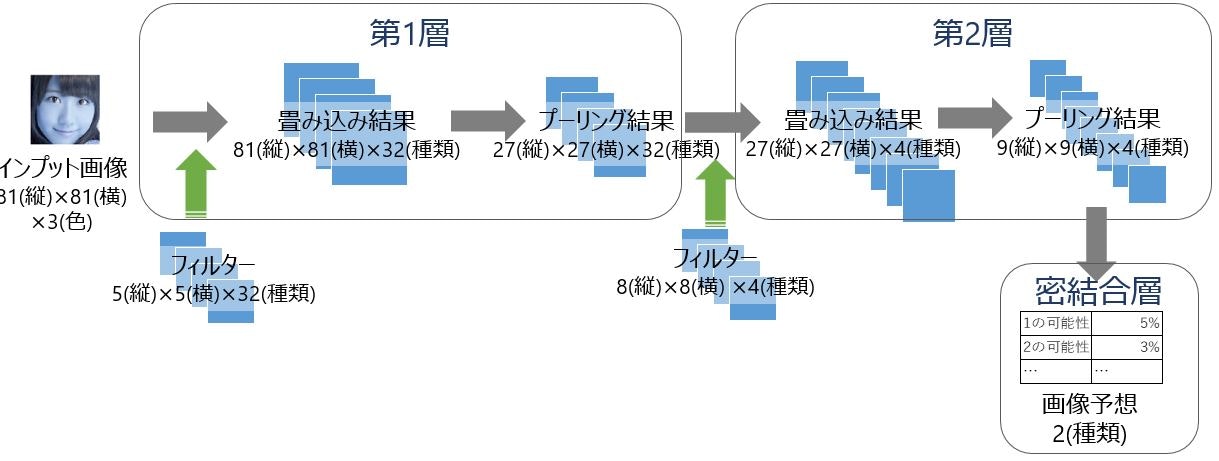
画像処理の流れ
1. 画像サイズ変更
「学習処理概要」の図には載せていませんが、TensorFlowで処理する前にOpenCVを使って画像サイズを統一した大きさに変更しています。「【入門者向け解説】TensorFlowチュートリアルDeep MNIST」と同じように27ピクセル四方では小さすぎるので、今回は81ピクセル四方にしています。
↓は参考画像ですが、なぜかresize後の画像をTensorBoardで見ると色がおかしいです(imshowすると普通なんですが・・・)。

Pythonではこう書いています(後ろにコード全体をのせます)。
img = cv2.imread(file_name[0])
img = cv2.resize(img, (FLAGS.image_size, FLAGS.image_size))
2. 第1層畳み込み処理
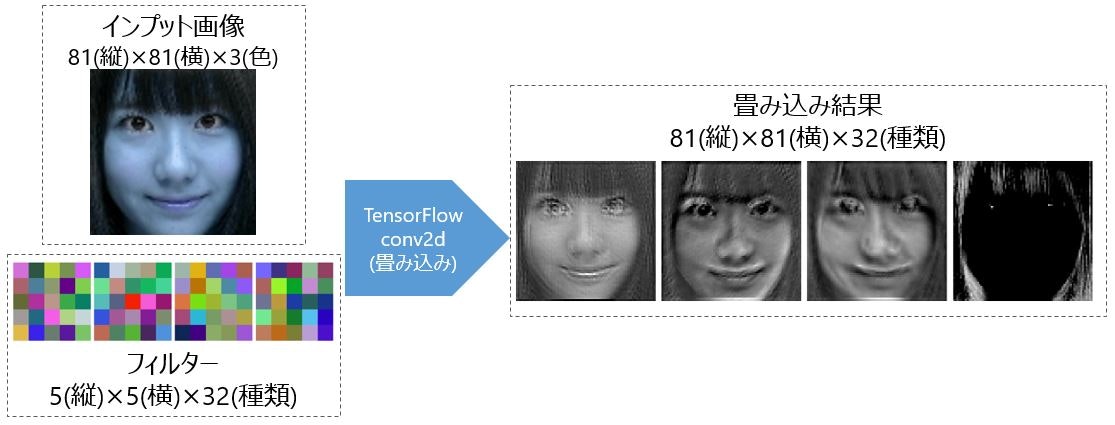
第1層畳み込み処理では、5ピクセル四方で32種類のフィルターを使って畳み込み処理をしています。ここは、「【入門者向け解説】TensorFlowチュートリアルDeep MNIST」と変えていません。活性化関数もReLUのままです。畳み込み処理の解説に関しては、記事「【入門者向け解説】畳み込み処理入門(TensorFlowで説明)」を参照ください。
↓で画像を一部のみ紹介しています。畳込み処理により特徴を出しています。一番右の画像は、鼻や口が消え、目の特徴を出しているのがわかります。フィルターはまるで意味がわかりませんね。
3. 第1層プーリング処理
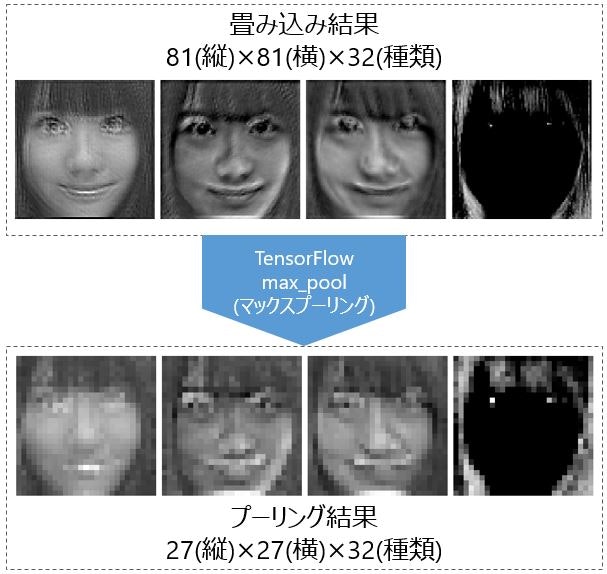
第1層プーリング処理では、第1層畳み込み結果の画像を1/3にマックスプーリングしています。最初の画像サイズが81と大きかったのでDeep MNISTとくらべて、1/2から1/3に変更しました。プーリング処理に関しては、記事「【入門者向け解説】プーリング処理入門(TensorFlowで説明)」を参照ください。
画像を見るとマックスプーリングで粗くなっているのがよくわかります。
4. 第2層畳み込み処理
第2層畳み込み処理では、8ピクセル四方で4種類のフィルターを使って畳み込み処理をしています。8ピクセルにしたのは、だいたい鼻のサイズがそのくらいかと思ったためです。また、特徴を少なく絞り込むために4種類にしてみました(結果意味なかったですが)。
画像で見るとこの時点で失敗しているのがわかります。特徴どころかほとんどが消えています・・・たまたまピックアップした画像が悪い?

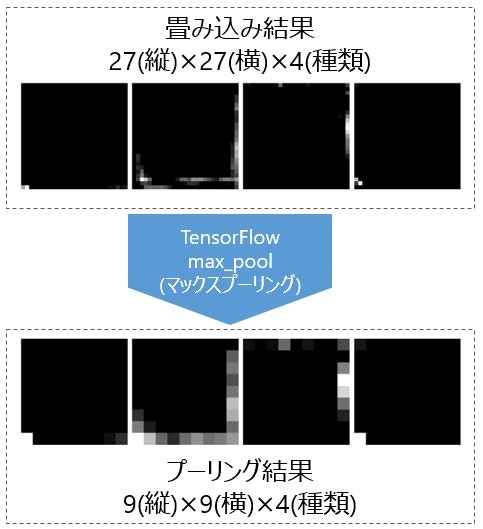
5. 第2層プーリング処理
第2層プーリング処理では、第2層畳み込み結果の画像を1/3にマックスプーリングしています。
画像を見ると端に特徴を求めているのがわかります。髪型を見ている?
6. 密結合層
あとは密結合層です。これはドロップアプトを含めてDeep MNISTと変えていません。
学習実行
実行準備
フォルダ構成はこんな感じで、"inputs"フォルダにテストデータtest.txtと訓練データtrain.txtというタブ区切りテキストファイルを配置しています。このフォルダ・ファイル構成は実行時のパラメータで変更できます。
inputs
│  test.txt
│  train.txt
ファイルの中身は画像のようになっていて、1列目がファイル、2列目が0 or 1です(0を柏木由紀さんとしています)。文字コードはS-JISで改行コードはCR-LFにしています。

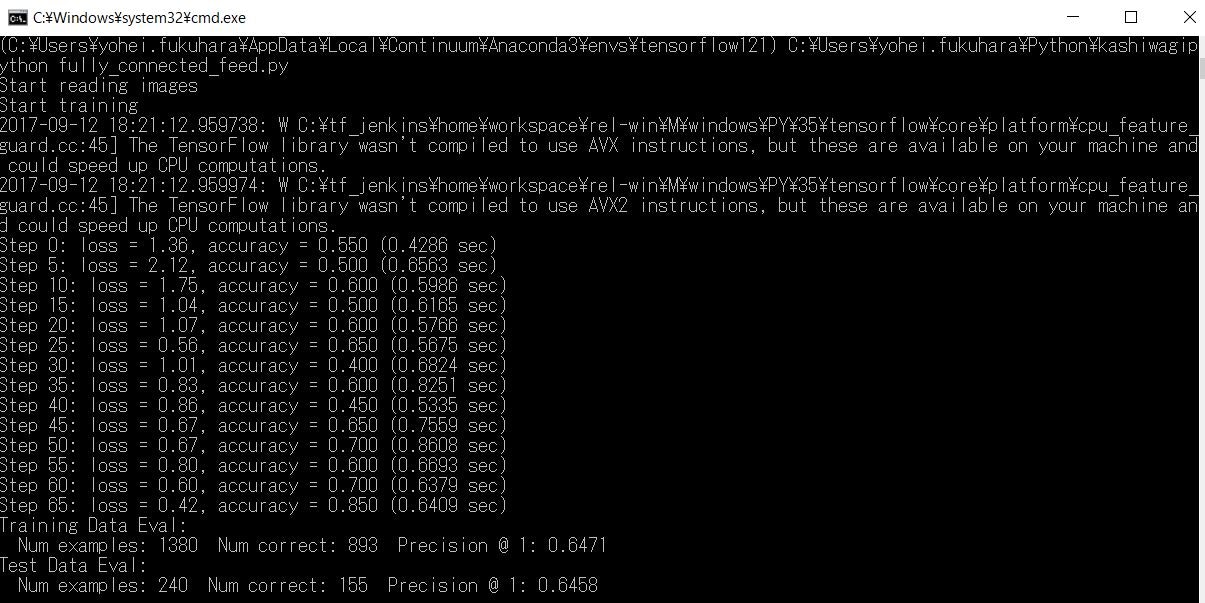
学習実行
python fully_connected_feed.py
実行時のパラメータとして以下を用意しています。記事「openCVの顔検出でパラメータを指定して手っ取り早く検出精度を高める」で少し解説しているライブラリargparseを使って実装しています。
| パラメータ | 内容 | 初期値 | 備考 |
|---|---|---|---|
| learning_rate | 学習レート | 1e-4 | AdamOptimizerの学習レート |
| batch_size | バッチサイズ | 20 | この数ごとに訓練データを学習していきます。学習データが少ないのにひきづられて初期値が少なめ |
| input_train_data | 訓練データ | ./inputs/train.txt | この値を変えれば訓練データのフォルダ・ファイルを指定可能 |
| input_test_data | テストデータ | ./inputs/test.txt | この値を変えればテストデータのフォルダ・ファイルを指定可能 |
| log_dir | ログ保存ディレクトリ | /tmp/tensorflow/kashiwagi/logs | 学習したパラメータとTensorBoardログを保存するディレクトリ |
| image_size | 画像サイズ | 81 | resizeするときの初期画像サイズ |
| pool_size | プーリングのサイズ | 3 | マックスプーリングのサイズ |
処理フロー
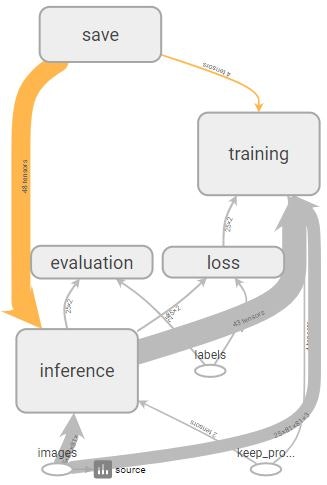
TensorBoradでComputational Graphと呼ばれる処理全体(「【入門者向け解説】TensorFlow基本構文とコンセプト」参照)を出力すると下図のとおりです。この処理の流れは公式チュートリアルTensorFlow Mechanics 101を参考にして作っています。
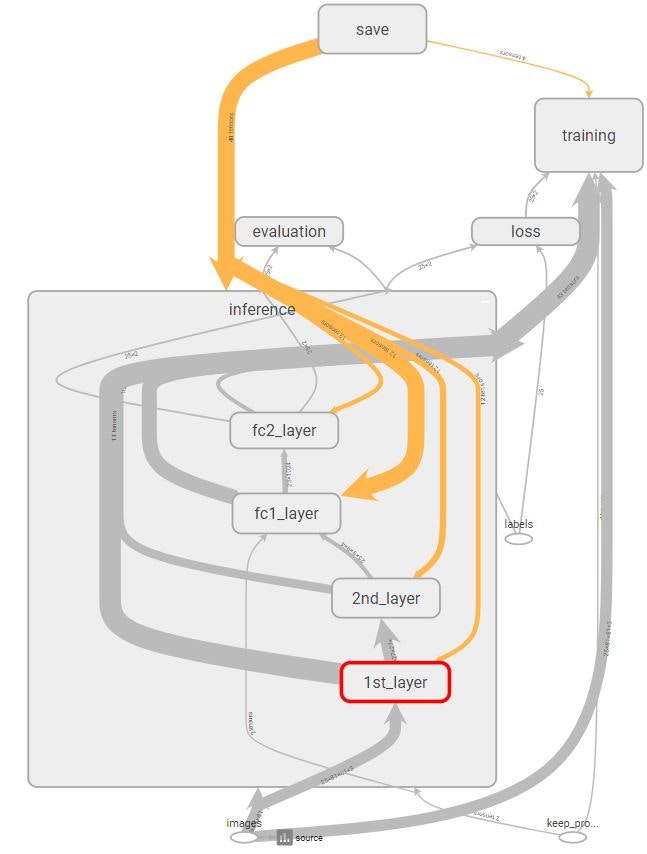
メインとなるinference部分を展開すると下図のとおりです。
Pythonプログラム
モデル部分(model_deep.py)
TensorFlow Mechanics 101のmnist.pyを参考に作った学習モデル部分です。
import tensorflow as tf

# TensorBoardに出力するImageのタグ
IMAGE_SOURCE = 'source'
IMAGE_FILTER = 'filter'
IMAGE_CONV   = 'conv'
IMAGE_POOL   = 'pool'

# 識別ラベルの数(今回は柏木由紀:0,その他:1)
NUM_CLASSES       = 2
NUM_OUTPUT_IMAGES = 64
NUM_FILTER1       = 32
NUM_FILTER2       = 4
SIZE_FILTER1      = 5
SIZE_FILTER2      = 8
NUM_FC            = 1024

def inference(images, keep_prob, image_size, pool_size):

    with tf.name_scope('inference'):
        # 重みを標準偏差0.1の正規分布乱数で定義
        def weight_variable(shape):
            return tf.Variable(tf.truncated_normal(shape, stddev=0.1))

        # バイアスを初期値0.1定数で定義
        def bias_variable(shape):
            return tf.Variable(tf.constant(0.1, shape=shape))

        # 畳み込み層定義
        def conv2d(x, W):
            return tf.nn.conv2d(x, W, [1, 1, 1, 1], 'SAME')

        # プーリング層定義
        def max_pool(x):
            return tf.nn.max_pool(x, ksize=[1, pool_size, pool_size, 1], strides=[1, pool_size, pool_size, 1], padding='SAME')

        # 入力情報
        with tf.name_scope('input'):
            tf.summary.image(IMAGE_SOURCE, images, NUM_OUTPUT_IMAGES, family=IMAGE_SOURCE)

        # 第1層
        with tf.name_scope('1st_layer'):
            # 第1畳み込み層
            with tf.name_scope('conv1_layer') as scope:
                W_conv1 = weight_variable([SIZE_FILTER1, SIZE_FILTER1, 3, NUM_FILTER1])
                b_conv1 = bias_variable([NUM_FILTER1])
                h_conv1 = tf.nn.relu(conv2d(images, W_conv1) + b_conv1)

                #Tensorを[縦,横,3,フィルタ数]から[フィルタ数,縦,横,3]と順列変換してimage出力
                tf.summary.image(IMAGE_FILTER, tf.transpose(W_conv1, perm=[3,0,1,2]), 4, family=IMAGE_FILTER)

                #Tensorを[-1,縦,横,フィルタ数]から[-1,フィルタ数,縦,横]と順列変換し、頭2次元をマージしてimage出力
                tf.summary.image(IMAGE_CONV, tf.reshape(tf.transpose(h_conv1, perm=[0,3,1,2]), [-1,image_size,image_size,1]), 4 , family=IMAGE_CONV)

            # 第1プーリング層
            with tf.name_scope('pool1_layer') as scope:

                # プーリング処理後の画像サイズ計算
                image_size1 = int(image_size / pool_size)

                h_pool1 = max_pool(h_conv1)

                #Tensorを[-1,縦,横,フィルタ数]から[-1,フィルタ数,縦,横]と順列変換し、頭2次元をマージしてimage出力
                tf.summary.image(IMAGE_POOL, tf.reshape(tf.transpose(h_pool1,perm=[0,3,1,2]),[-1, image_size1, image_size1, 1]),
                                 NUM_OUTPUT_IMAGES, family=IMAGE_POOL)

        # 第2層
        with tf.name_scope('2nd_layer'):
            # 第2畳み込み層
            with tf.name_scope('conv2_layer') as scope:
                W_conv2 = weight_variable([SIZE_FILTER2, SIZE_FILTER2, NUM_FILTER1, NUM_FILTER2])
                b_conv2 = bias_variable([NUM_FILTER2])
                h_conv2 = tf.nn.relu(conv2d(h_pool1, W_conv2) + b_conv2)

                #Tensorを[縦,横,フィルタ数1,フィルタ数2]から[フィルタ数1*フィルタ数2,縦,横,1]と順列変換してTensorBoardにiimage出力
                tf.summary.image(IMAGE_FILTER, tf.reshape(tf.transpose(W_conv2,perm=[2,3,0,1]),[-1,SIZE_FILTER2,SIZE_FILTER2,1]), 4, family=IMAGE_FILTER)
                #Tensorを[-1,縦,横,64]から[-1,64,縦,横]と順列変換し、[-1]と[64]をマージしてTensorBoardにiimage出力
                tf.summary.image(IMAGE_CONV, tf.reshape(tf.transpose(h_conv2,perm=[0,3,1,2]),[-1,image_size1,image_size1,1]), 4, family=IMAGE_CONV)

            # 第2プーリング層
            with tf.name_scope('pool2_layer') as scope:

                # プーリング処理後の画像サイズ計算
                image_size2 = int(image_size1 / pool_size)

                h_pool2 = max_pool(h_conv2)
                #Tensorを[-1,縦,横,フィルタ数2]から[-1,フィルタ数2,縦,横]と順列変換し、頭2次元をマージしてTensorBoardにimage出力
                tf.summary.image(IMAGE_POOL, tf.reshape(tf.transpose(h_pool2,perm=[0,3,1,2]),[-1,image_size2,image_size2,1]),
                                 NUM_OUTPUT_IMAGES, family=IMAGE_POOL)

        # 全結合層1の作成
        with tf.name_scope('fc1_layer') as scope:
            W_fc1 = weight_variable([image_size2 ** 2 * NUM_FILTER2, NUM_FC])
            b_fc1 = bias_variable([NUM_FC])
            h_pool2_flat = tf.reshape(h_pool2, [-1, image_size2 ** 2 * NUM_FILTER2])

            h_fc1 = tf.nn.relu(tf.matmul(h_pool2_flat, W_fc1) + b_fc1)
            h_fc1_drop = tf.nn.dropout(h_fc1, keep_prob)

        # 全結合層2の作成(読み出しレイヤー)
        with tf.name_scope('fc2_layer') as scope:
            W_fc2 = weight_variable([NUM_FC, NUM_CLASSES])
            b_fc2 = bias_variable([NUM_CLASSES])

            logits = tf.matmul(h_fc1_drop, W_fc2) + b_fc2

        return logits

def loss(logits, labels):

    with tf.name_scope('loss'):
        # 交差エントロピーの計算
        cross_entropy = tf.nn.sparse_softmax_cross_entropy_with_logits(labels=labels, logits=logits, name='xentropy')

        # 誤差の率の値(cross_entropy)を返す
        return tf.reduce_mean(cross_entropy)

# 誤差(loss)を元に誤差逆伝播を用いて設計した学習モデルを訓練する
def training(loss, learning_rate):
    with tf.name_scope('training'):
        # TensorBoardに誤差のScalar出力
        tf.summary.scalar('loss', loss)

        # Adamを使って最適化
        train_op = tf.train.AdamOptimizer(learning_rate).minimize(loss)
        return train_op

# 学習モデルが出した予測結果の正解数を算出する
def evaluation(logits, labels, batch_size):

    with tf.name_scope('evaluation'):

        # 正解数の計算
        correct = tf.reduce_sum(tf.cast(tf.nn.in_top_k(logits, labels, 1), tf.int32))

        # 正答率の計算とTensorBoardへのScalar出力
        accuracy = correct / batch_size
        tf.summary.scalar('accuracy', accuracy)
        return correct, accuracy
学習時モデル呼び出しプログラム(fully_connected_feed.py)
TensorFlow Mechanics 101のfully_connected_feed.pyを参考に作った学習時のモデル呼び出しプログラムです。学習データが少数向けに作っているので、多い場合は適宜コードを変更ください。
import argparse
import cv2
import os
import time
import numpy as np
import random
import sys
import tensorflow as tf
import model_deep

# 基本的なモデルパラメータ
FLAGS = None

# 全データに対して答え合わせ
def do_eval(sess,
            eval_correct,
            images_placeholder,
            labels_placeholder,
            images_data, labels_data,
            keep_prob):

    true_count = 0  # 正答数

    # 総数を算出
    steps_per_epoch = len(images_data) // FLAGS.batch_size  # 切り捨て除算
    num_examples = steps_per_epoch * FLAGS.batch_size       # num_examplesは結果的に切り捨て分のみを減算

    # 全件評価
    for step in range(steps_per_epoch):

        # 正答数を受け取り、加算
        true_count += sess.run(eval_correct,
                               feed_dict={images_placeholder: images_data[step * FLAGS.batch_size: step * FLAGS.batch_size + FLAGS.batch_size],
                                          labels_placeholder: labels_data[step * FLAGS.batch_size: step * FLAGS.batch_size + FLAGS.batch_size],
                                          keep_prob: 1.0
                                         })

    # 正答率計算と表示
    print('  Num examples: %d  Num correct: %d  Precision @ 1: %0.04f' % (num_examples, true_count, (float(true_count) / num_examples)))

def run_training():
    #TensorBoardのグラフに出力するスコープを指定
    with tf.Graph().as_default():

        # プレースホルダ定義
        images_placeholder = tf.placeholder(tf.float32, name='images', shape=(FLAGS.batch_size, FLAGS.image_size, FLAGS.image_size, 3))
        labels_placeholder = tf.placeholder(tf.int32,   name='labels', shape=(FLAGS.batch_size) )
        keep_prob = tf.placeholder(tf.float32, name='keep_probability' )

        # inference()を呼び出してモデルを作る
        logits = model_deep.inference(images_placeholder, keep_prob, FLAGS.image_size, FLAGS.pool_size)

        # loss()を呼び出して損失を計算
        loss_value = model_deep.loss(logits, labels_placeholder)

        # training()を呼び出して訓練して学習モデルのパラメーターを調整する
        train_op = model_deep.training(loss_value, FLAGS.learning_rate)

        # 精度の計算
        eval_correct, accuracy = model_deep.evaluation(logits, labels_placeholder, FLAGS.batch_size)

        # TensorBoardにここまでの内容を出力
        summary = tf.summary.merge_all()

        # 保存の準備
        saver = tf.train.Saver()

        # Sessionの作成
        with tf.Session() as sess:

            # TensorBoradへの書込準備
            summary_writer = tf.summary.FileWriter(FLAGS.log_dir, sess.graph)

            # 変数初期化
            sess.run(tf.global_variables_initializer())

            # 画像データループ
            for step in range(len(FLAGS.train_image) // FLAGS.batch_size):

                # 開始時間退避
                start_time = time.time()

                # batch_size分の画像に対して訓練の実行
                train_batch = FLAGS.batch_size * step

                # 訓練実行
                feed_dict = {
                    images_placeholder: FLAGS.train_image[train_batch:train_batch + FLAGS.batch_size],
                    labels_placeholder: FLAGS.train_label[train_batch:train_batch+FLAGS.batch_size],
                    keep_prob: 0.5
                    }

                # train_opは捨てているが、指定しておかないと賢くならない
                _, loss_val, accuracy_val = sess.run([train_op, loss_value, accuracy] , feed_dict=feed_dict)

                # (1 epochあたり)処理時間算出
                duration = time.time() - start_time

                # 5回ごとにsummary(tensor boardのインスタンス)を取得し、writerに追加
                if step % 5 == 0:
                    # 10回ごとの結果出力
                    print('Step %d: loss = %.2f, accuracy = %.3f (%.4f sec)' % (step, loss_val, accuracy_val, duration))

                    # セッション実行しTensorBoardのサマリ取得
                    summary_str = sess.run(summary, feed_dict=feed_dict)

                    # TensorBoardにサマリを追加
                    summary_writer.add_summary(summary_str, step)
                    summary_writer.flush()

                # 最終ループ時に評価
                if (step + 1) == len(FLAGS.train_image)//FLAGS.batch_size:
                    saver.save(sess, os.path.join(FLAGS.log_dir, 'model.ckpt'), global_step=step)

                    print('Training Data Eval:')
                    # 訓練データ評価
                    do_eval(sess, eval_correct, images_placeholder, labels_placeholder, FLAGS.train_image, FLAGS.train_label, keep_prob)

                    # テストデータ評価
                    print('Test Data Eval:')
                    do_eval(sess, eval_correct, images_placeholder, labels_placeholder, FLAGS.test_image, FLAGS.test_label, keep_prob)

            # TensorBoardの書き込みクローズ
            summary_writer.close()

# 画像一覧ファイルを読み込んで個々の画像ファイルとラベルをTensorFlow形式に変換
def read_images(file_image_list):

    # データを入れる配列
    image_list = []
    label_list = []

    # ファイルを読み込みモードで開く
    with open(file_image_list) as file:
        file_data = file.readlines()

    # 順序をランダムシャッフル
    random.shuffle(file_data)

    for line in file_data:
        # 改行を除いてスペース区切りにする
        line      = line.rstrip()     #末尾スペース除去
        file_name = line.split('\t')  #デリミタ文字列(タブ)として区切る
        # 画像データを読み込んでFLAGS.image_size四方に縮小
        img = cv2.imread(file_name[0])
        img = cv2.resize(img, (FLAGS.image_size, FLAGS.image_size))

        # 0-1のfloat値に変換
        image_list.append(img.astype(np.float32)/255.0)

        # ラベル配列の最後に追加
        label_list.append(int(file_name[1]))

    # numpy形式に変換してReturn
    return np.asarray(image_list), np.asarray(label_list)

# 主処理
def main(_):

    # TensorBoard保存ディレクトリが存在したら削除し、再作成
    if tf.gfile.Exists(FLAGS.log_dir):
        tf.gfile.DeleteRecursively(FLAGS.log_dir)
    tf.gfile.MakeDirs(FLAGS.log_dir)

    # 訓練およびテストデータ画像ファイル読込
    print('Start reading images')
    FLAGS.train_image, FLAGS.train_label = read_images(FLAGS.input_train_data)
    FLAGS.test_image,  FLAGS.test_label  = read_images(FLAGS.input_test_data)

    # 訓練開始
    print('Start training')
    run_training()

# Importしたときも使えるようにしておく
parser = argparse.ArgumentParser()

# 入力パラメータ定義
parser.add_argument(
    '--learning_rate',
    type=float,
    default=1e-4,
    help='Initial learning rate.'
)
parser.add_argument(
    '--batch_size',
    type=int,
    default=20,
    help='Batch size.  Must divide evenly into the dataset sizes.'
)
parser.add_argument(
    '--input_train_data',
    type=str,
    default='./inputs/train.txt',
    help='File list data to put the input train data.'
)
parser.add_argument(
    '--input_test_data',
    type=str,
    default='./inputs/test.txt',
    help='File list data to put the input test data.'
)
parser.add_argument(
    '--log_dir',
    type=str,
    default='/tmp/tensorflow/kashiwagi/logs',
    help='Directory to put the log data.'
)
parser.add_argument(
    '--image_size',
    type=int,
    default=81,
    help='Input image size'
)
parser.add_argument(
    '--pool_size',
    type=int,
    default=3,
    help='MAX pooling size'
)

FLAGS, unparsed = parser.parse_known_args()

if __name__ == '__main__':
    # main関数スタート
    tf.app.run(main=main, argv=[sys.argv[0]] + unparsed)
