はじめに
使用するもの
- Eclipse
- Gradle
- 認証サーバここで作成したもの
install
- Eclipse Market Placeから
- Gradle IDE Pack
- Spring Tool Suite
Project setup
project作成
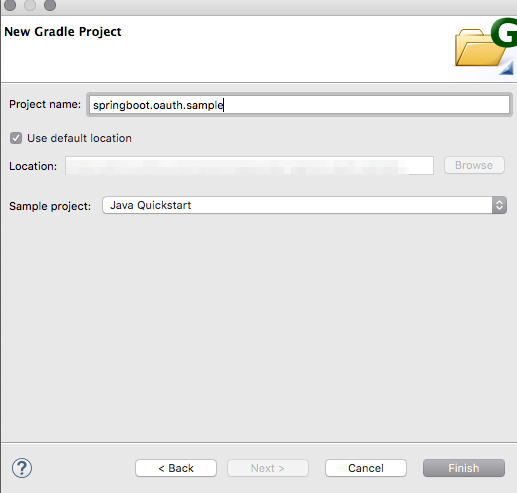
- Eclipse - File - New - Project...
- Gradle - Gradle Project
- Project nameに
任意の名前、Sample ProjectにJava Quick startを選択
- 不要なパッケージの削除
- src/main/java 配下
- src/main/resources 配下
- src/test/java 配下
- src/test/resources 配下
gradleより依存パッケージのインストール
- package version情報を外出しするため、project直下に
gradle.propertiesファイルを作成し以下の記述
gradle.properties
SPRING_BOOT_VERSION=1.3.2.RELEASE
SPRING_LOADED_VERSION=1.2.5.RELEASE
JAVA_VERSION=1.8
POSTGRES_VERSION=9.4-1200-jdbc41
SPRING_CORE_VERSION=4.2.4.RELEASE
- build.gradleに依存パッケージ情報を記述
build.gradle
buildscript {
    repositories {
      mavenCentral()
      maven {
        url "https://plugins.gradle.org/m2/"
      }
    }
    dependencies {
      classpath "org.springframework.boot:spring-boot-gradle-plugin:${SPRING_BOOT_VERSION}"
      classpath "org.springframework:springloaded:${SPRING_LOADED_VERSION}"
    }
}

apply plugin: 'java'
apply plugin: 'spring-boot'

sourceCompatibility = "${JAVA_VERSION}"
targetCompatibility = "${JAVA_VERSION}"

repositories {
  mavenCentral()
}

jar.baseName = 'springboot-oauth-sample'

dependencies {
    // for web application
    compile "org.springframework.boot:spring-boot-starter-web:${SPRING_BOOT_VERSION}"

    // template engine: jade
    compile "com.domingosuarez.boot:spring-boot-starter-jade4j:0.3.0"

    // use spring security
    compile "org.springframework.boot:spring-boot-starter-security:${SPRING_BOOT_VERSION}"

    // use spring security oauth2
    compile "org.springframework.security.oauth:spring-security-oauth2:2.0.7.RELEASE"

    // use configuration processor
    compile "org.springframework.boot:spring-boot-configuration-processor:1.2.5.RELEASE"

    // use spring core
    compile "org.springframework:spring-core:${SPRING_CORE_VERSION}"

    // use Scribe OAuth
    compile "com.github.scribejava:scribejava-apis:2.2.2"

}
- Project右クリック - Gradle - Refresh All
coding
エントリポイントの作成
- src/main/javaを右クリック - New - Package
今回package nameは
springboot.oauth.sampleとした
- 作成したパッケージ右クリック - New - Class -
Main.javaを作成する
package springboot.oauth.sample;

import org.springframework.boot.SpringApplication;
import org.springframework.boot.autoconfigure.SpringBootApplication;

@SpringBootApplication
public class Main {

  public static void main(String[] args)  {
    SpringApplication.run(Main.class, args);
  }

}
application設定
- src/main/resources/application.ymlを作成
- 事前にoauth server側でclientを作成
- 作成時に取得したclient-idとclient-secretを設定
- oauth server側の認証urlも設定する
- OAuth側の設定はほぼこれだけであとは勝手に認証処理してくれる
server:
  port: 8080
  session-timeout: 1200

spring:
  main:
    show-banner: true

security:
  basic:
    enabled: false
  oauth2:
    client:
      client-id: sampleapp
      client-secret: wlpaBFBJTzmRLcLInQcIiS8ggLclLjQg
      access-token-uri: http://localhost:9999/api/oauth2/token
      user-authorization-uri: http://localhost:9999/api/oauth2/authorize
      scope: admin,user
      authorized-grant-types: authorization_code,refresh_token,client_credentials

    resource:
      user-info-uri: http://localhost:9999/api/profile
      prefer-token-info: false

    custom:
      # for single sign out(global logout)
      server-logout-url: http://localhost:9999/logout

      # redirect url for after single signed out
      server-logouted-redirect-url: http://localhost:8080/
Spring securityの設定
- src/main/java//config/SecurityConfig.java
- spring securityの設定にて認証が必要なurlを設定する
-
HttpSecurityにセット
-
- spring securityに認証をOAuthサーバに任せるよう
@EnableOAuth2Ssoアノテーションをつける
package springboot.oauth.sample.config;

import org.springframework.boot.autoconfigure.security.oauth2.client.EnableOAuth2Sso;
import org.springframework.context.annotation.Configuration;
import org.springframework.security.config.annotation.web.builders.HttpSecurity;
import org.springframework.security.config.annotation.web.configuration.EnableWebSecurity;
import org.springframework.security.config.annotation.web.configuration.WebSecurityConfigurerAdapter;
import org.springframework.security.web.header.writers.frameoptions.XFrameOptionsHeaderWriter;
import org.springframework.security.web.header.writers.frameoptions.XFrameOptionsHeaderWriter.XFrameOptionsMode;

@Configuration
@EnableWebSecurity
@EnableOAuth2Sso
public class SecurityConfig extends WebSecurityConfigurerAdapter {

  @Value("${security.oauth2.custom.server-logout-url}") private String serverLogoutUrl;

  @Value("${security.oauth2.custom.server-logouted-redirect-url}") private String serverLogoutedRedirectUrl;

  @Override
  public void configure(HttpSecurity http) throws Exception {
    http
      .headers()
        // allow iframe
        .addHeaderWriter(new XFrameOptionsHeaderWriter(XFrameOptionsMode.SAMEORIGIN))
      .and()
      .authorizeRequests()
      .antMatchers("/public/**").permitAll()
      .antMatchers("/").permitAll()
      .antMatchers("/admin/**").hasRole("ADMIN")
      .anyRequest().authenticated()
      .and()
      .csrf()
        .csrfTokenRepository(csrfTokenRepository())
      .and()
      .logout()
        .logoutRequestMatcher(new AntPathRequestMatcher("/logout"))
        .logoutSuccessUrl(serverLogoutUrl + "?next=" + serverLogoutedRedirectUrl)
        .deleteCookies("JSESSIONID")
        .invalidateHttpSession(true)
        .permitAll()
    ;
  }

  private CsrfTokenRepository csrfTokenRepository() {
    HttpSessionCsrfTokenRepository repository = new HttpSessionCsrfTokenRepository();
    repository.setHeaderName("X-XSRF-TOKEN");
    return repository;
  }
}
Controllerの作成
-
認証が必要なURLを作成
- 実際はSecurityConfig.javaの設定で認証を必要とするURL
- 今回は
/protectedとした
-
アクセス時、OAuthサーバへ自動的に認証しにいき、さらに認証OK後、accessTokenを取得、profileを取得するところまで全自動
-
認証OKでcontrollerに入ってくるので認証情報を
OAuth2Authenticationで取得できる
package springboot.oauth.sample.controller;

import org.springframework.security.core.Authentication;
import org.springframework.security.oauth2.provider.OAuth2Authentication;
import org.springframework.web.bind.annotation.RequestMapping;
import org.springframework.web.bind.annotation.RequestMethod;
import org.springframework.web.bind.annotation.RestController;

@RestController
@RequestMapping(value = "/protected")
public class ProtectedController extends BaseController {

  @RequestMapping(value = {"", "/"}, method = RequestMethod.GET)
  public Authentication index(OAuth2Authentication authentication) {
    return authentication;
  }
}
試してみる
ログイン
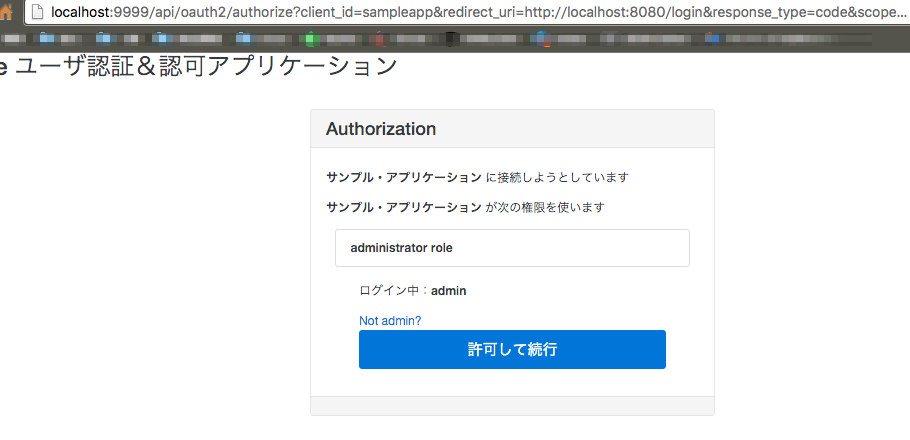
- ブラウザからlocalhost:8080/protectedにアクセス
- 自動的にOAuthサーバの認証ページに遷移する
- 認証OKすると以下のことをSpring Securityが自動的にしてくれる
-
/loginというURLを使いOAuth codeを取得 - codeを使ってOAuthサーバにリクエストを投げ、access_tokenを取得
- access_tokenを使ってOAuthサーバのprofile apiにアクセスしてprofileを取得
- もともとリクエストされたURLに遷移
-
ログアウト
- ブラウザからlocalhost:8080/logoutにアクセス
- /logoutはSecurityConfigで指定したURLで、spring securityが自動的にurlをマッピングしてくれる
- ログアウト後、OAuthサーバのログアウトURLに飛ばしているのでOAuthサーバ側もログアウトされる
- この辺は無理やりだけれどglobal logoutってきっとこういうことなんだろうと勝手に解釈


