はじめに
深層学習を用いた画像認識では、学習時に訓練画像に対してランダムな画像処理を行いデータを水増しする、データ拡張が重要です。データ拡張を実現するため、imgaug1, Augmentor2, albumentations3といった高機能なライブラリを利用することができます。これらのライブラリは非常に多機能で素晴らしいのですが、あくまで同じ大きさの画像に対して処理を行うことが想定されているのか、様々な大きさの画像から学習に利用する画像をクロップしながら利用するような用途で下記のような不満がありました。
- パイプラインで処理を行うため、本質的には1回の射影変換で実現可能なクロップ、回転、スケーリングといった処理が複数回に分かれて行われる
- クロップを行いながら幾何変換を行うことができないため、画面外のピクセルが出力画像に混じってしまう
- Augmentorはランドマークのような点座標の変換に対応していない、マスク画像をGeneratorで利用できない、imgaugは点座標変換が使いづらい
ということで、画像をクロップしながらランダムな幾何変換を行うことに特化したライブラリ(といっても関数1個ですが)を作りました。特徴としては下記のようなものです。
- 効率的にランダムな回転、スケーリング、射影変換、クロップを行う
- 1枚の画像だけではなく、マスク画像やヒートマップ画像、ランドマーク等の点座標に対して同じ変換を行うことができる
- 関数1つだけの実装で、numpy配列の画像とnumpy配列の点座標が直感的に扱える
ちなみにガウスノイズやブラーをかけるとか、コントラストを変更するとか、random erasingを適用するといった機能は前述のライブラリで豊富に実装されているため、それらを併用する想定です。
コードは下記にあります。不具合報告やフィードバック大歓迎です。
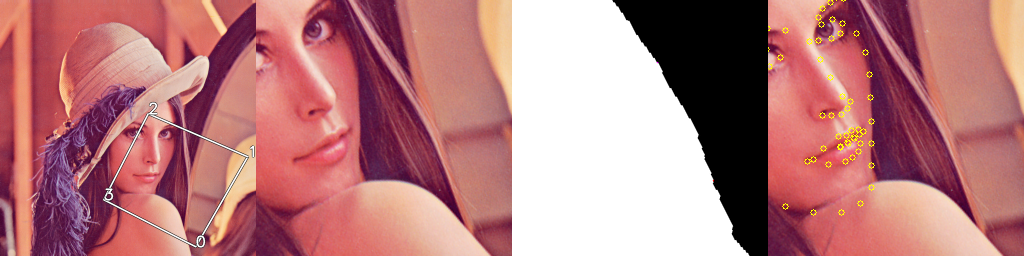
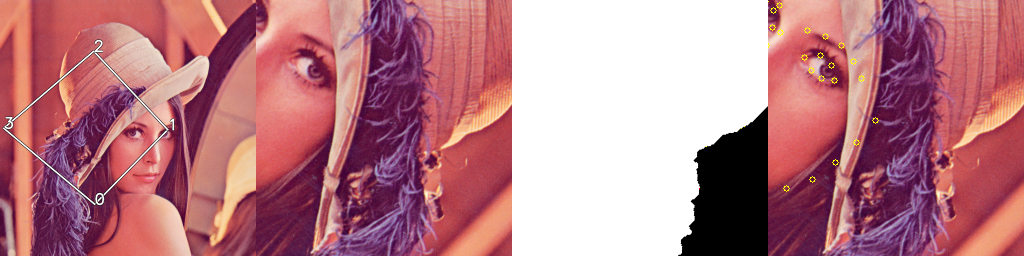
データ拡張例
データ拡張の例を下記に示します。左から入力画像、入力画像のクロップ画像、マスク画像のクロップ画像、点座標を変換したものをクロップ画像に重畳したものです。入力画像の四角はクロップした領域です。

使い方
生まれて初めてPyPIに登録してみたのでpipでインストールできます。
pip install imgcrop
下記でどんな感じで動作するのか確認できるデモが動かせます。
git clone https://github.com/yu4u/imgcrop.git
cd imgcrop
python example/example.py
実際にプログラム中で利用する際には、
random_crop = imgcrop.get_cropper(patch_size=128, scale=(1.0, 1.0), rotate=(0, 0), distort=0.0, flip=0, margin=0) ->
でクロップする関数を取得し、下記でクロップを実行するだけです。
random_crop(img, points=None) -> cropped_img[, output_points], src_points, m
imgには、画像(numpy配列)だけではなく、画像のリストを入力することができ、その場合全ての画像に対して同一の変換が行われるため、セグメンテーションマスクやヒートマップ画像のようなものも扱うことができます。また、pointsにはNx2のnumpy配列を入れると、ランドマークのような点座標として出力画像と合うように座標変換を行うことができます。
src_pointsは入力画像におけるcrop領域を表す4点、mは入力画像の座標系から出力画像の座標系への3x3の射影変換行列です。これらの情報があれば、何か追加の機能をライブラリの外側で実現することもできます。
サンプルコードを参照したほうが分かりやすいかもしれません。
アルゴリズム
やっていることは非常に単純で、クロップする領域を4点の座標で定義し、その4点に対してランダムな幾何変換を加え、最後にその4点を出力画像の四隅に移動するような射影変換行列を求め、その射影変換を入力画像に適用することでランダムなクロップと幾何変換を一度に行っています。

実装も下記のコードだけです。
import math
import numpy as np
import cv2


def get_cropper(patch_size=128, scale=(1.0, 1.0), rotate=(0, 0), distort=0.0, flip=0, margin=0):
    def random_crop(img, points=None):
        src_points = np.array([[1, 1], [1, -1], [-1, -1], [-1, 1]], dtype=np.float32)

        # flip
        if np.random.uniform(0, 1.0) > flip:
            dst_points = np.array([[1, 1], [1, 0], [0, 0], [0, 1]], dtype=np.float32) * patch_size
        else:
            dst_points = np.array([[0, 1], [0, 0], [1, 0], [1, 1]], dtype=np.float32) * patch_size

        # random scaling
        sampled_scale = np.random.uniform(scale[0], scale[1])
        src_points *= patch_size * sampled_scale / 2

        # random rotation
        theta = np.random.uniform(rotate[0] * math.pi * 2 / 360, rotate[1] * math.pi * 2 / 360)
        c, s = np.cos(theta), np.sin(theta)
        r = np.array([[c, -s], [s, c]], dtype=np.float32)
        src_points = np.dot(r, src_points.T).T

        # random perspective distortion
        distort_in_px = patch_size * sampled_scale * distort / 2
        src_points += np.random.uniform(-distort_in_px, distort_in_px, src_points.shape)

        # random shift
        x_min, y_min = src_points.min(axis=0)
        x_max, ymax = src_points.max(axis=0)
        w, h = x_max - x_min, ymax - y_min

        if isinstance(img, list):
            img_h, img_w = img[0].shape[:2]
        else:
            img_h, img_w = img.shape[:2]

        x = np.random.uniform(-margin, img_w - w + margin)
        y = np.random.uniform(-margin, img_h - h + margin)
        src_points[:, 0] += x - x_min
        src_points[:, 1] += y - y_min

        # get perspective transformation
        m = cv2.getPerspectiveTransform(src_points, dst_points)

        # perform random cropping
        # TODO: enable to select cv2.INTER_NEAREST, cv2.INTER_LINEAR, cv2.INTER_CUBIC
        if isinstance(img, list):
            cropped_img = [cv2.warpPerspective(i, m, (patch_size, patch_size), flags=cv2.INTER_CUBIC,
                                               borderMode=cv2.BORDER_REPLICATE) for i in img]
        else:
            cropped_img = cv2.warpPerspective(img, m, (patch_size, patch_size), flags=cv2.INTER_CUBIC,
                                              borderMode=cv2.BORDER_REPLICATE)

        if points is None:
            return cropped_img, src_points, m
        else:
            output_points = cv2.perspectiveTransform(points.reshape(-1, 1, 2), m).reshape(-1, 2)
            return cropped_img, output_points, src_points, m
    return random_crop
おわりに
以上、幾何変換とクロッピングにフォーカスしたデータ拡張のお話でした。
-
imgaug, https://github.com/aleju/imgaug ↩
-
Augmentor, https://github.com/mdbloice/Augmentor ↩
-
albumentations, https://github.com/albu/albumentations ↩