Visual Studio CodeでTypeScriptの開発環境を作る手順を調べてみました。
Node.jsで動く簡単なCLIツールを作る前提で進めていきますが、他の開発にも応用できるかと思います。
なお、Visual Studio CodeとNode.jsはインストール済みの前提です。
Windows 10環境で以下のバージョンで確認しています。
C:\>node -v
v8.10.0

C:\>npm -v
3.10.6

C:\>code -v
1.21.1
79b44aa704ce542d8ca4a3cc44cfca566e7720f1
x64
(ショートカット)
以降で使っていくコマンドです。(一度にインストールしたい人向け)
mkdir ts-sample
cd ts-sample

npm init -y
mkdir .vscode src test config

npm i -SEB config log4js
npm i -DE typescript ts-node tslint
npm i -DE @types/node @types/config
npm i -DE espower-typescript power-assert mocha @types/mocha
npm i -DE nyc
npm i -DE rimraf cpx

node_modules\.bin\tsc --init
npm i -g npm-run
npm-run tslint --init

code --install-extension eg2.tslint
code --install-extension fabiospampinato.vscode-commands
TypeScriptプロジェクトの作成
プロジェクトフォルダー(例:ts-sample)をまず作成して、npm initでpackage.jsonを出力します。
mkdir ts-sample
cd ts-sample
npm init -y
{
  "name": "ts-sample",
  "version": "1.0.0",
  "main": "index.js",
  "scripts": {
    "test": "echo \"Error: no test specified\" && exit 1"
  },
  "keywords": [],
  "author": "",
  "license": "ISC",
  "description": ""
}
公開しない限り、ほとんどの項目は不要なので適当に削除しておきます。
{
  "name": "ts-sample",
  "version": "1.0.0",
  "private": true
}
ただし、以下のようなWARNがnpmコマンドを打つたびに出るのもアレなので"private": trueで非公開設定にしておきます。
npm WARN ts-sample@1.0.0 No description
npm WARN ts-sample@1.0.0 No repository field.
npm WARN ts-sample@1.0.0 No license field.
続いて、プロジェクトに必要なディレクトリを作成します。
mkdir .vscode src test config
なお、今回のプロジェクト構成は以下のようになっています。
├─.vscode
├─bin          # リリース後のjsソース配置先
├─build        # ビルド用の一時ディレクトリ
│  ├─src       # jsソース出力先
│  └─test      # jsテスト出力先
├─config
├─coverage
├─logs
├─node_modules
├─src          # tsソース
└─test         # tsテスト
TypeScriptトランスパイラ(tsc)とTS実行ツール(ts-node)のインストール
以下のコマンドでインストールします。
(npm iはnpm installと同じです。-Dは--save-dev、-Eは--save-exactと同じで、package.jsonのdevDependenciesにバージョン固定で記録されます)
npm i -DE typescript ts-node
インストール後、tsc --initでtsconfig.json(トランスパイル設定ファイル)を出力します。
node_modules\.bin\tsc --init
{
  "compilerOptions": {
    "target": "es5",
    "module": "commonjs",
    "strict": true,
    "esModuleInterop": true
  }
}
今回はNode.jsで動くCLIツールを作る前提なので、targetはより新しいES2017にしておきます。
また、デバッグ用に"sourceMap": trueと、js出力先outDir、tsソース配置先includeを追加します。
{
  "compilerOptions": {
    "target": "ES2017",
    "module": "commonjs",
    "sourceMap": true,
    "outDir": "build",
    "strict": true
  },
  "include": [
    "src/**/*",
    "test/**/*"
  ]
}
なお、esModuleInteropは削除しています。これがtrueになっているとconfigモジュールを使ったときにTypeError: config.get is not a functionというエラーが出たので、現時点では削除しておいたほうがよさそうです。
簡単なソースでお試し実行
const message: string = "world";
console.log(`Hello ${message}`);
src内に上記のようなtsを作って、tscでトランスパイル(コンパイル)すると
node_modules\.bin\tsc
以下のようなjsが出力されます。
(test内が空だとbuild直下、空でなければbuild/srcに出力されます)
"use strict";
const message = "world";
console.log(`Hello ${message}`);
//# sourceMappingURL=main.js.map
以下のコマンドで実行するとHello worldと出力されると思います。
node build/main.js
なお、ts-nodeを使うとコンパイルせずに実行できます。
node_modules\.bin\ts-node src/main.ts
また、毎回node_modules\.bin\と打つのも大変なので、npm-runをインストールすると楽できます。
(以降の説明でもnpm-runはインストール済みとしています)
npm i -g npm-run
npm-run ts-node src/main.ts
注意点として、Windowsの場合、npm-runは拡張子が.exeのものを先に見てしまうようで、tscはC:\Program Files (x86)\Microsoft SDKs\TypeScript\1.0\tsc.exeが先に見つかってしまうとnpm-runでは使えません。
(コマンドプロンプトからだとwhere tscでtscの場所が見れます)
TSLintのインストール・設定
まずはtslintをインストールします。
npm i -DE tslint
さらにVSCodeでTSLint拡張を画面で選択するか、以下のコマンドでインストールします。
code --install-extension eg2.tslint
以下のコマンドでtslint.jsonを生成すると、lint(コードの静的解析)が有効になります。
npm-run tslint --init
{
    "defaultSeverity": "error",
    "extends": [
        "tslint:recommended"
    ],
    "jsRules": {},
    "rules": {},
    "rulesDirectory": []
}
"defaultSeverity": "error"だとコンパイルエラーとlintのエラーの区別がつかなくなるのでwarnに変更しておきます。
console.logで怒られないようにしたい場合は"no-console": falseを設定します。
{
    "defaultSeverity": "warn",
    "extends": [
        "tslint:recommended"
    ],
    "jsRules": {},
    "rules": {
        "no-console": false
    },
    "rulesDirectory": []
}
VSCodeでコード実行タスクの設定
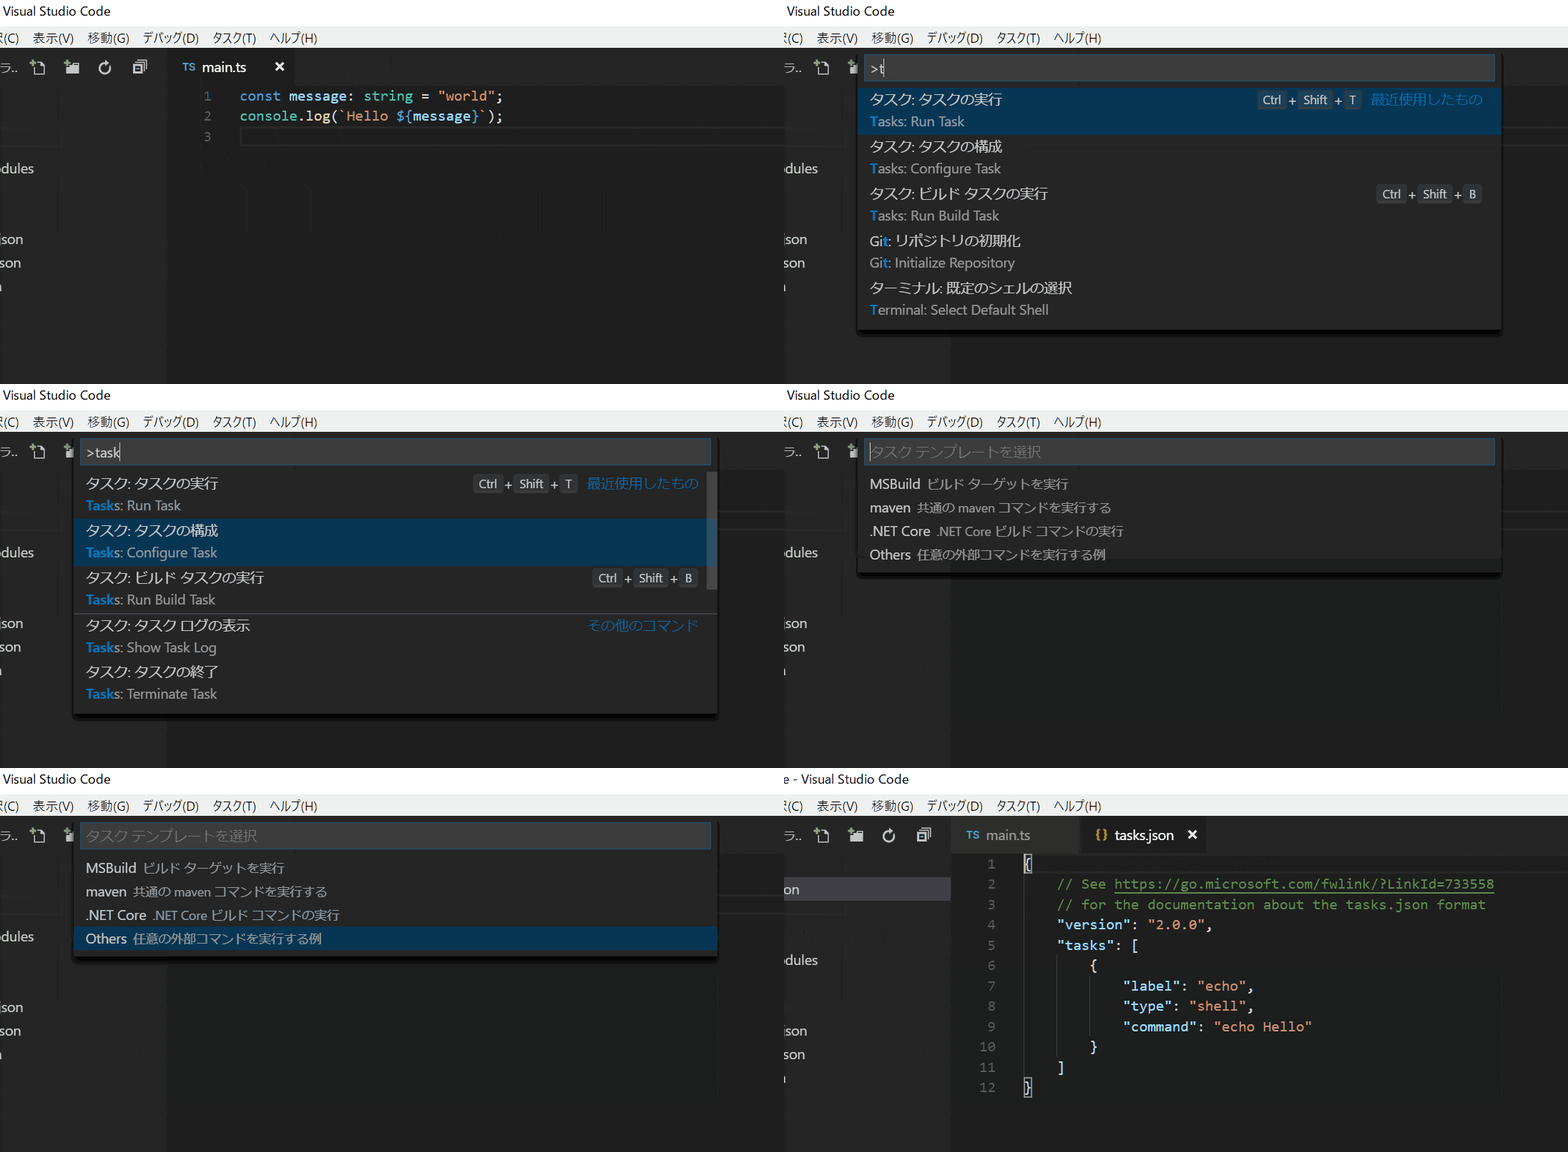
以下のようにコマンドパレットで選択すると、tasks.jsonが出力されます。
{
    // See https://go.microsoft.com/fwlink/?LinkId=733558
    // for the documentation about the tasks.json format
    "version": "2.0.0",
    "tasks": [
        {
            "label": "echo",
            "type": "shell",
            "command": "echo Hello"
        }
    ]
}
以下のようにするとタスク経由でtsコードの実行ができます。
{
    "version": "2.0.0",
    "tasks": [
        {
            "label": "ts-node",
            "type": "shell",
            "command": "npm-run ts-node ${relativeFile}"
        }
    ]
}
ユニットテストの実行
Mochaとpower-assertを使ったユニットテストの設定をしていきます。
まずは以下のコマンドで必要なツールをインストールします。
npm i -DE @types/node
npm i -DE espower-typescript power-assert mocha @types/mocha
以下のようなソースで実行してみます。
(if (require.main === module)の中はソースが(テスト経由でなく)直接実行されたときのみ動きます)
export function main(message: string) {
    console.log(`${message}`);
    return `Hello ${message}`;
}

if (require.main === module) {
    main(process.argv[2]);
}
import assert = require("assert");
import {main} from "../src/main";

describe("main()", () => {
    const message = "world!";
    it("hello world!", () => {
        assert(main(message) === "Hello world");
    });
});
以下のようにmochaのタスクを作成して実行すると
{
    "version": "2.0.0",
    "tasks": [
        {
            "label": "ts-node",
            "type": "shell",
            "command": "npm-run ts-node ${relativeFile}"
        },
        {
            "label": "mocha",
            "type": "shell",
            "command": "npm-run mocha -r espower-typescript/guess ${relativeFile}"
        }
    ]
}
以下のように詳細なエラー表示がされます。
(上記で${relativeFile}の代わりに${file}を使うとpower-assertが効かなくなるので注意です)

(比較対象の右辺の最後に!が足りないのでエラーになっています)
(オプション)ステータスバーにボタン設置
VSCodeにCommands拡張を入れるとステータスバーのボタンから各種実行ができて便利です。
VSCodeの拡張画面からインストールするか、以下のコマンドでインストールできます。
code --install-extension fabiospampinato.vscode-commands
インストール後、コマンドパレットからCommands: Edit Configurationを実行するとcommands.jsonが出力されます。
{
  "commands": [
    {
      "command": "commands.refresh",
      "text": "$(sync)",
      "tooltip": "Refresh commands",
      "color": "#FFCC00"
    }
  ]
}
以下のように設定すると
{
  "commands": [
    {
      "command": "commands.refresh",
      "text": "$(sync)",
      "color": "#FFCC00"
    },
    {
      "command": "workbench.action.tasks.runTask",
      "arguments": ["ts-node"],
      "text": "$(triangle-right) ts-node",
      "color": "#CCFFCC",
      "filterFileRegex": "\\.ts"
    },
    {
      "command": "workbench.action.tasks.runTask",
      "arguments": ["mocha"],
      "text": "$(octoface) mocha",
      "color": "#EEBBAA",
      "filterFileRegex": "\\.ts"
    },
    {
      "command": "workbench.action.terminal.toggleTerminal",
      "text": "$(terminal)"
    }
  ]
}
以下のような表示になります。

なおtextにはOcticonsが使えます。
テストカバレッジの出力
nycを使うと簡単にテストカバレッジが出力できます。
npm i -DE nyc
  "scripts": {
    "test": "nyc -i ts-node/register --temp-directory coverage/.nyc -r text -r html -n test/**/*.ts -n src/**/*.ts -e .ts mocha test/**/*.ts"
  },
上記のようにpackage.jsonのscriptsにtestを設定すると、npm testで以下のような出力がされます。

以下はcoverageディレクトリ内にHTMLで出力されたものです。

(オプション)デバッグ実行の設定
デバッグ画面で歯車のようなボタンを押すとlaunch.jsonが出力されます。
{
    // IntelliSense を使用して利用可能な属性を学べます。
    // 既存の属性の説明をホバーして表示します。
    // 詳細情報は次を確認してください: https://go.microsoft.com/fwlink/?linkid=830387
    "version": "0.2.0",
    "configurations": [
        {
            "type": "node",
            "request": "launch",
            "name": "プログラムの起動",
            "program": "${workspaceFolder}/src\\main.ts",
            "outFiles": [
                "${workspaceFolder}/**/*.js"
            ]
        }
    ]
}
以下の設定でデバッグ実行ができてブレークポイントなどが使えます。
デバッグコンソールよりもターミナルのほうが、標準出力の表示がされるなど便利なので"console": "integratedTerminal"の設定をしています。
{
    "version": "0.2.0",
    "configurations": [
        {
            "type": "node",
            "request": "launch",
            "name": "ts-node[debug]",
            "program": "${workspaceFolder}/node_modules/ts-node/dist/bin.js",
            "args": [
                "${relativeFile}"
            ],
            "console": "integratedTerminal"
        },
        {
            "type": "node",
            "request": "launch",
            "name": "mocha[debug]",
            "program": "${workspaceFolder}/node_modules/mocha/bin/_mocha",
            "args": [
                "--no-timeouts",
                "--colors",
                "--require",
                "espower-typescript/guess",
                "${relativeFile}"
            ],
            "console": "integratedTerminal"
        }
    ]
}
(VSCode 1.21.1にはバグがあってブレークポイントが効かないことがあります。VSCode Insiders 1.20で上記の動作確認しています)
(オプション)設定ファイルの読み込みとログ出力設定
configで設定ファイルを読み込んで、log4jsでログ出力するサンプルを作ってみました。
以下のコマンドで必要なものをインストールします。
(-Sは--saveと同じでpackage.jsonのdependenciesに記録されます。-Bは--save-bundleと同じでbundleDependenciesに記録され、パッケージ化した際に内部にライブラリが含まれるようになります)
(なお、@types/log4jsは不要です。log4jsに既に含まれていますので)
npm i -SEB config log4js
npm i -DE @types/config
設定ファイルは標準のもの(default.json)と開発時に値が上書きされるもの(development.json)を作成しています。(詳しくはライブラリのドキュメントを見てください)
{
    "log4js": {
        "appenders": {
            "out": {
                "type": "stdout"
            },
            "error": {
                "type": "dateFile",
                "filename": "logs/error.log",
                "daysToKeep": 31
            }
        },
        "categories": {
            "default": {
                "appenders": [
                    "error"
                ],
                "level": "INFO"
            },
            "console": {
                "appenders": [
                    "out",
                    "error"
                ],
                "level": "INFO"
            }
        }
    }
}
{
    "log4js": {
        "categories": {
            "default": {
                "level": "DEBUG"
            },
            "console": {
                "level": "DEBUG"
            }
        }
    }
}
ソースは以下のとおりです。
#!/usr/bin/env nodeはパッケージ化した後、そのパッケージのインストール時に自動でnode_modules/.binに実行スクリプトが作られるようにするためのものです。
# !/usr/bin/env node
process.env.NODE_CONFIG_DIR = __dirname + "/../config";
import * as config from "config";
import * as log4js from "log4js";

log4js.configure(config.get("log4js"));
const log = log4js.getLogger();
const consoleLog = log4js.getLogger("console");

export function main(argv: string[]) {
    try {
        consoleLog.debug(`argv: ${argv}`);
        const message: string = argv[2];
        return `Hello ${message.charAt(0)}`;
    } catch (e) {
        log.error(e);
    } finally {
        log4js.shutdown((e) => e && console.log(e));
    }
}

if (require.main === module) {
    main(process.argv);
}
リリース
リリース用に、rm -rf相当のrimrafとcp -R相当のことができるcpxをインストールします。
npm i -DE rimraf cpx
package.jsonにはリリース用のスクリプト(release)と、パッケージ内に含めるファイル(files)と、node_modules/.binに生成される実行スクリプトの設定(ファイル名:sample、起動ソース:bin/main.js)を記載します。
  "scripts": {
    "test": "nyc -i ts-node/register --temp-directory coverage/.nyc -r text -r html -n test/**/*.ts -n src/**/*.ts -e .ts mocha test/**/*.ts",
    "release": "rimraf build bin && tsc && cpx build/src/** bin && cd build && npm pack -cwd .."
  },
  "files": [
    "bin",
    "config/default.json"
  ],
  "bin": {
    "sample": "bin/main.js"
  },
npm run releaseを実行すると、スクリプトが走ってbuild内にts-sample-1.0.0.tgzが出力されます。
このファイルを別のところに持っていって、npm i ts-sample-1.0.0.tgzとするとインストールができます。
これでプロジェクトの作成からリリースまで、ひととおりの作業ができるかと思います。
(その他)package.jsonの最終形
{
  "name": "ts-sample",
  "version": "1.0.0",
  "private": true,
  "scripts": {
    "test": "nyc -i ts-node/register --temp-directory coverage/.nyc -r text -r html -n test/**/*.ts -n src/**/*.ts -e .ts mocha test/**/*.ts",
    "release": "rimraf build bin && tsc && cpx build/src/** bin && cd build && npm pack -cwd .."
  },
  "files": [
    "bin",
    "config/default.json"
  ],
  "bin": {
    "sample": "bin/main.js"
  },
  "devDependencies": {
    "@types/config": "0.0.34",
    "@types/mocha": "2.2.48",
    "@types/node": "9.4.7",
    "cpx": "1.5.0",
    "espower-typescript": "8.1.3",
    "mocha": "5.0.4",
    "nyc": "11.6.0",
    "power-assert": "1.4.4",
    "rimraf": "2.6.2",
    "ts-node": "5.0.1",
    "tslint": "5.9.1",
    "typescript": "2.7.2"
  },
  "dependencies": {
    "config": "1.30.0",
    "log4js": "2.5.3"
  },
  "bundledDependencies": [
    "config",
    "log4js"
  ]
}
