本記事はMagento2 Advent Calendar 2018 24日目の記事になります。
はじめに
magento2において、SNSリンクを追加することができます。
本記事はmagento2で商品ページにSNSリンクを追加するやり方について紹介します。
目次
- 子テーマの作り方
- レイアウトテンプレートの識別
- レイアウトテンプレートの上書き
- テンプレートファイルの作成
子テーマの作り方
子テーマの作り方について、既にmagento公式DevDocsに掲載されていますので、詳しくはMagento DevDocs: Create themeを参考にすればよいと思います。
主な流れは以下となります。
- テーマのディレクトリの作成:app / design / frontend / your_vendor_name / your_theme_name
- 宣言ファイルtheme.xml、etcディレクトリ、テーマディレクトリの中にview.xmlファイルの作成
- composer.jsonファイルの追加
- registration.phpファイルの追加
- CSS、JavaScript、images、fontsのディレクトリの作成
theme.xml、composer.json、registration.phpなどのファイルはDevDocsのリンクでサンプルがありますので、そのままコピーして使っても問題がないと思います。
レイアウトテンプレートの識別
子テーマを作成したら、商品ページのレイアウトテンプレートを識別して、ブロックを追加します。
必要なレイアウトテンプレートを見つけるために、まず、Magento2 Admin Panelをログインし、Template Path Hintsを有効にします。
Stores -> Configuration -> Advanced -> Developer -> Debug:
Enabled Template Path Hints for Storefront -> Yes -> Save Config
cacheをリフレッシュして、Magentoフロントの商品ページを見ると、強調された赤い部分はUI要素のtemplate pathとなります。
レイアウトテンプレートの上書き
Magento2で商品ページのレンダリング用のレイアウトファイルは次の通りです。
Magento_Catalog_module_dir/view/frontend/layout/catalog_product_view.xml
このレイアウトファイルを上書きするための手順は以下となります。
まず、そのレイアウトファイルの中に必要なコードをコピーして、子テーマのディレクトリに入れます。
child_theme_dir/Magento_Catalog/layout/catalog_product_view.xml
例えば、child_theme_dir/Magento_Catalog/layout/catalog_product_view.xmlは以下となります。
<?xml version="1.0"?>
<!--
/**
* Copyright © Magento, Inc. All rights reserved.
* See COPYING.txt for license details.
*/
-->
<page layout="1column" xmlns:xsi="http://www.w3.org/2001/XMLSchema-instance" xsi:noNamespaceSchemaLocation="urn:magento:framework:View/Layout/etc/page_configuration.xsd">
    <body>

        <referenceContainer name="product.info.social">
            <!-- adding social sharing block -->
            <block class="Magento\Catalog\Block\Product\View" name="product.info.sns" template="product/view/sns-social.phtml"/>
        </referenceContainer>

        <move element="page.main.title" destination="product.info.main" before="-"/>
        <move element="product.info.stock.sku" destination="product.info.price" after="product.price.final"/>
        <move element="product.info.review" destination="product.info.main" before="product.info.price"/>
    </body>
</page>
その中に追加したコードは以下となります。
 <referenceContainer name="product.info.social">
            <!-- adding social sharing block -->
            <block class="Magento\Catalog\Block\Product\View" name="product.info.sns" template="product/view/sns-social.phtml"/>
 </referenceContainer>
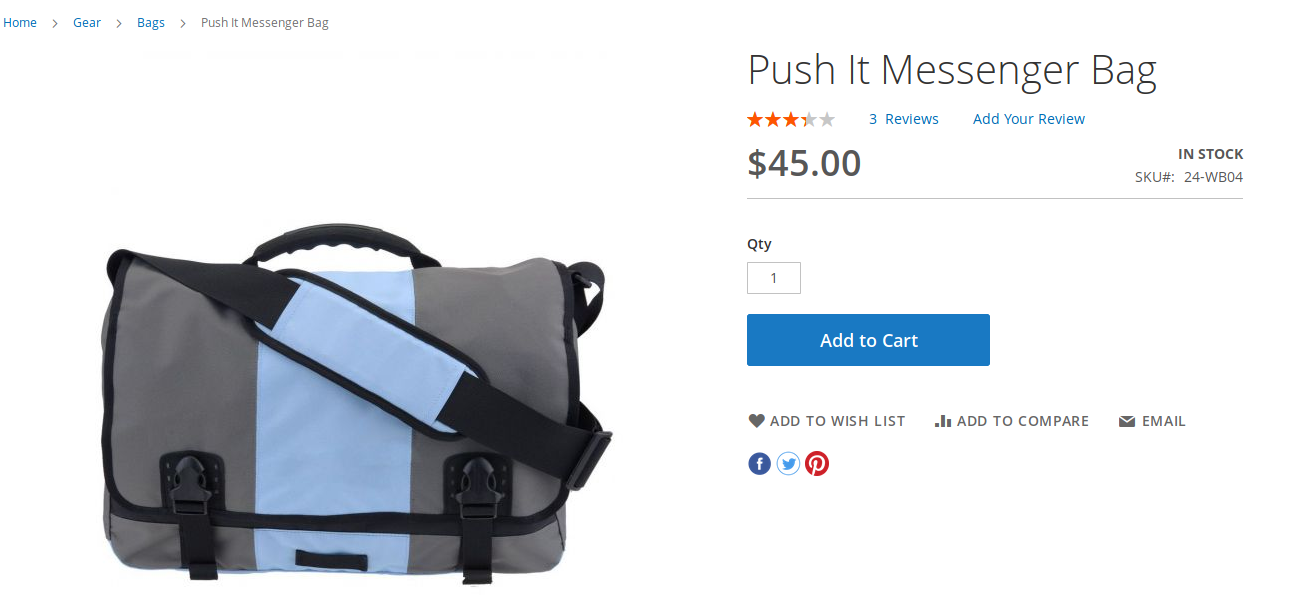
"product.info.social" というコンテナは "ADD TO WISH LIST" や "ADD TO COMPARE" をレンダリングするためのコンテナなので、その後ろに、SNSレンダリング用のブロックを追加すると、 "ADD TO WISH LIST" ボタンの下にSNSアイコンが表示されます。
テンプレートファイルの作成
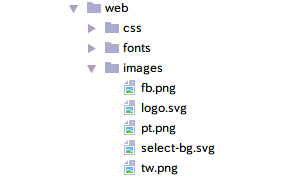
phtmlテンプレートファイルを作成する前に、まず、SNSアイコンの画像をアップロードします。
SNSアイコンの画像の置き場所は次の通りです。
child_theme_dir/web/images/
最後、sns-social.phtmlというテンプレートファイルを作成します。子テーマのディレクトリに置きます。
child_theme_dir/Magento_Catalog/templates/product/view/sns-social.phtml
今回はFacebook、Twitter、Pinterestのアイコンを追加してみます。その他のSNSを追加したい場合は、Facebook、Twitter、Pinterestアイコン追加用のコードをコピーして、適当に修正すればよいと思います。
<?php
$_product = $block->getProduct(); // GET THE PRODUCT
?>

<div class="sns-social-icons" data-role="sns-social-icons">

    <!-- FACEBOOK -->
    <a href="https://www.facebook.com/sharer/sharer.php?u=<?php echo urlencode($_product->getProductUrl());?>&t=<?php echo urlencode($_product->getName())?>" onclick='javascript:window.open(this.href,"","width=640,height=480,left=0,top=0,location=no,status=yes,scrollbars=yes,resizable=yes");return false' title="Share on FaceBook">
        <img src="<?php echo $this->getViewFileUrl('images/fb.png'); ?>" alt="FaceBook" width="5%">
    </a>

    <!-- TWITTER -->
    <a href="http://twitter.com/home/?status=<?php echo urlencode($_product->getProductUrl());?>(<?php echo urlencode($_product->getName())?>)" onclick='javascript:window.open(this.href,"","width=640,height=480,left=0,top=0,location=no,status=yes,scrollbars=yes,resizable=yes");return false' title="Share on Twitter">
        <img src="<?php echo $this->getViewFileUrl('images/tw.png'); ?>" alt="Twitter" width="5%">
    </a>

    <!-- Pinterest -->
    <a href="http://www.pinterest.com/home/?status=<?php echo urlencode($_product->getProductUrl());?>(<?php echo urlencode($_product->getName())?>)" onclick='javascript:window.open(this.href,"","width=640,height=480,left=0,top=0,location=no,status=yes,scrollbars=yes,resizable=yes");return false' title="Share on Pinterest">
        <img src="<?php echo $this->getViewFileUrl('images/pt.png'); ?>" alt="Pinterest" width="5%">
    </a>

</div>
キャッシュをクリアして、商品ページに戻りますと、SNSリンクが追加できました!
まとめ
本記事では、Magento2で商品ページにSNSリンクを追加する手順について紹介させていただきました。
Magento 2 Development Cookbookで、SNSボタンを追加する方法も書かれていますが、主にFacebookの " Like " と " Share " ボタンの追加方法のため、やり方としては多少の違いがあります。
ご覧いただきありがとうございます。少しでも皆様の参考になりましたら幸いです。