はじめに
この記事は,SLP KBIT Advent Calendar 2019 の14日目の記事です.
ReactとReduxでSpotifyのAPIを利用した音楽検索アプリを開発していきます.
記事を書くのは初めてで,手が震えていたりしてます😅
https://adventar.org/calendars/4214
Reactとは
Reactとは,Facebook製のJavaScriptライブラリです.Webアプリケーションのユーザーインターフェイスを効率的に構築することを目的としており,主にView部分を設計するだけで,データの変更を検知し,関連するコンポーネントだけを更新,描画します.React公式
なお,こちらの記事に非常に詳しく書かれておりますので,ぜひこちらも読んでください.今から始めるReact入門 ~ Reactの基本
Redux
Reduxは,アプリケーションのstateを管理するためのオープンソースのJavascriptライブラリです.React以外にもAngularやVueなどと併せて使用することもできます.
Reduxの要素
Reduxは主に,3つの要素からなります.
- Action
- Reducer
- Store
Actionは,何かが起こった時,Storeにどんなデータを利用するかを定義します.基本的な書き方は以下のようになります.typeにactionのタイプを指定します.
  return {
    type: types.RECEIVE_ITEM,
    item
  }
Reducerは現在のstateとActionから新しいstateを生成します.
Reducerでしてはいけないことがいくつかあります.
・ 引数が不自然に変更されるような処理はしてはいけない
・ API問い合わせやルーティングのような副作用を生み出す実装をしてはいけない
・ 純粋関数ではない関数を呼んではいけない
Reducerでは,同じ引数を渡したら常に同じ結果が返ってくるように設計をします.
 switch(action.type) {
  case types.REQUEST_ITEM:
  case types.RECEIVE_ITEM:
    return {
      ...state,
      items: action.itemData
    }
  default:
    return state
  }
Storeはアプリケーションのstateを保持します.また,stateへアクセスするためのgetState()や更新をするためのdispatch(action)を提供します.storeを作るには,reducerをcreateStore()へ渡す必要があります.
import rootReducer from '../reducers';
import {createStore} from 'redux';

const store = createStore(rootReducer);
Reduxの3原則
Reduxを設計する上で,以下の3つの原則に基づいて設計することが重要になります.
1. Single source of truth
アプリケーション内でStoreは1つのみとし,Stateは単独のオブジェクトとしてStoreに保持される
2. State is read-only
状態を変更する手段は、変更内容をもったactionをStoreへdispatchすることでしかstateは変更できない
3. Changes are made with pure functions
actionがどのように状態を変化するのをpureな関数(reducer)でかく
redux-saga
redux-sagaはReact/Reduxアプリケーションにおける非同期処理などをより簡単に管理するためのライブラリです.以下の状況などで利用します.
1. 特定のActionを待って,別のActionをdispatchしたい
2. 通信処理の完了を待って,別の通信処理を開始したい
3. 初期化時にデータを読み込みたい
4. 頻繁に発生するActionをバッファしてまとめてdispatchしたい
5. 他のフレームワーク,ライブラリとうまく連携したい
今回は特に,Actionの発生,終了から別のActionをdispatchしたかったため,redux-sagaを利用することにしました.
redux-sagaの詳細な説明や使い方などはこちらの記事が非常に参考になります.
redux-sagaで非同期処理と戦う
Spotify APIを利用した音楽検索アプリ
Spotify APIとは,アーティストやアルバム,曲情報をSpotifyが提供しているAPIです.これらの情報をJSON形式で取得することができます.今回は,これを利用して,音楽を検索できるSPAを開発していきます.
音楽検索アプリの流れ
全体の処理の流れは以下の図にようになっています.まずSpotify APIからtokenを取得します.取得したtokenはのちに使用するのでstoreに保存しておきます.入力ごとにactionをdispatchし,redux-sagaで受け取ります.sagaでは,actionが発生したことを検知したら受け取った入力値とtokenを利用してAPIをたたきに行きます.APIには,アーティスト,アルバム,トラックの3つの検索を行うため,3回リクエストが飛びます.各検索処理が完了するのをredux-sagaのcallを利用し,待ちます.完了したら3つのデータを一つにmergeして再度actionをdispatchし,storeに更新をかけます.

ディレクトリ構成
src/
  ├ actions/
  │     └ index.js
  ├ components/
  │     ├ audio/
  │     │   └ AudioController.js
  │     ├ tabs/
  │     │   ├ Album.js
  │     │   ├ Artist.js
  │     │   ├ SearchBar.js
  │     │   ├ Track.js
  │     │   ├ tab-content.js
  │     │   ├ tab-list-item.js
  │     │   └ tab-list.js
  │     └ SearchMusic.js
  ├ constants/
  │     ├ action.js
  │     ├ component.js
  │     └ server-constants.js
  ├ containers/
  │     └ App.js
  ├ images/
  ├ reducers/
  │     └ index.js
  ├ sagas/
  │     └ index.js
  ├ store/
  │     └ index.js
  ├ styles/
  ├ authentication.js
  └ index.js
Spotify APIからtokenを取得する
Spotify APIを利用して楽曲情報を取得するには,Spotifyからtokenを取得する必要があります.Spotify APIは以下の3つの認証フローを提供しています.
| Flow | Access User Resources | Require Secret key | Access Token Refresh |
|---|---|---|---|
| Authorization Code | Yes | Yes | Yes |
| Client Crendentials | No | Yes | Yes |
| Implicit Grant | Yes | No | No |
今回は,手軽に利用できるClient Crendentialsの認証フローでtokenを取得していきたいと思います.指定したURLハッシュとしてtokenをつけた状態でリダイレクトされる形で取得できます.client_idとredirect_uriに関しては,spotifyAPIのサイトから発行したものを利用します.
function authentication() {
  if(/localhost:3000\/$/.test(window.location.href)) {
    // implicit grant flow  (change it to authorization flows later)
    window.location.replace(
      "https://accounts.spotify.com/authorize?client_id="+serverConstants.clientId+"&redirect_uri="+serverConstants.redirectUri+"&response_type=token&state=123"
    )
  }
  let url = window.location.href
  return url.match(/#(?:access_token)=([\S\s]*?)&/)[1]
}
他の認証フローや詳細などはAuthorization Guideに記載されていますのでそちらを参考にお願いします.
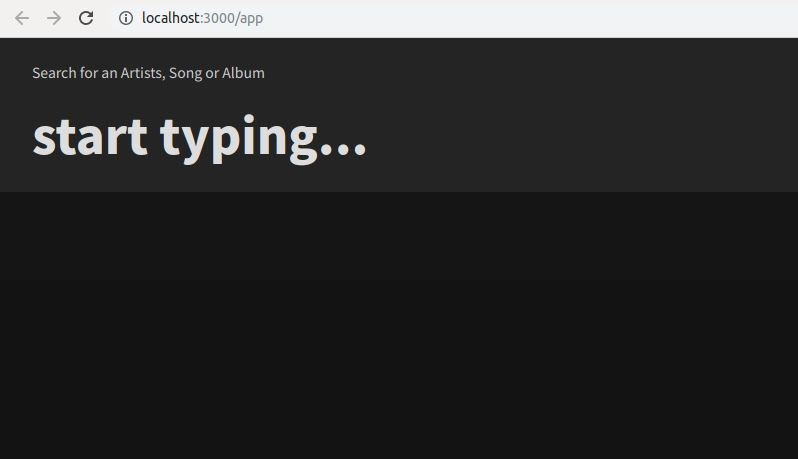
ユーザー入力部分の実装
ユーザーが入力した文字を,親コンポーネントのsearch-music.js内のhandleSearchBarChange関数を呼び出します.関数内では,bindActionCreatorsでactionを生成し,随時dispatchし,store内のstateを更新しています.
class SearchBar extends Component {
  render()
    let input = this.props.item
    return (
      <div className='searchBar-wrapper'>
        <p>Search for an Artists, Song or Album</p>
        <form onChange = {e => {
          e.preventDefault()
          this.props.onChange(input.value)
        }}>
          <input
            autoFocus
            defaultValue={this.props.item}
            placeholder="start typing..."
            ref={node => {
              input = node
            }}
          />
        </form>
      </div>
    )
  }
}
SearchBar = connect()(SearchBar)
export default SearchBar
handleSearchBarChange(nextItem) {
    this.props.boundActionsCreators.searchItem(nextItem)
}
入力部分の実装画面が下図のようになると思います
Spotify APIから情報を取得し,更新する部分
tokenと入力データは取得できたと思うので,ようやくSpotify APIから曲情報を取得していきたいと思います.キーの入力毎にstateが更新されるので,ReactのライフサイクルのcomponentDidUpdate()を利用して,stateを更新直後にstateを利用してSpotify APIから検索をしていきたいと思います.componentDidUpdate()は更新が行われた直後に呼び出され,引数に前回のpropsを受け取ります.
前回と今回の入力値を比較し,違う場合にactionをdispatchします.また,入力した文字を消した場合も呼び出されるため,何も入力されていない場合にはactionを呼び出さないように設定します.
  componentDidUpdate(prevProps) {
    if ((this.props.item !== prevProps.item) && (this.props.item !== '')) {
      this.props.fetchData(this.props.item, this.props.token)
    }
  }
fetchDataのactionは以下のようになっています.
export function fetchData(searchedItem, token) {
  return {
    type: types.FETCH_DATA,
    searchedItem,
    token
  }
}
通常ならば,dispatchしたactionをそのままreducerが受け取り,stateを更新していきます.今回はredux-sagaを利用しているため,saga側でactionを受け取ります.apiFlow()関数は,裏で走っており,
actionが発生するのをまだかまだかと待っている状況です.actionが発生すると,下記のfetchData関数のタスクを開始させ,Spotify APIからそれぞれアーティスト,アルバム,トラック情報を取得してきます.
function* apiFlow() {
  while(typeof x === 'undefined')
    const {searchedItem, token} = yield take(types.FETCH_DATA);
    yield fork(fetchData, searchedItem, token);
  }
}

export default function* rootSaga(cable) {
  yield fork(apiFlow);
}
しかし,このままだとstateの更新ごとにcomponentDidUpdate()は呼ばれ,APIをたたきにいってしまいます.ある程度まとめて処理をできるように,リクエストの回数を減らすような工夫が必要になってきます.今回はredux-sagaのdelayを利用します.Actionを受け取ったらAPIをたたきに行く前に,1秒間処理の遅延を行います.その間に新たなActionを受け取った場合,実行中のタスクを終了させ,新たなタスクを開始させます.これにより,入力直後の1秒間はActionは何度生成されても,最終的にAPIをたたきに行くのは一度だけで済みます.
function forkLater(task, searchedItem, token) {
  return fork(function* () {
    yield delay(1000);
    yield fork(task, searchedItem, token)
  })
}

function* apiFlow() {
  let task;
  while(typeof x === 'undefined') {
    const {searchedItem, token} = yield take(types.FETCH_DATA);
    if (task && task.isRunning()) {
      task.cancel();
    }
    task = yield forkLater(fetchData, searchedItem, token);
  }
}
function* fetchData(searchedItem, token) {
  let setArtists = yield call(fetchArtists, searchedItem, token);
  let setAlbums = yield call(fetchAlbums, searchedItem, token);
  let setTracks = yield call(fetchTracks, searchedItem, token);

  let parsedItems = mergeFetchedData(setArtists, setAlbums, setTracks)
  yield put({type: types.RECEIVE_ITEM, item: searchedItem, itemData: parsedItems})
}
以下が実際にAPIをたたきに行く関数の一部です.
function* fetchArtists(item, token) {
  yield put({type: types.REQUEST_ITEM, item})

  return yield axios.get( `https://api.spotify.com/v1/search?q=${item}&type=artist`, {
    headers: { 'Authorization': 'Bearer ' + token, }
  })
    .then(response => response.data)
    .then(res => res.artists.items.map(item => ({
      id: item.id,
      name: item.name,
      image: item.images[1]
    })))
    .catch(err => {
      console.log(err)
    })
}
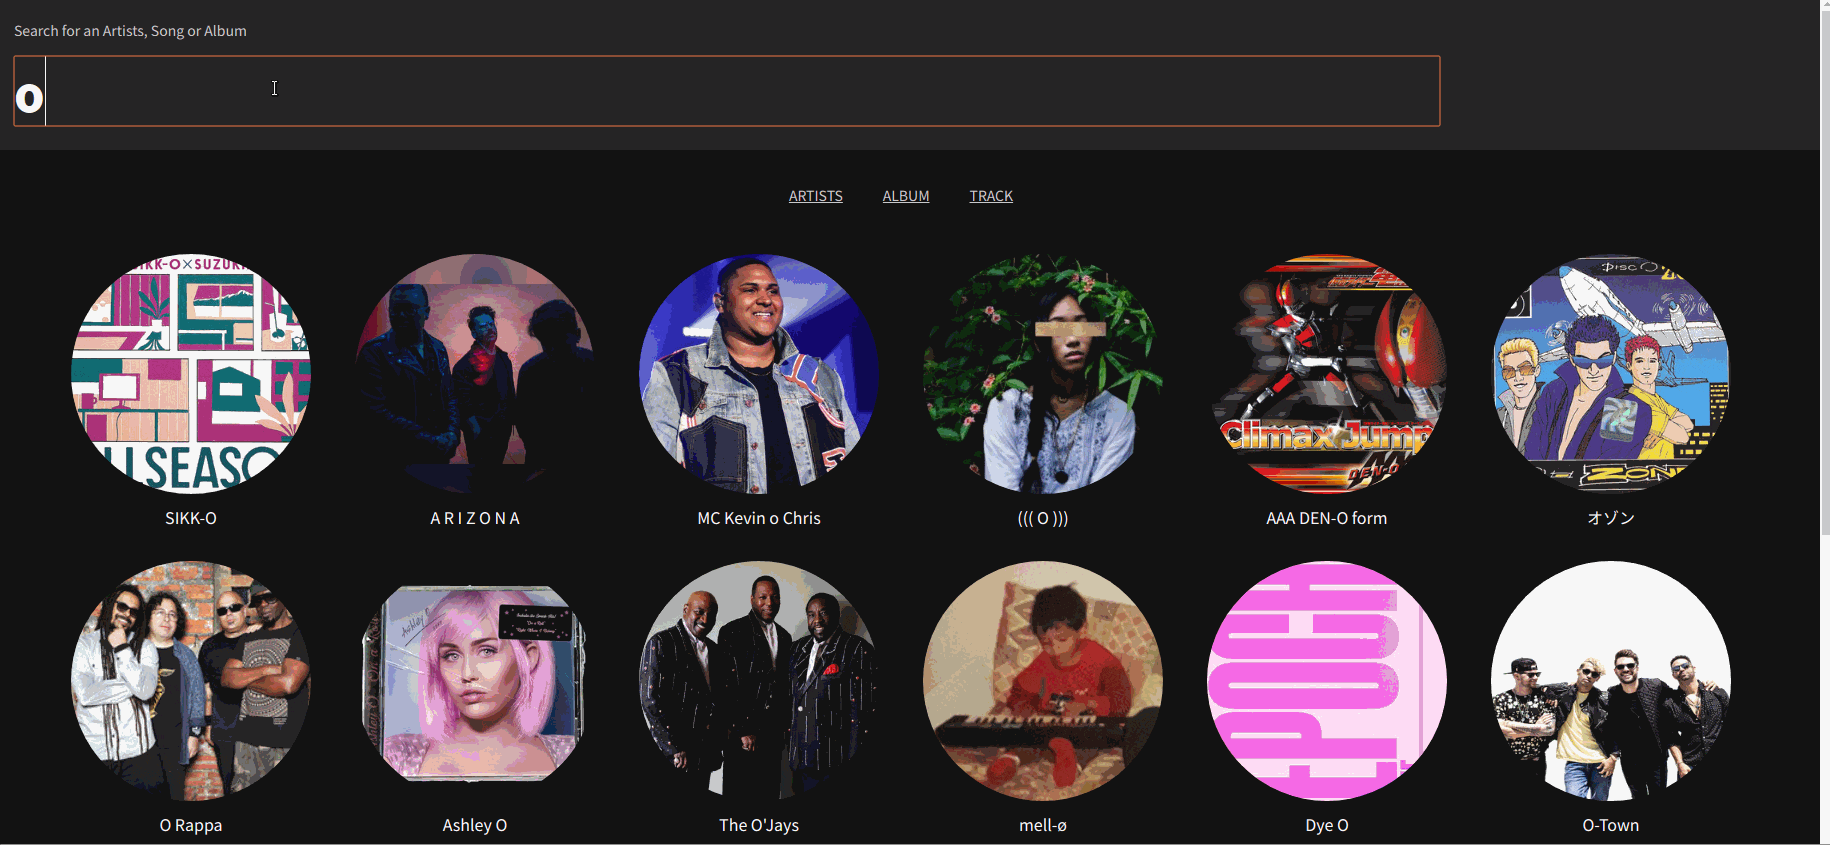
取得した情報の表示
spotifyからアルバム,アーティストとトラックデータが取得できていると思います.これらのデータをいい感じに表示していきます.それぞれにパネルを用意し,クリックで遷移するような形にしたいと思います.
まず,パネル遷移部分の実装を書いていきます.this.stateに保存している現在のpanelに合わせて,表示するpanelを返却します.
  getPanel() {
    if (this.props.spotify.items === undefined || this.props.spotify.items.length === 0) {
      return ;
    } else {
      switch(this.state.showPanel) {
        case constants.ARTIST_PANEL:
          return (
            <Artist artists={this.props.spotify.items.artists} />
          );
        case constants.ALBUM_PANEL:
          return (
            <Album albums={this.props.spotify.items.albums}/>
          );
        case constants.TRACK_PANEL:
          return (
            <Track tracks={this.props.spotify.items.tracks}/>
          );
      }
    }
  }
TabListにそれぞれのパネルのタブを入れます.クリックすると対応するパネル名をsetStateで更新し,getPanel()で表示します.
  render() {
    const panel = this.getPanel()
    return (
      <div>
        ...
        <TabList>
          <TabListItem dist={constants.ARTIST_PANEL} label="Artists" onClick={this.onClick.bind(this)} />
          <TabListItem dist={constants.ALBUM_PANEL} label="Album" onClick={this.onClick.bind(this)} />
          <TabListItem dist={constants.TRACK_PANEL} label="Track" onClick={this.onClick.bind(this)} />
        </TabList>
        <TabContent>
          {panel}
        </TabContent>
      </div>
    )
  }
実装画面が以下のようになります.
まとめ
JavaScriptを全く書いたことない人がReact,Reduxを利用して音楽検索アプリを作ってみました.ネットで書き方などを検索した際に,最初に混乱したのがES5とES6で書き方が変わっていたことです.参考にするサイトによってはES5で書かれていたりしたので,エラーがよく生じていました.また,reduxのactionとreducerの仕組みを理解するのにかなり時間を要しました.
色々と詰め込んだのでかなり量が多くなってしまいました.「ここおかしいぞ」とか「ここ直した方がいいぞ」等々ありましたら、指摘していただけると嬉しいです。今回のコードをこちらのGitHubのリポジトリにおいてあります。もしよかったら参考にしてみてください。
GitHub: SpotifyPlayer
最後まで読んでくださり、ありがとうございました。
追記: hookを用いた実装(redux未使用)も別ブランチにて行いましたので、興味があれば