APIを利用することはよくありますが、作成することがあまりないため、Node.js + Expressで従業員名のリストを表示するAPIを作成しました。
またリストをUIで追加・削除する機能や、在籍している従業員のダイアログにチェックを入れることで、enroll(登録)の項目をTrueにする機能も備えます。
※イメージ
今回ほとんどこちらの記事を参考にしました。
https://sbfl.net/blog/2018/08/25/nodejs-express-webapi/#API
node.jsの実行環境は既に用意されているものとします。
Expressセットアップ
Node.jsの有名なフレームワークである、Expressを使います。
ディレクトリ作成
$ mkdir new_api
$ cd new_api/
プロジェクトを初期化
$ npm init
expressインストール
npm install --save express
Web APIの作成(index.js)
API作成のためindex.jsというファイル名でnew_apiディレクトリに記載・保存します。
// Load each module
const express = require('express');
const multer = require('multer');
const uuidv4 = require('uuid/v4');

// Create instance
const app = express();
// Interpreting browser data with multer
app.use(multer().none());
// Publish contents of 'web' folder
app.use(express.static('web'));

// empList data
const empList = [];

// Return data in json format when accessing http://ServerIP:3000/api/v1/list
app.get('/api/v1/list', (req, res) => {
    res.json(empList);
});

// Add items when sending data to http://ServerIP:3000/api/v1/add
app.post('/api/v1/add', (req, res) => {
    const empData = req.body;
    const empTitle = empData.title;
    const id = uuidv4();
    const empItem = {
        id,
        title: empTitle,
        enroll: false
    };
    empList.push(empItem);
    console.log('Add: ' + JSON.stringify(empItem));

    res.json(empItem);
});

// Delete an item when it is sent to http://ServerIP:3000/api/v1/delete
app.delete('/api/v1/item/:id', (req, res) => {
    const index = empList.findIndex((item) => item.id === req.params.id);

    if(index >= 0) {
        const deleted = empList.splice(index, 1);
        console.log('Delete: ' + JSON.stringify(deleted[0]));
    }

    res.sendStatus(200);
});

// When the check mark is checked, enroll item is set to true.
app.put('/api/v1/item/:id', (req, res) => {
    const index = empList.findIndex((item) => item.id === req.params.id);
    if(index >= 0) {
        const item = empList[index];
        if(req.body.enroll) {
            item.enroll = req.body.enroll === 'true';
        }
        console.log('Edit: ' + JSON.stringify(item));
    }

    res.sendStatus(200);
});

// Listen
app.listen(3000, () => console.log('Listening on port 3000'));
コード解説(index.js)
簡単に何が記載されているか説明します。
・expressモジュールだけでなく、ブラウザによるデータ操作のためにmulter、uuidモジュールも読み込んでします。
・app.use(express.static('web')); は「"web"というディレクトリにあるコンテンツを読み込んでください」という指示です。
・http://ServerIP:3000/api/v1/list と指定すると従業員リストを表示します。
※WebAPIは一般的に/api/APIバージョン/機能名の形式をとることが多い。
・res.json(empItem); でJSON形式でデータを返しています。
・app.listen(3000, () => console.log('Listening on port 3000')); でポート3000でListenします。
UIの作成(index.html)
index.jsで"web"というディレクトリにあるコンテンツを読み込む記載をしました。
そのためディレクトリを作成します。
mkdir web
webディレクトリの中に、index.htmlというファイル名で以下を記載・保存します。
<!DOCTYPE html>
<html lang="ja">
<head>
    <meta http-equiv="content-type"
        content="text/html; charset=UTF-8">
    <title>empList api</title>
    <style>
    body { font-size:12pt; color:#343A41; }
    h1 { font-size:18pt; background-color:#F6EFD1; }
    pre { background-color:#F2F1F3; }
    </style>
</head>
    <h1>empList api</h1>
    <p>* Checking the dialog, Employee item (enroll) is changed to true</p>
    <div>
        <ul id="emp-container"></ul>
        <input id="new-emp-item-title"><button id="new-emp-item-add-button">Add</button>
    </div>

    <script>
        function checkboxListener(event) {
            const checkbox = event.currentTarget;
            const id = checkbox.dataset.id;
            const body = new FormData();
            body.append('enroll', checkbox.checked.toString());

            // Access the API with the DELETE method
            fetch(`./api/v1/item/${id}`, { method: 'PUT', body })
                .then(() => fetchEmpList());
        }

        // Function called when the Delete button is pressed
        function deleteButtonListener(event) {
            const button = event.currentTarget;
            const id = button.dataset.id;

            // Access the API with the DELETE method
            fetch(`./api/v1/item/${id}`, { method: 'DELETE' })
                .then(() => fetchEmpList());
        }
        // Function to draw the emp list
        function renderEmpList(empList) {

            // get id = "emp-container" element
            const empContainer = document.querySelector('#emp-container');

            // Erase all contents of container
            const deleteButtonList = empContainer.querySelectorAll('.delete-button');
            deleteButtonList.forEach((button) => button.removeEventListener('click', deleteButtonListener));
            const checkboxList = empContainer.querySelectorAll('.checkbox');
            checkboxList.forEach((checkbox) => checkbox.removeEventListener('change', checkboxListener));
            empContainer.innerHTML = '';

            // For each element of JSON
            for(const item of empList) {
                const li = document.createElement('li');
                const label = document.createElement('label');
                const checkbox = document.createElement('input');
                checkbox.classList.add('checkbox');
                checkbox.type = 'checkbox';
                checkbox.checked = item.enroll;
                checkbox.dataset.id = item.id;
                checkbox.addEventListener('change', checkboxListener);
                const text = new Text(item.title);
                const deleteButton = document.createElement('button');
                deleteButton.innerText = 'Delete';
                deleteButton.classList.add('delete-button');
                deleteButton.dataset.id = item.id;
                deleteButton.addEventListener('click', deleteButtonListener);
                // Add checkbox, text and delete button to label
                label.appendChild(checkbox);
                label.appendChild(text);
                label.appendChild(deleteButton);
                // Add the previous label to the list element
                li.appendChild(label);
                // Add a list element to a emp list
                empContainer.appendChild(li);
            }
        }

        // Function that draws a emp list from the API
        async function fetchEmpList() {

            // Get JSON from API
            return fetch('./api/v1/list')
                .then((response) => response.json())
                .then((empList) => {
                    renderEmpList(empList);
                })
        }

        // Function to POST a new Emp item to the API
        async function postNewEmpItem(empItem) {

            // Add title text to the transmitted data 'title'
            const body = new FormData();
            body.append('title', empItem.title);

            // Send data to the Web API via POST using the Fetch API
            return fetch('./api/v1/add', {
                method: 'POST',
                body
            }).then((response) => response.json());
        }
        const newEmpItemTitleInput = document.querySelector('#new-emp-item-title');
        const newEmpAddButton = document.querySelector('#new-emp-item-add-button');

        // POST a new Emp item when the Add button is clicked
        newEmpAddButton.addEventListener('click', (event) => {
            const title = newEmpItemTitleInput.value;

            // If title is not empty
            if(title) {

                // Update List
                postNewEmpItem({title}).then((item) => fetchEmpList());
            }
        });

        // Initial data reading
        fetchEmpList();
    </script>
</body>
</html
コード解説(index.html)
基本的に何かのイベント発生時にAPIにアクセスし、リストに反映させています。
実際にブラウザで操作して動きを確認します。
まずサーバ起動させます。
node index.js
そしてブラウザで以下表示させます。
http://サーバのIP:3000/
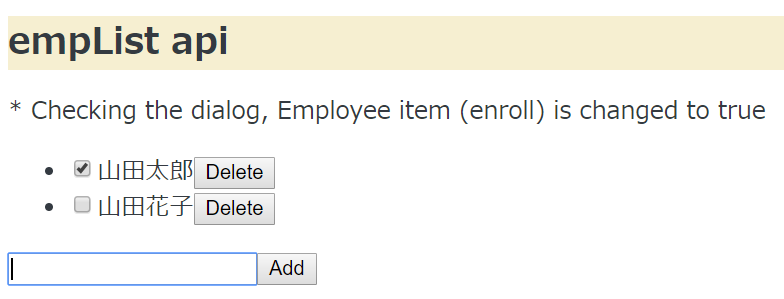
すると以下の画面が表示されます。
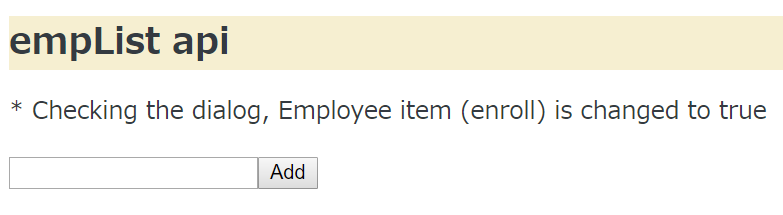
左下に何か入力し「Add」ボタンを追加すると、リストに表示されます。
片方にチェックを入れてみます。

そこでブラウザで以下指定します。
http://サーバのIP:3000/api/v1/list
するとJSON形式でデータが表示されました。チェックを入れたほうのenrollの項目はTrueと表示されています。

ただDBにデータを格納していないため、これだけでは再起動するとデータが消えてしまいます。
EJSのテンプレートを使ったり、MySQLとの接続も試してみたいと思います。