Word文書では、このフォームを使用すると、データをわかりやすく直感的に分析および整理することができます。 テーブルは通常少なくとも1つの行を含み、各行は少なくとも1つのセルを含み、セルはテキストや表(つまりネストした表)などの複数の要素を含むことができます。 この資料では、Spire.Docを使用してWord文書にテーブルとネストされたテーブルを作成する方法について説明します。
テーブルを作成するときには、表の行と列の数を事前に指定するか、表に行とセルを動的に追加できます。
定義済みの行と列を持つ表を作成する
C#
using System;
using System.Collections.Generic;
using System.Linq;
using System.Text;
using System.Threading.Tasks;
using Spire.Doc;
using Spire.Doc.Fields;
using System.Drawing;
namespace Table_in_Word
{
class Program
{
static void Main(string[] args)
{
//Word文書を作成する
Document document = new Document();
//セクションを追加
Section section = document.AddSection();
//フォームを追加
Table table = section.AddTable(true);
//テーブルの行数と列数を指定します(2行3列)
table.ResetCells(2, 3);
//セルを取得し(1行目、1行目)、テキストを追加する
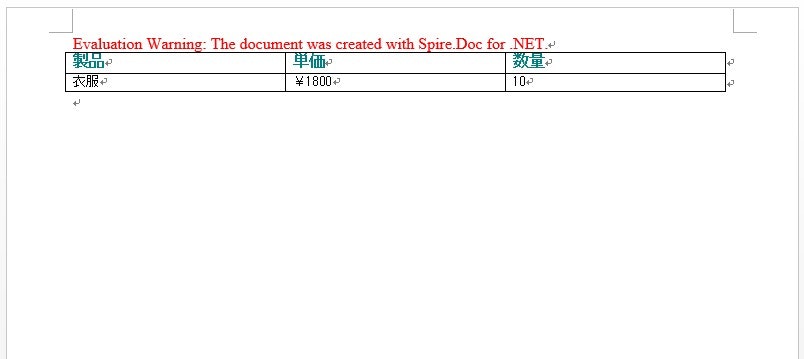
TextRange range = table[0, 0].AddParagraph().AppendText("製品");
range.CharacterFormat.FontName = "MS Gothic";
range.CharacterFormat.FontSize = 12;
range.CharacterFormat.TextColor = Color.Teal;
range.CharacterFormat.Bold = true;
//セルを取得(1行目、2行目)し、テキストを追加する
range = table[0, 1].AddParagraph().AppendText("単価");
range.CharacterFormat.FontName = "MS Gothic";
range.CharacterFormat.FontSize = 12;
range.CharacterFormat.TextColor = Color.Teal;
range.CharacterFormat.Bold = true;
//セルを取得し(行1とセル3)、テキストを追加する
range = table[0, 2].AddParagraph().AppendText("数量");
range.CharacterFormat.FontName = "MS Gothic";
range.CharacterFormat.FontSize = 12;
range.CharacterFormat.TextColor = Color.Teal;
range.CharacterFormat.Bold = true;
//セルを取得(2行目、1番目のセル)し、テキストを追加する
range = table[1, 0].AddParagraph().AppendText("衣服");
range.CharacterFormat.FontName = "MS Gothic";
range.CharacterFormat.FontSize = 10;
//セルを取得(2行目、2行目)してテキストを追加する
range = table[1, 1].AddParagraph().AppendText("¥1800");
range.CharacterFormat.FontName = "MS Gothic";
range.CharacterFormat.FontSize = 10;
//セルを取得(2行目、3番目のセル)し、テキストを追加する
range = table[1, 2].AddParagraph().AppendText("10");
range.CharacterFormat.FontName = "MS Gothic";
range.CharacterFormat.FontSize = 10;
//ドキュメントを保存
document.SaveToFile("テーブル.docx");
}
}
}
デバッグしてコードを実行した後に生成されるドキュメントは、次のとおりです:
行とセルをテーブルに動的に追加する
行とセルをテーブルに動的に追加する必要がある場合は、Table.AddRow()メソッドとTableRow.AddCell()メソッドを使用する必要があります。 コード例:
C#
using System;
using System.Collections.Generic;
using System.Linq;
using System.Text;
using System.Threading.Tasks;
using Spire.Doc;
namespace Table_in_Word2
{
class Program
{
static void Main(string[] args)
{
//Word文書を作成する
Document doc = new Document();
//セクションを追加
Section section = doc.AddSection();
//フォームを追加
Table table = section.AddTable(true);
//行1を追加
TableRow row1 = table.AddRow();
//最初のセルを最初の行に追加する
TableCell cell1 = row1.AddCell();
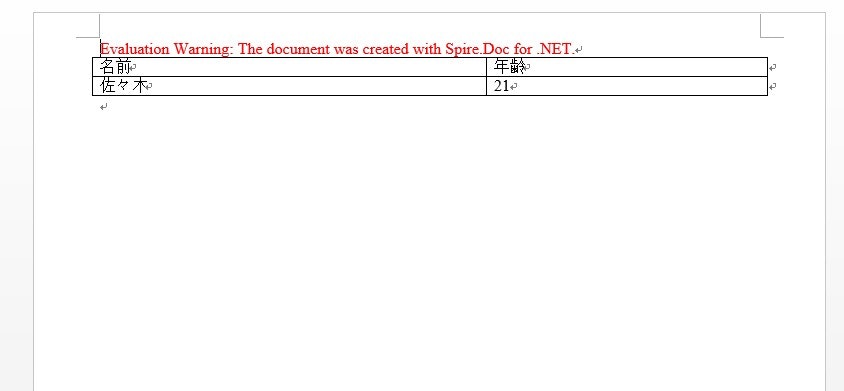
cell1.AddParagraph().AppendText("名 前");
//2番目のセルを最初の行に追加する
TableCell cell2 = row1.AddCell();
cell2.AddParagraph().AppendText("年 齢");
//2行目を追加
TableRow row2 = table.AddRow(true, false);
//最初のセルを2行目に追加する
TableCell cell3 = row2.AddCell();
cell3.AddParagraph().AppendText("佐 々 木");
//2番目のセルを2番目の行に追加する
TableCell cell4 = row2.AddCell();
cell4.AddParagraph().AppendText("21");
table.AutoFit(AutoFitBehaviorType.AutoFitToWindow);
//ドキュメントを保存
doc.SaveToFile("テーブル2.docx");
}
}
}
デバッグしてコードを実行した後に生成されるドキュメントは、次のとおりです:
ネストした表を作成する
Body.AddTable()メソッドを使用して、テーブルの指定されたセルにネストしたテーブルを追加できます。 コード例:
C#
using System;
using System.Collections.Generic;
using System.Linq;
using System.Text;
using System.Threading.Tasks;
using Spire.Doc;
namespace Table_in_Word3
{
class Program
{
static void Main(string[] args)
{
//Word文書を作成する
Document doc = new Document();
Section section = doc.AddSection();
//テーブルを追加
Table table = section.AddTable(true);
table.ResetCells(2, 3);
//行の高さと列の幅を設定する
table.Rows[0].Height = 20;
table.Rows[1].Height = 50;
table.Rows[0].Cells[0].Width = table.Rows[0].Cells[1].Width = 50;
table.Rows[1].Cells[0].Width = table.Rows[1].Cells[1].Width = 50;
table.AutoFit(AutoFitBehaviorType.AutoFitToWindow);
//セルにテキストを追加する
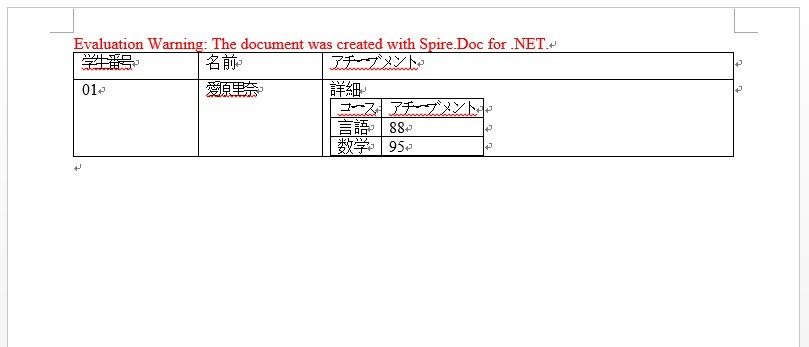
table[0, 0].AddParagraph().AppendText("学生番号");
table[0, 1].AddParagraph().AppendText("名 前");
table[0, 2].AddParagraph().AppendText("アチーブメント");
table[1, 0].AddParagraph().AppendText("01");
table[1, 1].AddParagraph().AppendText("愛原里奈");
table[1, 2].AddParagraph().AppendText("詳 細");
//行3、セル3にネストした表を追加する
Table nestedTable = table[1, 2].AddTable(true);
nestedTable.ResetCells(3, 2);
nestedTable.AutoFit(AutoFitBehaviorType.AutoFitToContents);
//ネストした表にテキストを追加する
nestedTable[0, 0].AddParagraph().AppendText("コース");
nestedTable[0, 1].AddParagraph().AppendText("アチーブメント");
nestedTable[1, 0].AddParagraph().AppendText("言 語");
nestedTable[1, 1].AddParagraph().AppendText("88");
nestedTable[2, 0].AddParagraph().AppendText("数 学");
nestedTable[2, 1].AddParagraph().AppendText("95");
//ドキュメントを保存
doc.SaveToFile("テーブル3.docx", FileFormat.Docx2013);
}
}
}
デバッグしてコードを実行した後に生成されるドキュメントは、次のとおりです: