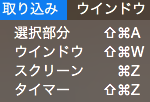
Macのスクリーンショットの取り方の種類
- 全画面
- ⌘(command)+Shift+3
- 範囲選択
- ⌘(command)+Shift+4
- 範囲指定(ウインドウ単位など)
- ⌘(command)+Shift+4+スペース
- 範囲指定(上記の影無し)
- ⌘(command)+Shift+4+スペース+option
- mkdirでスクリーンショットの保存用フォルダをデスクトップ上に作成します
- スクリーンショットの保存先を「~/Desktop/ScreenShots」にします
- SystemUIServerを再起動して、設定を有効にします
- タイプをjpgに変えます
- SystemUIServerを再起動して、設定を有効にします
スクリーンショットの保存先を変更
スクリーンショットの保存先が、Macのデフォルトではデスクトップになっていますが、それだと他のファイルと混ざって不便なので変更しました。
$ mkdir ~/Desktop/ScreenShots
$ defaults write com.apple.screencapture location ~/Desktop/ScreenShots
$ killall SystemUIServer
ファイル形式を変更
$ defaults write com.apple.screencapture type jpg
$ killall SystemUIServer
デフォルトではpngですが、jpg, bmp, gif, tif ,pdf ,pict jp2, psd ,sgi ,tga指定可能です。
Grab (スクリーンショットのタイマー撮影など)
Macには「Grab」というキャプチャソフトが標準装備されています。タイマー撮影などが出来て、tiff形式で保存されます。
以下のようにポインタを変えてスクリーンショットを取れます。⌘(command)+,で環境設定を呼び出せます。
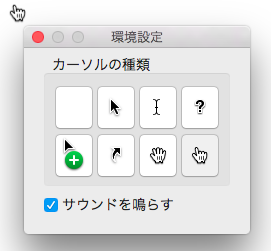
いちいち探して起動させるのが面倒だと思うので、Alfredを使えば楽にGrabが起動できるかと思います。