はじめに
Maas + JuJuでARMアーキテクチャを使ったベアメタルクラウドサーバを構築したいので、とりあえずWEB画面からのサーバ起動を目標に研究用のCPUボード(CubieTruck)でNetwork boot環境を構築してみる。
CubieTruckなどCPUボードの場合、bootイメージから作成しないとダメだが、通常はbiosのPXEブートで、すぐに試せるみたい。
注意:スペックやネットワーク環境にもよりますが、NetBootの環境構築は非常に時間がかかるので、構築する方は気合いが必要です。
※ファイルI/Oが多いのでSSDの端末でコンパイル作業を行う方がいいと思います。
ベアメタル調査メモ
物理サーバをクラウドのようにプロビジョニングするサービスとなる。
ビッグデータ演算の性能や直接ラックへの配置など、AWS・Azureなどとの差別化が図れるため、
今後、期待される技術であるので、研究として自宅にベアメタルクラウド環境を構築する。
個人的だが、国内企業はクラウドよりウケがいい気がいいと思う。
ベアメタルの特性について
ベアメタルをデータセンタサービスを基に比較してみる。
| サービス | 仮想化オーバーヘッド | 他サーバの影響 | スケールアウト | 初期費用 | 構成の柔軟性 |
|---|---|---|---|---|---|
| パブリッククラウド(laaS) | あり | あり | ○ | ◎ | △ |
| 物理サーバ | なし | なし | × | × | ○ |
| ベアメタルクラウド | なし | なし | ○ | ○ | △ |
※ベアメタルの初期費用については、サーバをCPUボードやブレードサーバで想定。
課題
・Armでの情報はインターネットおよび書籍などの情報が少ないので、ハードル高い!!
今回構築する構成について
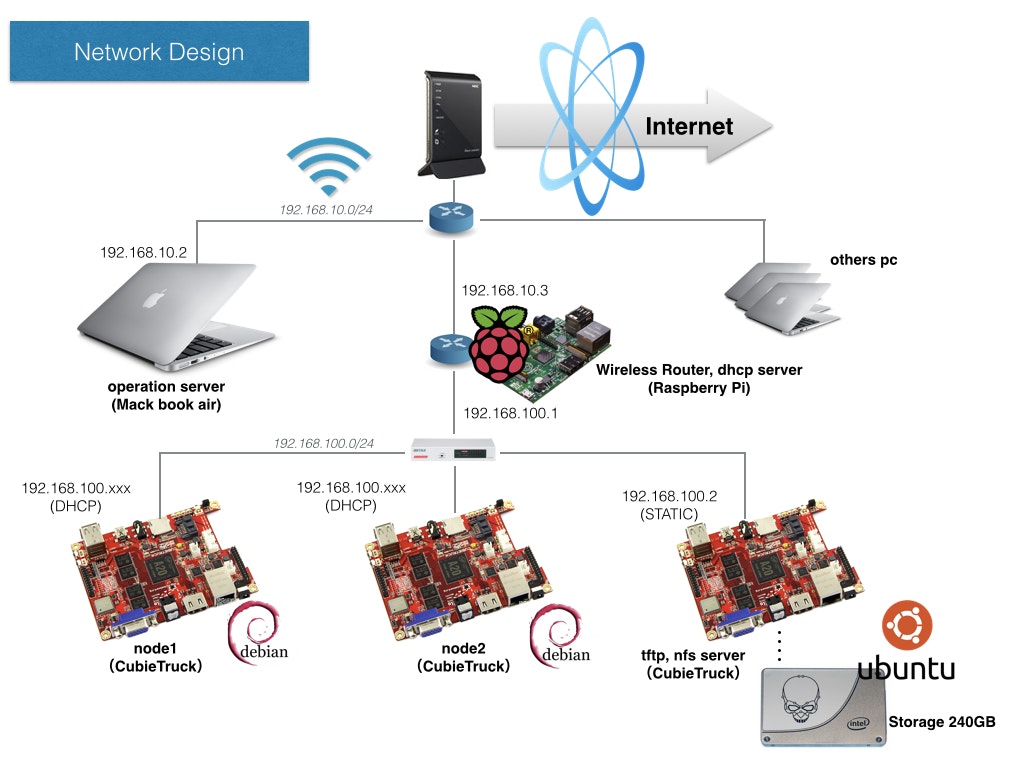
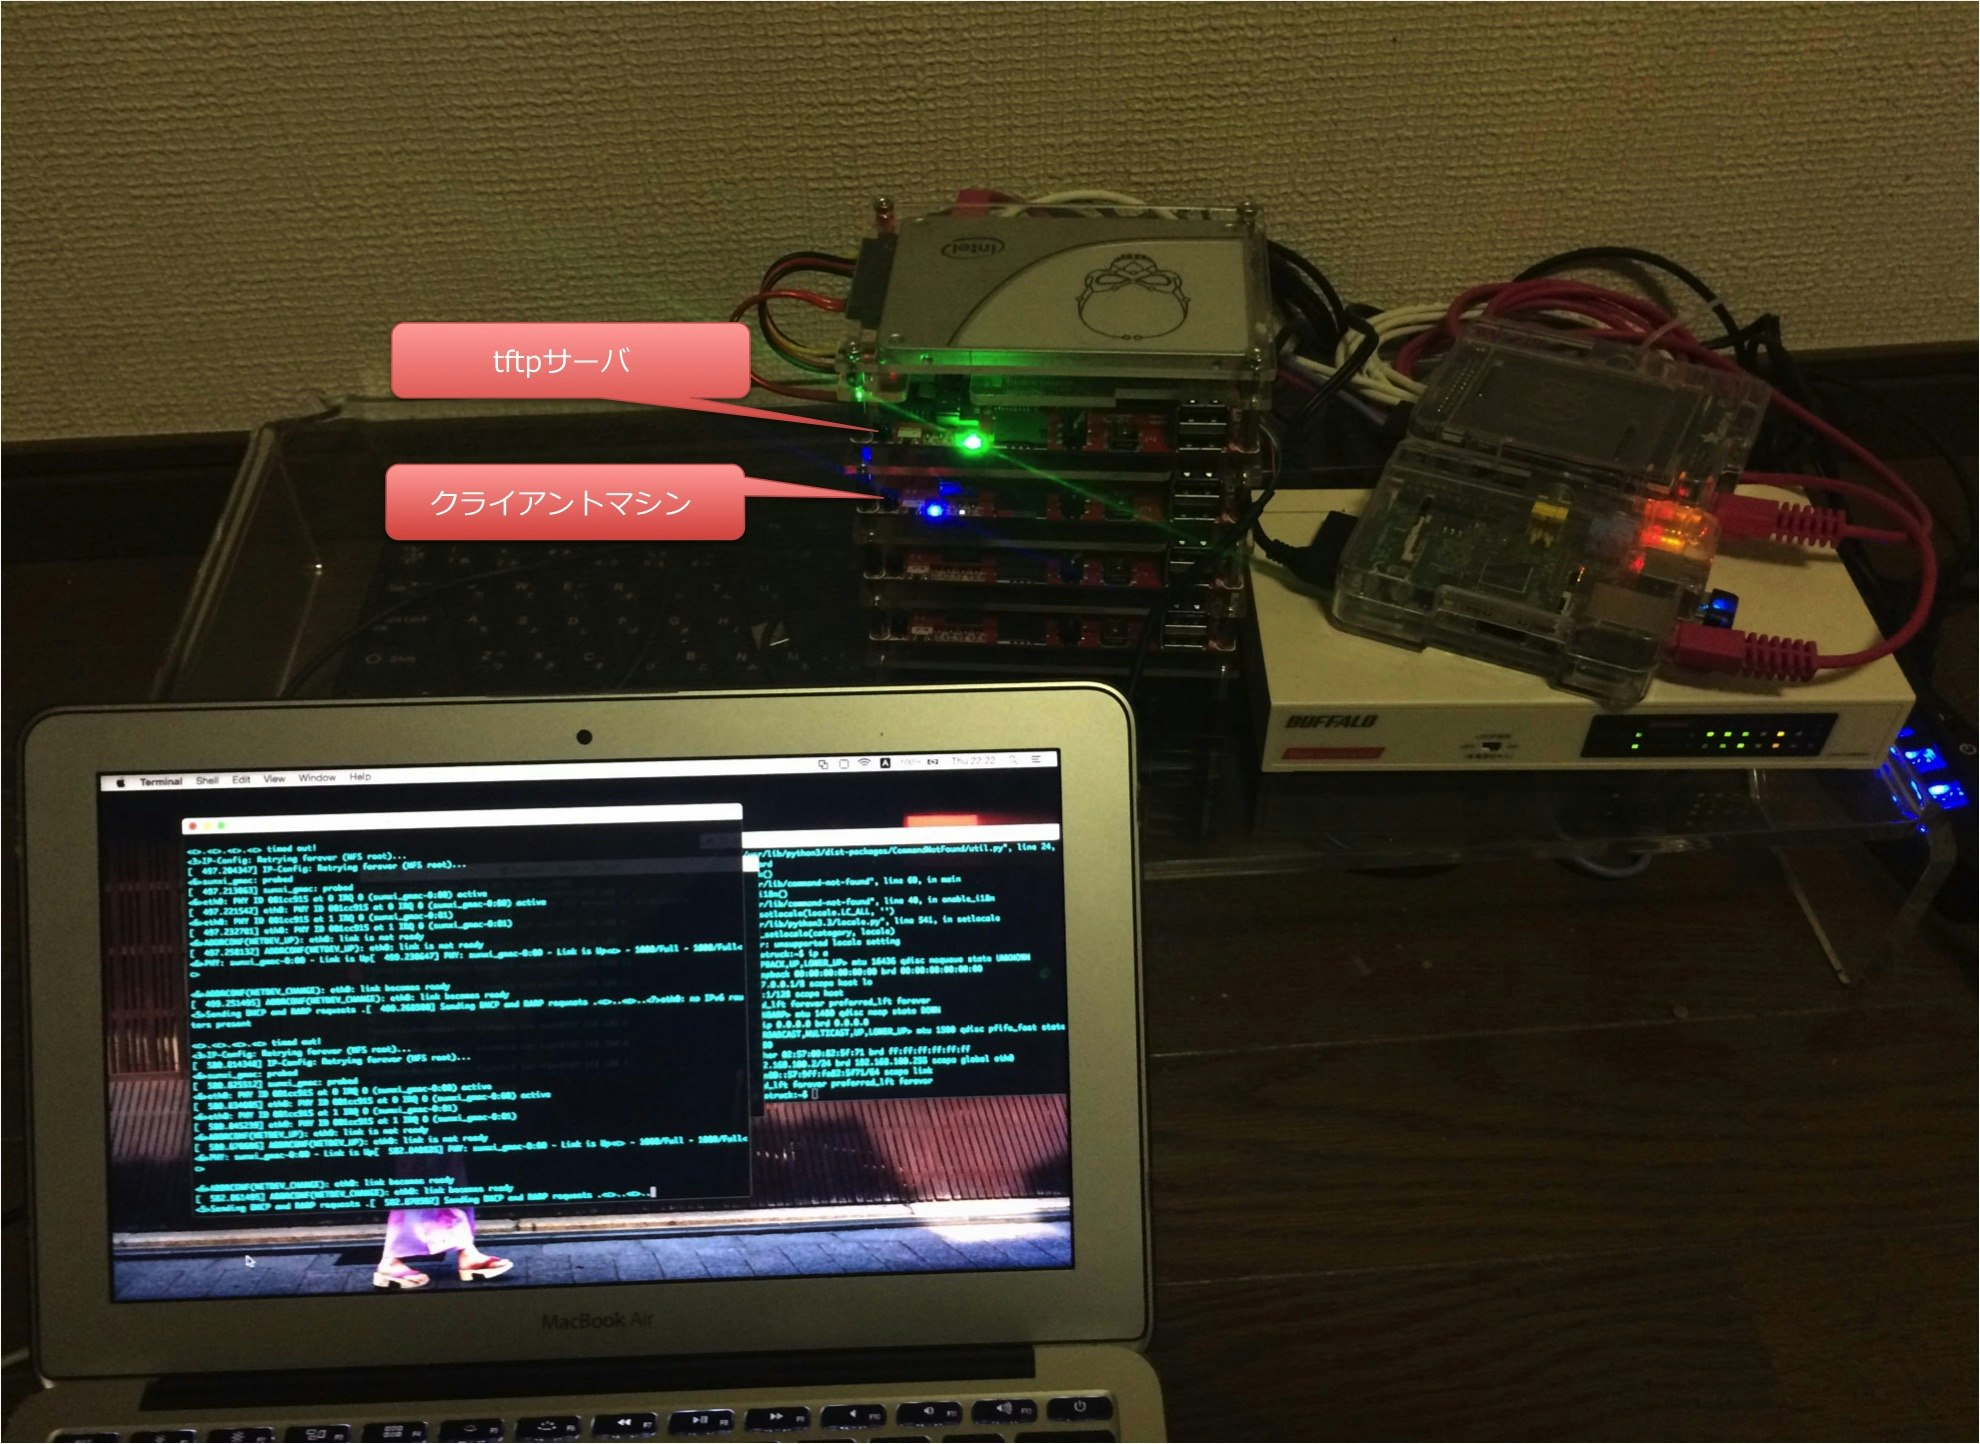
準備した環境
 ■ tftpサーバ (SSD boot)
  ・Cubietruck : Lubuntu
   (CPU :ARM Cortex-A7 Dual-Core, MEM: 2GB, Storage: 240G(Intel SSD))

 ■ クライアントサーバ
  ・Cubietruck × 2
   (CPU :ARM Cortex-A7 Dual-Core, MEM: 2GB, Storage: 16G(SDCard))

 ■ DHCPサーバ(無線ルータ兼用)
  ・Raspberry PI TYPE B

 ■ オペレーションサーバ
  ・Mac book Air
   ( VMWaer Fusion: Ubuntu 14.04 CPU: 2 / MEM: 4GB)

 その他 ・USB-シリアル変換ケーブル
       ・Cubie-PC接続用のUSB(A-mini B)がケーブル
       ・switch(LAN HUB)
       ・SDカードライター (MacBook Air 11などの場合)
【サーバ・ネットワーク構成図】
※Macからcubie側のセグへのルーティングは設定済み。
$ sudo route -n add 192.168.100.0/24 192.168.10.3
Cubietruckのtftpサーバ作成
イメージ準備
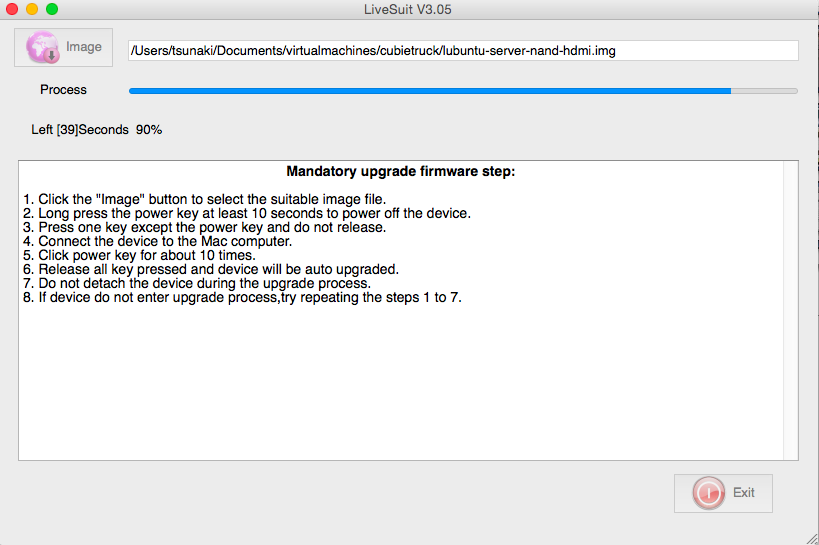
Cubietruckへの書き込みは、SDカードは使わず、USB OTG経由でSSDへイメージを書き込みます。
イメージのダウンロード先(lubuntu)
http://docs.cubieboard.org/tutorials/a20-cubietruck_lubuntu_server_releases
イメージの書き込みツール(Livesuit)
http://docs.cubieboard.org/downloads
ツールの手順通りCubietruckのUSB OTGからインストールする
※ H/Wの横についてる、FELkeyを押したままUSBでPCを接続し、接続後にボタンを離す。
インストール後のネットワーク設定
ssh ID/PASS : linaro/linaro
# nicの設定がdhcpとなっているので、staticに変更
$ sudo vi /etc/network/interfaces
auto lo eth0
iface lo inet loopback
# iface eth0 inet dhcp
iface eth0 inet static
address 192.168.100.2
netmask 255.255.255.0
gateway 192.168.100.1

# ディスプレイがないので再起動する (ifup/ifdown可)
$ sudo reboot
SSDの設定する
$ sudo fdisk /dev/sda
 Command (m for help): d
 Command (m for help): n
  Partition type:
   p   primary (0 primary, 0 extended, 4 free)
   e   extended
  Select (default p): p
  Partition number (1-4, default 1):
  Using default value 1
  First sector (2048-468862127, default 2048):
  Using default value 2048
  Last sector, +sectors or +size{K,M,G} (2048-468862127, default 468862127):
  Using default value 468862127

 Command (m for help): w

$ sudo mkfs.ext4 /dev/sda1

# RootディスクをSSDにコピー
$ sudo dd if=/dev/nandb of=/dev/sda1 bs=1M

# BootファイルにRootfsを設定
$ mkdir /tmp/boot
$ sudo mount /dev/nanda /tmp/boot

# Rootfsを以下に変更
$ sudo vi /tmp/boot/uEnv.txt
  nand_root=/dev/sda1

$ sync
$ sudo reboot

# 再起動後にdfサイズ確認(デフォルトだと2GBしか使えない)
$ df -h
 Filesystem      Size  Used Avail Use% Mounted on
 /dev/root       2.0G  655M  1.3G  34% /
 devtmpfs        889M  4.0K  889M   1% /dev
 none            4.0K     0  4.0K   0% /sys/fs/cgroup
 tmpfs            20M     0   20M   0% /tmp
 none            197M  160K  197M   1% /run
 none            5.0M     0  5.0M   0% /run/lock
 none            985M     0  985M   0% /run/shm
 none            100M     0  100M   0% /run/user

# 領域の拡張
$ sudo resize2fs /dev/sda1
$ df -h
 Filesystem      Size  Used Avail Use% Mounted on
 /dev/root       221G  656M  211G   1% /
 devtmpfs        889M  4.0K  889M   1% /dev
 none            4.0K     0  4.0K   0% /sys/fs/cgroup
 tmpfs            20M     0   20M   0% /tmp
 none            197M  160K  197M   1% /run
 none            5.0M     0  5.0M   0% /run/lock
 none            985M     0  985M   0% /run/shm
 none            100M     0  100M   0% /run/user
サーバの初期設定
# 以下のリポジトリを設定
$ sudo vi /etc/apt/sources.list
deb http://old-releases.ubuntu.com/ubuntu/ raring main universe restricted multiverse
deb-src http://old-releases.ubuntu.com/ubuntu/ raring main universe restricted multiverse

deb http://old-releases.ubuntu.com/ubuntu/ raring-security main universe restricted multiverse
deb-src http://old-releases.ubuntu.com/ubuntu/ raring-security main universe restricted multiverse

deb http://old-releases.ubuntu.com/ubuntu/ raring-updates main universe restricted multiverse
deb-src http://old-releases.ubuntu.com/ubuntu/ raring-updates main universe restricted multiverse

deb http://old-releases.ubuntu.com/ubuntu/ raring-backports main restricted universe multiverse
deb-src http://old-releases.ubuntu.com/ubuntu/ raring-backports main restricted universe multiverse

deb http://old-releases.ubuntu.com/ubuntu/ raring-proposed main restricted universe multiverse
deb-src http://old-releases.ubuntu.com/ubuntu/ raring-proposed main restricted universe multiverse


$ sudo apt-get update

# Time zoneの設定
$ sudo mv /etc/localtime /etc/localtime.org
$ sudo ln -s /usr/share/zoneinfo/Japan /etc/localtime
$ sudo apt-get install -y ntp
$ date

# 不要なミドル削除
$ sudo apt-get remove --purge mysql-server mysql-client mysql-common
$ sudo apt-get autoremove
$ sudo apt-get autoclean
tftpサーバのイストール
NetBootのイメージ配布サーバをインストールする。
$ sudo apt-get install -y xinetd tftpd tftp
$ sudo mkdir /usr/local/tftpboot
$ sudo chmod -R 777 /usr/local/tftpboot
$ sudo chown -R nobody /usr/local/tftpboot


$ sudo mkdir /etc/xinetd.d
$ sudo vi /etc/xinetd.d/tftp
service tftp
{
    protocol        = udp
    port            = 69
    socket_type     = dgram
    wait            = yes
    user            = nobody
    server          = /usr/sbin/in.tftpd
    server_args     = /usr/local/tftpboot
    disable         = no
}

$ sudo /etc/init.d/xinetd restart
接続テスト
$ sudo vi /usr/local/tftpboot/test.txt
test
$ ls -l /usr/local/tftpboot/
total 4
-rw-r--r-- 1 root root 5 Jan  1 04:59 test.txt

$ tftp 192.168.100.2
tftp> get test.txt
Received 6 bytes in 0.0 seconds
tftp> quit
NFSサーバのセットアップ
各ノードからマウントするrootfs用のNFSサーバを構築する。
これにより、起動用のSDだけで動かせるようになる。
$ sudo apt-get install nfs-kernel-server rpcbind nfs-common

# rootfsの領域
$ sudo mkdir /usr/local/tftpboot/rootfs
$ sudo chmod 755 /usr/local/tftpboot/rootfs

# マウント許可を以下を追記
$ sudo vi /etc/exports
/usr/local/tftpboot/rootfs *(rw,sync,no_root_squash,no_subtree_check)

$ sudo exportfs -ra
$ sudo /etc/init.d/nfs-kernel-server restart
接続テスト
Raspberry Piからの接続テスト
pi$ sudo apt-get install nfs-common
pi$ sudo mkdir -p /mnt/nfs
pi$ sudo mount 192.168.100.2:/usr/local/tftpboot/rootfs /mnt/nfs
pi$ sudo vi /mnt/nfs/test.txt
test

# cubieからファイル作成の確認
$ ls -l /usr/local/tftpboot/rootfs
total 4
-rw-r--r-- 1 root root 5 Jan  1 16:11 test.txt


pi$ sudo umount /mnt/nfs
サーバ側の設定はここまで。
CubietruckのNetwork Bootイメージのコンパイル
コンパイル作業はMac上のUbuntuで行うことにする.
初期準備
# コンパイル作業はrootで行う
$ sudo su -

$ apt-get update
$ apt-get upgrade

# イメージビルドに必要なソフトのインストール
$ apt-get install -y build-essential u-boot-tools libncurses-dev git make gcc g++-arm-linux-gnueabihf libusb-1.0-0-dev pkg-config dkms
イメージビルド
# workディレクトリの作成
$ mkdir ~/build
$ cd ~/build/

# bootイメージのダウロード(u-boot)
$ git clone https://github.com/linux-sunxi/u-boot-sunxi.git

# コンパイルターゲットがあることを確認(FELはUSBブート用)
$ cd u-boot-sunxi
$ cat boards.cfg | awk '{print $7}' | grep -i Cubietruck

# bootイメージコンパイル
$ make Cubietruck_config CROSS_COMPILE=arm-linux-gnueabihf-
$ make CROSS_COMPILE=arm-linux-gnueabihf-


# boot script(script.bin)を作成
$ cd ~/build/
$ git clone https://github.com/linux-sunxi/sunxi-tools
$ git clone https://github.com/cubieboard/cubie_configs

$ cd sunxi-tools
$ make

# script.binの作成
$ cd ~/build/
$ sunxi-tools/fex2bin cubie_configs/sysconfig/linux/cubietruck.fex script.bin
script.binの配置
全手順で作成したscript.binをscpなどでCubietruckのtftpbootのフォルダへ移動(権限 777)
################ Cubietruck ################
$ ls -l  /usr/local/tftpboot/script.bin
-rwxrwxrwx 1 linaro linaro 46240 Jan  1 17:33 /usr/local/tftpboot/script.bin
kernelのコンパイル
################ 再び mac上での作業 ################
# kernelコンパイル
$ git clone http://github.com/cubieboard/linux-sunxi.git
$ cp cubie_configs/kernel-configs/3.4/cubietruck_defconfig linux-sunxi/.config
$ cd linux-sunxi

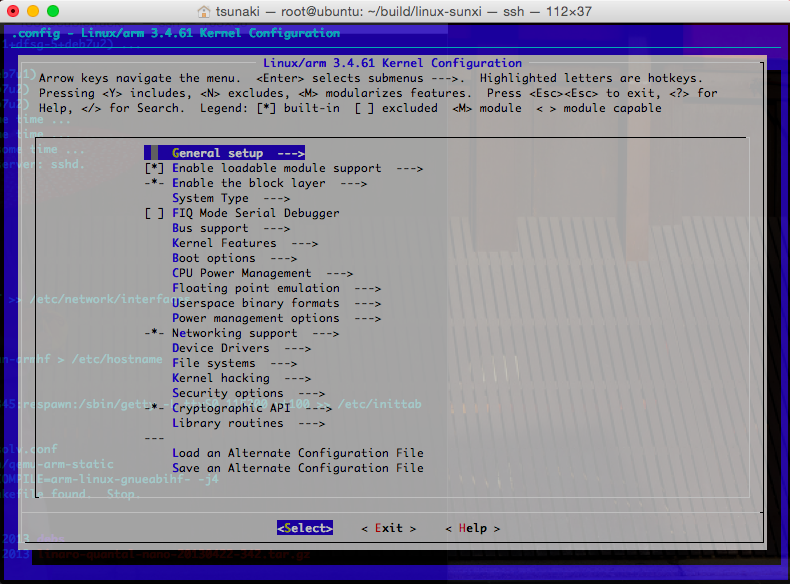
# kernelの設定
$ make ARCH=arm menuconfig
ここで以下の項目を「」に設定する
Device Drivers --> Network device support --> ** CAIF transport drivers *** section --> Ethernet driver support --> Sunxi platform 10/100/1000Mbps Ethernet driver
コンパイル
$ make ARCH=arm CROSS_COMPILE=arm-linux-gnueabihf- uImage modules

# 完了後はここにuImageが作成される
$ ls -l arch/arm/boot/uImage
uImageの配置
全手順で作成したscript.binをscpなどでCubietruckのtftpbootのフォルダへ移動(権限 777)
################ Cubietruck ################
$ ls -l  /usr/local/tftpboot/
total 4532
drwxr-xr-x 22 root   root      4096 Jan  1 18:25 rootfs
-rwxrwxrwx  1 linaro linaro   46240 Jan  1 17:33 script.bin
-rwxrwxrwx  1 linaro linaro 4583488 Jan  1 20:11 uImage
rootfsの準備
chrootでシステム構成を実施するためターゲットのOSはDebianとする。
※tftpサーバとなるCubietruck上での作業
$ apt-get install qemu-user-static debootstrap binfmt-support

# 環境変数の設定
$ targetdir=/usr/local/tftpboot/rootfs
$ distro=wheezy

# rootイメージを取得
$ wget https://releases.linaro.org/13.04/ubuntu/quantal-images/nano/linaro-quantal-nano-20130422-342.tar.gz

# イメージの展開
$ tar -xzf linaro-quantal-nano-20130422-342.tar.gz -C $targetdir

# OSのカスタマイズ準備
$ debootstrap --arch=armhf --foreign $distro $targetdir

# イメージへソースコピー
$ cp /usr/bin/qemu-arm-static $targetdir/usr/bin/
$ cp /etc/resolv.conf $targetdir/etc

# イメージにchrootしてカスタマイズ
$ chroot $targetdir

$ distro=wheezy
$ export LANG=C
$ /debootstrap/debootstrap --second-stage

$ cat <<EOT > /etc/apt/sources.list
deb http://ftp.kr.debian.org/debian $distro main contrib non-free
deb-src http://ftp.kr.debian.org/debian $distro main contrib non-free
deb http://ftp.kr.debian.org/debian $distro-updates main contrib non-free
deb-src http://ftp.kr.debian.org/debian $distro-updates main contrib non-free
deb http://security.debian.org/debian-security $distro/updates main contrib non-free
deb-src http://security.debian.org/debian-security $distro/updates main contrib non-free
EOT

$ cat <<EOT > /etc/apt/apt.conf.d/71-no-recommends
APT::Install-Recommends "0";
APT::Install-Suggests "0";
EOT

## パッケージ更新(language設定)
$ apt-get update
$ apt-get install locales dialog
$ dpkg-reconfigure locales

# ssh,ntp サーバのインストール
$ apt-get install -y openssh-server ntpdate

# root passwd設定
$ passwd

# ネットワーク設定
$ echo <<EOT >> /etc/network/interfaces
allow-hotplug eth0
iface eth0 inet dhcp
EOT

# HOSTNAME設定
$ echo debian-armhf > /etc/hostname

# シリアルコンソール設定
$ echo T0:2345:respawn:/sbin/getty -L ttyS0 115200 vt100 >> /etc/inittab

$ exit

# 一時的なファイルを削除
$ rm $targetdir/etc/resolv.conf
$ rm $targetdir/usr/bin/qemu-arm-static
boot用のSDを作成
mac上での作業
$ export card=/dev/sdd
$ dd if=/dev/zero of=$card bs=2M count=1

# すべての領域を利用
$ fdisk $card
Command (m for help): n
Command (m for help): w

$ mkfs.ext3 $card

$ cd ~/build/u-boot-sunxi
$ dd if=u-boot-sunxi-with-spl.bin of=$card bs=1024 seek=8
CubieTruck Boot設定
ここでは、UART経由でのシリアル通信作業が必要となる。
ボードのUART IOとMac上のUbuntuとでUSB接続する。
# Ubuntuでの作業

# シリアルコンソールのインストール
$ apt-get install picocom

# ボードに接続
$ picocom -b 115200 -d 8 -p n --send-cmd "sz -y" --receive-cmd "rz -y" /dev/ttyUSB0
picocom v1.7

port is        : /dev/ttyUSB0
flowcontrol    : none
baudrate is    : 115200
parity is      : none
databits are   : 8
escape is      : C-a
local echo is  : no
noinit is      : no
noreset is     : no
nolock is      : no
send_cmd is    : sz -y
receive_cmd is : rz -y
imap is        :
omap is        :
emap is        : crcrlf,delbs,

Terminal ready

### ethaddr アドレスをメモしておく
sun7i$ printenv


sun7i$ saveenv default -a
sun7i$ saveenv

# tftpサーバ設定

sun7i$ setenv autoload no
sun7i$ setenv serverip 192.168.100.2

sun7i$ setenv nfsroot ${serverip}:/usr/local/tftpboot/rootfs/

## 自動起動設定(自動起動しない場合は、不要)
sun7i$ setenv bootcmd "dhcp; tftp 0x43000000 script.bin; tftp 0x48000000 uImage; bootm 0x48000000"


sun7i$ setenv bootargs "console=ttyS0,115200 root=/dev/nfs init=/sbin/init
nfsroot=${nfsroot} ip=${ipaddr}:${serverip}:${gatewayip}:${netmask}::eth0"

sun7i$ saveenv

sun7i$ dhcp

sun7i$ saveenv
CubieTruckのネットワーク起動
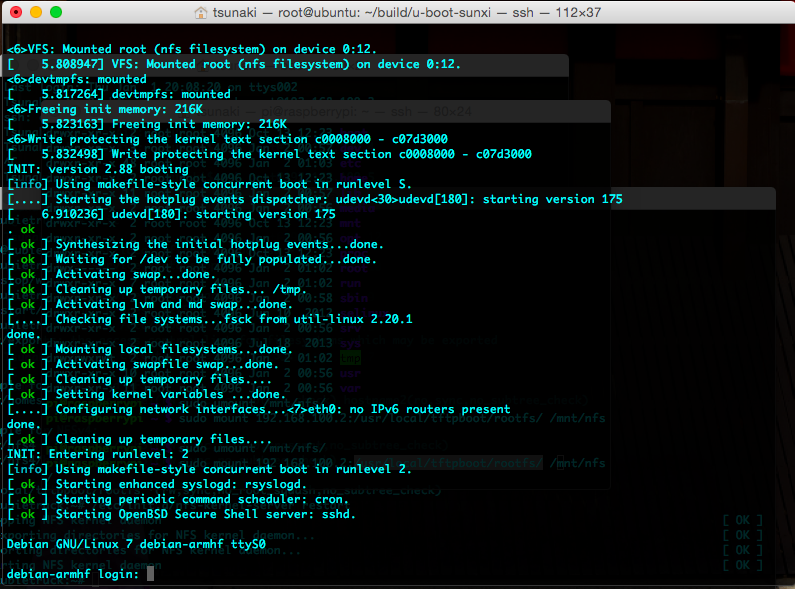
sun7i$ boot
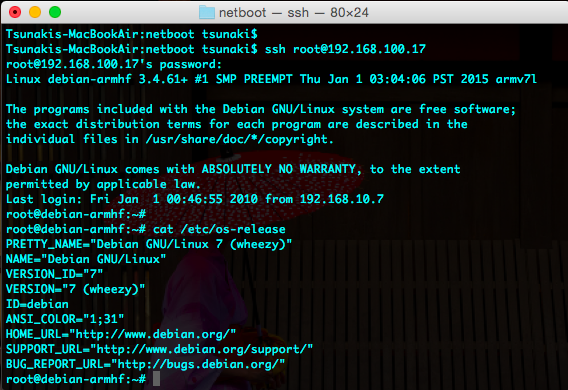
起動完了
$ cat /etc/os-release
PRETTY_NAME="Debian GNU/Linux 7 (wheezy)"
NAME="Debian GNU/Linux"
VERSION_ID="7"
VERSION="7 (wheezy)"
ID=debian
ANSI_COLOR="1;31"
HOME_URL="http://www.debian.org/"
SUPPORT_URL="http://www.debian.org/support/"
BUG_REPORT_URL="http://bugs.debian.org/"
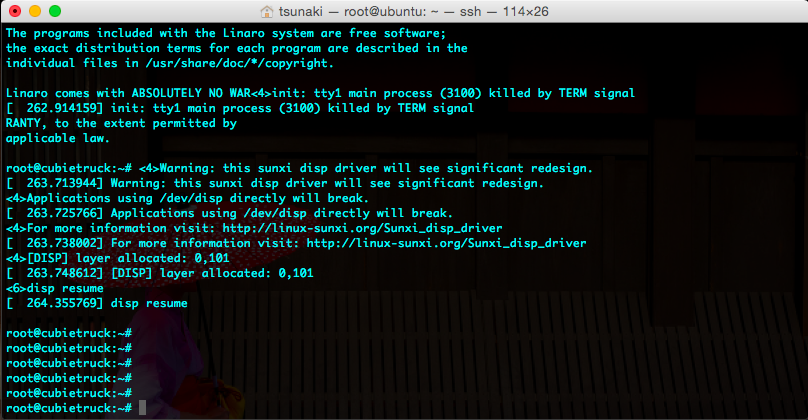
イメージの変更してubuntuを起動
ベアメタルクラウドのように、イメージを変更して起動させる。
tftpサーバにイメージを配置
$ mkdir -p /usr/local/tftpboot/images/ubuntu
$ cd ~/
$ wget http://dl.cubieboard.org/software/a20-cubietruck/lubuntu/ct-lubuntu-card0-v1.00/desktop/rootfs-part2.tar.gz

# imageの準備
$ tar -C /usr/local/tftpboot/images/ubuntu -xvf rootfs-part2.tar.gz

# NFS設定
$ vi /etc/exports
# ADD
/usr/local/tftpboot/images/ubuntu *(rw,sync,no_root_squash,no_subtree_check)

$ exportfs -ra
$ /etc/init.d/nfs-kernel-server restart
UART経由でのシリアル通信作業
sun7i$ setenv serverip 192.168.100.2

sun7i$ setenv nfsroot ${serverip}:/usr/local/tftpboot/images/ubuntu

sun7i$ setenv bootargs "console=ttyS0,115200 root=/dev/nfs init=/sbin/init
nfsroot=${nfsroot} ip=${ipaddr}:${serverip}:${gatewayip}:${netmask}::eth0"

sun7i$ saveenv

sun7i$ dhcp; tftp 0x43000000 script.bin; tftp 0x48000000 uImage; bootm 0x48000000
続いて実機に直接OSをイントールする
ネットワーク経由で実機のディスクにOSイメージをインストールする方法
tftpサーバでの作業
bootを作成する
$ mkdir /usr/local/tftpboot/installer
$ cd /usr/local/tftpboot/installer
$ mkdir netboot
$ mkdir device-tree

$ wget -P netboot http://d-i.debian.org/daily-images/armhf/daily/netboot/vmlinuz http://d-i.debian.org/daily-images/armhf/daily/netboot/initrd.gz

$ wget -P device-tree http://d-i.debian.org/daily-images/armhf/daily/device-tree/sun7i-a20-cubietruck.dtb

$ vi cubietruck
#setenv diargs <EXTRA ARGUMENTS>

setenv fdt_addr       0x43000000
setenv ramdisk_addr_r 0x48000000
setenv kernel_addr_r  0x47000000

setenv dibase installer

tftp ${kernel_addr_r} ${dibase}/netboot/vmlinuz
setenv bootargs "console=ttyS0,115200 --- ${diargs}"

tftp ${fdt_addr} ${dibase}/device-tree/sun7i-a20-cubietruck.dtb
fdt addr ${fdt_addr} 0x40000

tftp ${ramdisk_addr_r} ${dibase}/netboot/initrd.gz
bootz ${kernel_addr_r} ${ramdisk_addr_r}:${filesize} ${fdt_addr}

$ mkimage -T script -A arm -d /usr/local/tftpboot/installer/cubietruck /usr/local/tftpboot/installer/cubietruck.scr
Cubietruckでの作業
bootで先ほどの起動イメージを指定
sun7i$ setenv autoload no
sun7i$ dhcp
sun7i$ tftp 0x46000000 uImage
sun7i$ tftp ${scriptaddr} installer/cubietruck.scr
sun7i$ saveenv
sun7i$ source ${scriptaddr}
これでインストーラがはじまります
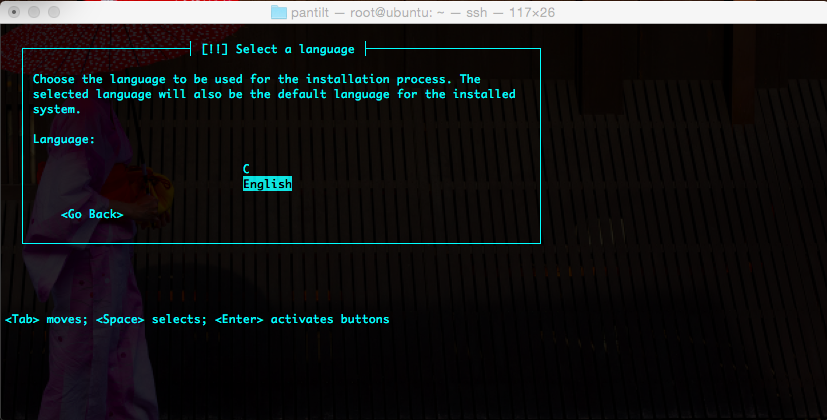
※ネットワークおよびフルコンパイルのインストールなので、少し時間がかかります。
インストールが完了すると普通に使えるようになります。
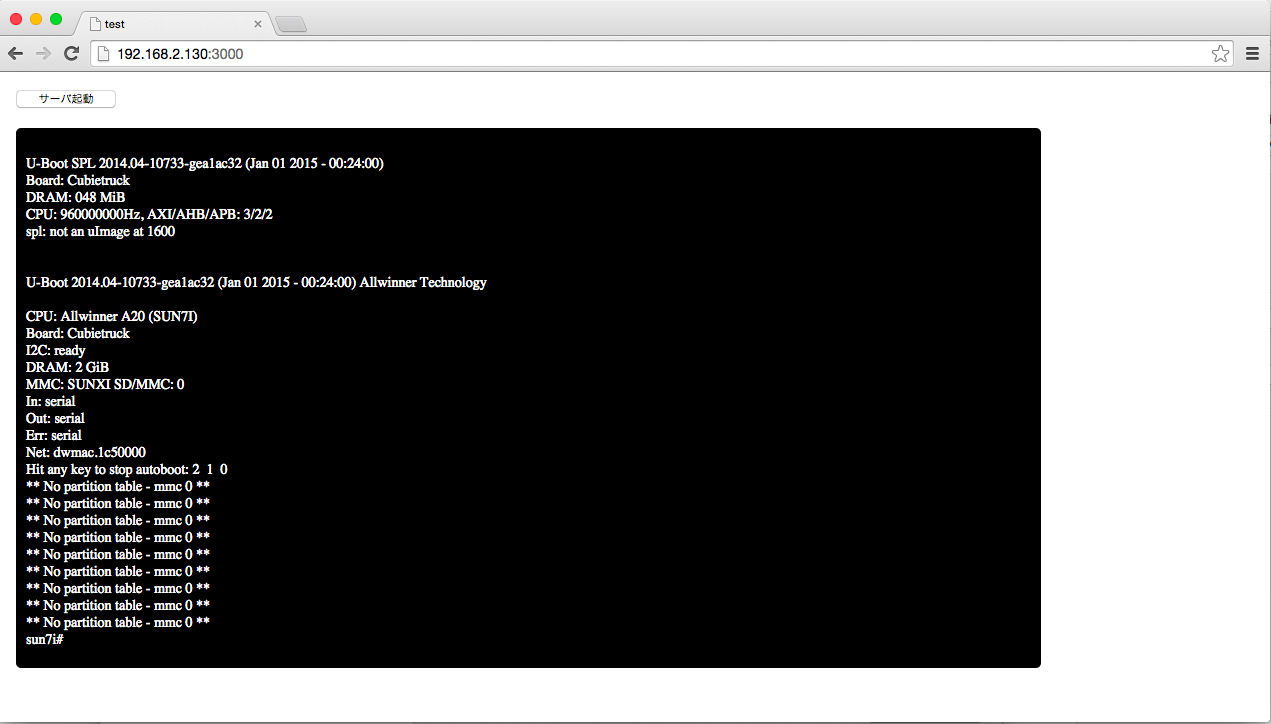
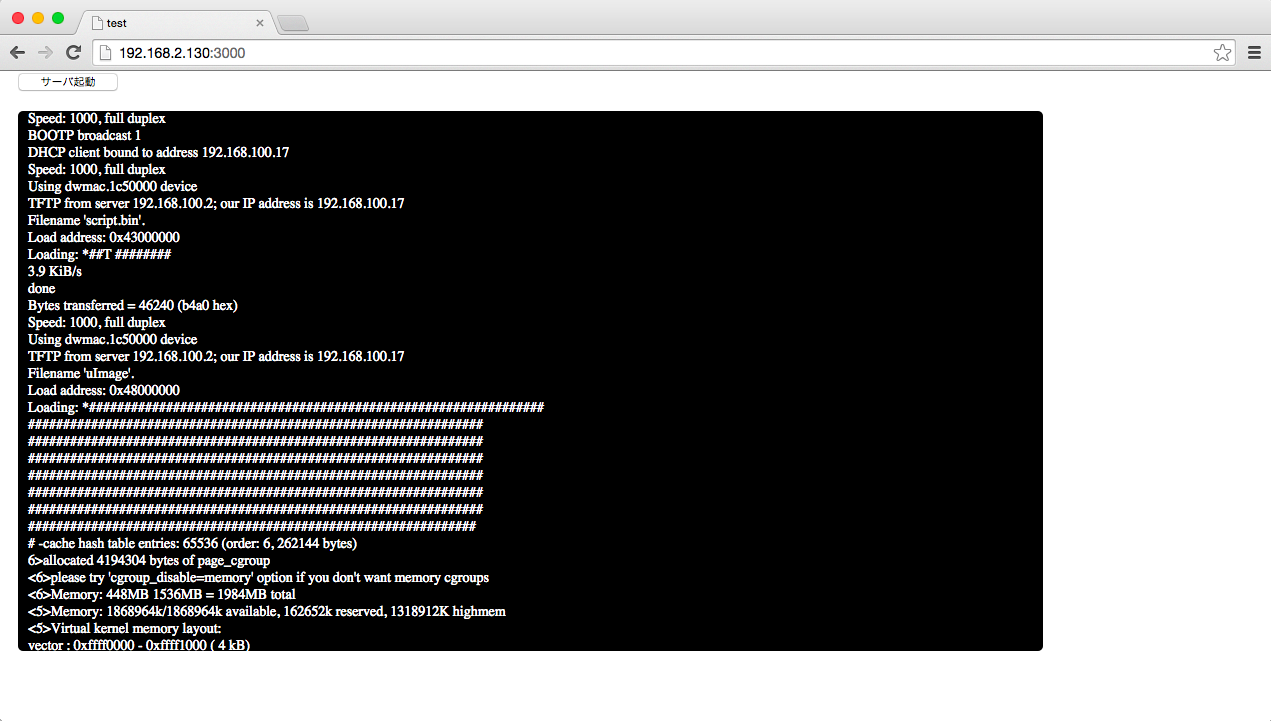
WEBからサーバ起動してみる
適当なプログラムを作成して、WEBから起動。
プログラムの例
まず、UART接続している端末にnodeをインストール(ここでは、Mac上のUbuntu 14.04)して、
以下のプログラムを実行。(サンプルは参考までに)
package.json
{
  "name": "netboot",
  "version": "0.0.0",
  "private": true,
  "scripts": {
    "start": "node ./bin/www"
  },
  "devDependencies": {
  },
  "dependencies": {
    "express": "latest",
    "socket.io": "latest",
    "serialport": "^1.4.9"
  }
}
app.js
var express = require('express'),
    app = express(),
    server = require('http').Server(app),
    io = require('socket.io')(server);

app.use(express.static(__dirname + '/app/webroot'));
server.listen(3000);


io.sockets.on('connection', function (socket) {
  console.log("connection");
  var serialport = require('serialport');
  var sp = new serialport.SerialPort("/dev/ttyUSB0", {
    baudRate: 115200,
    dataBits: 8,
    stopBits: 1,
    parser: serialport.parsers.readline("\n")
  });
  sp.on('open', function() {
    console.log('open');
    sp.on('data', function(input) {
      console.log(input.toString());
      socket.emit("buffer", input.toString());
      if (input.toString().indexOf("autoboot") > -1) {
        sp.write("\n");
      }
    });
  });
  socket.on("boot", function() {
    console.log('boot');
    sp.write("dhcp;");
    sp.write("tftp 0x43000000 script.bin;");
    sp.write("tftp 0x48000000 uImage;");
    sp.write("bootm 0x48000000;");
    sp.write("\n");
  });
});
index.htlm
<!DOCTYPE HTML>
<html>
<head>
  <meta charset="UTF-8">
  <title>test</title>
  <script type="text/javascript" src="jquery.js"></script>
  <script src="/socket.io/socket.io.js"></script>
  <script type="text/javascript">
    var url = location.protocol + "//" + location.host;
    var io = io.connect(url);
    io.on("connect", function () {});
    io.on("buffer", function (data) {
      $("#buffer").append("<span>" + data + "<br/></span>");
    });
    $(document).ready(function() {
      $("#boot").on("click", function() {
        console.log("boot");
        io.emit("boot");
      });
    });
  </script>
  <style>
    *{
      font-size:14px;
      padding:0;
      height: 100%;
    }
    div.console {
      margin:10px;
      background-color: #000;
      color : #fff;
      padding: 10px;
      width : 80%;
      height: 80%;
      border-radius : 5px;
      overflow: scroll;
    }
    #boot {
      margin:10px;
      width : 100px;
    }
  </style>
</head>
<body>
<input type='button' id="boot" value="サーバ起動">
<div id="buffer" class="console"></div>
</body>
</html>
まとめ
WEB画面で起動ノードやインストールするミドルウェアなでのプロビジョニングを管理すれば、ベアメタルクラウドの構築完了。
今回、ミドルの管理まではないが、次はミドル構築にチャレンジしてみたいと思います。
インフラ系のスキルが低いのに加え、とにかく情報が少ないのでハマります。
