Hubotで自分のスクリプトを作ってみたことがなかったので勉強がてらHubotでCodeDeployのデプロイをできるようにしてみたのでその時のメモ。
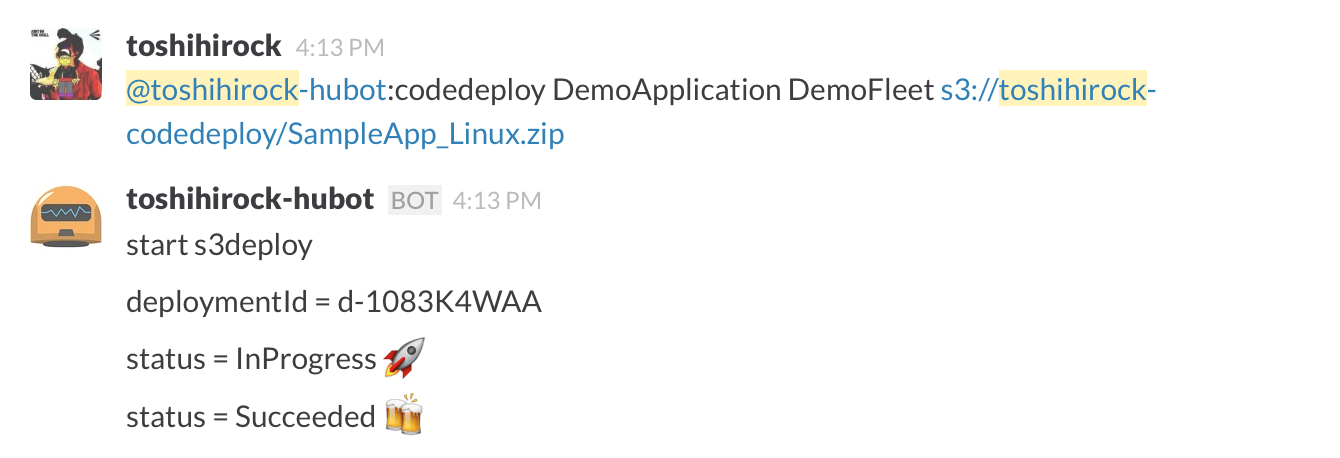
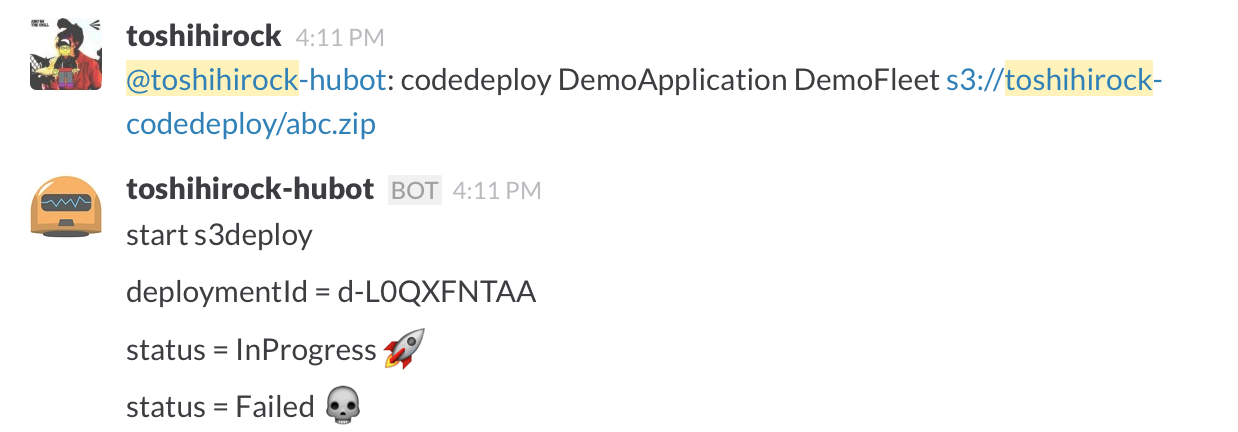
最終的には以下のようにHubot経由でCodeDeployのデプロイを実行し、結果が確認できるまでを作成しました。
参考
SlackにHubot Integrationを追加してから開発環境を整えるまで
前提
- Slack導入済み
- npmインストール
- Herokuのアカウント作成及びCLIツールの導入済み
slack側での設定
- slackのintegrationでslackを追加
- 任意のslack名を設定
-
HUBOT_SLACK_TOKENをメモっておく。
botを作ってみる
botを作ってみます。
hubotの雛形を作成するためにnpmでyoとgenerator-hubotをインストールします。
$npm install -g yo generator-hubot
次にHubot用のディレクトリを作成します。
以下のtoshihirock-hubotというフォルダ名は任意。
$mkdir -p toshihirock-hubot
$cd toshihirock-hubot
yoコマンドで雛形を作成します。OwnerやBot nameなど聞かれますが、デフォルトのままでよければenterを押せばOKです。
なお、 Bot adapter では slack を指定することでslack用のモジュールなどが追加されます。
$yo hubot
                     _____________________________
                    /                             \
   //\              |      Extracting input for    |
  ////\    _____    |   self-replication process   |
 //////\  /_____\   \                             /
 ======= |[^_/\_]|   /----------------------------
  |   | _|___@@__|__
  +===+/  ///     \_\
   | |_\ /// HUBOT/\\
   |___/\//      /  \\
         \      /   +---+
          \____/    |   |
           | //|    +===+
            \//      |xx|

? Owner: toshihirock <hogefuga@gmail.com>
? Bot name: toshihirock-hubot
? Description: A simple helpful robot for your Company
? Bot adapter: (campfire) slack
? Bot adapter: slack
...
上記で雛形のファイル群が作成されます。
次に以下のコマンドでローカル環境にてhubotを起動してみます。Heroku用のモジュールもデフォルトでインストールされており、環境変数が設定されていないと怒らせますが、動くので無視で大丈夫です。
$./bin/hubot
toshihirock-hubot> [Tue Sep 01 2015 11:10:56 GMT+0900 (JST)] ERROR hubot-heroku-alive included, but missing HUBOT_HEROKU_KEEPALIVE_URL. `heroku config:set HUBOT_HEROKU_KEEPALIVE_URL=$(heroku apps:info -s  | grep web_url | cut -d= -f2)`
[Tue Sep 01 2015 11:10:56 GMT+0900 (JST)] INFO hubot-redis-brain: Using default redis on localhost:6379

>toshihirock-hubot, ping
>PONG
大丈夫そうなので、このコードの内容でGitリポジトリを作成し、コミットします。(Herokuはgit pushでデプロイする形のため)
$git init
$git add .
$git commit -m "Initial commit"
次にherokuのCLIコマンドを使ってログイン認証します。
herokuコマンド未インストールの場合には以下を参考にインストールすること。
$heroku login
Enter your Heroku credentials.
Email: hogefuga@gmail.com
Password (typing will be hidden):
Authentication successful.
次にHerokuでhubot用のアプリケーションを作成します。
$heroku create toshihirock-hubot
上記でHeroku上でtoshihirock-hubotというアプリが作成され、gitの設定にもherokuのデプロイ先のurlが登録されました。
$git config -l |grep heroku
remote.heroku.url=https://git.heroku.com/hogefuga.git
remote.heroku.fetch=+refs/heads/*:refs/remotes/heroku/*
次にHerokuでredisのアドオンを使う設定をします。
Herokuでは無料でredisを使えるプラン(nanoというプラン。インスタンスサイズは5MB)があるのでそれを使います。
$heroku addons:create redistogo:nano
 !    Please verify your account to install this add-on plan (please enter a credit card) For more information, see https://devcenter.heroku.com/categories/billing Verify now at https://heroku.com/verify
むむむ。。。どうやら無料プランでもクレジットカード入力しないとだめっぽい。。。どうせ無料なので登録します(redisを使わなければ登録しなくても良い)。完了後、再度コマンドを実行してみます。
$heroku addons:create redistogo:nano
Creating redistogo-shapely-2010... done, (free)
Adding redistogo-shapely-2010 to hogefuga... done
Setting REDISTOGO_URL and restarting toshihirock-hubot... done, v3
Use `heroku addons:docs redistogo` to view documentation.
次にHerokuで利用する環境変数を設定します。まずはSlackとHubotのintegration設定をした時のHUBOT_SLACK_TOKENを設定します。
$heroku config:set HUBOT_SLACK_TOKEN=[token]
次にapps:infoコマンドでアプリの情報を確認します。
$heroku apps:info

=== hogefuga
Addons:        redistogo:nano
Dynos:         0
Git URL:       https://git.heroku.com/hogefuga.git
Owner Email:   hogefuga@gmail.com
Region:        us
Stack:         cedar-14
Web URL:       https://hogefuga.herokuapp.com/
Workers:       0
上記でWebURLとなっている部分を環境変数HUBOT_HEROKU_KEEPALIVE_URLで設定します。
$heroku config:set HUBOT_HEROKU_KEEPALIVE_URL=[hubot app url]
Herokuへデプロイします。
$git push heroku master
Slack上でpingが通ればOKです。
Hubotで定期的な発言を行うようにする
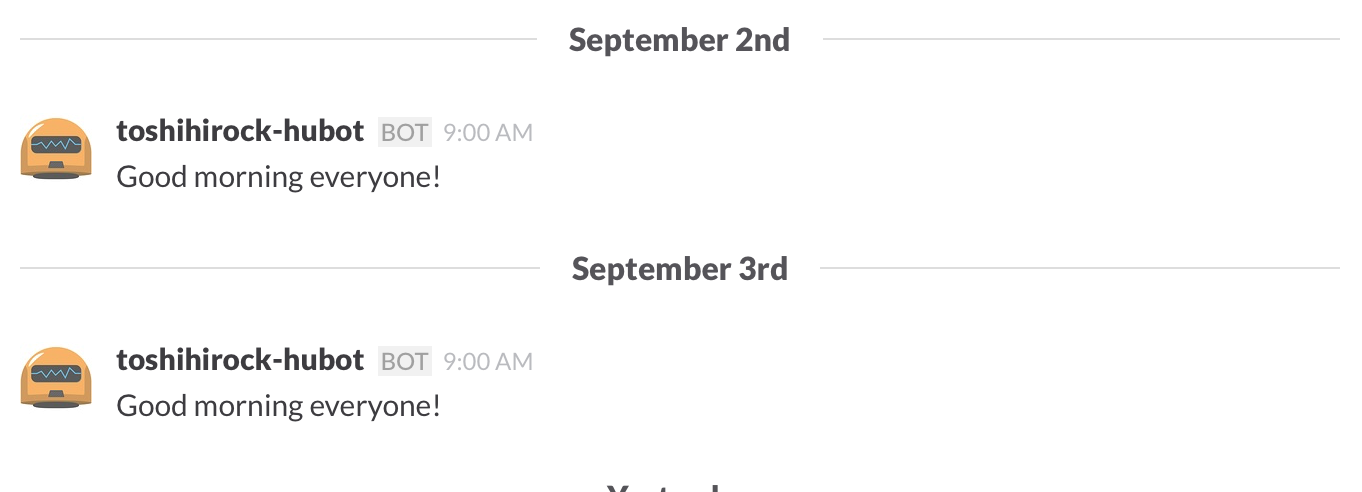
Hubotで定期的に発言(毎日10時に朝会がある旨のコメントなど)を行うために以下にを利用します。
まず、HerokuのTimeZoneを東京の設定に変更します。
$heroku config:add TZ=Asia/Tokyo
Setting config vars and restarting hogefuga... done, v7
TZ: Asia/Tokyo
環境変数の設定が正しくできているか確認します。
$heroku config
設定を追記
-  "hubot-shipit"

+  "hubot-shipit",
+  "hubot-cron"
-    "hubot-slack": "^3.3.0",
+    "hubot-slack": "^3.3.0"
+    "hubot-cron": ">= 0.1.0"
以下のコマンドでインストール。
$npm install
ローカルで試してみます。
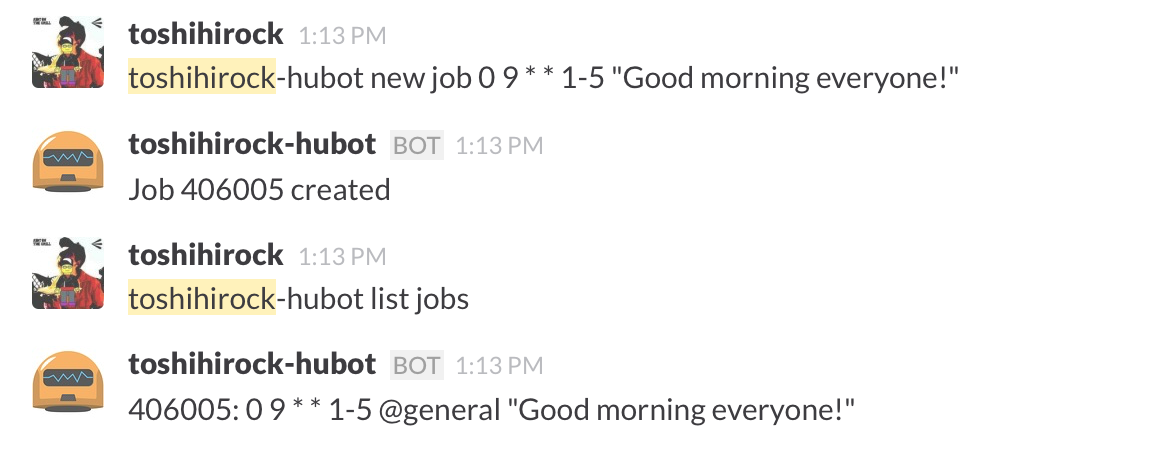
toshihirock-hubot> toshihirock-hubot new job 40 11 * * 1-5 "Good morning everyone!"
toshihirock-hubot> Job 209046 created
起動したまま、少し待ちます
toshihirock-hubot> Good morning everyone!
動作しましたのでHerokuにデプロイします。
$git add .
$git commit -m "add hubot-cron"
$git push heroku master
上記によってHerokuにはデプロイできているはずなのに、pingコマンドすら通らなくなってしまいました。。。
で、色々調べてたら以下の記事が。。。
Herokuの新しいプライシングがついに公開。Freeは1日6時間以上Sleepする必要あり
- 30分以上inactivityの場合にはsleep状態になる
- 1日で6時間はsleepする必要がある
で、今回は上記の30分以上がないためにinactivity状態となり、hubotで命令を受けることができない状態になっていたようです。
sleep状態をやめるためにheroku apps:infoのWebURLで表示されるURLにアクセスします。
アクセス後は正しく動きました。
ただし、毎日6時間はsleepさせる必要があるというのはどうしたものかと思っていたら良い解決策が記載された記事が!
これで正しく動くようになりました。素晴らしい。
独自のスクリプトを設定する
既存のものを使わず、自分で独自のスクリプトを作ってみます。
module.exports = (robot) ->
  robot.hear /おはよう/i, (msg) ->
    msg.send "Good morning!"

  robot.respond /こんにちは/i, (msg) ->
    msg.reply "Hello!"

  robot.respond /こんばんわ/i, (msg) ->
    msg.emote "Good evening!"
実行結果は以下のとおり。
toshihirock-hubot> おはよう
toshihirock-hubot> Good morning!

toshihirock-hubot> toshihirock-hubot こんにちは
toshihirock-hubot> Shell: Hello!

toshihirock-hubot> toshihirock-hubot こんばんわ
toshihirock-hubot> * Good evening!
今までと同じようにデプロイしてみます。
上記と同じように動きました。(emoteが単純にreplyと同じ形の表示となっていた)
AWS SDKを使ってhubot経由でCodeDeployを実行する
色々遠回りしましたが、本題です。
以下を参考に作成してみました。
slack経由でhubotからAWS SQSにキューを入れる
JavaScriptの正規表現の箇所は以下を参考にしました。
ローカルでテストする
AWS SDKを使うようにpackge.jsonにその旨を追記。
-   "hubot-cron": ">= 0.1.0"
+   "hubot-cron": ">= 0.1.0",
+   "aws-sdk": ">= 2.0.9"
以下のコマンドでインストール。
$npm install
あとはローカルでテストしつつ、最後にHerokuにデプロイすればOK
herokuから使えるようにする
AWS SDKを使うためにはAccessKey,SecretyKeyが必要なので設定します。
$heroku config:add AWS_ACCESS_KEY_ID=hoge
$heroku config:add AWS_SECRET_ACCESS_KEY=fuga
コード
以下のような感じです。
aws  = require('aws-sdk')
aws.config.update region: 'ap-northeast-1'
codedeploy = new aws.CodeDeploy

getDeploymentStatus = (msg, id) ->
  params = {
     deploymentId: id
  }

  tmp  = ''
  timer = setInterval(->
    codedeploy.getDeployment params, (err, data) ->
      text = ''
      if err
        msg.send err.message
      else
        status = data.deploymentInfo.status
        text += "status = #{status}"
        switch status
          when 'Succeeded'
            text += ' :beers:'
          when 'Failed'
            text += ' :skull:'
          when 'Stopped'
            text += ' :camel:'
          when 'InProgress'
            text += ' :rocket:'
        msg.send text unless text is tmp
        tmp = text
        if status is 'Succeeded' || status is 'Failed' || status is 'Stopped'
          clearInterval timer

  , 1000)


s3deploy = (msg, name, group, bucket, key, extension)->
  msg.send "start s3deploy"
  params = {
    applicationName: name
    deploymentGroupName: group
    deploymentConfigName: 'CodeDeployDefault.OneAtATime'
    description: 'desc'
    ignoreApplicationStopFailures: false
    revision:
      revisionType: 'S3'
      s3Location:
        bucket: bucket
        bundleType: extension
        key: key
  }

  codedeploy.createDeployment params, (err, data) ->
    if err
      msg.send err.message
    else
      msg.send "deploymentId = #{data.deploymentId}"
      getDeploymentStatus msg, data.deploymentId

deploy = (msg, name, group, path) ->
  if (/^s3:\/\//.test(path))
    s3path = path.replace(/s3:\/\//g, '')

    bucket = ((s3path.split('/'))[0])

    key = s3path.replace(new RegExp(bucket + '/', 'g'), '')

    reg = /(.*)(?:\.([^.]+$))/
    extension = s3path.match(reg)[2]
    s3deploy(msg, name, group, bucket, key, extension)
  else
    msg.send 'support S3 only'

module.exports = (robot) ->
  robot.respond /(?:codedeploy) (.*) (.*) (.*)/i, (msg) ->
    deploy msg, msg.match[1], msg.match[2], msg.match[3]
使ってみる
以下のような感じ使えます。
- hubot [Application Name] [Deployment Group Name] [S3file path]
- CodeDeployのアプリ、グループは作成済みの前提
- S3のファイルもアップロード済みの前提


