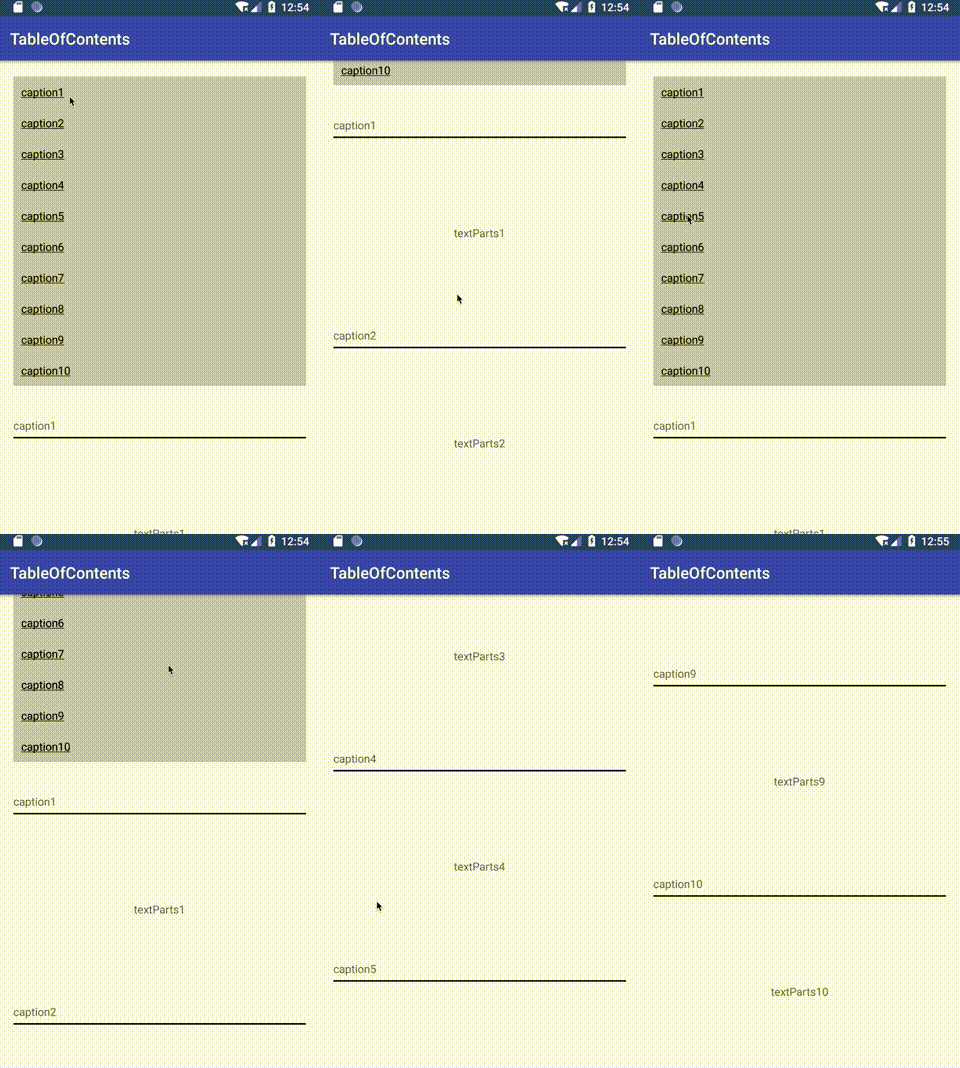
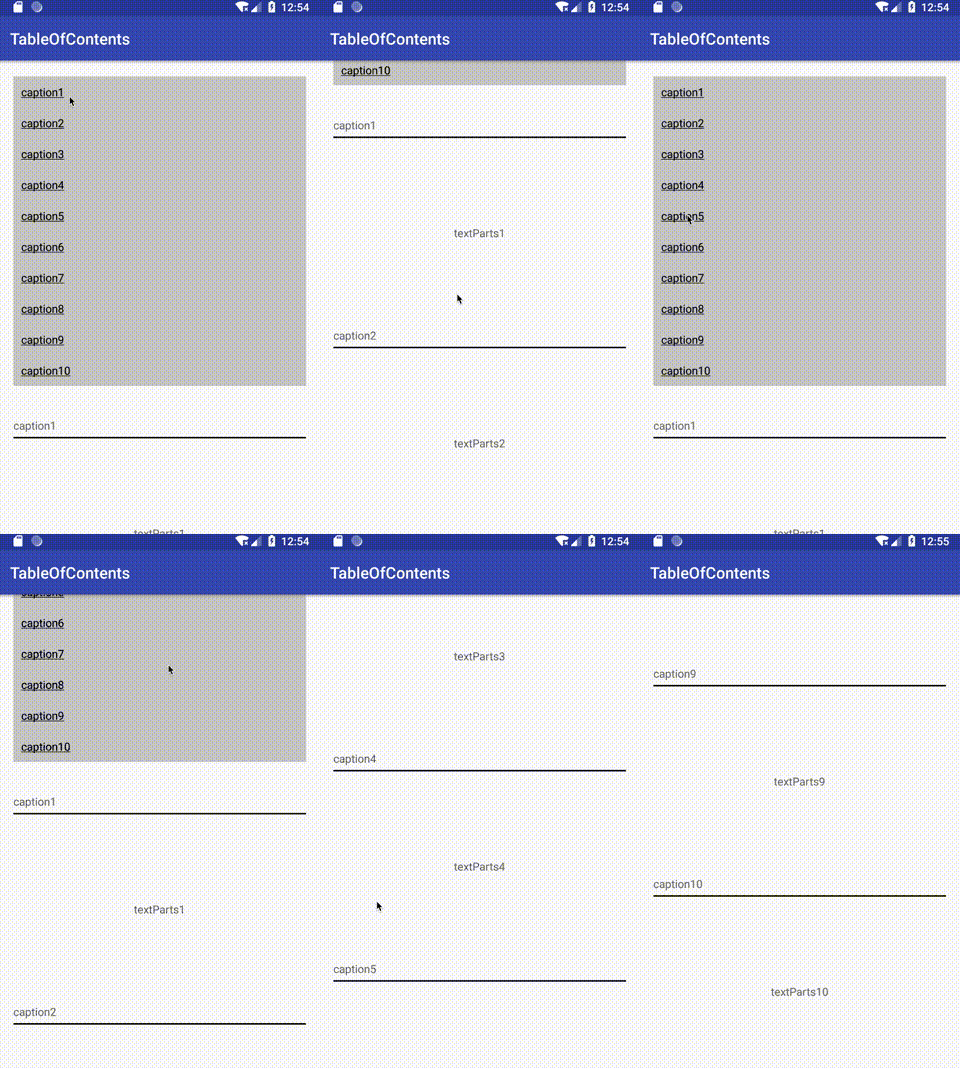
完成イメージ
目次パーツ、見出しパーツ、テキストパーツからなる。
画面上部に目次があり、タップすると対応する見出し部分にスクロールする。

開発環境の設定
開発言語にKotlinを使用し、 databindingを活用していく。その他、ライブラリとしてEpoxyを導入する。
build.gradle
...
apply plugin: 'kotlin-kapt'

android {
    ...
    dataBinding {
        enabled = true
    }
}

kapt {
    generateStubs = true
    correctErrorTypes = true
}

dependencies {
    ...
    implementation 'com.airbnb.android:epoxy:2.10.0'
    kapt 'com.airbnb.android:epoxy-processor:2.10.0'
    implementation 'com.airbnb.android:epoxy-databinding:2.10.0'
    ...
}
メインのレイアウト
RecyclerViewのみを配置する。
activity_main.xml
<layout xmlns:android="http://schemas.android.com/apk/res/android"
    xmlns:app="http://schemas.android.com/apk/res-auto"
    xmlns:tools="http://schemas.android.com/tools" >

    <FrameLayout
        android:layout_width="match_parent"
        android:layout_height="match_parent">

        <android.support.v7.widget.RecyclerView
            android:id="@+id/recyclerView"
            app:layoutManager="android.support.v7.widget.LinearLayoutManager"
            android:layout_width="match_parent"
            android:layout_height="match_parent" />

    </FrameLayout>

</layout>
目次パーツのレイアウト
リンクのテキストを入れるためのLinearLayoutのみを配置しておく。
table_of_contents.xml
<layout xmlns:android="http://schemas.android.com/apk/res/android" >

    <LinearLayout
        android:id="@+id/container"
        android:background="#cccccc"
        android:layout_margin="20dp"
        android:orientation="vertical"
        android:layout_width="match_parent"
        android:layout_height="wrap_content" />

</layout>
中身のリンク部分のレイアウトは以下となる。上記のLinearLayoutに下記のレイアウトのviewを動的にaddViewしていく。
リンクがタップされたらコールバックを返す。
link.xml
<layout xmlns:android="http://schemas.android.com/apk/res/android" >

    <data>

        <variable name="link" type="com.example.tomo.tableofcontents.Link" />
        <variable name="callback" type="com.example.tomo.tableofcontents.TableOfContentsCallback" />

    </data>

    <FrameLayout
        android:onClick="@{() -> callback.onClickLink(link)}"
        android:background="?attr/selectableItemBackground"
        android:orientation="vertical"
        android:padding="10dp"
        android:layout_width="match_parent"
        android:layout_height="wrap_content">

        <TextView
            android:id="@+id/title"
            android:text="@{link.title}"
            android:textColor="#000000"
            android:layout_width="wrap_content"
            android:layout_height="wrap_content" />

    </FrameLayout>

</layout>
見出しパーツのレイアウト
caption_parts.xml
<layout xmlns:android="http://schemas.android.com/apk/res/android"
    xmlns:tools="http://schemas.android.com/tools">

    <data>

        <variable name="caption" type="com.example.tomo.tableofcontents.Content.CaptionParts" />

    </data>

    <LinearLayout
        android:padding="20dp"
        android:orientation="vertical"
        android:layout_width="match_parent"
        android:layout_height="wrap_content">

        <TextView
            android:text="@{caption.title}"
            android:layout_width="wrap_content"
            android:layout_height="wrap_content"
            tools:text="text"
            />

        <View
            android:background="#000000"
            android:layout_marginTop="5dp"
            android:layout_width="match_parent"
            android:layout_height="2dp" />

    </LinearLayout>

</layout>
テキストパーツのレイアウト
text_parts.xml
<layout xmlns:android="http://schemas.android.com/apk/res/android" >

    <data>

        <variable name="text" type="String" />

    </data>

    <FrameLayout
        android:layout_width="match_parent"
        android:layout_height="200dp">

        <TextView
            android:text="@{text}"
            android:layout_gravity="center"
            android:layout_width="wrap_content"
            android:layout_height="wrap_content" />

    </FrameLayout>

</layout>
package-info.javaの作成
EpoxyにレイアウトファイルからBindingModel_クラスを自動生成してもらうために、package-info.javaを作成する。参考
package-info.java
@EpoxyDataBindingLayouts({
        R.layout.table_of_contents_parts,
        R.layout.text_parts,
        R.layout.caption_parts,
})
package com.example.tomo.tableofcontents;

import com.airbnb.epoxy.EpoxyDataBindingLayouts;
データクラスの作成
目次パーツ、見出しパーツ、テキストパーツのデータ定義を作成する。目次と見出しを紐付けるために、内部的にtagを持たせている。
Data.kt
package com.example.tomo.tableofcontents

data class Data(val contents: List<Content>)

sealed class Content {
    data class TableOfContentsParts(val links: List<Link>) : Content()
    data class CaptionParts(val tag: String, val title: String) : Content()
    data class TextParts(val text: String) : Content()
}

data class Link(val tag: String, val title: String)
EpoxyContollerの作成
データが設定されたら、それぞれviewを構築していく。
目次パーツの中のリンク部分については、動的にviewをinflateし、addViewしていく。
EpoxyController.kt
package com.example.tomo.tableofcontents

import android.content.Context
import android.databinding.DataBindingUtil
import android.graphics.Paint
import android.view.LayoutInflater
import com.airbnb.epoxy.TypedEpoxyController
import com.example.tomo.tableofcontents.databinding.LinkBinding
import com.example.tomo.tableofcontents.databinding.TableOfContentsPartsBinding

class EpoxyController(private val context: Context, private val callback: TableOfContentsCallback) : TypedEpoxyController<Data>() {

    override fun buildModels(data: Data) {

        data.contents.forEach {
            when (it) {
                is Content.TableOfContentsParts -> {
                    val inflater = context.getSystemService(Context.LAYOUT_INFLATER_SERVICE) as LayoutInflater
                    TableOfContentsPartsBindingModel_()
                            .onBind { model, view, position ->
                                val container = (view.dataBinding as TableOfContentsPartsBinding).container
                                if (container.childCount == 0) {
                                    it.links.forEach {
                                        val binding = DataBindingUtil.inflate<LinkBinding>(inflater, R.layout.link, null, false)
                                        binding.link = it
                                        binding.callback = callback
                                        binding.title.paintFlags = binding.title.paintFlags or Paint.UNDERLINE_TEXT_FLAG
                                        container.addView(binding.root)
                                    }
                                }
                            }
                            .id(modelCountBuiltSoFar)
                            .addTo(this)
                }

                is Content.CaptionParts -> {
                    CaptionPartsBindingModel_()
                            .id(modelCountBuiltSoFar)
                            .caption(it)
                            .addTo(this)
                }

                is Content.TextParts -> {
                    TextPartsBindingModel_()
                            .id(modelCountBuiltSoFar)
                            .text(it.text)
                            .addTo(this)
                }
            }
        }
    }
}
MainActivity.ktの作成
テスト用のデータを作成し、EpoxyControllerに設定している。
目次のリンクがタップされたらコールバックメソッドが呼び出され、一致するタグの見出し位置が画面のトップとなるようsmooth scrollさせる。
MainActivity.kt
package com.example.tomo.tableofcontents

import android.databinding.DataBindingUtil
import android.support.v7.app.AppCompatActivity
import android.os.Bundle
import android.support.v7.widget.LinearLayoutManager
import com.example.tomo.tableofcontents.databinding.ActivityMainBinding
import android.support.v7.widget.LinearSmoothScroller

class MainActivity : AppCompatActivity(), TableOfContentsCallback {

    private val binding: ActivityMainBinding by lazy { DataBindingUtil.setContentView<ActivityMainBinding>(this, R.layout.activity_main) }
    private val controller: EpoxyController by lazy { EpoxyController(this, this) }

    override fun onCreate(savedInstanceState: Bundle?) {
        super.onCreate(savedInstanceState)

        val contents = listOf(
                Content.TableOfContentsParts(listOf(
                        Link("tag1", "caption1"),
                        Link("tag2", "caption2"),
                        Link("tag3", "caption3"),
                        Link("tag4", "caption4"),
                        Link("tag5", "caption5"),
                        Link("tag6", "caption6"),
                        Link("tag7", "caption7"),
                        Link("tag8", "caption8"),
                        Link("tag9", "caption9"),
                        Link("tag10", "caption10")
                )),
                Content.CaptionParts("tag1", "caption1"), Content.TextParts("textParts1"),
                Content.CaptionParts("tag2", "caption2"), Content.TextParts("textParts2"),
                Content.CaptionParts("tag3", "caption3"), Content.TextParts("textParts3"),
                Content.CaptionParts("tag4", "caption4"), Content.TextParts("textParts4"),
                Content.CaptionParts("tag5", "caption5"), Content.TextParts("textParts5"),
                Content.CaptionParts("tag6", "caption6"), Content.TextParts("textParts6"),
                Content.CaptionParts("tag7", "caption7"), Content.TextParts("textParts7"),
                Content.CaptionParts("tag8", "caption8"), Content.TextParts("textParts8"),
                Content.CaptionParts("tag9", "caption9"), Content.TextParts("textParts9"),
                Content.CaptionParts("tag10", "caption10"), Content.TextParts("textParts10")
        )
        val data = Data(contents)

        controller.setData(data)
        binding.recyclerView.adapter = controller.adapter
    }

    override fun onClickLink(link: Link) {
        val smoothScroller = object : LinearSmoothScroller(this) {
            override fun getVerticalSnapPreference(): Int {
                return LinearSmoothScroller.SNAP_TO_START
            }
        }
        for (itemIdx in 0 until controller.adapter.itemCount) {
            val model = controller.adapter.getModelAtPosition(itemIdx)
            if (model is CaptionPartsBindingModel_ && link.tag == model.caption().tag) {
                val layoutManager = binding.recyclerView.layoutManager as LinearLayoutManager
                smoothScroller.targetPosition = itemIdx
                layoutManager.startSmoothScroll(smoothScroller)
                break
            }
        }
    }
}
TableOfContentsCallback.kt
package com.example.tomo.tableofcontents

interface TableOfContentsCallback {
    fun onClickLink(link: Link)
}
まとめ
RecyclerViewとEpoxyを使用して目次機能付き画面ができた。![]()
