AWS Device Farm Gradle Plugin を導入した話。
(Instrumentation で試しましたが、Appium 等でも同じ方法でいけるはず)
効果
Android Studio から ./gradlew devicefarmUpload で Device Farm のテスト実行ができて便利!
(※但し、呼び出しに限る。結果は Web で!)
準備
前提
- Android Studio で何らかの Instrumentation テストが記述されているプロジェクトがある
- なければ、↓あたりを使って下さい。
- AWS Device Farm Sample App for Android(AWS 公式サンプル)
- DeviceFarmSampleAndroid (自分が作ったコンパクトなサンプル)
- AWS のアカウントを持っている
- なければ、こちら から登録を!
- AWS Device Farm で何らかのプロジェクトを作成済み(ここでは
DeviceFarmSampleAndroidとする)- なければ、AWS Device Farm を開いて
Create a new projectを!
- なければ、AWS Device Farm を開いて
build.gradle への追記
buildscript {
    repositories {
        mavenLocal()
        mavenCentral()
    }
    dependencies {
        classpath 'com.android.tools.build:gradle:1.3.0'
        classpath 'com.amazonaws:aws-devicefarm-gradle-plugin:1.2'
    }
}
apply plugin: 'devicefarm'

devicefarm {
    projectName "DeviceFarmSampleAndroid" // required: Must already exists.
    devicePool "Top Devices" // optional: Defaults to "Top Devices"
    authentication {
        accessKey "aws-iam-user-accesskey"
        secretKey "aws-iam-user-accesskey"
    }
}
IAM ユーザを作成して、accessKey / secretKey を取得する
(IAM : Identity and Access Management)
Step 3: Generating an IAM User のとおりです。
ユーザ作成後に、accessKey / secretKey が表示され、ダウンロード可能なので控えておいて下さい。
ハマった点として、
14. Paste the following policy into Policy Document.
は
    {
        "Version": "2012-10-17",
        "Statement": [
            {
                "Sid": "DeviceFarmAll",
                "Effect": "Allow",
                "Action": [ "devicefarm:*" ],
                "Resource": [ "*" ]
            }
        ]
    }
をコピペすると、
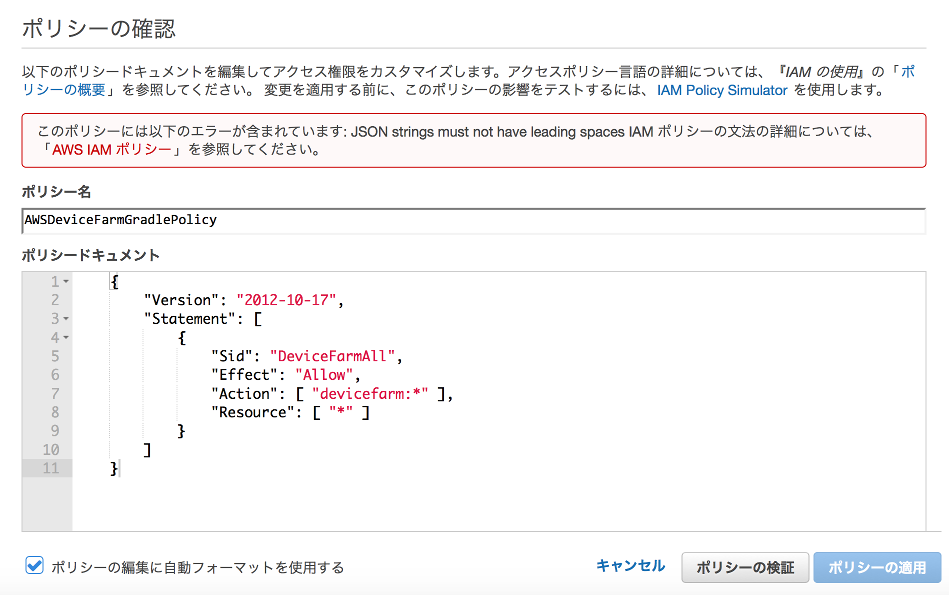
になってしまいます。。。
どうやら、行先頭のタブが邪魔しているので、
{
    "Version": "2012-10-17",
    "Statement": [
        {
            "Sid": "DeviceFarmAll",
            "Effect": "Allow",
            "Action": [ "devicefarm:*" ],
            "Resource": [ "*" ]
        }
    ]
}
を貼り付ける必要がありました。
実行設定(オプション)
テストのフィルタ設定などができます。
Step 4: Configuring Test Types 参照。
instrumentation の場合、
instrumentation {
    filter "test filter per developer docs" // optional
}
でフィルタ設定ができるようです。
実行
- accessKey / secretKey を
app/build.gradleに設定 -
./gradlew devicefarmUploadを実行
$ ./gradlew devicefarmUpload
AWS Device Farm Plugin version 1.2
AWS Device Farm configuration is VALID
:app:preBuild UP-TO-DATE
(…中略…)
:app:assembleDebugAndroidTest UP-TO-DATE
:app:devicefarmUpload
Using Project "DeviceFarmSampleAndroid", "arn:aws:devicefarm:us-west-2:XXXXX:project:XXXXX"
Using Device Pool "Nexus 5 5.0.1", "arn:aws:devicefarm:us-west-2:XXXXX:devicepool:XXXXX"
Will test app in  "app-debug.apk", "arn:aws:devicefarm:us-west-2:XXXXX:upload:XXXXX"
Will run tests in app-debug-androidTest-unaligned.apk, arn:aws:devicefarm:us-west-2:XXXXX:upload:XXXXX
View the INSTRUMENTATION run in the AWS Device Farm Console: https://console.aws.amazon.com/devicefarm/home?#/projects/XXXXX/runs/XXXXX

BUILD SUCCESSFUL

Total time: 30.645 secs
あくまでも呼び出しに過ぎないので、結果は自分で見に行く必要があります。。。
View the INSTRUMENTATION run in the AWS Device Farm Console: https://...
で記された URL を開くと、
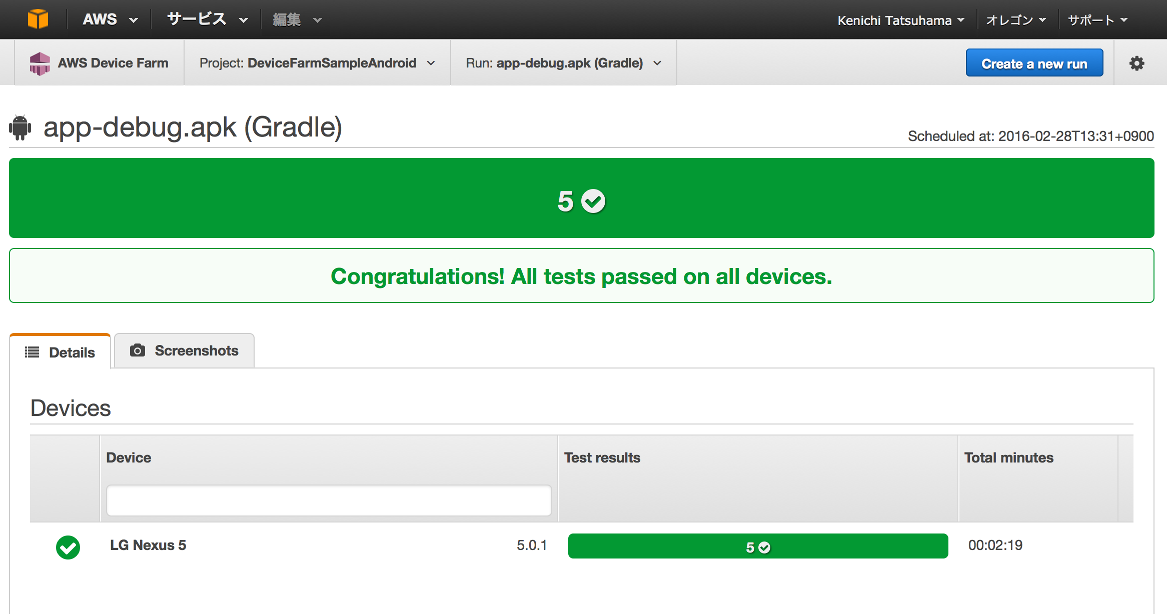
が表示されます。(※スクショは完了時のモノ)
補足
plugin のバージョン
※2016/02/28時点で、Step 2: Setting up the AWS Device Farm Gradle Plugin には
classpath 'com.amazonaws:aws-devicefarm-gradle-plugin:1.0'
と書かれていますが、1.0 では
AWS Device Farm configuration is NOT VALID (with valid config)
が修正されていないので、少なくとも 1.1 以上を使っておく必要があります。
1.0 だと、実行すると
AWS Device Farm configuration is NOT VALID が表示されます。
(しばらくハマった。。。)
Jenkins plugin
JenkinsからAWS DeviceFarmを使ってAndroidのInstrumentationテストを実行する 参照。
結果が Jenkins 上で見れるので、Jenkins plugin の方が結果も見ることができて良さ気。