背景
FCM(Firebase Cloud Messaging)とFirebase Cloud Functionsでプッシュ通知を送るので少し苦戦したので、メモ的な感覚で実装方法を残しておきます。
トークアプリでメッセージを送信した時に相手に通知を送信するパターンを例にしようと思います。(画面等は実装せず裏側の処理のみ記載していきます。)
前提条件
- プッシュ通知が届く設定ができている
- できていない場合はこちらを参考に設定してみてください(IOSの設定)
- Firebaseとアプリの連携はできている
FCMで特定の端末にプッシュ通知を送る方法
FCMトークンを指定してプッシュ通知を送信する(今回はこちらの実装)
トピックを登録してプッシュ通知を送信する
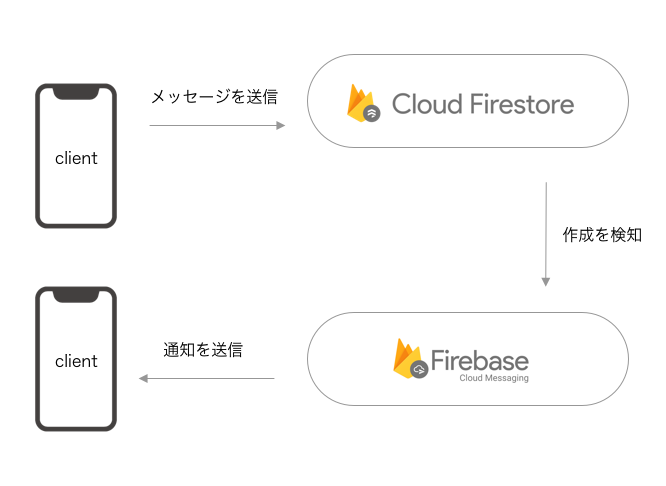
今回の実装の流れ
- アプリ側でFCMトークンを取得してFirestoreのUsersコレクションに保存(1端末1FCMトークン)
- メッセージをFirestoreに更新(FieldにUserのドキュメントIDを保存)
- メッセージデータの作成をキーにCloudFunctionsで通知を送信する処理を実装
実装
1.アプリ側でFCMトークンを取得する
こちらの記事を参考に実装しました!
※Firebaseの設定等は下記記事を参考にしてください。
https://dev.classmethod.jp/articles/flutter_fcm_push1/
ライブラリのインストール
pubspec.yaml
dependencies:
   firebase_messaging: ^6.0.16
コードを実装
main.dart
import 'package:firebase_messaging/firebase_messaging.dart';  // ライブラリのインポート

void main() {
  runApp(MyApp());
}

// 省略
class _MyHomePageState extends State<MyHomePage> {

  final FirebaseMessaging _firebaseMessaging = new FirebaseMessaging();

  @override
  void initState() {
    super.initState();
    _firebaseMessaging.requestNotificationPermissions(
        const IosNotificationSettings(sound: true, badge: true, alert: true));
    _firebaseMessaging.onIosSettingsRegistered
        .listen((IosNotificationSettings settings) {
      print("Settings registered: $settings");
    });
    _firebaseMessaging.getToken().then((String token) {
      assert(token != null);
      // tokenの中にFcmTokenが入ってる
      print("Push Messaging token: $token");
      // firestoreへtokenの更新を行う
      // 省略
    });
  }
}
更新内容
以下のように更新するようにする
2.メッセージをFirestoreに更新
今回は簡単のため(CloudFunctionsで通知を送るのがメイン)以下のようなデータが送信されるとします。

3.メッセージデータの作成をキーにCloudFunctionsで通知を送信する処理を実装
Cloud Functionsのはじめのデプロイまでは以下の記事を参考にしてください。
https://firebase.google.com/docs/functions/get-started?hl=ja
今回はTypeScriptで実装しています。
index.ts
const functions = require('firebase-functions');
const admin = require('firebase-admin');
admin.initializeApp(functions.config().firebase);
export const firestore = admin.firestore();

// プッシュ通知を送る関数
const sendPushNotification = function(token:string,title:string,body:string,badge:string) {

    const payload = {
        notification: {
            title: title,
            body: body,
            badge: badge,
            sound:"default"
        }
    };
    const option = {
        priority: "high"
    };
    // ここで実際に通知を送信している
    admin.messaging().sendToDevice(token,payload,option);
}

// 新規依頼作時
export const createMessage = functions.firestore.document('/message/{message}')
    .onCreate( async (snapshot, context) => {
        // ここにmessageのデータが入っている(senderId,senderName,receiverId,content)
        const message = snapshot.data()
        const receiverRef = firestore.collection("Users").doc(message["receiverId"])
        // 受信者の情報にアクセスする
        receiverRef.get().then(function(doc){
                if (doc.exists === true) {
                    // 受信者の情報を取得(name,fcmToken)
                    const receiver = doc.data()
                    const fcmToken = receiver["fcmToken"]
                    const senderName = message["senderName"]
                    const content = message["content"]
                    // 通知のタイトル
                    const title = `$senderName`
                    // 通知の内容
                    const body = `$content`
                    sendPushNotification(fcmToken,title,body,"1");
                    console.log("newMessage")
                 } else {
                    console.log("notExists")
                }
            })
})
最後に
FCMを使うとかなり簡単にPush通知を実装することができました!
今はそのままFCMTokenをFirestoreに保存してるけど、実際はサブコレクションとかでセキュリティの設定しておいた方が良さそう。

