前回はReact+Reduxを使って、カウントアップタイマーを作ってみました。
今回はReactと同様にコンポーネントベースの軽量なViewライブラリであるRiotを使って、同様のアプリケーションを作ってみたいと思います。
開発環境の構築
前回と同様にビルドツールとしてwebpackを使い、babel-loaderを使ってES6のコンパイルをしていきます。
またRiotではカスタムタグと呼ばれるもので、コンポーネントを定義していきます。
そのため、カスタムタグファイルを読み込むために、tag-loaderを利用します。
$ npm i --save-dev webpack babel babel-core babel-loader tag-loader
webpackの設定をしていきます。
webpack.config.jsを次の内容で作成します。
module.exports = {
  entry: './js/main.js',
  output: {
    path: 'dist',
    filename: 'bundle.js'
  },
  module: {
    loaders: [
      { test: /\.js$|\.tag$/, exclude: /node_modules/, loader: 'babel-loader' },
      { test: /\.tag$/, exclude: /node_modules/, loader: 'tag-loader' }
    ]
  }
}
次にRiotをインストールします。
$ npm i --save riot
pakcage.jsonにwebpackを利用したビルドスクリプトを追記しておきます。
  "scripts": {
    "test": "echo \"Error: no test specified\" && exit 1",
    "build": "webpack"
  },
ディレクトリ構成
今回のアプリケーションのディレクトリ構成です。
$ tree -L 2 -I 'node_modules'
.
├── dist
│   └── bundle.js
├── index.html
├── js
│   └── main.js
├── package.json
├── tags
│   ├── timer-button.tag
│   └── timer.tag
└── webpack.config.js
カスタムタグの実装
Riotではカスタムタグを実装することで、コンポーネントを定義することができます。
カスタムタグは、関連するHTMLとJavaScriptをくっつけて再利用可能なコンポーネントとしてまとめます。
Riot.js
コンポーネントの構成は前回と同様にします。
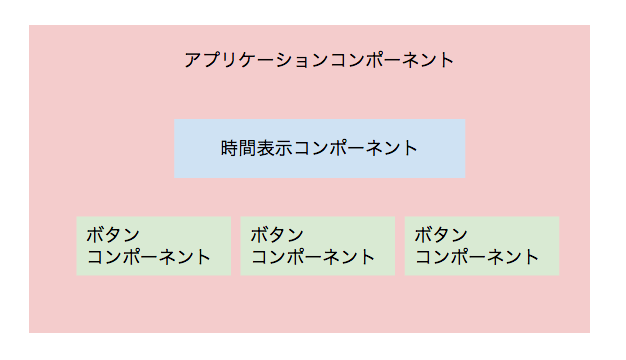
ボタンのカスタムタグを実装
ボタン部分のカスタムタグtimer-button.tagを実装していきます。
opts.titleはボタンに表示するテキストです。
opts.observableはタグのイベントを監視するための、riotが提供しているオブジェクトです。
opts.eventはボタンに割り当てる役割(START, STOP, RESET)を表しています。
ボタンのクリックイベント時に、obsarvableインスタンスを通して、opts.eventをイベント発火させることで、タイマータグにて、どのボタンが押されたかを通知します。
<timer-button>
  <button type="button" onclick={ click }>{opts.title}</button>

  <script type="text/javascript">
    this.observable = opts.observable
    this.event = opts.event

    this.click = () => {
      this.observable.trigger(this.event)
    }
  </script>
</timer-button>
タイマーのカスタムタグを実装
続いてタイマーの時間を表示するカスタムタグtimer.tagを実装していきます。
タイマータグでは、obsarvableを利用してボタンのイベントを監視します。そして、クリックされたボタンに応じて処理を実行していきます。
タイマー時間の表示の更新は、timerTag.update({time: timerTag.time + 1})とカスタムタグの内部状態を新たに更新して、表示を更新するすることで行なっています。
<timer>
  <span>{createTimeText(time)}</span>

  <script type="text/javascript">
    const self = this
    this.time = opts.time
    this.timerID = opts.timerID
    this.observable = opts.observable

    // スタートボタンのイベントを監視
    this.observable.on('start', () => startTimer(self))

    // ストップボタンのイベントを監視
    this.observable.on('stop', () => stopTimer(self))

    // リセットボタンのイベントを監視
    this.observable.on('reset', () => resetTimer(self))

    /**
     * 時間(秒)をテキストに変換
     * @param {number} time タイマーが示す時間の秒数
     */
     this.createTimeText = time => {
      // 秒数から時間を取得
      const hour = second2Hour(time)

      // 秒数から分を取得
      const minute = second2Minute(time)

      // 秒数を60進数に変換
      const second = time - (hour * 3600 + minute * 60)

      // タイマーの時間を示すテキストを生成
      return [hour, minute, second].map(zeroPadding).join(':')
    }

    /*
     * 引数で渡された数値をゼロ埋めした2桁の文字列を返す
     * @param {number} num ゼロ埋めをしたい数値
     * @return ゼロ埋めされた文字列
     */
    function zeroPadding(num) {
      return ('00' + num).slice(-2)
    }

    /**
     * 秒数から時間を取得
     * @param {number} seconds 秒数
     */
    function second2Hour(seconds) {
      return Math.floor(seconds / 3600)
    }

    /**
     * 秒数から分を取得
     * @param {number} seconds 秒数
     */
    function second2Minute(seconds) {
      return Math.floor(seconds / 60)
    }

    /**
     * タイマーを開始する
     */
    function startTimer(timerTag) {
      // 定期実行のタスクが無い時だけ、定期実行を開始
      if(!timerTag.timerID) {
        const timerID = setInterval(() => updateTimer(timerTag), 1000)
        timerTag.update({ timerID })
      }
    }

    /**
     * タイマーを止める
     */
    function stopTimer(timerTag) {
      if(timerTag.timerID) {
        clearInterval(timerTag.timerID)
      }
    }

    /**
     * タイマーをリセットする
     */
    function resetTimer(timerTag) {
      timerTag.update({ time: 0 })
    }

    /**
     * タイマーを1秒更新する
     * @param {number} time 更新前の秒数
     * @return 更新後の秒数
     */
    function updateTimer(timerTag) {
      // 明示的にupdate()を呼ぶ必要がある
      // http://riotjs.com/ja/api/#section-5
      timerTag.update({time: self.time + 1})
    }

  </script>

  <style>
    span {
      font-size: 30px;
      color: white;
    }
  </style>
</timer>
HTMLの作成
タイマーを表示するindex.htmlを作って、作成したカスタムタグを埋め込んでいきます。
<body>
  <div class="content">
    <timer></timer>
    <div class="button-list">
      <timer-button id="start-button"></timer-button>
      <timer-button id="stop-button"></timer-button>
      <timer-button id="reset-button"></timer-button>
    </div>
  </div>

  <script src="dist/bundle.js" charset="utf-8"></script>
</body>
コンポーネントのマウント
最後に、HTMLに埋め込んだカスタムタグをマウントする処理をmain.jsに実装していきます。
マウントの仕方はReactを大きくは変わらないです。
別ファイルで定義した、カスタムタグを読み込んで、それぞれ初期値を指定することで、コンポーネントをマウントしています。
特別なことは特に無いですが、注意点としてはイベント監視のために、共通のobsarvableインスタンスを渡しているところです。
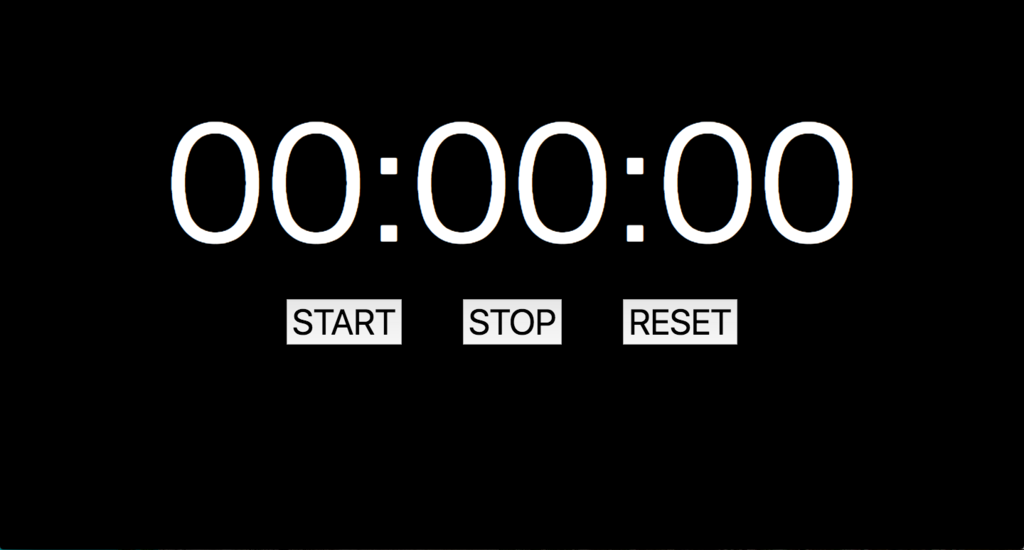
以上でカウントアップタイマーの完成です!
require('../tags/timer.tag')
require('../tags/timer-button.tag')
const riot = require('riot')

const timerObservable = riot.observable()

riot.mount('timer', {
  time: 0,
  observable: timerObservable
})

riot.mount('#start-button', {
  title: 'START',
  event: 'start',
  observable: timerObservable
})

riot.mount('#stop-button', {
  title: 'STOP',
  event: 'stop',
  observable: timerObservable
})

riot.mount('#reset-button', {
  title: 'RESET',
  event: 'reset',
  observable: timerObservable
})