前回はVue.jsでモデルを切り替えたりTweenを入れて動かしたりするまで行いました。
次は各モデルごとに詳細ページを作っていきたいと思います。
3Dモデルごとに詳細ページを作る
選択した3Dモデルごとに対応したDOMを表示させるようにします。
まずは3Dモデルの各Entityに載せたい情報が入ったHTMLを登録していきます。
今回は私の方で用意したHTMLを追加します。
中の記述は任意で変更してみてください。
[content01.html]
            <article>
              <h1 class="color-base">3Dモデルビュワー01</h1>
              <p>杏マナー杏マナー杏マナー杏マナー杏マナー杏マナー杏マナー杏マナー杏マナー杏マナー杏マナー杏マナー杏マナー杏マナー杏マナー杏マナー杏マナー杏マナー杏マナー杏マナー杏マナー杏マナー杏マナー杏マナー杏マナー杏マナー杏マナー杏マナー杏マナー杏マナー杏マナー杏マナー杏マナー杏マナー杏マナー杏マナー杏マナー杏マナー杏マナー杏マナー杏マナー杏マナー杏マナー杏マナー杏マナー杏マナー杏マナー杏マナー杏マナー杏マナー杏マナー杏マナー杏マナー杏マナー杏マナー杏マナー杏マナー杏マナー杏マナー杏マナー杏マナー杏マナー杏マナー杏マナー杏マナー杏マナー杏マナー杏マナー杏マナー杏マナー</p>
            </article>
            <article>
              <h2 class="color-base">プリミティブでも綺麗なものは作れる</h2>
              <div class="tableWrap">
                <table>
                  <tbody>
                    <tr>
                      <th class="bgcolor-sub-5">Primitive</th>
                      <td>Box/Sphere</td>
                    </tr>
                    <tr>
                      <th class="bgcolor-sub-5">Material</th>
                      <td>None</td>
                    </tr>
                    <tr>
                      <th class="bgcolor-sub-5">Collision</th>
                      <td>0On</td>
                    </tr>
                    <tr>
                      <th class="bgcolor-sub-5">RighidBody</th>
                      <td>On</td>
                    </tr>
                  </tbody>
                </table>
              </div>
            </article>
            <article>
              <h3>プリミティブでも良いところはある</h3>
              <ul>
                <li><span class="color-base">プリミティブだから</span></li>
                <ul>
                  <li><span>軽い</span></li>
                  <li><span>見栄えは気にしちゃいけない</span></li>
                </ul>
              </ul>
              <ol>
                <li><span>モデリングができなくても…</span></li>
                <li><span>プリミティブでも頑張ろう…</span></li>
              </ol>
            </article>
            <article>
              <h2>宣伝</h2>
              <p><a href="https://pcpo.sabo.jp/3dwebsite/" target="_blank"><span class="color-base">3DWebSite</span></a><span>というPlayCanvas運営事務局が作った3DのWebサイト</span><br><span>その3DWebSiteが</span><a href="https://webgl.souhonzan.org/entry/?v=1588" target="_blank"><span class="color-base">WebGL総本山</span></a><span>で紹介していただきました!</span></p>
            </article>
            <article>
              <dl>
                <dt>PlayCanvas運営事務局</dt>
                <dd>キドユウタ</dd>
              </dl>
            </article>
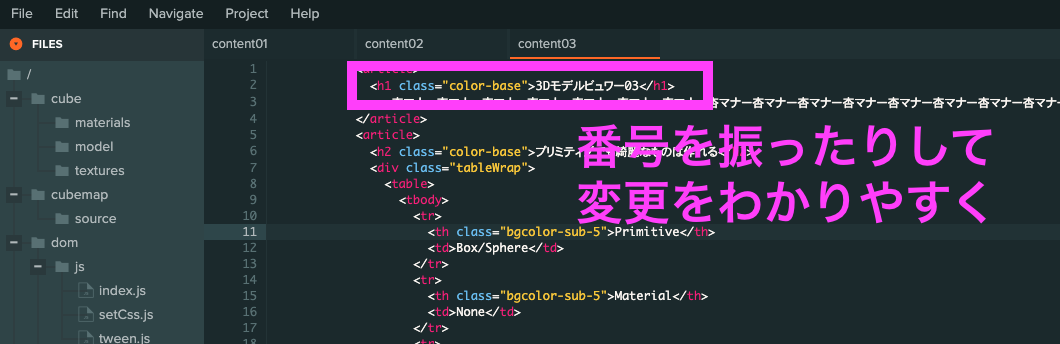
切り替えた時に中のHTMLがちゃんと切り替わっているか判断しやすくするために、HTMLは複数作っておきます。
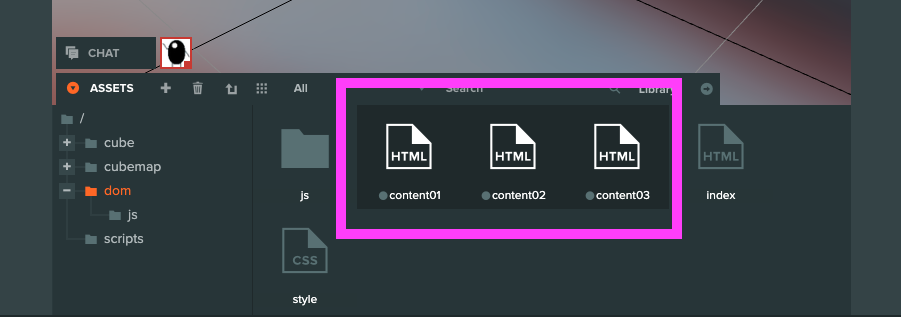
念の為、中の文章を変更するなどしておくと良いです。
作成したHTMLをそれぞれEntityに当てはめて行きます。
そのために、当てはめる用のjsを作成します。
HTMLを追加するためだけなので、属性設定に登録できるようにします。
[addhtml.js]
var Addhtml = pc.createScript('addhtml');

Addhtml.attributes.add("sethtml", {type:"asset", assetType:"html"});

Addhtml.prototype.initialize = function() {};

Addhtml.prototype.update = function(dt) {};
該当Entityを選択して、ADD COMPONENTからScriptsを選択。
ADD SCRIPTから先ほど作成したaddhtml.jsを登録し、ParseしてからHTMLを登録します。
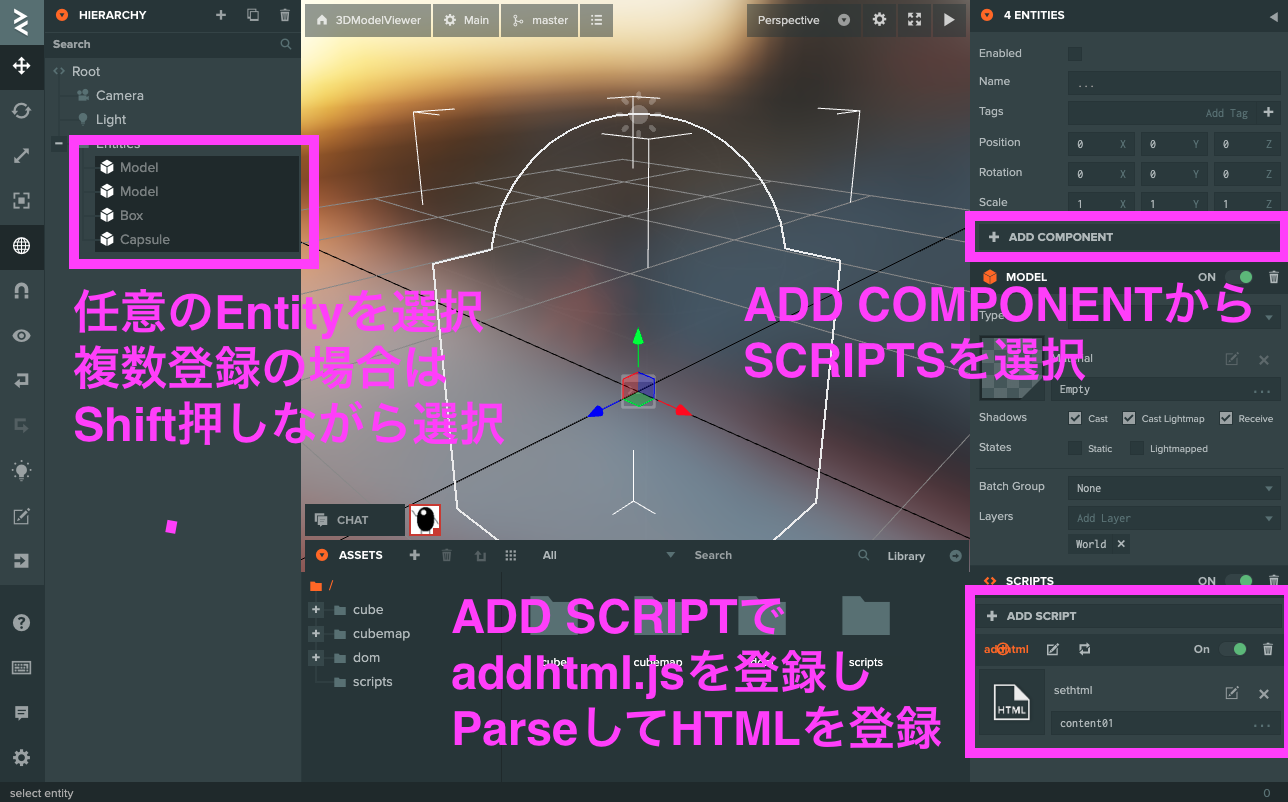
同じjsをテンプレート化して使いまわしたいというやり方がPlayCanvasのEditorではできます。
各々のEntityに登録ができるので、開発も少し楽ができますね。
index.jsに戻りまして、先ほど登録したHTMLを取得してVueを使ってindex.htmlに流し込みます。
ます、どのデータに登録したHTMLが入っているのか探す必要があります。
ここで以下のコードをindex.jsの一番下に追加します。
[index.js]
Index.prototype.swap = function(old) {
    for(var k=0; k<old.target.children.length; k++){
        console.log(old.target.children[k]);
    }
};
swapというのは、このscriptがホットリロードされた時に呼び出します。
Lauchをリロードせずともscriptで使いたい情報を探すのに活用できます。
ここで参照しているのは、Entitiesの子要素であるEntityを参照しています。
子要素のEntityの属性に取得したいHTMLが入っているのでこれを探します。
すると以下にたどり着けると思います。
[index.js]
Index.prototype.swap = function(old) {
    for(var k=0; k<old.target.children.length; k++){
        console.log(old.target.children[k].script.addhtml.__attributes.sethtml._resources[0]);
    }
};
これを使って追加していきます。
先ほどswapで確認したやり方を使ってHTMLのソースを取得し、それをVueに渡してあげます。
以下をコピペして書き換えます。書き加えたのは17-20行目と27行目です。
[index.js]
var Index = pc.createScript('index');

Index.attributes.add("baseHtml", {type:"asset", assetType:"html"}); // 登録したhtmlを取得
Index.attributes.add("target", {type:"entity"}); // 参照するEntityを登録

Index.prototype.initialize = function() {
    var self = this; // this書き換え
    var canvas = document.getElementsByTagName("canvas")[0]; // canvasを取得
    canvas.classList.add("pcCanvas"); // canvasにclass名を指定
    var wrapper = document.createElement("div"); // div作成
    wrapper.classList.add("wrapper"); // 作成したdivにwrapperというclass名を指定
    wrapper.innerHTML = self.baseHtml._resources[0]; // 事前に登録していたhtmlをwrapperに流し込み
    document.body.appendChild(wrapper); // bodyにwrapperを追加

    var nowEntity = ""; // どのEntityが選択されているか保管

    var t_htmls = {}; // htmlを保管
    for(var k=0; k<self.target.children.length; k++){ // Entitiesの子要素に登録されたHTMLを参照
        t_htmls[k] = self.target.children[k].script.addhtml.__attributes.sethtml._resources[0]; // 登録されたHTMLのソースを取得
    }

    var app = new Vue({ // Vue呼び出し
        el: '#app', // id名がappの要素を参照
        data: { // 使用するdataを登録
            clickFlag: false, // クリックされたか
            entities: self.target.children, // 属性で追加したEntityの子どもを参照
            contents: t_htmls // HTMLをVueに渡す
        },
        methods: { // イベントハンドラ作成
            onEntityClick: function(target,index) { // Entityを選択された時
                var v_self = this; // thisを保管

                if(v_self.clickFlag) return; // クリックされて処理中か
                v_self.clickFlag = true; // クリック処理中

                self.target.tween(self.target.getLocalRotation()).rotate(new pc.Vec3(180, 0, 0), 0.5, pc.QuadraticIn).on('complete', function () { // tweenでrotateをアニメーション completeで完了後呼び出し
                    if(nowEntity){ // Entityが保管されているか
                        nowEntity.enabled = false;
                    }
                    target.enabled = true; // 選択したEntityを表示
                    nowEntity = target; // 選択したEntityを保管

                    self.target.tween(new pc.Vec3(180, 0, 0)).rotate(new pc.Vec3(360, 0, 0), 1, pc.BounceOut).on('complete', function(){ v_self.clickFlag = false; }).start(); // 選択したEntityのアニメーション
                }).start();

            }
        }
    });
};

Index.prototype.swap = function(old) {
    for(var k=0; k<old.target.children.length; k++){
        console.log(old.target.children[k].script.addhtml.__attributes.sethtml._resources[0]);
    }
};
Vueに追加したcontentsにHTMLのソースが入っているので、これをindex.htmlに追加します。
以下にコピペして書き換えます。
14行目に先ほどのcontentsを展開して挿入しています。
[index.html]
<div id="app">
    <header class="header">
        <nav>
            <ol>
                <li v-for="(entity,index) in entities" @click="onEntityClick(entity,index)" ><span>{{entity.name}}</span></li>
            </ol>
        </nav>
    </header>
    <main class="main">
        <div class="container">
            <section v-for="(content,index) in contents" v-html="content"></section>
        </div>
    </main>
</div>
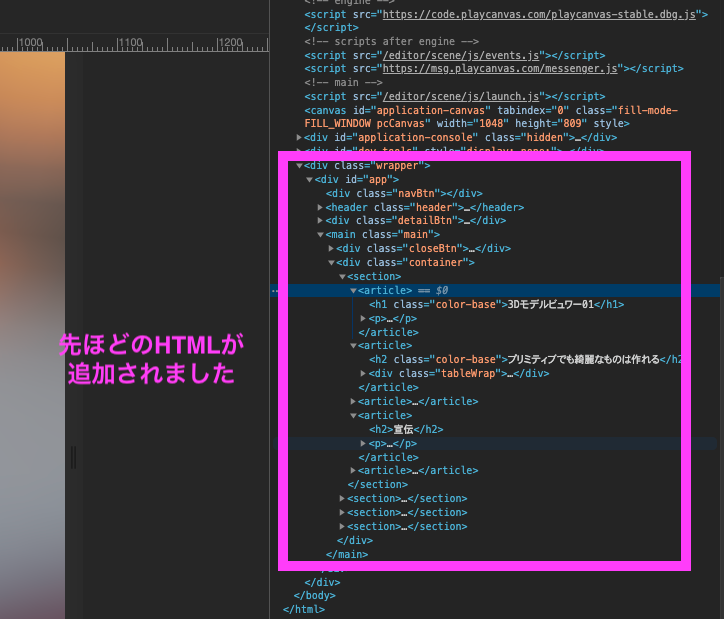
Launchからディベロッパーツールで確認してみますと、section要素に先ほどのHTMLが追加されているのが確認できると思います。
表示するためのHTMLも追加できましたので、
次に詳細ページに切り替えるための処理を書いていきます。
詳細ページへの切り替えなどの処理を作る
各々の詳細が書いてあるHTMLを追加できたので、それを表示するための処理を作っていきます。
選択したEntityから詳細ページへ行くためのボタンを用意します。
また、詳細ページから前のページに戻るためのボタンも用意します。
[index.html]
<div id="app">
    <header class="header">
        <nav>
            <ol>
                <li v-for="(entity,index) in entities" @click="onEntityClick(entity,index)" ><span>{{entity.name}}</span></li>
            </ol>
        </nav>
    </header>
    <div class="detailBtn" v-show="detailBtnShow" @click="onDetailClick()"></div>
    <main class="main">
        <div class="closeBtn" @click="onCloseClick()"></div>
        <div class="container">
            <section v-for="(content,index) in contents" v-show="sectionNum == index" v-html="content"></section>
        </div>
    </main>
</div>
detailBtnとcloseBtnを追加すると合わせて、この後行うクリックイベントとv-showという表示非表示を処理するための記述も書いています。
これらを使うために、index.jsに処理を書いていきます。
index.jsのVueの箇所を以下に書き換えます。
[index.js]
    var app = new Vue({ // Vue呼び出し
        el: '#app', // id名がappの要素を参照
        data: { // 使用するdataを登録
            clickFlag: false, // クリックされたか
            detailFlag: false, // 詳細を表示しているか
            detailBtnShow: false, // 詳細ボタンを表示しているか
            entities: self.target.children, // 属性で追加したEntityの子どもを参照
            contents: t_htmls, // HTMLをVueに渡す
            sectionNum: "", // 何個目のEntityが表示されているか
        },
        methods: { // イベントハンドラ作成
            onCloseClick: function() { // 詳細を閉じる
                document.body.classList.remove("is-open");
                detailFlag = false;
            },
            onDetailClick: function(target) { // 詳細を表示
                detailFlag = true;
                document.body.classList.add("is-open");
            },
            onEntityClick: function(target,index) { // Entityを選択された時
                var v_self = this; // thisを保管

                if(v_self.clickFlag) return; // クリックされて処理中か
                if(!v_self.detailBtnShow) v_self.detailBtnShow = true; // 詳細ボタンを表示(初回のみ)
                v_self.clickFlag = true; // クリック処理中

                this.sectionNum = index; // 何個目のEntityが表示されているか

                self.target.tween(self.target.getLocalRotation()).rotate(new pc.Vec3(180, 0, 0), 0.5, pc.QuadraticIn).on('complete', function () { // tweenでrotateをアニメーション completeで完了後呼び出し
                    if(nowEntity){ // Entityが保管されているか
                        nowEntity.enabled = false;
                    }
                    target.enabled = true; // 選択したEntityを表示
                    nowEntity = target; // 選択したEntityを保管

                    self.target.tween(new pc.Vec3(180, 0, 0)).rotate(new pc.Vec3(360, 0, 0), 1, pc.BounceOut).on('complete', function(){ v_self.clickFlag = false; }).start(); // 選択したEntityのアニメーション
                }).start();

            }
        }
    });
onDetailClickとonCloseClickのイベントハンドラを作成しています。
ここで詳細の表示非表示を行いますが、その表示非表示はclass名を参照しています。
htmlのbody要素に特定のclass名を持つときにCSSを使って表示非表示するようにしました。
v-showを使うことでもできなくはないですが、アニメーションを含めるならCSSが簡単と思いましてこちらを採用しています。
これで3Dモデルビュワーは完成していますが、もう一点、スマホ対応もさせておきたいと思います。
index.htmlとindex.jsのVueの箇所を以下に書き換え
[index.html]
<div id="app">
    <div class="navBtn" @click="onNavClick()"></div>
    <header class="header">
        <nav>
            <ol>
                <li v-for="(entity,index) in entities" @click="onEntityClick(entity,index)" ><span>{{entity.name}}</span></li>
            </ol>
        </nav>
    </header>
    <div class="detailBtn" v-show="detailShow" @click="onDetailClick()"></div>
    <main class="main">
        <div class="closeBtn" @click="onCloseClick()"></div>
        <div class="container">
            <section v-for="(content,index) in contents" v-show="sectionNum == index" v-html="content"></section>
        </div>
    </main>
</div>
[index.js]
    var app = new Vue({ // Vue呼び出し
        el: '#app', // id名がappの要素を参照
        data: { // 使用するdataを登録
            clickFlag: false, // クリックされたか
            navFlag: false, // スマホ時のメニュー表示しているか
            detailFlag: false, // 詳細を表示しているか
            detailBtnShow: false, // 詳細ボタンを表示しているか
            entities: self.target.children, // 属性で追加したEntityの子どもを参照
            contents: t_htmls, // HTMLをVueに渡す
            sectionNum: "", // 何個目のEntityが表示されているか
        },
        methods: { // イベントハンドラ作成
            onNavClick: function() { //メニューボタン押す
                if(!this.navFlag) { // メニュー表示
                    this.navFlag = true;
                    document.body.classList.add("is-nav");
                }else{ // メニュー非表示
                    this.navFlag = false;
                    document.body.classList.remove("is-nav");
                }
            },
            onCloseClick: function() { // 詳細を閉じる
                document.body.classList.remove("is-open");
                detailFlag = false;
            },
            onDetailClick: function(target) { // 詳細を表示
                detailFlag = true;
                document.body.classList.add("is-open");
            },
            onEntityClick: function(target,index) { // Entityを選択された時
                var v_self = this; // thisを保管

                document.body.classList.remove("is-nav");

                if(v_self.clickFlag) return; // クリックされて処理中か
                if(!v_self.detailBtnShow) v_self.detailBtnShow = true; // 詳細ボタンを表示(初回のみ)
                v_self.clickFlag = true; // クリック処理中

                this.sectionNum = index; // 何個目のEntityが表示されているか

                self.target.tween(self.target.getLocalRotation()).rotate(new pc.Vec3(180, 0, 0), 0.5, pc.QuadraticIn).on('complete', function () { // tweenでrotateをアニメーション completeで完了後呼び出し
                    if(nowEntity){ // Entityが保管されているか
                        nowEntity.enabled = false;
                    }
                    target.enabled = true; // 選択したEntityを表示
                    nowEntity = target; // 選択したEntityを保管

                    self.target.tween(new pc.Vec3(180, 0, 0)).rotate(new pc.Vec3(360, 0, 0), 1, pc.BounceOut).on('complete', function(){ v_self.clickFlag = false; }).start(); // 選択したEntityのアニメーション
                }).start();

            }
        }
    });
navBtnという要素を追加して、onNavClickのイベントハンドラを呼ぶことでスマホ時でもメニューを開いて操作することができます。
ここでもbody要素にclass名のis-navを付与することでメニューの表示非表示を制御しています。
他にも色んな方法はありますので、試してみると良いでしょう。
これで、本チュートリアルの制作は終了です。
最後に今回作ったプロジェクトをPublishして終わりにしたいと思います。
Publishして誰でも見れるように公開!
プロジェクトを作成してビルドまでやってくれるのもPlayCanvasのすごいところ。
ここまで作成したものをPlayCanvasの公開環境に公開してみましょう。
左のメニュー、またはシーンの左上のManage Scenesから以下のPublish画面を開きます。
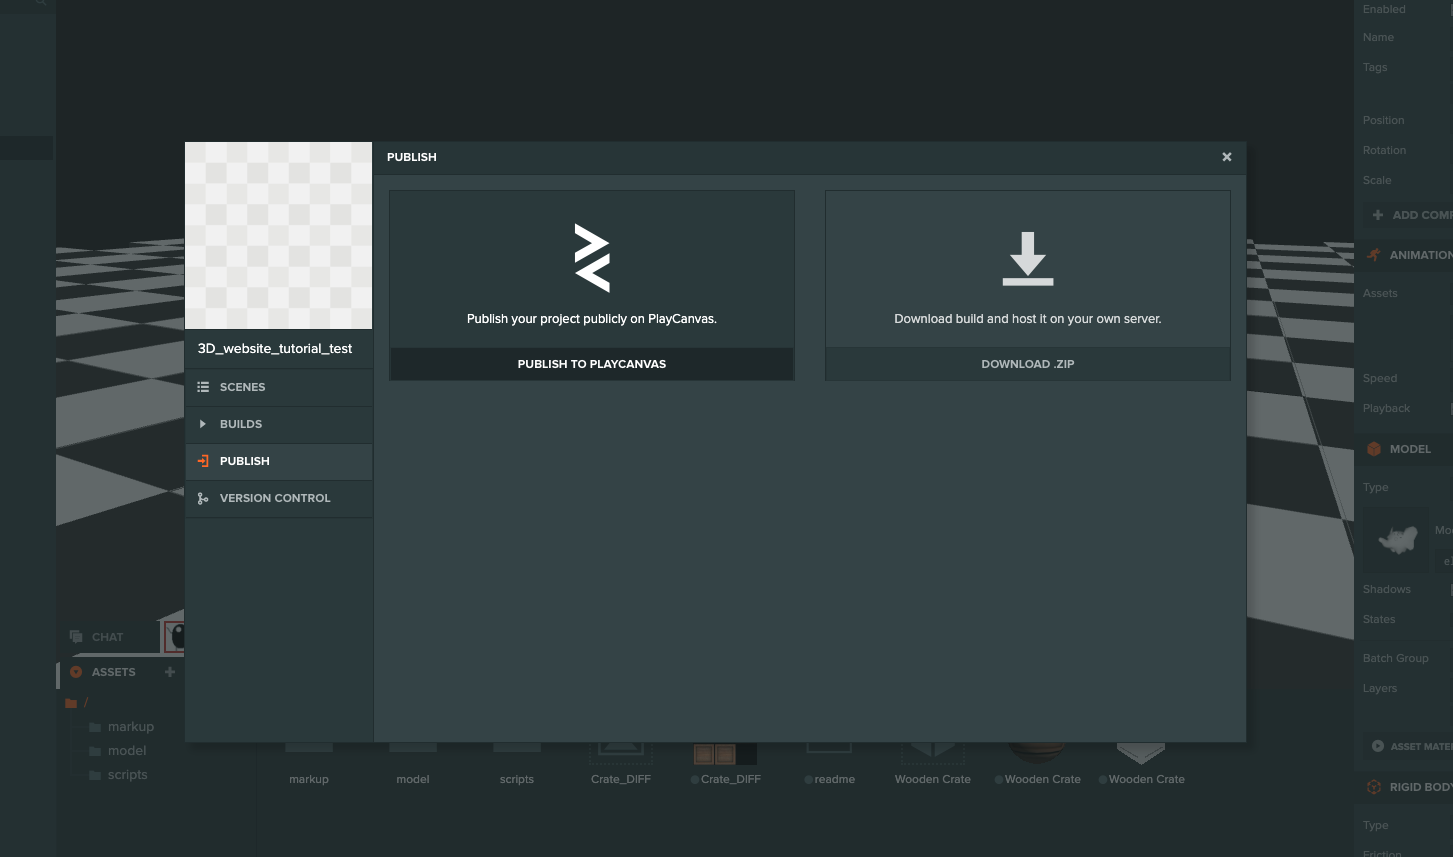
PUBLISH TO PLAYCANVASを選択して、一番下のPUBLISH NOWをクリックしてビルドは完了です。
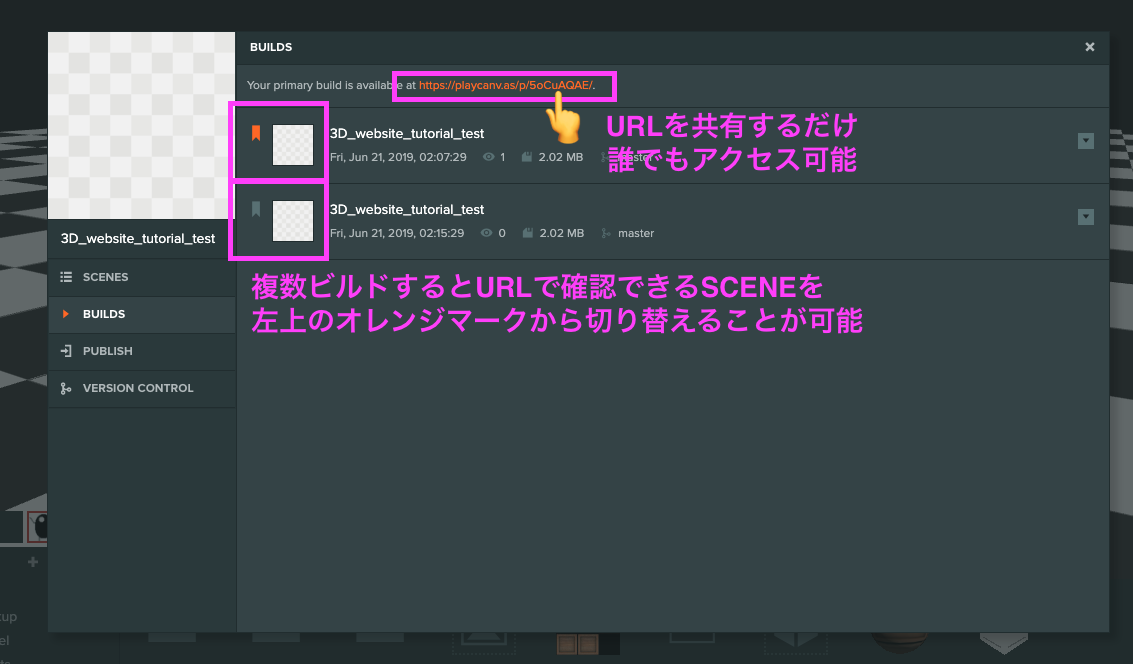
URLでPC、スマホ、他ユーザーにもログインすることなく共有することができます。
以上でチュートリアルの終了です。
おつかれさまでした!
PlayCanvasはゲームエンジンでありますが、こんな感じでwebサイト的なものとして使えちゃいます。
WebGLで3Dコンテンツを使いたいけどうまく扱えない人とかにはとても良いものな気がします。
PlayCanvas、使いましょう!
-