やりたいこと
前回(NestJS作る備品管理的なもの#1 OpenAPIでAPIを公開する)はOpenAPIにItemエンティティを操作するAPIを公開した。今度は、Itemが置き場であるLocationに設置されていることを示す関係を追加し、それをAPIで公開していこうと思う。
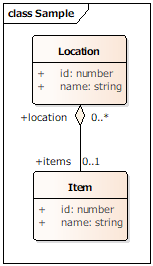
ここで、ItemとLocationの関係を多対一で表現し、必要なときだけ取得できるようにしたいと思う。というのも、Itemの情報を取得するとき常にLocationの情報が必要というわけではないためだ。
APIをどうするか
Item/Locationそれぞれに対して、関連するLocation/Itemの情報を取得する方法はいくつかある。
例えば/items/:id/locationや、/locations/:id/itemsのように、階層で取得したいものを選ぶというのがREST的な方法の一つらしい。ただ、このやり方だとN+1(というか1+N)問題が起きてしまい、小さなリクエストが何度も発生してしまう。
そこで、RESTらしさを保ちつつ、うまく関連情報を取得する方法を調べてみたところ「WebAPI 設計のベストプラクティス」という記事に行き着いた。この記事によると、クエリパラメータを使うと良いらしい。例えば/items?join=locationと書けば、ItemにLocationをJOINするといった具合でリクエストが書けるので、RESTらしいし柔軟になる。
ManyToOne/OneToManyの取得方法
ItemはLocationに対して、ManyToOneの関係にある(複数の備品は1つの置き場にまとめて置けるから)。この関係はTypeORMでは以下のように表せる。
@Entity()
export class Item extends EntityCommon {
    // 中略
    @ManyToOne( type=>Location, location=>location.items )
    @JoinColumn( { name: 'locationId' } )
    readonly location?: Location;  // 設置場所

    constructor( init?: Partial<Item> ) {
        super();
        Object.assign( this, init );
    }
}
ManyToOneの関係にあるlocationの情報を取得したければ、リポジトリのfindメソッドのオプションで、relationsに取得したい情報=Joinしたいプロパティの文字列のを与えれば良い。以下の場合、locationプロパティを取得したいので、文字列配列にlocationを指定している。
@Injectable()
export class ItemService  {
    constructor(
        @InjectRepository( Item ) private readonly repo: Repository<Item>
    ) {}

    async findAll(): Promise<Item[]> {
        return await this.repo.find( { relations: [ 'location' ]} );
    }
}
クエリでJOIN対象を指定する
ManyToOne(またはその逆)の情報をJOINで取得する方法がわかったので、今度はそれをクエリパラメータで与えられるようにしたい。そのためには以下のようにDTOを用意しておくと、OpenAPIで使い方が表示できて便利になる。
JOIN対象を指定するクエリパラメータ(DTO)
DTOの方は以下のように、JOIN対象を示す文字列を設定できるようにしている。例えば/items?join=locationと書いたら、文字列としてlocationが格納されることになる。
参考: オプションクエリ
export class GetQueryDto {
    @ApiModelProperty( {
        required: false
    } )
    join?: string;
}
JOIN対象を指定できるItemコントローラ
JOIN対象を指定できるよう、クエリパラメータとしてGetQueryDtoを受け取るように指定する。受け取ったオプションからjoinを取得し、カンマで分割したものをJOIN対象として扱う。(this.itemsは後述するItemエンティティを操作するサービス)
    @Get()
    async findAll( @Query() option?: GetQueryDto ):  Promise<Item[]> {
        let join = [];
        if( option && option.join) {
            join = option.join.split(',');  // 文字列を","で区切る
        }
        return await this.items.findAll( join );
    }
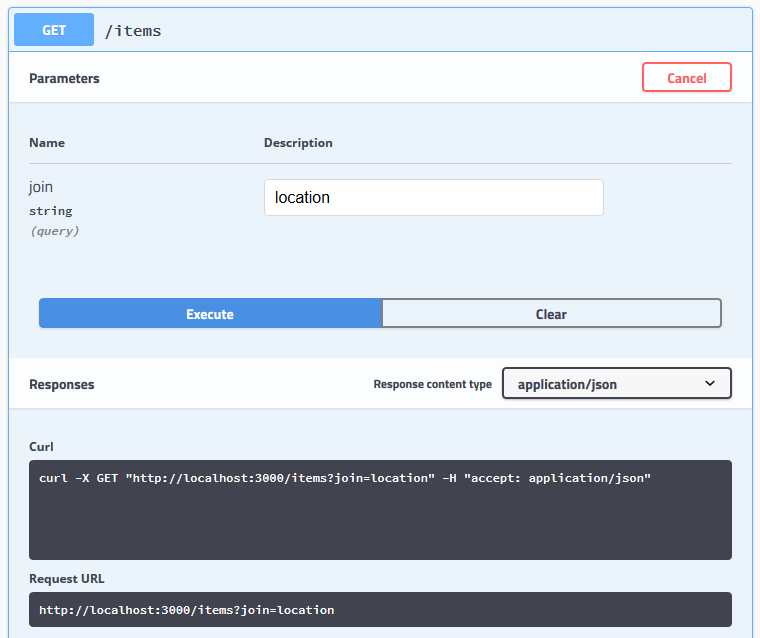
OpenAPI上では、DTOのおかげで以下のようにクエリパラメータが試せるようになる。
JOIN対象を指定できるItemサービス
検索時にJOIN対象を示す文字列の配列を受け取り、リポジトリのfindメソッドでrelationsオプションを与えることで、JOIN対象を指定する。
@Injectable()
export class ItemService  {
    constructor(
        @InjectRepository( Item ) private readonly repo: Repository<Item>
    ) {}

    async findAll( join: string[] ): Promise<Item[]> {
        return await this.repo.find( { relations: join } );
    }
}
自動でJOIN対象を列挙する
ここまででクエリパラメータを使ってJOIN対象を指定できるようにしたが、JOIN対象がどれだけあるのか、正しく指定されているかはチェックした方が良い。そのための仕組みを毎回手で実装するのは面倒なので、デコレータを使って少し楽をする。
Joinableデコレータ
プロパティデコレータを用いて、ManyToOneやOneToManyのプロパティ(item.locationなど)の名前を収集することで、リポジトリのfindメソッドのrelationsに与えられる文字列を自動で収集することができる。
// JOIN対象を登録するデコレータ
export function Joinable(): PropertyDecorator {
    // Entityの静的メンバであるJoinablesに、プロパティ名(key)を追加する
    return function( target: any, key: string ) {
        if( target.constructor.Joinables === undefined ) {
            target.constructor.Joinables = [];
        }
        target.constructor.Joinables.push( key );
    }
}

@Entity()
export class EntityCommon {
    // EntiyCommonを継承したEntityで、
    // @Joinableデコレータを付けたプロパティ名が登録される配列
    static Joinables: string[];

    // 引数で与えた文字列のうち、Joinablesに含まれているものだけ抽出する
    static FilterJoinable( keys: string[] ): string[] {
        return keys.filter( key => this.Joinables.indexOf( key ) >= 0 );
    }
}
JOIN対象を収集する
上記EntityCommonを継承し、@Joinableデコレータを付加することで、Join対象をもれなく抽出できるようになる。例えば以下のようにすると、Joinablesは['location']になる。(少ないからまだよいが、増えたり名前が変わったりすると大変)
import { EntityCommon, Joinable } from '../common';
import { Location } from '../location/entity';

@Entity()
export class Item extends EntityCommon {
    @Joinable()   // locationという文字列がJoinables静的メンバに追加される
    @ManyToOne( type=>Location, location=>location.items )
    @JoinColumn( { name: 'locationId' } )
    readonly location?: Location;  // 設置場所
}
JOIN対象をAPIで公開する
上記のようにすることで、ItemエンティティのJOIN対象をItem.Joinablesで取得できるようになった。この情報を使えば、例えばAPIで何をJOINできるかを利用者に示すことができるようになる。
@ApiUseTags('Items')
@Controller('items')export class ItemController {
    constructor(private readonly items: ItemService ) {}
    @Get('/joinables')
    getJoinables(): string[] {
        return Item.Joinables;
    }

    // /items?join=locationのようにJOIN対象を指定する
    @Get()
    async findAll( @Query() option?: GetQueryDto ):  Promise<Item[]> {
        let join = [];
        if( option && option.join ) {
            join = option.join.split(',');
        }
        return await this.items.findAll( join );
    }
}
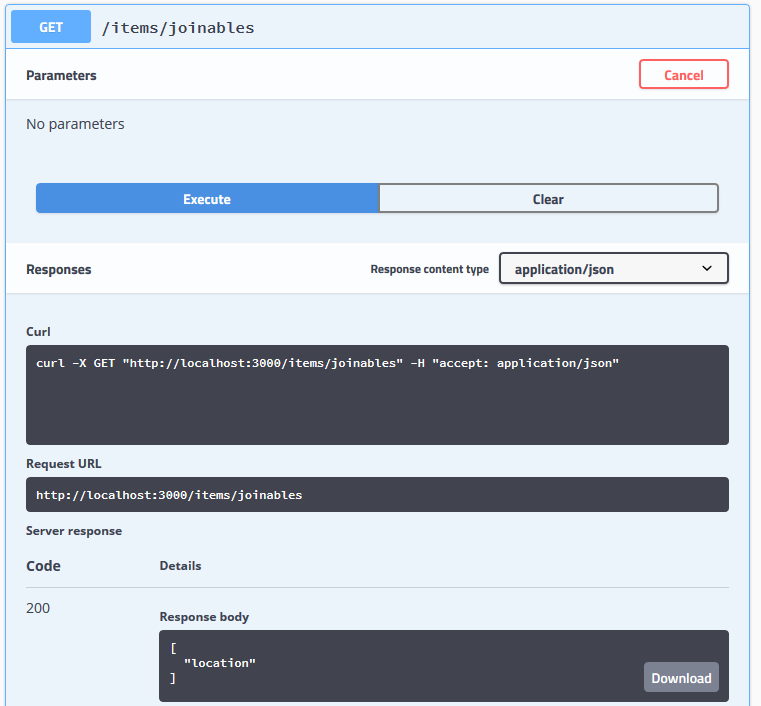
結果、OpenAPI上で試してみると、JOINできるのはlocationだけと応答が返ってくる。
JOIN対象を指定できるサービス改
先ほどのJOIN対象を指定できるコントローラから、有効なJOIN対象だけを抽出するように改良すると以下のようになる。以下の例では、ItemエンティティのJOIN対象以外は除外され、relationsオプションに与えられる。
@Injectable()
export class ItemService  {
    constructor(
        @InjectRepository( Item ) private readonly repo: Repository<Item>
    ) {}

    private filter( join: string[] } ): string[] {
        let keys:string[] = [];
        keys = Item.FilterJoinable( option.join );
        return keys;
    }

    async findAll( option?: join: string[] = []): Promise<Item[]> {
        let keys = this.filter( join );
        return await this.repo.find( { relations: keys } );
    }
}
動かした結果
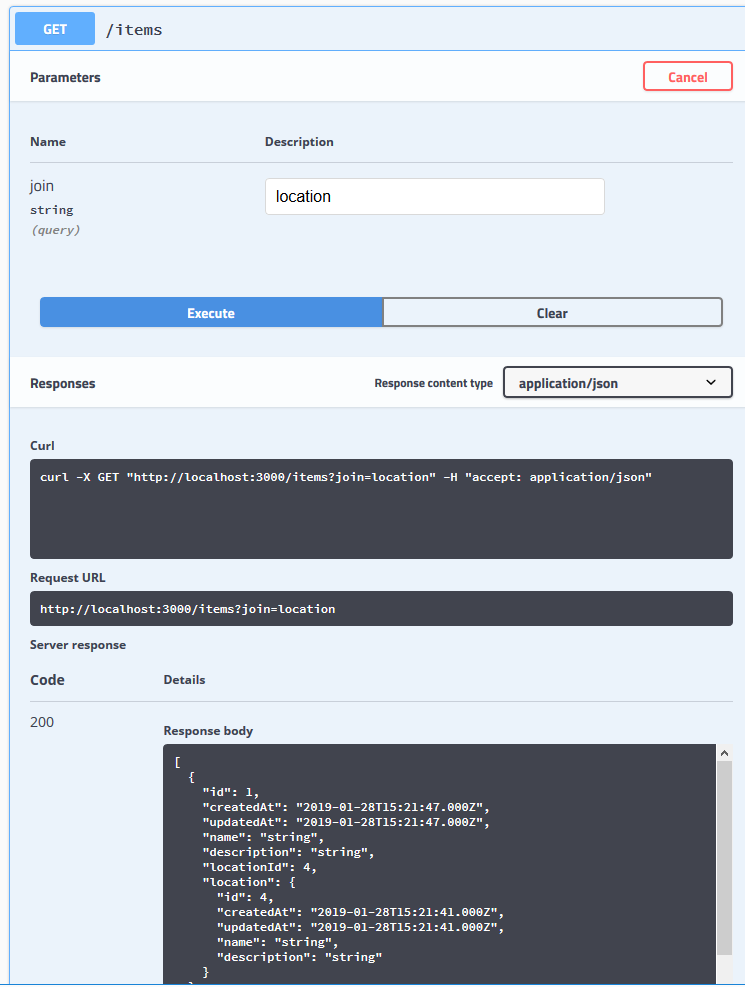
JOIN対象にlocationを指定してGETすると、以下のようにlocation以下にLocationエンティティの情報がJOINされることがわかる。今後ManyToOneやOneToMany、OneToOneの関係を増やしても、
TL;DR
OneToMany/ManyToOneの関係にある情報は、リポジトリのfindメソッドに与えるrelationsオプションで、プロパティ名を指定することで取得できる。
プロパティ名をいちいち手で実装するのは面倒なので、@Joinablesデコレータを使って自動で収集する方法と、それをAPIで公開する方法を紹介した。
改善点
relationsオプションは、単純なエンティティだけでなくlocation.itemsのようにドットを使うことでJOINした先で更にJOINすることができるようになっている。例えば「備品が置かれている場所に置かれている備品」といった具合だ。こうした使い方にも対応できると嬉しい。