概要
C#&WPFで簡易的なプレゼンテーションソフト(パワーポイント的なやつです)を作ります。
起動時にCSVファイルを読み込みます
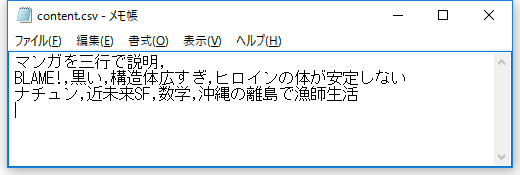
(入力CSVファイル)
最初の0行目は0列目のみ読み取られ、プレゼン全体のタイトルとして常に上に表示されます。
次に1行目を読み取り、0列目をそのスライドのタイトルとして少し強調されアイコン(material:PackIconのBlur)で囲われます。
1列目以降がその下に列挙で表示されます。
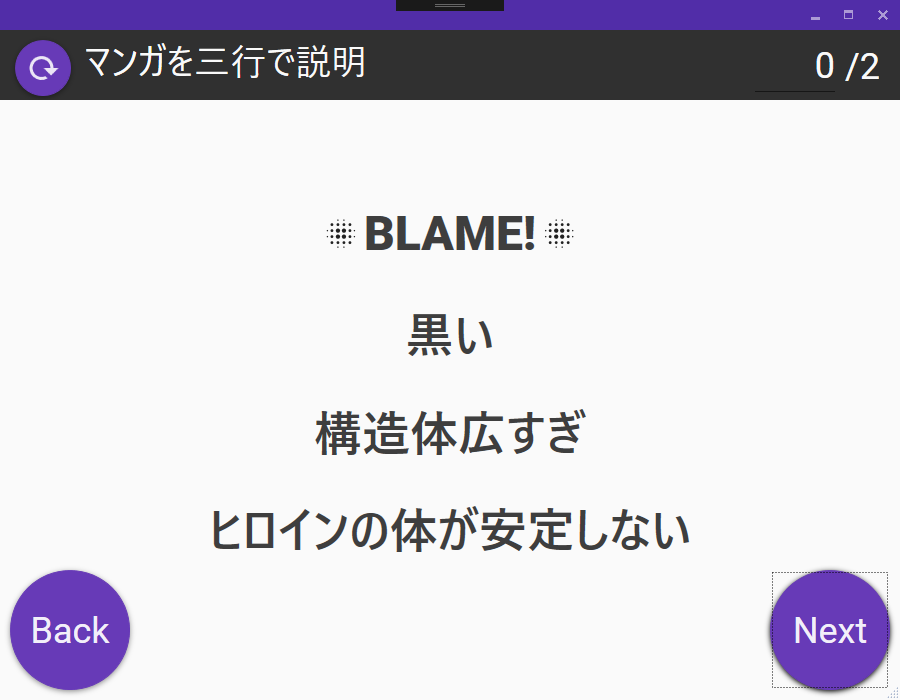
(1ページ目)
Nextのボタン、Returnキー、スライドが左クリックされる、のいずれかで次のスライドに行きます。
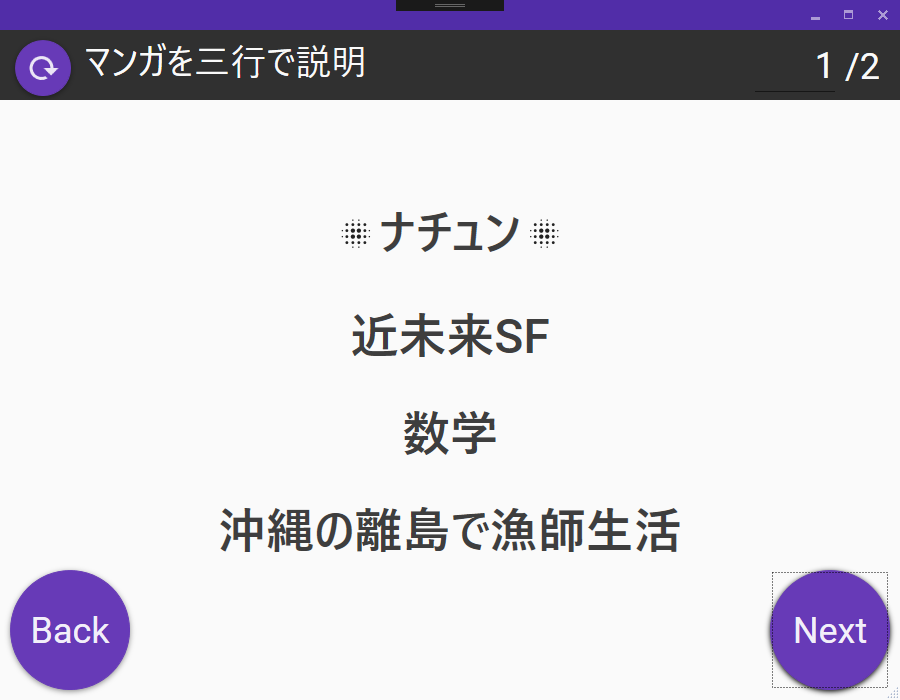
(2ページ目)
最後まで行くと終了メッセージが流れます。
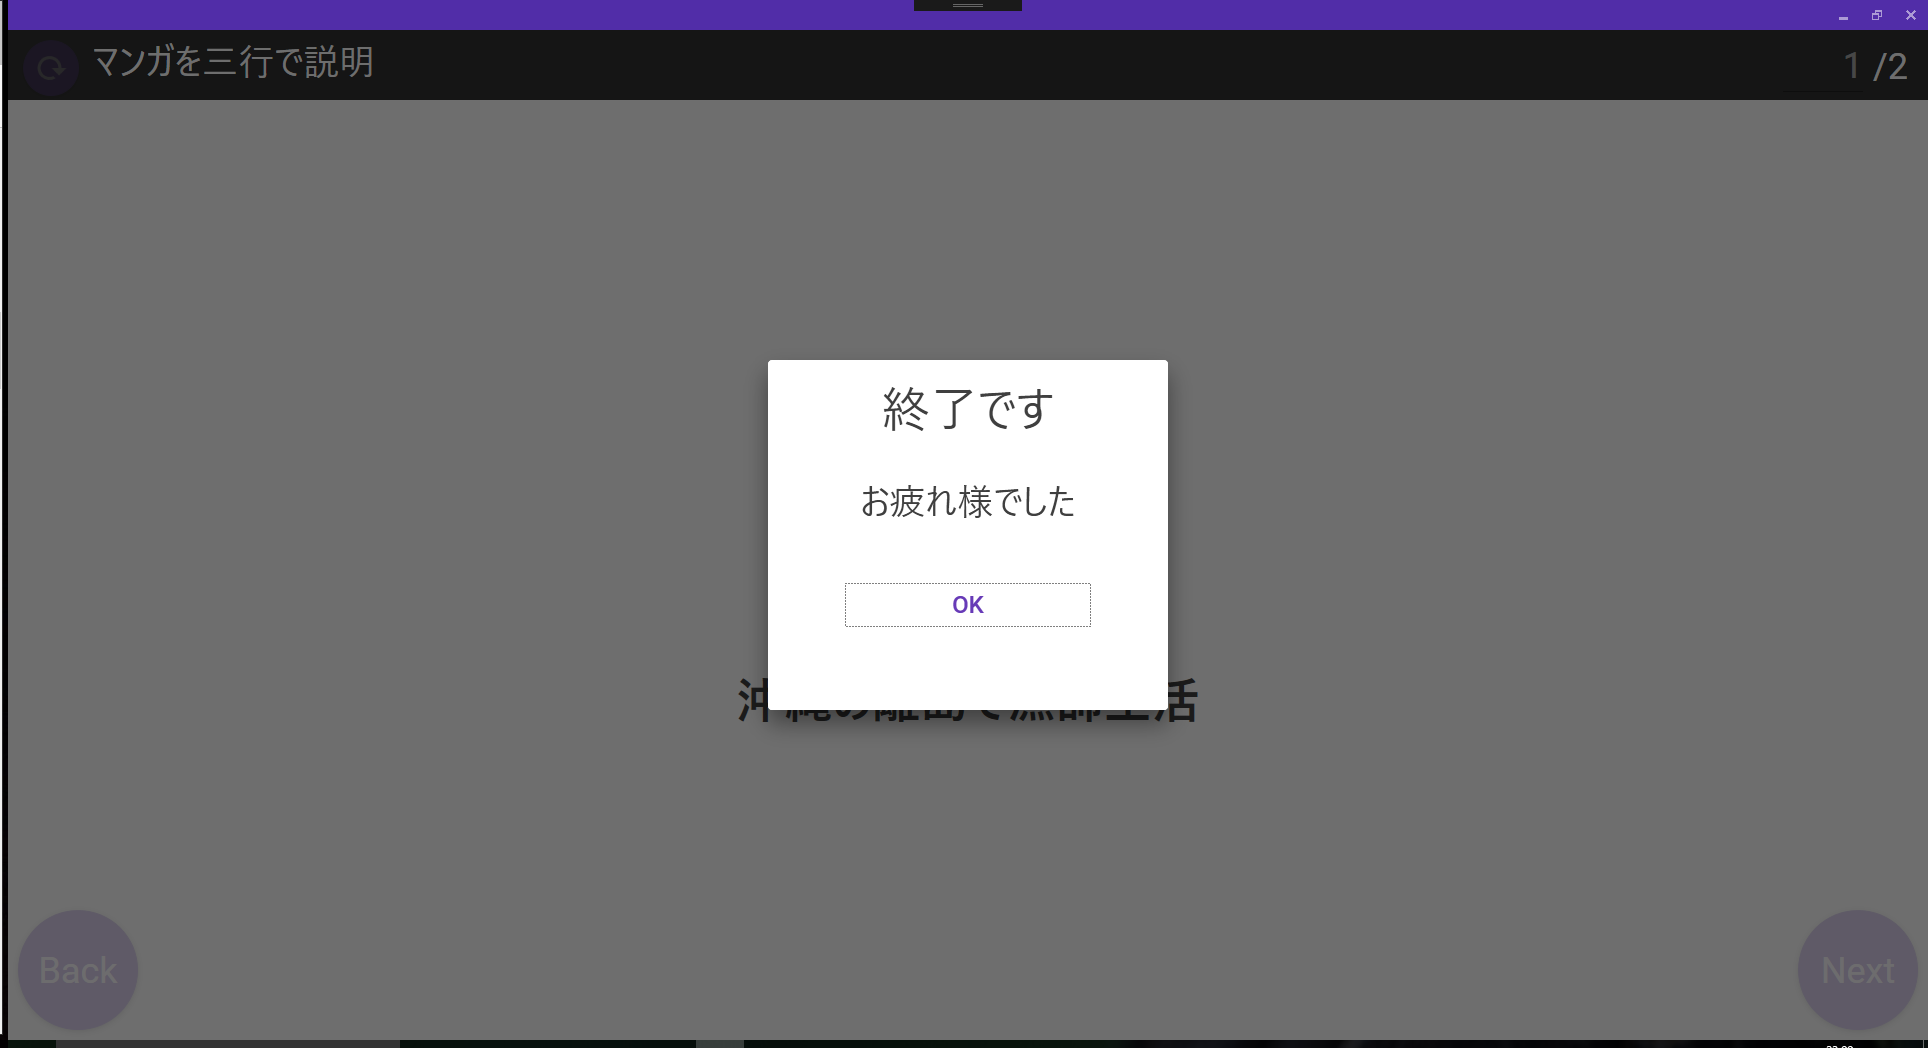
(終了メッセージ)
左上の再読込ボタンを押すとCSVファイルを再度読み込みます。
左下のBackボタン、BackSpaceキー、スライドを右クリックで1ページ戻ります。
任意のスライドに行きたい場合は右上のスライド番号に入力するとそのスライドに飛びます。
なお、上のスクリーンショットのマンガはオススメです。
コード
View
見た目を整えるためMahAppsとMaterial Design In XAML Toolkitを使用します。
上記2つの基本的な説明は
Material Design In XAML ToolkitでWPFアプリにモダンなUIを!
Material Design In XAML Toolkitでお手軽にWPFアプリを美しく
等を参考にしてください。
大まかにいうと
ヘッダ
└再読込ボタン
└全体タイトル
└現在スライド位置
└全体スライド数
メイン
└スライドタイトル
└スライド内容
フッタ
└戻るボタン
└進むボタン
となるように配置します。
他にもキーバインドや初期化呼び出しなどを入れます。
ヘッダは上記ライブラリのColorZoneを使用することで目立たせます。
<mahApps:MetroWindow
    x:Class="WpfSlide.Views.MainWindow"
    xmlns="http://schemas.microsoft.com/winfx/2006/xaml/presentation"
    xmlns:x="http://schemas.microsoft.com/winfx/2006/xaml"
    xmlns:i="http://schemas.microsoft.com/expression/2010/interactivity"
    xmlns:ei="http://schemas.microsoft.com/expression/2010/interactions"
    xmlns:l="http://schemas.livet-mvvm.net/2011/wpf"
    xmlns:v="clr-namespace:WpfSlide.Views"
    xmlns:vm="clr-namespace:WpfSlide.ViewModels"

    xmlns:mahApps="clr-namespace:MahApps.Metro.Controls;assembly=MahApps.Metro"
    xmlns:material="http://materialdesigninxaml.net/winfx/xaml/themes"
    TextElement.Foreground="{StaticResource MaterialDesignBody}"
    TextElement.FontSize="36"
    Background="{StaticResource MaterialDesignPaper}"
    FontFamily="pack://application:,,,/MaterialDesignThemes.Wpf;component/Resources/Roboto/#Roboto"
    ResizeMode="CanResizeWithGrip"
    WindowState="Maximized"
    Height="700" Width="900">
    <mahApps:MetroWindow.DataContext>
        <vm:MainWindowViewModel/>
    </mahApps:MetroWindow.DataContext>
    <mahApps:MetroWindow.Resources>
        <DataTemplate DataType="{x:Type vm:MaterialDialogViewModel}">
            <v:MaterialDialog Width="400" Height="350"/>
        </DataTemplate>
        <Style TargetType="{x:Type Button}" BasedOn="{StaticResource MaterialDesignFloatingActionButton}"/>
        <Style TargetType="{x:Type TextBlock}">
            <Setter Property="VerticalAlignment" Value="Center"/>
        </Style>
    </mahApps:MetroWindow.Resources>

    <i:Interaction.Triggers>
        <i:EventTrigger EventName="ContentRendered">
            <l:LivetCallMethodAction MethodTarget="{Binding}" MethodName="Initialize"/>
        </i:EventTrigger>
    </i:Interaction.Triggers>

    <mahApps:MetroWindow.InputBindings>
        <KeyBinding Key="Backspace" Command="{Binding BackPageCommand}"/>
        <KeyBinding Key="Return" Command="{Binding NextPageCommand}"/>
        <MouseBinding Gesture="LeftClick" Command="{Binding NextPageCommand}"/>
        <MouseBinding Gesture="RightClick" Command="{Binding BackPageCommand}"/>
    </mahApps:MetroWindow.InputBindings>

    <material:DialogHost>
        <Grid FocusManager.FocusedElement="{Binding ElementName=nextButton}">
            <Grid.RowDefinitions>
                <RowDefinition Height="Auto"/>
                <RowDefinition Height="*"/>
                <RowDefinition Height="Auto"/>
            </Grid.RowDefinitions>
            <!--スライドヘッダ-->
            <material:ColorZone Grid.Row="0" Mode="Dark" Padding="10">
                <Canvas Height="50">
                    <!--再読込ボタン-->
                    <Button Canvas.Left="5" Command="{Binding ReLoadCommand}">
                        <material:PackIcon Kind="Reload" Width="36" Height="36"/>
                    </Button>
                    <!--全体タイトル-->
                    <TextBlock Canvas.Left="50" Text="{Binding WindowTitle.Value}"
                               HorizontalAlignment="Center" FontSize="36" Margin="24,1"/>
                    <StackPanel Canvas.Right="10" Orientation="Horizontal">
                        <!--スライド位置-->
                        <TextBox Text="{Binding CurrentIndexPage.Value,UpdateSourceTrigger=PropertyChanged}"
                             Width="80" TextAlignment="Right" Margin="10,0"/>
                        <TextBlock  Text="{Binding CountContent.Value}"/>
                    </StackPanel>
                </Canvas>
            </material:ColorZone>

            <StackPanel Grid.Row="1" VerticalAlignment="Center">
                <!--スライドタイトル-->
                <StackPanel Orientation="Horizontal" HorizontalAlignment="Center" >
                    <material:PackIcon Kind="Blur" Height="36" Width="36" VerticalAlignment="Center"/>
                    <Label Content="{Binding PageTitle.Value}" FontSize="48" FontWeight="Heavy"/>
                    <material:PackIcon Kind="Blur" Height="36" Width="36" VerticalAlignment="Center"/>
                </StackPanel>
                <!--スライド内容-->
                <ItemsControl ItemsSource="{Binding ContentText.Value}" Margin="20">
                    <ItemsControl.ItemTemplate>
                        <DataTemplate>
                            <WrapPanel Orientation="Horizontal" HorizontalAlignment="Center" >
                                <TextBlock Text="{Binding}" FontSize="48" FontWeight="Medium" Margin="20" />
                            </WrapPanel>
                        </DataTemplate>
                    </ItemsControl.ItemTemplate>
                </ItemsControl>
            </StackPanel>

            <Canvas Grid.Row="2">
                <!--戻るボタン-->
                <Button Canvas.Bottom="10" Canvas.Left="10" Command="{Binding BackPageCommand}"
                        Width="120" Height="120"
                        Content="Back"/>
                <!--進むボタン-->
                <Button Canvas.Bottom="10" Canvas.Right="10" Command="{Binding NextPageCommand}"
                        Width="120" Height="120"
                        Content="Next"/>
            </Canvas>
        </Grid>
    </material:DialogHost>
</mahApps:MetroWindow>
XAMLは長くなりがちですね。
Model
LivetのTriggerで初期化時にModelの初期化・CSVファイル読込を呼び出します。
CSVファイルの読込はCSVHelperを使用します。
Modelでは全体タイトルと全てのページの内容をObservableCollectionで保持しています。
表示上の現在のスライド位置は把握していません。
    public class Model : NotificationObject
    {
        public ReactiveProperty<string> Head
            = new ReactiveProperty<string>("全体タイトル内容");

        public ObservableCollection<string[]> Contents
            = new ObservableCollection<string[]>()
            {
                new [] {"ページタイトル", "内容1", "内容2", "内容3" }
            };

        public void LoadContent()
        {
            Contents.Clear();
            using (var sr = new StreamReader("content.csv", Encoding.GetEncoding("SHIFT_JIS")))
            using (var csv = new CsvReader(sr))
            {
                //ヘッダ(0行目)全体タイトルとして使用
                csv.ReadHeader();
                this.Head.Value = csv.FieldHeaders.First();
                //各行読み取り
                while (csv.Read())
                {
                    Contents.Add(csv.CurrentRecord
                        //空白は無視する
                        .Where(field => !String.IsNullOrWhiteSpace(field))
                        .ToArray());
                }
            }
        }
    }
ViewModel
ReactivePropertyを使用してViewと接続します。
次へボタンやスライド番号の直接指定などで
スライド現在位置ReactiveProperty<int> CurrentIndexPage
を変更します。
スライド現在位置が変更されると
private void TransPage(int nextIndex)
が呼び出され、Modelの
ObservableCollection<string[]> Contents
に該当するインデックスが有ればそれを表示、
無ければ終了メッセージを表示します。
public class MainWindowViewModel : ViewModel
{
    private Model model;

    public ReactiveProperty<int> CurrentIndexPage { get; } =
        new ReactiveProperty<int>(0);

    public ReactiveProperty<string> CountContent { get; }
        = new ReactiveProperty<string>("/10");

    public ReactiveProperty<string> WindowTitle { get; }

    public ReactiveProperty<string> PageTitle { get; }
    = new ReactiveProperty<string>("");

    public ReactiveProperty<string[]> ContentText { get; }
        = new ReactiveProperty<string[]>();

    public ReactiveCommand NextPageCommand { get; }
        = new ReactiveCommand();
    public ReactiveCommand BackPageCommand { get; }
        = new ReactiveCommand();
    public ReactiveCommand ReLoadCommand { get; }
        = new ReactiveCommand();

    public MainWindowViewModel()
    {
        this.model = new Model();

        WindowTitle = model.Head;

        model.Contents.ObserveAddChanged()
            .Subscribe(_ =>
                CountContent.Value = $"/{model.Contents.Count()}");

        NextPageCommand.Subscribe(_ =>
            CurrentIndexPage.Value++);
        BackPageCommand.Subscribe(_ =>
            CurrentIndexPage.Value--);
        ReLoadCommand.Subscribe(_AppDomain =>
            {
                model.LoadContent();
                TransPage(CurrentIndexPage.Value);
            });

        CurrentIndexPage.Subscribe(nextIndex =>
            TransPage(nextIndex));
    }

    public void Initialize()
    {
        model.LoadContent();
        TransPage(0);
    }

    private void TransPage(int nextIndex)
    {
        CurrentIndexPage.Value = (nextIndex >= 0 ? nextIndex : 0);

        if (nextIndex >= model.Contents.Count())
        {
            CurrentIndexPage.Value--;

            var dialogVM = new MaterialDialogViewModel(
                    "終了です",
                    "お疲れ様でした");
            DialogHost.Show(dialogVM);
        }

        PageTitle.Value = model.Contents[CurrentIndexPage.Value].First();
        ContentText.Value = model.Contents[CurrentIndexPage.Value]
            .Skip(1).ToArray();
    }
}
メッセージボックスの出し方はWPFでいけてるダイアログを出す方法を参照ください。
環境
VisualStudio2015
.NET Framework 4.6
C#6
Livet
ReactiveProperty
CsvHelper
Material Design In XAML Toolkit