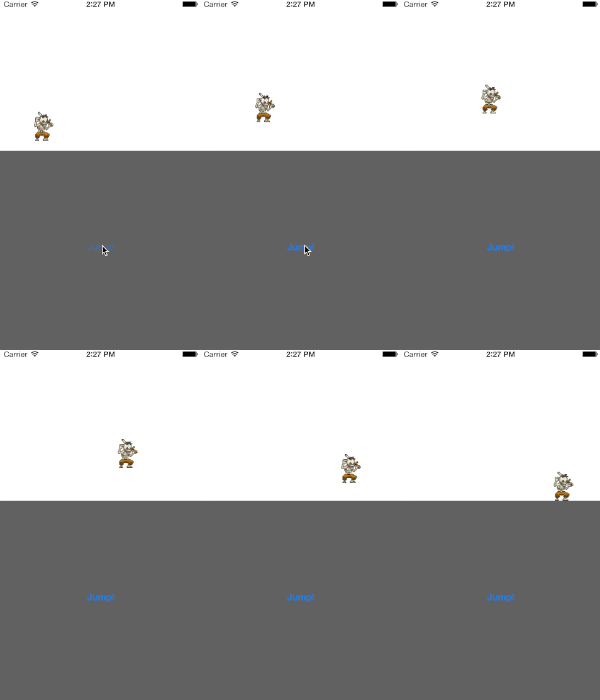
Core Animationを用いると、UIViewのアニメーションと比較してより自由度の高いアニメーションを実現できます。たとえば、CAKeyframeAnimation に Core Graphics で描画したパスを渡すことで、円に沿ってアニメーションさせたり、放物線状にアニメーションさせたり、ハート形などの図形や、手書きの軌跡に沿ってアニメーションさせたりといったことが可能になります。
放物線状にアニメーションさせる
パスに沿ってアニメーションさせる方法のシンプルな事例として、サイドビューの2Dゲームのキャラ(例:マリオ)のジャンプのように、放物線状にアニメーションさせる場合の実装例を紹介します。
アニメーションの処理を下記のように実装します。
swift
// CAKeyframeAnimationオブジェクトを生成
let animation = CAKeyframeAnimation(keyPath: "position")
animation.fillMode = kCAFillModeForwards
animation.removedOnCompletion = false
animation.duration = 1.0

// 放物線のパスを生成
let path = CGPathCreateMutable()
CGPathMoveToPoint(path, nil, startPos.x, startPos.y)
CGPathAddCurveToPoint(
    path, nil,
    startPos.x - jumpHeight/2, startPos.y - jumpHeight,
    endPos.x - jumpHeight/2, startPos.y - jumpHeight,
    endPos.x, endPos.y)

// パスをCAKeyframeAnimationオブジェクトにセット
animation.path = path

// レイヤーにアニメーションを追加
imageView.layer.addAnimation(animation, forKey: nil)
objc
// CAKeyframeAnimationオブジェクトを生成
CAKeyframeAnimation *animation;
animation = [CAKeyframeAnimation animationWithKeyPath:@"position"];
animation.fillMode = kCAFillModeForwards;
animation.removedOnCompletion = NO;
animation.duration = 1.0;

// 放物線のパスを生成
CGFloat jumpHeight = 80.0;
CGMutablePathRef curvedPath = CGPathCreateMutable();
CGPathMoveToPoint(curvedPath, NULL, kStartPos.x, kStartPos.y);
CGPathAddCurveToPoint(curvedPath, NULL,
                      kStartPos.x + jumpHeight/2, kStartPos.y - jumpHeight,
                      kEndPos.x - jumpHeight/2, kStartPos.y - jumpHeight,
                      kEndPos.x, kEndPos.y);

// パスをCAKeyframeAnimationオブジェクトにセット
animation.path = curvedPath;

// パスを解放
CGPathRelease(curvedPath);

// レイヤーにアニメーションを追加
[self.imageView.layer addAnimation:animation forKey:nil];
この実装のポイントは以下の2点です。
-
CAKeyFrameAnimationでpositionプロパティをアニメーションさせるよう指定する - Core Graphics で描画した放物線のパスを
CAKeyframeAnimationのpathプロパティにセットする
アニメーション完了時に処理を行う
アニメーション完了後に処理をさせたい場合は、CAAnimation のプロパティにある delegate を指定しておけば、
swift
animation.delegate = self
objc
animation.delegate = self;
animationDidStop:finished:メソッドがアニメーション完了後に呼ばれるようになります。
swift
override func animationDidStop(anim: CAAnimation, finished flag: Bool) {
    print("完了")
}
objc
- (void)animationDidStop:(CAAnimation *)anim finished:(BOOL)flag {
    NSLog(@"完了");
}
UIBezierPath オブジェクトをパスとして使用する
CAKeyframeAnimation の path プロパティの型は CGPathRef なので、UIBezierPath オブジェクトをパスとして使用したい場合は、UIBezierPath の CGPath プロパティから CGPathRef を取り出して使用します。
objc
// CAKeyframeAnimationオブジェクトを生成
CAKeyframeAnimation *animation;
animation = [CAKeyframeAnimation animationWithKeyPath:@"position"];
animation.fillMode = kCAFillModeForwards;
animation.removedOnCompletion = NO;
animation.duration = 1.0;

// UIBezierPathで放物線のパスを生成
UIBezierPath *path = [UIBezierPath bezierPath];

CGFloat jumpHeight = 80.0;
[path moveToPoint:kStartPos];
[path addCurveToPoint:kEndPos
        controlPoint1:CGPointMake(kStartPos.x + jumpHeight/2,
                                  kStartPos.y - jumpHeight)
        controlPoint2:CGPointMake(kEndPos.x - jumpHeight/2,
                                  kEndPos.y - jumpHeight)];

// パスをCAKeyframeAnimationオブジェクトにセット
animation.path = path.CGPath;

// レイヤーにアニメーションを追加
[self.imageView.layer addAnimation:animation forKey:nil];

